

In the previous parts of these MySQL optimization series, we told you how query optimization works on a high level, then walked you through how you should optimize queries that insert, read, or update data. Remember the laws of physics? “What goes up, must come down”? Translated into database terms, that means “the data that is inserted, will (sometimes, eventually) need to be deleted.” In the last part of these MySQL optimization series, we will tell you how you should go about optimizing queries that delete data.
Deleting Data – the Basics
Ask any DBA how to delete data and you will hear about one or both of the following methods:
- Run a DELETE query –
DELETEqueries are pretty self-explanatory and they delete rows within our database tables. - Run a TRUNCATE query –
TRUNCATEis a brother toDELETEwith a key difference: whileDELETEdeletes a set amount of rows,TRUNCATEdeletes all rows within a table.TRUNCATEalso has a caveat – it’s significantly faster thanDELETEif we’re deleting all rows from a table since it has less overhead. But let’s start from the beginning.
To begin with, an ordinary DELETE query in MySQL looks like the following:
|
1 |
DELETE FROM demo_table WHERE [boolean_expression] |
Let’s break it down:
DELETE FROMspecifies that we’re deleting data.demo_tableis the name of our table (of course, you will need to replace the table name with your own.)WHERE [boolean_expression]is an expression that deletes matching data from that table. The expression can be any Boolean expression referencing rows in the table, variables, and literals. When it evaluates totrue, the row is deleted, any other returnfalseorNULL, and the row is left as is.
Nothing complex, yes? Yup, we agree.
That’s the crux of it, really – optimizing DELETE queries isn’t rocket science. Don’t delete rows within your tables just yet though – there are a couple of things you need to know.
NOTE: We will not cover every setting available for the DELETE statement, for that, you may wish to read the documentation for that statement in the MySQL documentation.
Optimizing Data Deletion
There are a couple of basic things that you should keep in mind nonetheless though:
To optimize your data deletion processes, first decide on the method of your choice:
- Are you deleting every row within a table? Use the
TRUNCATE TABLEstatement. I(f you haveFOREIGN KEYconstraints on the table, use theFOREIGN_KEY_CHECKSsetting to allowTRUNCATEto work. More information about that setting here.)). - Are you deleting a set number of rows within a table? Use the DELETE query.
This article is primarily about DELETE queries, so if you want to know more about truncating a table see the TRUNCATE TABLE topic in the reference manual.
To optimize your DELETE queries, consider the following pieces of advice:
- Use WHERE and LIMIT clauses – both
WHEREandLIMIThelp yourDELETEstatement to complete faster since:- WHERE can be used to filter data according to a specific expression. Say, if you specify
DELETE FROM your_table WHERE id < 500;,only the first 499 rows will be deleted (assuming theIDcolumn is unique and increments automatically.) LIMIThelps you achieve a similar purpose – specifyingLIMIT 0,500will help you delete 500 rows counting from the first one, specifyingLIMIT 500,1000will help you delete 500 rows counting from 500, etc. This is useful for deleting large numbers of rows, one group at a time
- WHERE can be used to filter data according to a specific expression. Say, if you specify
- Indexing and partitioning capabilities – we don’t mean “remove all of your indexes or partitions from the tables you’re deleting data from” here, but rather, be wary that all indexes and partitions slow down the deletion of data since when data is deleted, data from an index and from the partition has to be deleted too.
- Different storage engines – if you find yourself using different storage engines in MySQL or in any other DBMS, keep in mind that data deletion may also have different impacts. More on that in a second.
- The ability to wipe fractions of data – combining CREATE TABLE statements with SELECT … FROM statements can be used to save off fractions of data from a table. If you have a large table and need a fraction of that data to be filtered out, consider creating another table, then selecting the necessary data from an old table. That way, you will save the data you need, and delete the rest.
If you find yourself using partitions, deleting a partition will also delete all of the data in that partition. Consider this example:
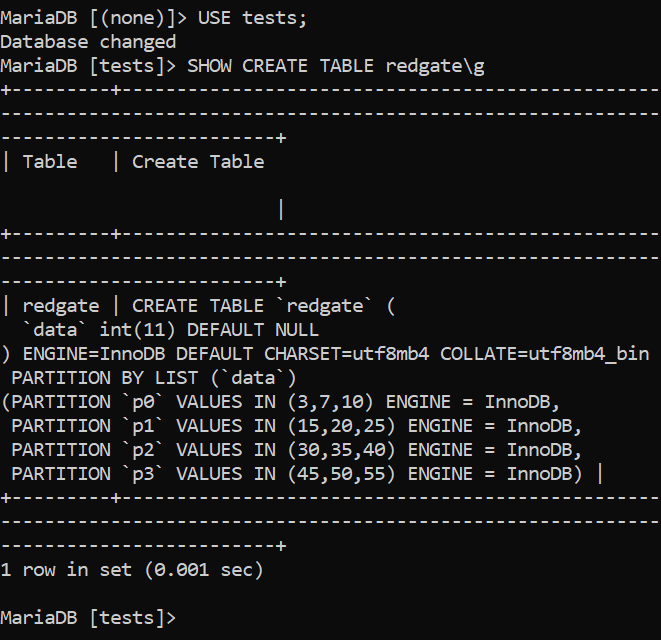
Image 1 – Creating a table with partitions
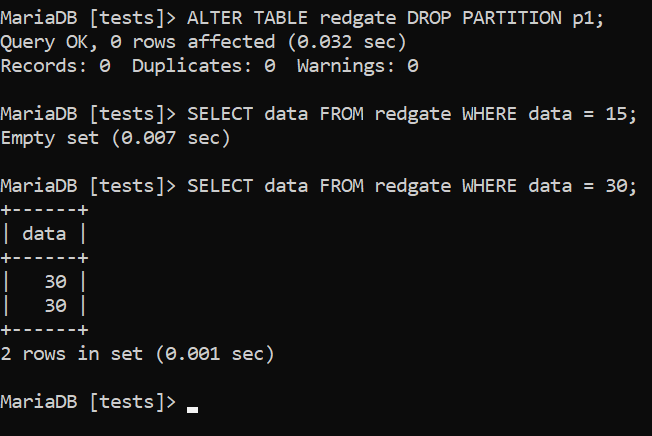
Image 2 – Deleting data in partitions
Got the point? We deleted the partition “p1” which held the values “15”, “20” and “25” and once we dropped it, all of the values in that partition were gone, while the values in other partitions had stayed intact. Cool, yeah?
Such an approach works no matter what type of partitioning we’re using.
Deleting data in partitions and using clauses is your first glance into deleting data in parts and we’ll tell you more about it later on.
Deleting Data in Parts
First, we have the WHERE and LIMIT clauses – use them wisely and forget about DELETE queries taking a lot of time to execute. Employ them like so:
DELETE FROM [your_table] WHERE [boolean expression]where the expression filters out unnecessary data by using math operators or functions. Bear in mind that the same rules will apply here as they did for the SELECT statement. MySQL goes through the same process to find the rows to delete as to present them. It is the final step that is different.
DELETE FROM [your_table] LIMIT [a,b]whereais the starting row andbis the ending row. You can also use the LIMIT clause by specifying only one number (e.g. LIMIT 500) – in that case, only the first 500 rows will be deleted. Note that if you want to delete rows in some order, you are allowed to add anORDERBYclause to the statement.
If WHERE and LIMIT don’t work the way you need them to, especially for larger sets of data, consider indexes and partitions to help out the process.
Indexes and Partitions
If limiting doesn’t help when deleting many rows of data, look into the indexes and partitions present on your table – the more data and indexes your table has, the slower UPDATE and DELETE queries will become since the data that is updated or deleted needs to be changed or removed from the index too.
As mentioned earlier, if you know what kind of data resides in what partition (e.g. if you know that you have one partition for rows beginning with “a”, another partition for rows beginning with “b”, etc.) and you want to delete data from that partition, it can be easily done by running:
ALTER TABLE [your_table] DROP PARTITION [partitions]– such a query will drop all of the specified partitions within a specified table.ALTER TABLE [your_table] TRUNCATE PARTITION [partitions]– running such a query will help you remove all of the data within a specific partition.ALTER TABLE [your_table] DISCARD PARTITION [partitions] TABLESPACE– such queries help you copy partition tablespaces from one MySQL Server instance to another MySQL Server instance.
Setting up partitioning is beyond this article, but to gain a basic understanding, read more about partitioning in MySQL in the documentation here, and keep in mind that there are various types of partitioning available for you to use, too. Partitions can be of RANGE, LIST, HASH, COLUMNS, and KEY type and each of them work differently:
- Partitioning by
RANGEenables us to split a specific table into partitions based on a range of values. - Partitioning by
LISTenables us to split a table into partitions after defining predefined value lists. The example above can be an example of partitioning byLIST. - Partitioning by
HASHassigns values to partitions based on a hashing method. - Partitioning by
KEYis very similar to partitioning byHASH, but with a caveat of MySQL providing its own hashing function. - Finally, partitioning by
COLUMNSinvolves splitting a table into partitions based on the values of columns within that table.
Wiping Fractions of Data
If you have to delete a lot of data, one thing you can do is to delete the data in fractions. To do that, employ a query like so:
|
1 |
CREATE TABLE [table_x] AS SELECT [columns] FROM [table_y]; |
Such a SQL query would create a new table with content matching a specified clause. Often, creating a table in such a way is preferable when we need to filter loads of data in a quick fashion.
Of course, this one is a rather hackish approach to wiping data out of a database instance – such an approach could be considered once we have billions of rows and are tired of re-importing them. Another approach to wipe loads of data would be as follows – such a query would delete the first 1,000 rows that match specified criteria. It’s recommended to write a script to automate this part to lessen the burden:
|
1 |
DELETE FROM `demo_table` WHERE [criteria] ORDER BY `id` LIMIT 1000; |
LIMIT your rows from 0 to 1000, then either repeat, or from 1000 to 2000, in cases where that makes sense.
Understanding DELETE operations in different Storage Engines
One more thing you can do is to make use of the capabilities of the different storage engines within your MySQL server to delete data. If you find yourself using certain storage engines, understanding their internals and how they work in specific scenarios will do you wonders. We will begin with the king of the MySQL storage engine world – InnoDB.
InnoDB
When we’re using InnoDB or its enhanced version (XtraDB) our data is only marked as deleted, initially. Underneath the surface, our data is still flowing back and forth because of one simple reason – the storage engine holds all of the data relevant to it (the data, metadata, indexes of all tables, and multiversion concurrency control (MVCC) data) in a single file called ibdata1 (the file can be found in the data directory of MySQL.)
The file cannot be made smaller, nor can it be deleted. The file just keeps getting larger no matter what we do – and if we delete it, we delete all of the data relevant to InnoDB without the possibility to perform a clean restart on MySQL because upon start, MySQL would scan through the log files (ib_logfile0 and ib_logfile1) to restore InnoDB, and since its data file (ibdata1) isn’t there, the operation would error out.
To reliably delete data in InnoDB, make sure the file-per-table option is set to 1 in my.cnf and restart MySQL (in newer versions of MySQL the option is set to 1 by default.)

Image 3 – The file_per_table Option in my.cnf
Once the option is set and InnoDB has had a clean start (MySQL should also start without ibdata1, any data files or log files so they would be recreated), the data in the directory will look like this (in this case, we have two tables – “demo” and “emails” in the “tests” database. Our .frm files contain metadata, and .ibd files contain the data related to the table):
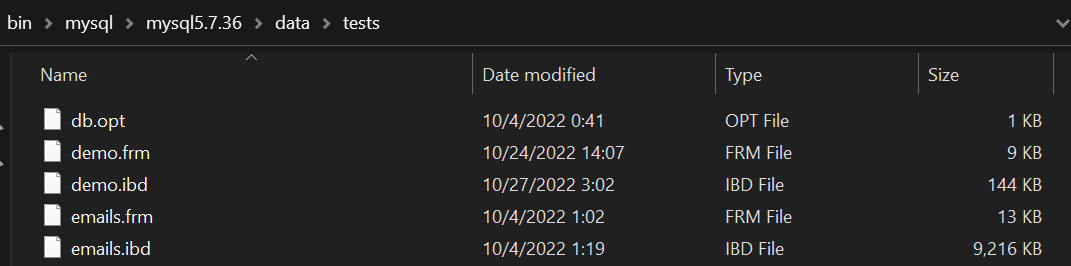
Image 2 – the files related to InnoDB
Once the file_per_table option is set, all we need to do to drop a table and the data within it is to either issue a DROP TABLE query or delete both the .frm and .ibd files related to it – since ibdata1 will only store metadata related to our tables, we won’t have any problems (the ibdata1 file also won’t be as big as a result.)
To sum up, the file-per-table option being enabled allows the data of our tables to be stored outside of the primary file that holds the data in the entire InnoDB infrastructure (ibdata1.) That relieves us of some data management problems since wiping the files relevant to InnoDB-based tables will wipe all of the data relevant to them without us needing to mess with the tablespace itself.
Deleting Data in MyISAM
When deleting data using the MyISAM storage engine, keep in mind that the time taken to delete rows within this storage engine is directly proportional to the number of indexes on the table.
To quickly delete rows within MyISAM, consider increasing the size of the key_buffer_size (MyISAM’s equivalent of the InnoDB’s buffer pool) – keep in mind that when using MyISAM, you cannot employ TRUNCATE TABLE operations in the middle of a running transaction, but everything else we’ve told you in this blog still stands.
MyISAM Internals
Many will know that using the MyISAM storage engine is rarely a good idea since it crashes often and it’s generally only a great fit for simple COUNT(*) queries since it keeps the internal row count inside of itself and InnoDB does not, but if you still want to use MyISAM after you’re advised of the risks, keep in mind that deleting data within it on a file-level is a lot more simple than deleting data in InnoDB or XtraDB – since the MyISAM storage engine stores all of its data inside of .MYD (.MYData) and .MYI (.MYIndex) files without relying on any additional files, simply deleting these files is enough.
To delete data in MyISAM on a file-level (everything related to DELETE or TRUNCATE statements still stands):
- Shut down MySQL.
- Head over to the data directory of MySQL (/var/lib/mysql/mysql*.*.**/data on Linux or /bin/mysql/mysql*.*.**/data on Windows where *.*.** is the version of MySQL, MariaDB, or Percona Server)
- Select a folder representing the database you want to delete (all of the folders within the data folder are databases), then either delete the entire folder if you want to delete the entire database, delete the file named table_name.MYD to delete the entire table, or delete the file titled table_name.MYI to delete an index within a table.)
That’s it!
Summary
Deleting data from a MySQL instance isn’t rocket science – still, it’s a frequent source of confusion to developers and experienced DBAs alike. The big takeaways:
- DELETE queries should always work on as few rows as possible. In other words, we need to tell our database what data we want to delete, so we should almost always have a
WHEREclause. The WHERE clause narrows down the deletion operation and the less data we delete, the faster it becomes. (Use aTRUNCATEstatement to delete all the data in a table. If you haveFOREIGN KEYconstraints, use theFOREIGN_KEY_CHECKSsetting to allowTRUNCATEto work. More information here.)). - DELETE queries that remove a lot of data can be made faster by dropping indexes or partitions that exist on a table – since whenever data is updated or deleted the data in the index must be updated as well, the fewer indexes we have, the faster the deletion process will become.A caveat is to not drop any index involved in finding the rows to delete or the process may take longer than you expect.
We hope that the last blog of these series has given you some actionable advice to optimize the way you delete data in your MySQL instances – make sure to read up on other articles in these series and optimize your SELECT, INSERT, and UPDATE queries before moving on to data deletion, make sure to optimize your database instances properly, and you should be good to go.
This document contains proprietary information and is protected by copyright law.
Copyright © 2026 Red Gate Software Limited. All rights reserved


Load comments