
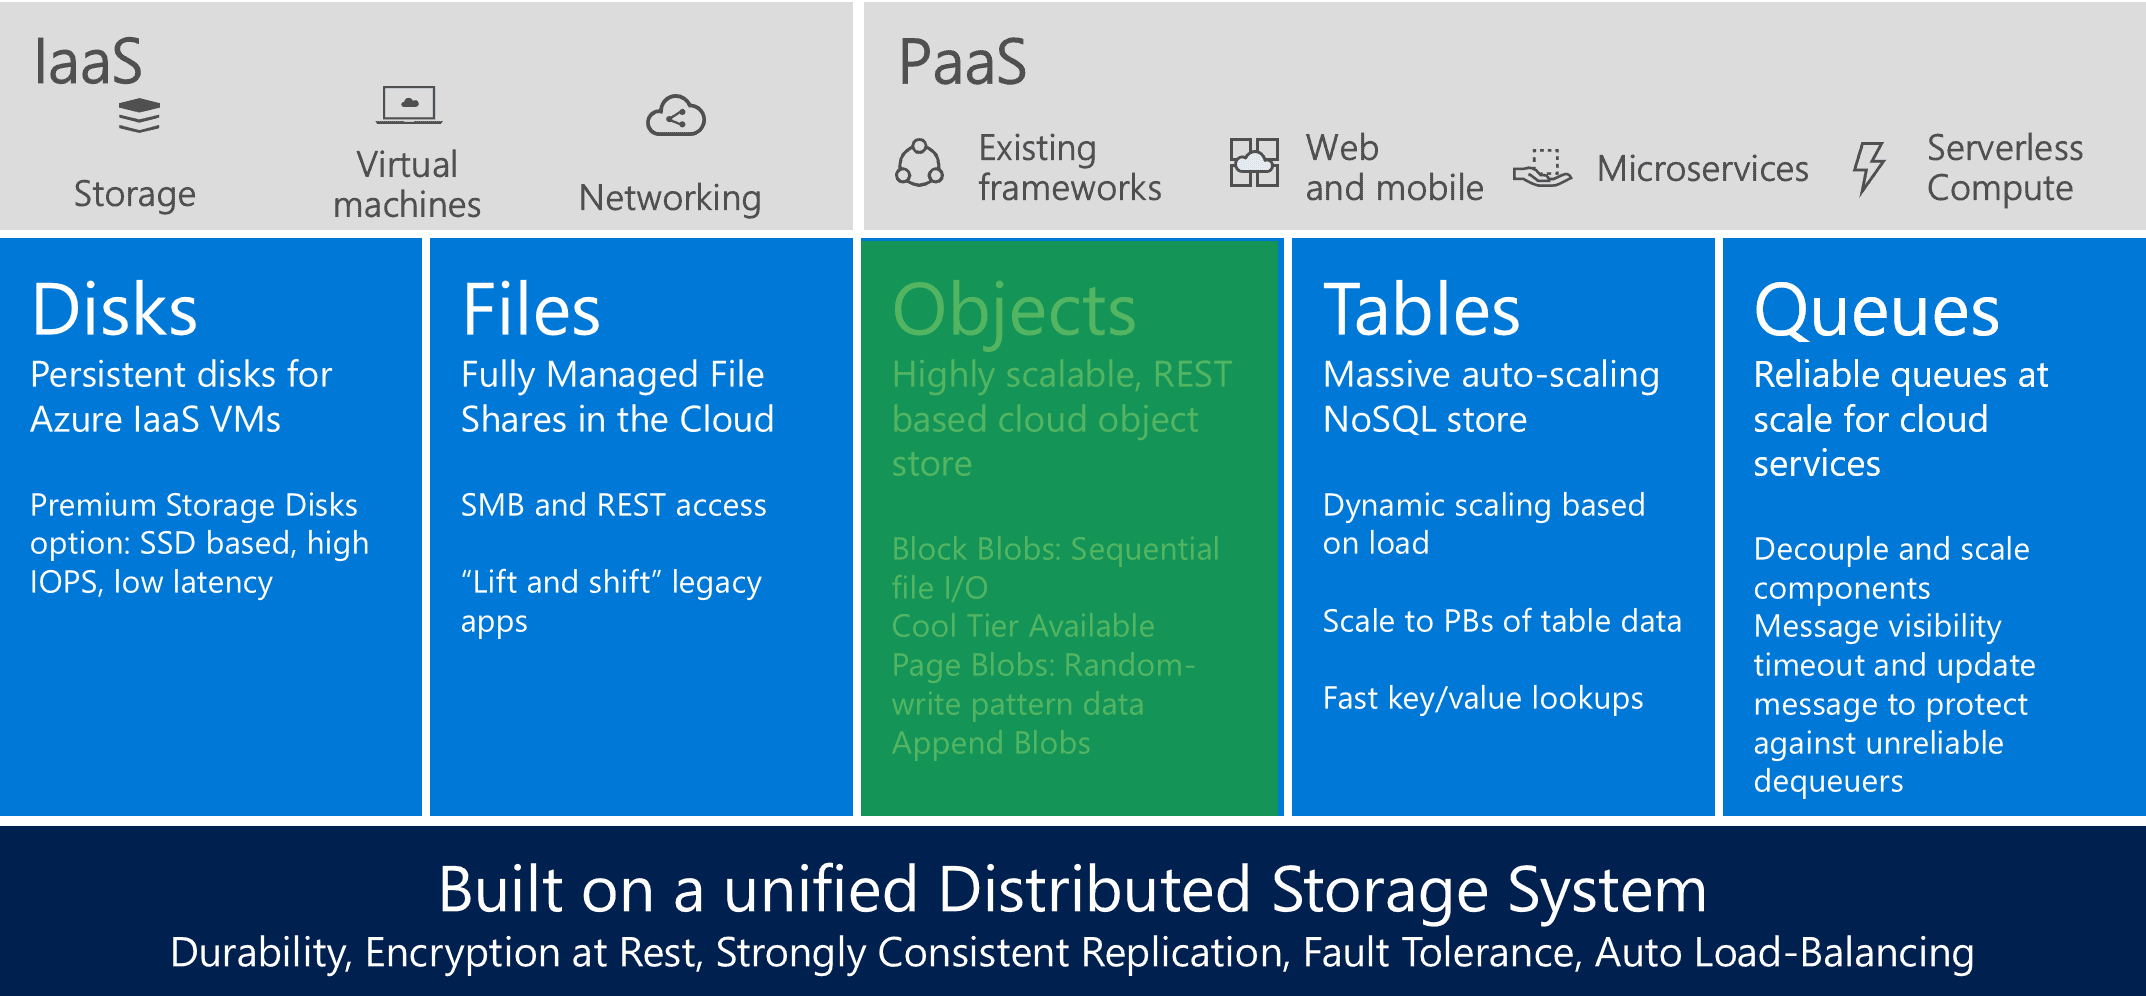
In previous posts, we explored the details of working and securing Azure Blob Storage. It is important to be aware of these details because this service underpins many of the basic operations on Azure. However, there is more to the Storage Service than just blobs: and the picture below aims to show you the landscape. In this article, we are going to examine Azure Storage Disks and run through the ways that we can best leverage them in our cloud solutions.
Azure Storage Disks
Azure Disks are persistent data disks for Azure IaaS virtual machines (VMs) that are supported on both Windows and Linux: They are backed by Page Blobs in Azure Storage and they come in two flavours: HDD (Standard Disks) and SSD (Premium Disks). Azure Disks can be used to extend VM storage capacity and they offer high I/O throughput and low latency. The Disks are registered as SCSI drives and the maximum size per Disk is 1034GBs or ~1TB. This size is due to increase in the coming months because this is a highly-requested feature. The size (SKU) of the virtual machine is what determines how many data and what types of Disks can be attached. This means that with right configuration, you can achieve over 80,000 IOPS and over 2,000 disk throughput per VM! Azure Disks are available in over 30 Azure Regions and support is extended to cover all existing and future regions.
Storage disks support server-side encryption at rest and Azure Disk Encryption (BitLocker). There’s a REST API to allow you to manage your Disks and Microsoft provides enterprise grade durability with three replicas for high availability and business continuity in case of a disk failure. One great benefit of Azure Disks is that you can expand their capacity in place, without needing to detach and reattach the disk.
Although it is easy to alter disk size, and this can happen in-place, it is not so easy to change between Standard to Premium tier. There are two recommended ways for changing Disk types:
- Offline migration using AzCopy to copy the data between the old and new disks. This option comes with a longer downtime, depending on the amount of data that needs to be copied
- Live migration using Azure Site Recovery or a third-party tool. This is a more appealing solution because there’s a much shorter downtime and the option to rollback in case of an issue.
Because migration between the two types is quite involved, it’s important that you understand the differences between Premium and Standard tiers before making a commitment. The matrix below summarizes these differences:
|
Premium storage disks – SSD |
Standard storage disks – HDD |
|
|
Recommended Workloads |
Mission critical applications which require high-performance, high-availability, and low latency for IO-intensive Enterprise workloads |
Infrequently accessed data and Dev/Test workloads |
|
Performance Expectations |
5,000 Provisioned IOPS and 200 MB/sec throughput for 1 TB disk 80,000 Provisioned IOPS and 2,000 MB/sec throughout with GS5 (largest VM) 160,000 Provisioned IOPS and 1,600 MB/sec throughout with GS5 (largest VM) Single digit millisecond latency Consistency of provisioned performance |
Up to 500 IOPS and 60 MB/sec for 1 TB disk 32,000 IOPS with G5 (largest VM) Performance is not provisioned |
|
Scenario |
Production and performance sensitive workloads |
Dev/Test, non-critical, |
In terms of Disaster Recovery (DR) and High Availability (HA), Azure Disks should be managed in the same was as any other attached storage. Therefore, you need a clear and concise disaster recovery strategy for Application and Data recoveries. However, whichever backup solution you choose, it must use “consistent” snapshots. At the time of writing this, there are three backup options
Option 1 – Use a backup Solution (recommended)
This is the best option. You can use either Azure Backup or a 3rd party solution for your Disk backups. Azure Backup creates consistent backups for running VMs and supports both Linux and Windows VMs. It offers Application consistent backups for Windows VMs and File System consistent backups for Linux VMs. Azure Backup also provides local and Geo-replicated backup options which means that this is the ideal solution for a geo-distributed infrastructure. Finally, Azure Backup has flexible backup frequencies and retention periods to better meet your HA/DR needs and backups can be encrypted for enhanced security.
Option 2 – Use a custom backup solution
With this option, you need to a solution that can freeze the disks, flush the pending I/Os and then create a blob snapshot. For Windows you can use WSB/VolumeShadow to create Application consistent snapshots. For Linux, you can use similar tools to create File System consistent snapshots. You then need to copy the backup to a different storage account for increased reliability and disaster recovery. Ideally, backups should be stored in a Standard Storage account with RA-GRS redundancy. To improve efficiency, you can implement incremental copying using the new Differential Page Ranges API.
Option 3 – Backup with downtime
This is the simplest solution but it does come with a lot of administrative overhead. To create backups of your disks, you need to take a snapshot. The process to achieve this is:
- Shutdown the VM
- Create blob snapshots for all attached disks
- Start the VM
- Copy the snapshots to a Standard RA-GRS Storage account for geo-redundant backups
Azure Disk recommended practices
When working with Azure Disks, choosing the right size and type can be extremely important to the overall performance of your infrastructure. Below we highlight some of the recommended practices and caveats you need to be aware of when making your infrastructure decisions.
Performance Recommended Practices
-
IOPs and Throughput
- These are separate limits, enforced independently of each other
- Throttling happens when either of these limits are reached
-
VM and Disk Size:
- Enforce independent limits on VM and Disk sizes
- Choose the right configuration based on workload needs
-
Traffic Patterns:
- Use larger I/O sizes for higher throughput and smaller I/O sizes for higher IOPS
- Use multiple parallel operations to push more traffic and avoid heavy bursts by reducing the I/O buffer to < 5% of the I/O limits
Application/VM configuration considerations
-
VM Host Caching:
- “ReadOnly” cache for Data disks, ideal for read-heavy and mixed workloads
- “None” cache for write-only or write-heavy data disks (logs)
- “ReadWrite” should be considered for Data Disks if the application handles I/O flushing or durability
- “ReadWrite” cache, which is the default, should be selected for OS Disks
-
SQL Server/Databases
- Use separate disks for data and log files
- Use Premium storage
- Use the VM’s temporary resources for TempDB
“Lift and Shift” recommendations
- You should only use a “lift and shift” approach for demanding enterprise workloads to the cloud. Where possible, attempt to migrate to a PaaS architecture
- Optimize the VM sizes based on application needs. Readjust as your needs change
- Optimize disks cost based on GB, IOPS and Throughput needs
- For migrating many VHDs from on-premises to Azure, AzCopy is a good solution
- Alternatively, Azure Site Recovery can also be used for migration purposes and can shorten the downtime with live migration capabilities
- For unmanaged standard Disks (HDD) you should enable TRIM. TRIM discards unused blocks on the disk so you’re only billed for the storage you actually use.
Summary
Azure Storage Disks are an important component of any IaaS infrastructure. The decision about the right Disk size, type and tier to select should be carefully weighted to ensure that it meets the workload requirements. It is possible to achieve really high I/O and/or throughput but it’s also important to understand that each disk type comes with its own SLAs and limitations. Therefore, it is advisable that these SLAs and limitations are carefully considered in terms of high availability and disaster recovery before making a choice. The Azure Storage team is also working hard on extending the service capabilities with new, larger Disk sizes and enhancements to disk analytics coming soon.
Load comments