
It is difficult for an architect or an organization to select the right Hyper-V high-availability or migration technology to deploy in the production environment. There are so many choices. In addition to the Hyper-V high-availability & migration technologies that were introduced in Windows Server 2008 RTM and R2, the new Hyper-V Version 3.0 running on Windows Server 2012 Operating System comes with a bunch of new migration technologies. These technologies not only provide the high-availability of virtual machines running on a Hyper-V environment but also help reduce the IT cost. An example of one of these new technologies is the ‘Shared-Nothing Live Migration’ technology, introduced in Windows Server 2012. Not only can you migrate live virtual machines without downtime but without the additional cost of shared storage devices since they aren’t required for this. Similarly, using ‘Hyper-V Replica’ of Windows Server 2012 allows you to configure a disaster recovery scenario without having to configure the ‘Windows Failover Clustering’ service!
Microsoft has been developing virtualization for a decade now and has recently entered into Server Virtualization, thereby providing business continuity with a robust platform for organizations to migrate their physical environment to virtual environment.
This article explains how you can use one or all of the Hyper-V high-availability & migration technologies based on what you want to make highly available. For example, you can make virtual machines highly available using ‘Hyper-V ‘Quick Migration” technology which requires the use of the ‘Windows Clustering’ feature with a minimal downtime. Similarly, you can use the ‘Hyper-V Live Migration’ feature to achieve business continuity without any downtime. You can use ‘Hyper-V Replica’ to build a Hyper-V disaster recovery environment without the use of the ‘Windows Clustering’ feature! Microsoft Hyper-V also provides high-availability technologies for virtual machine storage; We’ll be explaining how virtual machine storage can be migrated with or without any downtime.
In this article, I’ll be describing the different types of Microsoft Hyper-V high-availability & migration technologies that are available, and how organizations can best use them to achieve the results they need to meet their particular requirements. I will also explain and highlight the downtime involved in each Hyper-V high-availability & migration technology and provide the expected downtime in minutes/seconds.
We will also compare Microsoft Hyper-V running on Windows Server 2012 and VMware vSphere 5.1 Enterprise Plus and explain how Microsoft Hyper-V Version 3.0 has better cluster capability than its competitor, VMware.
I’ll also provide a comparison table for each Hyper-V high-availability & migration technology so as to help you choose the one which is right for your requirement.
We will discuss the following topics in detail in this article:
- Understanding Downtime Types
- An overview of migration technologies
- Deep dive into Hyper-V migration technologies
- Hyper-V clustering types
- Host versus guest clustering
- Cluster capability between Hyper-V and VMware Vsphere
- ‘Windows Failover Cluster’ interaction with Hyper-V migration technologies
- Choosing right Hyper-V migration technology
Understanding Downtime Types
When you are configuring high-availability, you need to consider both planned downtime and unplanned downtime. A planned downtime is sometimes called scheduled downtime in which production services are taken off for maintenance purpose. The planned downtime can also be categorized into two pieces; Fixed or Flexible downtimes.
Fixed downtime starts and stops at the exact start and end times that you specify when you schedule the downtime.
Flexible downtime is planned to coincide with times when you know that a service is going to be down for X minutes/hours, but you do not know exactly when that will start.
An unplanned downtime is a period of downtime due to a failure of a production service. These types of downtime mostly occur in IT production environment because of a failure on the server or network, and you are forced to restart a server/service.
Microsoft high-availability & migration technologies support both these types of downtime. I’ll next explain which Hyper-V migration technology supports which type of downtime
Overview of Hyper-V Migration Technologies
VMware provides DRS and VMotion as the high-availability technologies for their virtualization product; vSphere Server. Likewise, Microsoft introduced a high-availability feature in the first version of Hyper-V running on Windows Server 2008 RTM called ‘Quick Migration’, and went on to introducing more in Windows Server 2012.
There are now six types of migration technology available for Microsoft Hyper-V. two if which are failover/high-availability technologies, three are categorized as mobility/migration technologies and one is a disaster recovery technology, the newly-introduced feature in Microsoft Hyper-V 3.0; ‘Hyper-V Replica’.
Table 1.1 highlights the technology used by each Hyper-V migration technology and version of Hyper-V they are running on. It also shows the associated transfer-type (planned/unplanned) available with each Hyper-V migration technology and the expected downtime in minutes is also shown in the “Expected Downtime” column.
|
Migration Technology |
Technology |
Data |
Hyper-V Version |
Transfer Technology |
Transfer Type |
Expected Downtime |
|
‘Quick Migration’ |
Failover/high-availability |
virtual machine |
Hyper-V 1.0/Windows Server 2008 RTM |
Failover Cluster & Hyper-V |
Planned/Unplanned |
1 Minute* |
|
Live migration |
Failover/high-availability |
virtual machine |
Hyper-V 2.0/Windows Server 2008 R2 and Windows Server 2012 |
Failover Cluster & Hyper-V |
Planned |
No downtime |
|
‘Quick Storage Migration’ |
Mobility /migration |
virtual machine’s Storage |
Hyper-V 2.0/Windows Server 2008 R2 |
SCVMM R2, Bits and Hyper-V |
Planned |
1 Minute* |
|
Storage Live migration |
Mobility/migration |
virtual machine’s Storage |
Hyper-V 3.0/Windows Server 2012 |
Bits and Hyper-V |
Planned |
No Downtime |
|
‘Shared-Nothing Live Migration’ |
Mobility /migration |
virtual machine |
Hyper-V 3.0/Windows Server 2012 |
Hyper-V |
Planned |
No Downtime |
|
‘Hyper-V Replica’ |
Disaster Recovery |
virtual machine |
Hyper-V 3.0/Windows Server 2012 |
Replication |
Planned |
Minimal Downtime |
Table 1.1 – Hyper-V migration Technologies and Technology that they use
The high-availability feature which was introduced with first version of Hyper-V (1.0) in Windows Server 2008 RTM was called ‘Quick Migration’. The ‘Quick Migration’ high-availability feature involves configuring Windows Failover Clustering component between two or more Hyper-V Hosts to achieve the high availability of virtual machines running on Hyper-V Hosts.
You’ll see from the Table 1.1 above that ‘Quick Migration’ high-availability technology is available for Hyper-V running on all Windows Server Operating Systems including Windows Server 2012. ‘Quick Migration’ high-availability technology requires the ‘Windows Failover Cluster’ to be configured before it can be used with Hyper-V environment. The associated Transfer type is both planned and unplanned and there is downtime for the virtual machines. The table also shows that the expected downtime is about 1 minute depending on the Memory configured on the virtual machine and the network speed which is in use between two Hyper-V Hosts.
A Transfer Technology column in table 1.1 above indicates the technology involved to transfer the virtual machine data across cluster which is “Failover Cluster/Hyper-V” for ‘Quick Migration’ technology.
‘Live Migration’ first became available with Hyper-V Version 2.0, which runs on both Windows Server 2008 R2 and Windows Server 2012 Operating Systems. There is no downtime associated with ‘Live Migration’ technology and it works in much the same way as VMware’s VMotion technology to move the virtual machine’s live state to a node running in the Failover Cluster. The transfer type has always been ‘Planned’ for Live migration. The transfer is always initiated either from Hyper-V Manager running on Windows Server 2008 R2 and later console, Failover Cluster snap-in or System Center Virtual Manager 2008 R2 Console.
Like ‘Quick Migration’, ‘Live Migration’ also requires the use of the Windows Clustering feature and the technology involved in transferring the virtual machine data between nodes is “Failover Cluster and Hyper-V” as shown in the Table 1.1 above.
‘Quick Storage Migration’ with ‘Live Migration’ technology was also introduced with Windows Server 2008 R2 as a new feature for moving virtual machine storage with minimal downtime. The only difference between ‘Quick Storage Migration’ and ‘Live Migration’ is that the first one moves virtual machine storage from one location to another location and later one is capable of moving virtual machine along with the storage from one node to another node in the cluster. As stated in Table 1.1 above, ‘Quick Storage Migration’ does not require the use of the Windows Clustering Feature and its associated Transfer Type is ‘Planned’.
As shown in the Table 1.1 above, ‘Storage Live migration’ is a new feature introduced in Hyper-V 3.0 running on Windows Server 2012 and does not require the use of System Center virtual machine Manager to move virtual machine storage from one location to another location. Beginning with Hyper-V 3.0 running on a Windows Server 2012 Operating System, You can easily achieve a ‘Live Migration’ of virtual machine storage within single Hyper-V Host or across Hyper-V Hosts in a Hyper-V cluster by using Hyper-V 3.0 Manager which ships with Windows Server 2012. You also have the choice of initiating ‘Storage Live Migration’ using SCVMM 2012 and PowerShell.
There is also no downtime involved, as with ‘Quick Storage Migration’ technology which involves saving and resuming processes.
‘Shared-Nothing Live migration’ is a new feature introduced in Windows Server 2012 Hyper-V 3.0 which does not require the use of ‘Windows Failover Cluster’ and Shared Storage infrastructure. The ‘Live Migration’ product that was introduced in earlier versions of Hyper-V (version 2.0) required the use of ‘Windows Failover Cluster’ to migrate virtual machines across nodes in the cluster.
A Virtual Administrator initiates the migration of virtual machines from one Hyper-V Host to another Hyper-V Host using Hyper-V Manager MMC.
‘Shared-Nothing Live Migration’ leverages SMB 3.0, introduced in Windows Server 2012, to migrate virtual machines without any downtime.
Hyper-V Replica is a disaster technology first introduced in Windows Server 2012 which uses a different set of underlying components to replicate virtual machine data to another site configured as a disaster recovery site. ‘Hyper-V Replica’ does not require ‘Windows Failover Cluster’ to be configured on Hyper-V Hosts. ‘Hyper-V Replica’ works differently from all other Hyper-V migration technologies and explaining all of the ‘Hyper-V Replica’ components in this article is out of scope. So I will cover ‘Hyper-V Replica’ in the upcoming articles.
‘Quick Migration’, ‘Live Migration’, ‘Shared-Nothing Live Migration’, and ‘Hyper-V Replica’ migration technologies move complete virtual machine data whereas ‘Quick Storage Migration’ and ‘Storage Live Migration’ technologies are helpful in migrating virtual machine’s storage as mentioned in the Table 1.1 above.
Deep Dive into Hyper-V Migration Technologies
Quick Migration
‘Quick Migration’ did not work well because of the downtime involved for the virtual machines. In the case of a ‘Quick Migration’ scenario, virtual machines are saved at the failure node and then resumed at the surviving node. This results in downtime of virtual machines, as I’ll explain in detail in the “How ‘Quick Migration’ Works?” section of this article.
Uses of ‘Quick Migration’
You use ‘Hyper-V ‘Quick Migration” technology when…
- Moving Virtual Workloads in off-business hours
- Hardware Servicing of the Hyper-V Host
- Hyper-V Host maintenance Activity
Hardware Servicing of the Hyper-V Host is required when you need to upgrade the hardware of the Hyper-V Host.
Move Virtual Workloads is a common scenario in a production environment. You may want to move some of the virtual machines This scenario involves moving virtual machines from one node to another node in the Hyper-V cluster environment with minimal downtime of the virtual machines.
Hyper-V Host maintenance Activity involves patching Hyper-V Server Operating System. System Center virtual machine Provides Host Maintenance Mode feature which can be used to Quick Migrate or Live Migrate all running virtual machine to another Hyper-V Host.
‘Quick Migration’ Requirement
At a minimum, you must the following infrastructure in place before you can use the ‘Quick Migration’ feature of Microsoft Hyper-V:
- Two or more Servers running Windows Server 2008 RTM, Windows Server 2008 R2 or Windows Server 2012.
- Windows Failure Clustering Feature to be installed on all Hyper-V nodes which are going to participate in ‘Quick Migration’.
- DNS and Active Directory Infrastructure and Hyper-V cluster nodes to be in the same Active Directory domain
- All requirements pertaining to Microsoft Failover cluster (Identical hardware, same processor types)
- Shared Storage Network
How would I use ‘Quick Migration’?
The ‘Quick Migration’ technology works with ‘Windows Failover Cluster’ to move the virtual machines from one node to another node. As a high-level process, you will follow the steps outlined below to set-up ‘Quick Migration’ technology between two or more Hyper-V Hosts:
- Install Failover Cluster features on all Hyper-V Hosts
- Configure Shared Storage
- Enable Hyper-V Role on Hyper-V Hosts
- Create and configure virtual machines to use Shared Storage as the location for storing virtual machine configuration files and VHD Files. Change the location of snapshots also if required.
- Create virtual machine resource in the Failover Cluster
Once the virtual machines have been created as a Failover Resource in the cluster, there are two ways to Quick Migrate virtual machine from one Hyper-V node to another Hyper-V node:
- Using ‘Failover Cluster Manager’
- Using ‘System Center virtual machine Manager 2008 R2’ or above
Using ‘Failover Cluster Manager’, you need to right-click on the virtual machine and then click on “Quick Migrate virtual machine(s) to another node” button to migrate virtual machine to the destination Hyper-V Host as shown in the below screenshot:
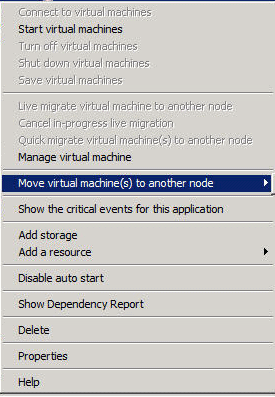
Figure 1.1 – ‘Quick Migration’ Option in Failover Cluster
How does ‘Quick Migration’ work?
The measurement of downtime for virtual machines is dependent on the downtime type involved; Planned or unplanned downtime. Both the Planned and unplanned downtime processes for ‘Hyper-V ‘Quick Migration” is explained in figure 1.2 below:
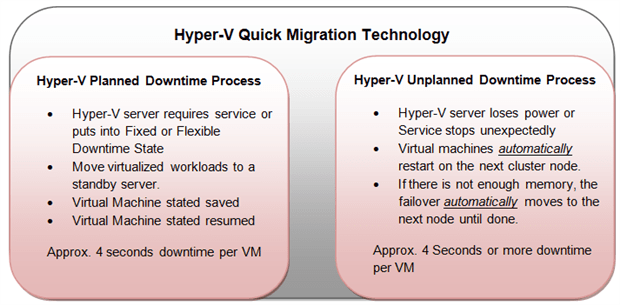
Figure 1.2 – Planned and unplanned downtime processes for ‘Hyper-V ‘Quick Migration’ Technology
As you can see in Figure 1.1 above, in case of planned downtime, the virtual machines move from one node to another node resulting in minimal downtime. As part of this process, the virtual machine state is saved and then resumed on the surviving node in the Failover cluster.
In the case of planned downtime, the failover process of the virtual machine is initiated from one node to another node using the Windows Failover snap-in.
On the other hand, in the case of the unplanned downtime process, the virtual machine is restarted on the next available surviving node in the Failover Cluster. This process may take longer than expected depending on the memory configured for the virtual machines and the network speed in use. This is explained in Table 1.2 below.
Note: In the case of unplanned downtime process, the server crashes or one of the services of Hyper-V stops responding which forces failover of virtual machines.
The measurement of ‘Hyper-V ‘Quick Migration’ downtime is based on the two factors:
- Memory configured on the virtual machines and
- Network infrastructure or Network Speed.
The table below shows how fast a ”Quick Migration” can occur based on the memory configured on the virtual machine and Network connection/speed in use.
|
VM Memory |
1 GBE iSCSI |
2 GB FC |
4 GB FC |
|
512 MB |
8 Seconds |
4 Seconds |
2 Seconds |
|
1 GB |
16 Seconds |
8 Seconds |
4 Seconds |
|
2 GB |
32 Seconds |
16 Seconds |
8 Seconds |
|
4 GB |
64 Seconds |
32 Seconds |
16 Seconds |
|
8 GB |
2 Minutes |
64 Seconds |
32 Seconds |
Table 1.2 – ‘Quick Migration’ Downtime based on the Virtual Machine Memory and Network Speed
As shown in the Table 1.2 above, for a virtual machine configured with 4 gb of Memory, it make take minimum 64 seconds for virtual machine to come online for network speed of 1 gbE iSCSI. Similarly, it takes at least 16 seconds for a virtual machine configured with 4 gb of Memory to come online on the surviving node if the network speed is using a 4 gb of FC connection.
Hence, it depends entirely on the virtual machine memory and network speed between Hyper-V Servers in the Failover Cluster.
Note: These tests are based on the early tests performed when Microsoft Hyper-V launched with Windows Server 2008 RTM.
Live migration
Live migration technology, which was first introduced in Windows Server 2008 R2, does not involve any type of downtime for the virtual machines running on ‘Hyper-V. Live Migration’ uses a technology called ‘Clustered Shared Volume’ or in short CSV.
CSV 1.0 was first introduced in Windows Server 2008 R2. In Windows Server 2012, it was renamed to CSV 2.0 with a few significant improvements over CSV 1.0. There were two key changes which were done for the’Live Migration‘ are the following:
- Live migration now supports multiple concurrent Live migrations of virtual machines.
- Failover clustering support has been increased from 32 nodes to 64 nodes allowing around 4000 virtual machines to be configured in one Windows Server 2012 Failover Cluster.
Scenarios for the usage of ‘Live Migration’
- Physical maintenance of the Hyper-V Host with no downtime
- Can be used in normal business hours
- Manual or automatic movement of virtual workloads and green IT
Physical Maintenance of the Hyper-V Host with no downtime
In any Virtualization environment, it is necessary to maintain the security of the Hyper-V host operating system. Security of the virtual machines running on a Hyper-V Host is partially dependent on the Hyper-V Host. As part of the job of maintaining the security of virtual machines, the Hyper-V Host must be patched with the latest security updates. You can easily move virtual machines from one Hyper-V Host to another without any downtime before bringing Hyper-V Host down for maintenance activities.
Can be used in Normal Business Hours
‘Hyper-V Live Migration’ can even be used during normal business hours because there is no downtime involved in the transfer process. The virtual machines running on a Hyper-V Host can be migrated to another Hyper-V Host with few clicks. The demands onb the resources of the virtual machine system can be addressed more easily by live-migrating virtual machines to another Hyper-V Host running with more free system resources. System Center Virtual Machine Manager’s ‘Intelligent Placement’ plays an important role to report on the current physical host utilization and allows you to select the ideal Hyper-V Host for live-migrating virtual machines.
Manual or Automatic Movement of Virtual Workloads and Green IT
Live migration and System Center Virtual Machine Manager R2 and later works closely with each other to provide a Dynamic IT environment.‘Live Migration’ of virtual machines can be initiated on the fly with the help of ‘System Center Virtual Machine Manager’ ‘Intelligent Placement’ feature. SCVMM Intelligent Placement allows you to dynamically manage the location of virtual machines from one Hyper-V Host to another Hyper-V Host when one of the Hyper-V Hosts is running low on system resources.
Live migration and SCVMM Intelligent Placement not only allows automatic movement of virtual machines across Hyper-V Hosts but also helps to save power for Hyper-V host by turning off unused physical servers, which reduces power consumption and cooling requirements. Explaining the Host Rating system is out of scope of this article.
How do you use ‘Live Migration’?
Since there is a great amount of content written already by fellow writer Jaap Wesselius, I would recommend you reading that rather than explaining how it works in this article. The article is published at https://www.simple-talk.com/sysadmin/virtualization/hyper-v-r2-live-migration/ explaining the requirement for‘Live Migration’ and how you can configure‘Live Migration’ in a production environment.
‘Quick Storage migration’
‘Quick Storage Migration’ has been renamed as ‘Storage Live Migration’ in Windows Server 2012. It does not involve downtime. ‘Storage Live Migration’ is explained later in this article.
Note: ‘Quick Storage Migration’ is also known as QSM and must be initiated using ‘System Center virtual machine Manager R2’.
Uses scenario for QSM
QSM can be used
- Within a Single Host
- Across hosts and clusters.
QSM on a single host can be used to migrate virtual machine Storage …
- From a windows volume, residing on the same host, to a ‘Clustered Shared Volume’ (CSV) once you have upgraded Windows Server 2008 Hyper-V environment to Windows Server 2008 R2.
- From a windows local storage to shared storage residing in a SAN environment.
- Between SANs.
QSM across hosts and clusters can be used to migrate virtual machine Storage between two Hyper-V Hosts there are not in the same cluster and between nodes of a Hyper-V Cluster
Requirements for QSM
At a minimum, you must have the following infrastructure in place before the ‘Quick Storage Migration’ feature of Windows Server 2008 R2 can be used:
- ‘System Center virtual machine Manager 2008 R2’ or above
- Hyper-V Hosts running Hyper-V R2 (Version 2.0) or above
- Virtual machine storage residing in VHD files
- Available disk space on source and target Hyper-V Hosts.
How does one use ‘Quick Storage Migration’?
You must use ‘System Center Virtual Machine Manager 2008 R2’ or above to quickly migrate virtual machine’s Storage to another location that you specify during the move wizard. The Virtual machine’s storage cannot be migrated using native ‘Hyper-V Manager’ UI which ships with Windows Server 2008 R2 but you can use ‘Hyper-V Manager’ on Windows Server 2012 to live-migrate virtual machine’s storage which is different from ‘Quick Storage Migration’.
Using SCVMM, you need to right-click on the virtual machine of which you want to migrate the storage and then click on “Migrate Storage” button to begin the migration process. Finally, follow the on-screen steps to successfully migrate the virtual machine’s storage.
How does QSM Work?
QSM works in the same way as ‘Hyper-V ‘Quick Migration” high-availability technology and uses almost the same process used by the ‘Quick Migration’ for transferring the storage from one location to another location as described in the following steps:
- QSM is initiated using the ‘System Center Virtual Manager R2’ by selecting ‘Migrate Storage’ option in the console.
- A snapshot or checkpoint is created of the virtual machine VHD file. At this step, SCVMM creates a differencing VHD file.
- The SCVMM R2 uses the BITS Service on the Windows to copy the base VHD over the network the new location you specify.
- The virtual machine is placed into Saved Stateresulting in minimal downtime.
- The SCVMM R2 again uses the BITS Service to copy the differencing VHD file it created in the 2nd step and virtual machine configuration files and its state to the new location making destination Hyper-V Server aware of these changes.
- On the destination Hyper-V Host, differencing VHD file is merged into the base VHD and original virtual machine is removed.
- Finally, the virtual machine is Resumed at the destination Host.
You might have noticed in these steps that the virtual machine is saved and then resumed on the destination Hyper-V Host which causes minimal downtime for the virtual machine. To avoid this risk, Microsoft developers and come up with a new feature in Windows Server 2012 called ‘Storage Live Migration’which is explained in the next section of this article.
Storage Live migration
‘Storage Live migration’ Usages Scenarios
‘Storage Live Migration’ is mainly used to Live Migrate virtual machine’s storage within a single Hyper-V Host or across Hyper-V Hosts in a cluster without any downtime.
Requirements for ‘Storage Live migration’
At a minimum, you must have the following infrastructure in place before the ‘Storage Live Migration’ feature of Windows Server 2012 can be used:
- Hyper-V Hosts running Hyper-V (Version 3.0) on Windows Server 2012.
- Virtual machine storage residing on VHD or VHDx files.
- Available disk space on source and target Hyper-V Hosts.
How to use Storage Live migration?
You can perform the ‘Storage Live Migration’ of virtual machines by either …
- Using Hyper-V 3.0 Manager
- Using a PowerShell script
- Using System Center virtual machine Manager 2012
Using Hyper-V 3.0 Manager
The process for ‘virtual machine storage’ migration is initiated by right-clicking on the virtual machine and then selecting the “Move” option.
Note: Please note that ‘Live Migration’ must be enabled on the Hyper-V Host property before you can start the move process.
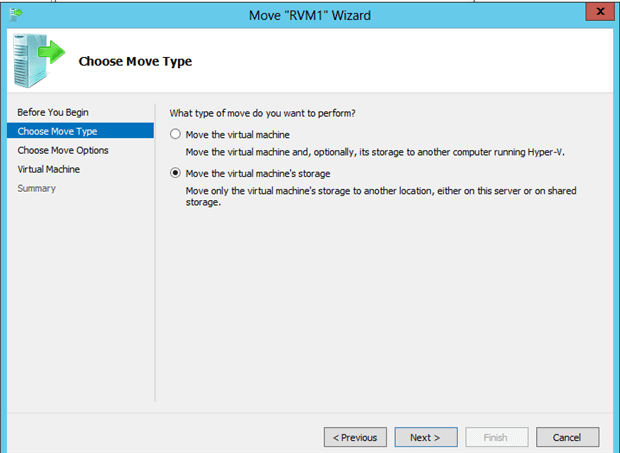
Figure 1.3 – Moving a virtual machine Storage using Hyper-V 3.0 Manager
Once the “Move the virtual machine’s Storage” option is selected, you are presented with the following options as shown in the Figure 1.4:
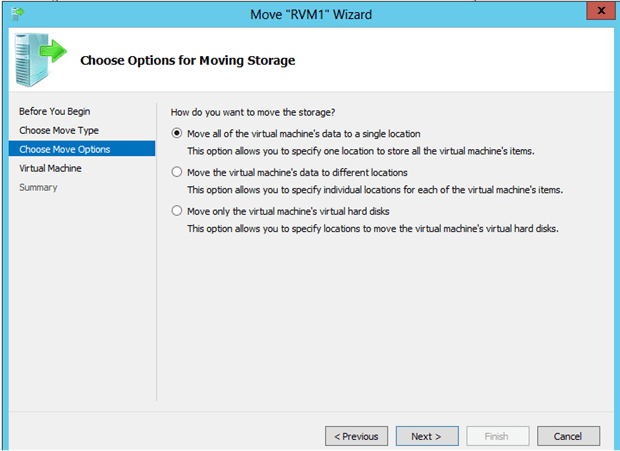
Figure 1.4 – Virtual machine Storage migration options
Using a PowerShell script
You can also use a PowerShell cmdlet to migrate virtual machine storage as shown below:
Move-vmstorage "VM1" -DestinationStoragePath M:VM
Using System Center virtual machine Manager 2012
Using System Center Virtual Manager 2012, right-click on the virtual machine and then click ‘Migrate Storage” button to begin the ‘Storage Live Migration’ process.
How does ‘Storage Live migration’ work?
‘Storage Live Migration’ follows the same steps as the ‘Quick Storage Migration’ as stated earlier in the ‘Quick Storage Migration’ section, except a few steps which are performed to avoid any downtime during the transfer of the virtual machine storage from one location to another.
- ‘Storage Live Migration’ is initiated using one of the following methods:
- System Center Virtual Manager 2012
- Using Hyper-V 3.0 Manager on Windows Server 2012
- Using a PowerShell command
- At this step, Hyper-V prepares itself. As part of the preparation, read and write operations (I/O) occurring on the virtual machine are copied/mirrored to the newly created virtual machine hard disk on the destination Hyper-V Host as follows:
- Read operations are occurring at the source virtual machine
- Write operations are taking place at both; source and destination virtual machines.
- The process uses the BITS Service on the Windows to copy the base VHD over the network to the new location you specify in migration wizard.
- Once the disk copy process is complete, Hyper-V switch virtual machine to run on the destination Hyper-V Server or storage.
- Finally, delete the virtual machine files and VHD from the source Hyper-V Host.
The ‘Storage Live Migration’ always provides the fall back option for any initiated virtual machine storage migration. You can easily switch back to source Hyper-V Host if it need be.
‘Storage Live Migration’ also allows you to run concurrent live migrations for virtual machines. You cannot multi-select virtual machines to start the concurrent ‘Storage Live Migration’. Instead, you must start for each virtual machine manually. By default, two concurrent ‘Storage Live Migration’ is allowed which can be changed under the property of the Hyper-V Host as shown in the Figure 1.3 below:
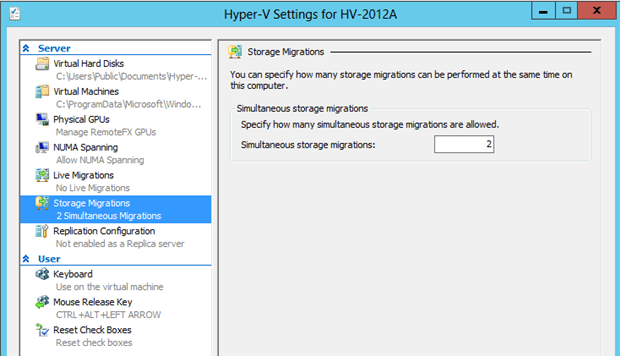
Figure 1.5 – ‘Storage Live migration’ Setting
Note: Since, initiating a ‘Storage Live Migration’ puts load on the system, please do not just initiate ‘Storage Live Migration’ for as many as virtual machines you want. You must understand the impact thoroughly before starting the ‘Storage Live Migration’ of virtual machines together.
‘Shared-Nothing Live migration’
‘Shared-Nothing Live Migration’ is a completely new term in Hyper-V 3.0 running Windows Server 2012.
‘Shared-Nothing Live Migration’ uses no a SAN device or shared storage and no failover clusters
Note: Although Failover Clustering is not a requirement for ‘Shared-Nothing Live Migration’ feature, it is not necessarily true that this is the replacement for the‘Live Migration’ technology as discussed in the earlier section of this article. Failover Clustering provides the automatic failover feature which is very useful in scenarios where you want the virtual machines to be moved to surviving Hyper-V node in case of any failure with the Hyper-V Host holding the virtual machine. ‘Shared-Nothing Live Migration’ is a mobility solution which you can use to migrate virtual machine including virtual machine configuration files, VHD files to a new location you specify during the move wizard.
‘Shared-Nothing Live Migration’ Requirements
- Same hardware or chipset to be either Intel or AMD on both Hyper-V Hosts unless you are using virtual machine’s Processor Compatibility feature.
- Identically named Virtual Switch on the source and destination Hyper-V Hosts. If you do not specify the same name for the Virtual Network Switch then ‘Shared-Nothing Live Migration’ process pauses.
- Two Hyper-V Hosts connected via a reliable Network Connection; preferably Gigabyte Network Connection and Hyper-V role enabled or Windows Server 2012 Hyper-V Server free edition.
- Live migration must be enabled on the Hyper-V Hosts
- Both Hyper-V Hosts must be part of the same Active Directory Domain.
- Pass-Through disks are not supported by the ‘Shared-Nothing Live Migration’ technology. You can only use VHD files.
- Firewall exception for TCP over port 6600. This firewall rule exception is enabled in the Firewall when you initially enable the ‘Live Migration’on the Hyper-V Host.
- SMB 3.0 File System. ‘Shared-Nothing Live Migration’ feature leverages SMB 3.0 introduced in Windows Server 2012.
- The following services enabled on the Network Adaptors you use for ‘Shared-Nothing Live Migration’ feature:
- Client for Microsoft Networks
- File and Printer Sharing for Microsoft Networks
How to use ‘Shared-Nothing Live Migration’
‘Shared-Nothing Live Migration’ is a technology name and a feature provided for Hyper-V 3.0 running on Windows Server 2012. You do not see ‘Shared-Nothing Live Migration’ name anywhere on the Hyper-V Manager UI. Instead, what you see is that “Move” button when you right-click on a virtual machine running on a Hyper-V Host.
The “Move” button allows you to choose the options for migrating virtual machine including its configuration files and VHD files to another location you specify in the wizard.
When you click “Move” button you are presented with the following options to choose, as shown in Figure 1.6 below:
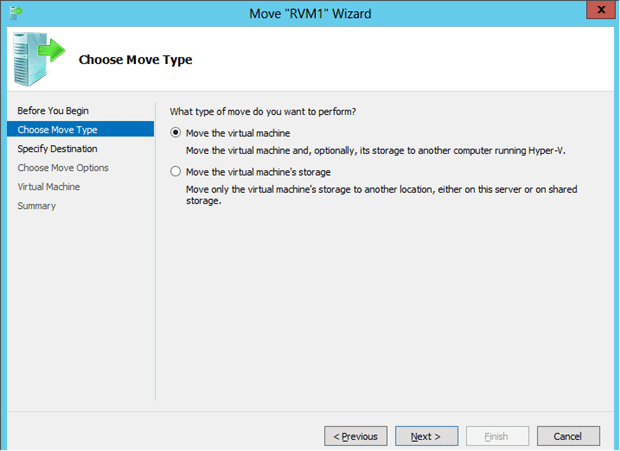
Figure 1.6 – Mirtual machine move options
“Move the Virtual Machine” is for moving the complete virtual machine to another location that you specify in the “Specify Destination” page as shown in the Figure 1.7 below:
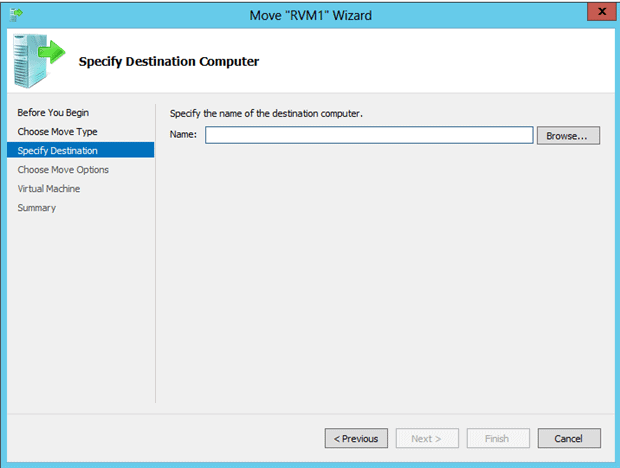
Figure 1.7 – Specifying Host Destination
Once you supply the required information, click on Finish to start the migration process. The virtual machine will be moved to the server you specified in the “Specify Destination” page. You can see the status in the Hyper-V Manager under the Status column.
How does ‘Shared-Nothing Live migration’ Work?
‘Shared-Nothing Live Migration’ leverages SMB 3.0, first introduced in Windows Server 2012, to live-migrate a virtual machine successfully. Yes, it is true and that is the reason that both source and destination Hyper-V Hosts must be running Windows Server 2012.
The process uses Client for Microsoft Networks and File and Print Sharing for Microsoft Networks service to create and access shared folders for the virtual machines in question. A connection to the target server is created by creating a shared folder. You can see the list of shared folders in the Shared Folders management snap-in.
A Shared Folder by name $VSMS is created on the root of the C:\ on the target server which has a sub-folder by the source server name and with some unique identifier attached to the shared folder to uniquely identify the virtual machine on the source server. The shared folder is hidden and administrators, even with full control permissions, are not allowed to see the contents of it but you will be able to see the contents of this shared folder once you take the ownership.
Note: You cannot migrate a virtual machine on the same Hyper-V Host. It has to be a remote Hyper-V Host always.
Hyper-V Clustering Types and Capability
There are four types of clustering that you can do with Microsoft Hyper-V.
- Parent Clustering – Two Hyper-V Hosts
- Child Clustering – Two virtual machines
- Mixed Clustering – Hyper-V Host and virtual machine
- SMB 3.0 Clustering
Host versus Guest Clustering
There are four types of clustering provided for Microsoft Hyper-V running on Windows Server 2008 and later Operating Systems, but you configure this clustering type between Hyper-V Hosts or between virtual machines running on Hyper-V Hosts. You should understand the main differences between these two types of clustering before you can use the Hyper-V high-availability technologies more efficiently. So a difference between Host Clustering and Guest Clustering is highlighted below in Table 1.3 rather than explaining each clustering type in detail:
|
Host Clustering |
Guest Clustering |
|
Cluster Physical Machine |
Cluster virtual machines |
|
Virtual machine is monitored for health |
Application is monitored for health |
|
Guards against host OS and hardware failures |
Guards against guest OS and application failures |
|
Application running on virtual machine does not need to be cluster aware |
Application running on virtual machine needs to be cluster aware |
Table 1.3 – Hyper-V Clustering Types
As shown in above Table 1.3, the clustering between two Hyper-V Hosts are configured to achieve the high-availability of virtual machines running on them and clustering between virtual machine is done to achieve the high availability of applications running inside the virtual machines.
When you do clustering between Hyper-V hosts, you are automatically achieving the availability of virtual machines and applications running inside virtual machines.
Table 1.3 also states that host clustering, which is between two Hyper-V Hosts, guards against the Host failures whereas guest clustering does not guard against Host failures but provides the availability of applications running inside the virtual machines.
SMB 3.0 is a new addition to Windows Server 2012 but I haven’t the space in this article to explain about it.
Cluster Capability between Hyper-V and VMWare vSphere
When it comes to cluster scalability, both from a physical cluster, and guest cluster perspective, Windows Server 2012 Hyper-V leads the way in comparison with VMware which is shown in the below Table 1.4 below:
|
Capability or High Availability Feature |
Windows Server 2012 Hyper-V |
VMWare vShpere 5.1 |
|
Nodes Per Cluster |
64 |
|
|
Virtual machines Per Cluster |
8000 |
|
|
Maximum Guest Cluster Nodes |
64 Nodes |
16 |
|
Guest Clustering with Live migration |
Yes |
No |
|
Guest Clustering with Dynamic Memory |
Yes |
No |
Table 1.4 – Cluster Capability between Windows Server 2012 and vShapre 5.1
Windows Failover Cluster Interaction with Hyper-V migration Technologies
It is important to understand how Windows failover-clustering components work with Microsoft Hyper-V so that it is easy to troubleshoot the issues as they occur. I would recommend reading this article at simple-talk.com for more information on how Failover Clustering components interact with Microsoft Hyper-V components:
Choosing Right Hyper-V migration Technology
So now we have spoken about all the migration Technologies available through Windows Server 2008 RTM to Windows Server 2012 in the above sections. It is time to decide which one you should choose to fit your requirements.
Before you start planning about a Microsoft Hyper-V migration technology in your production environment, it is a good practice to look at the comparison of the all the migration Technologies. Below, shown in Table 1.5, is the basic comparison between ‘Quick Migration’, ‘Live Migration’, ‘Hyper-V Replica’ and ‘Shared-Nothing Live Migration’ Technologies:
|
Description |
‘Quick Migration’ |
‘Live migration’ |
‘Hyper-V Replica’ |
‘Shared-Nothing Live migration’ |
|
Downtime |
Yes [ Minimal Downtime ] |
No |
Yes [ Minimal Downtime ] |
Yes [ Minimal Downtime ] |
|
Microsoft Clustering Components |
Required |
Required |
Not Required |
Not Required |
|
Use of Certified Hardware |
Required |
Required |
Required |
Required |
|
Identical hardware & Configuration |
Required |
Required |
Not Required |
Not Required |
|
Domain Membership |
Required |
Required |
Not Required |
Required |
|
Work in Standalone mode? |
No |
No |
Yes |
Yes |
|
APIs for Vendor provided? |
No |
No |
Yes |
Yes |
|
Recovery History |
No |
No |
Yes |
Yes |
|
Feature Availability |
Windows 2008/R2/2012 |
Windows 2008/R2/2012 |
Only Windows Server 2012 |
Only Windows Server 2012 |
|
Firewall Rules |
Not a requirement |
Not a requirement |
Required to open Ports for replication |
Not a requirement |
|
Downtime Type |
Planned and Unplanned |
Planned Only |
Planned |
Planned |
Table 1.5 – Comaprision between Microsoft Hyper-V migration Technologies
Conclusion
In this article we learned about the Microsoft Hyper-V migration technologies available to use in a production environment. We also the differences between each Hyper-V migration technology and the benefits they provide. By reading the “Deep Dive into Hyper-V migration Technology” section, we also learned about the underlaying components that it uses to migrate virtual machines from one location to another location or from one node to another node in a cluster environment.
The article also provided a basic comparision of cluster capability between Microsoft Hyper-V 3.0 running on Windows Server 2012 and VMware’s vSphere 5.1 and how Microsoft Hyper-V is beneficial.
In final section of this article, we put together a table comaring all Microsoft Hyper-V migration technologies.
This document contains proprietary information and is protected by copyright law.
Copyright © 2026 Red Gate Software Limited. All rights reserved
Load comments