
In Part I of this article series, I explained the basic concepts of Microsoft Hyper-V Replica and how to configure a virtual machine for Hyper-V Replication. In this article, I’ll explain the Replication options for a Replica Virtual Machine.
A Hyper-V Replica installation consists of a primary site where all Hyper-V hosts and the respective Virtual Machines are running. Besides the primary site there’s also a replica site. Hyper-V hosts are also located in this replica site but they contain replicas of virtual machines that are running in the primary site. Every five minutes, the primary site sends information regarding these last five minutes to the replica site where this information is replayed into the Hyper-V Replica.
Replication Actions on a Replica Virtual Machine
For any Replica Virtual Machine participating in the Hyper-V Replica, right-click the machine name to bring up the context menu and view the Replication actions available as shown in the figure 1.19 below:

Figure 1.19 – Context Menu of the Replica Virtual Machine on Replica Server
“Failover” and “Test Failover” will be discussed further on in this article.
“Pause Replication” pauses the replication for the Virtual Machine. The status of the Virtual Machine replication will be reflected on the “Replication Health” status page. This action can be performed on the Primary or Replica Server.
“View Replication Health” brings up the following screen which shows the overall status of the Replica Virtual Machine. This action can be performed from the Primary or Replica Server.
“Remove Replication” is used to stop the replication for the Replica Virtual Machine. This action can be performed on the Primary or Replica Server. Stopping the replication for the Virtual Machine does not delete the Virtual Machine and its files from the Replica Server! You must manually delete the files if you need to do so.
Hyper-V Failover
For any Primary and Replica Virtual Machine in a Hyper-V Replica environment, there are three types of failover operations available. Some of the failover tests can be used for the Primary Virtual Machine and some can be used for Replica Virtual Machine.
- Test Failover (TFO)
- Planned Failover (PFO)
- Unplanned Failover (UFO)
Test Failover (TFO)
Test Failover, as the name suggests, can be used to run tests against the Replica Virtual Machine. The “Failover Test” action is executed on the Replica Virtual Machine to ensure that it can come online successfully at the Replica Server in case of a Primary Virtual Machine running on Primary Server disaster. You can initiate a “Test Failover” without impacting the Primary Virtual Machine.
NOTE: The “Test Failover” is same as Windows Failover Cluster’s “Simulate” feature.
This type of failover can be performed by using the “Test Failover” option located on the Right Click context menu on the Replica Virtual Machine as shown in the Figure 1.20 below.
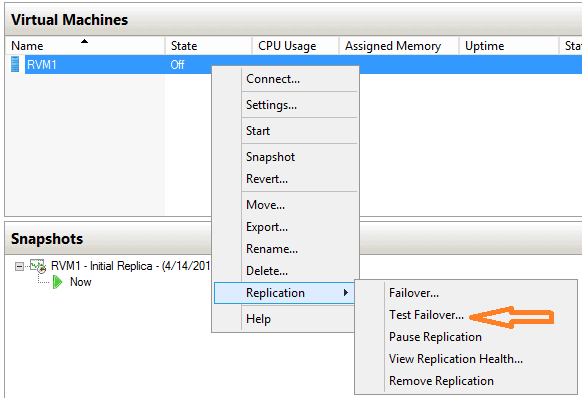
Figure 1.20 – “Test Failover” action on Right Click Context Menu of Replica Virtual Machine
Once you click “Test Failover“, the next snapshot shows the available recovery points for the Replica Virtual Machine.
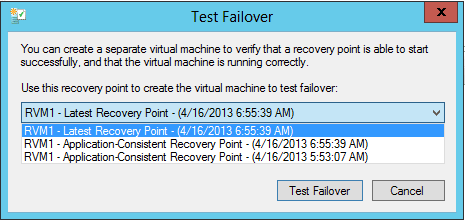
Figure 1.21 – Available Recovery Points for a Replica Virtual Machine
There are following types of recovery points available for your selection:
- Latest Recovery Point
- Standard Replicas (multiple)
- Application-Consistent Recovery Point (multiple)
“Latest Recovery Point” is the backup of Primary VHD of the Replica Virtual Machine which will be used to test the failover.
“Application-Consistent Recovery Point” and “Standard Replicas” are created by the Volume Shadow Copy Service (VSS) based on the interval you specified when configuring this Virtual Machine for replication.
What does Test Failover Do?
Using one of the recovery points you selected, the “Test Failover” operation creates a “Test Virtual Machine” on the Replica Server. The new Virtual Machine is appended with a tag “-Test” as shown in the figure 1.23 below.
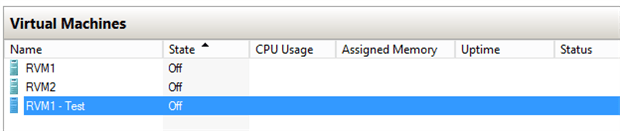
Figure 1.22 – Test Virtual Machine created by “Test Failover” Action on the Replica Server
In fact, “Test Failover” operation uses Hyper-V’s “Export and Import” feature internally to create a new Virtual Machine and then rename it. The “Test Failover” operations include:
- Export the Replica Virtual Machine to a temporary location (XML file, VHD files, etc.)
- Modify the XML file of exported Virtual Machine to use a unique GUID
- Register the newly created Virtual Machine with Hyper-V (VMMS.exe)
- Rename the Virtual Machine name
- Import the Virtual Machine onto the same Hyper-V server
NOTE: The Test Virtual Machine remains OFF after it has been imported successfully, by default, an imported Virtual Machine is not started automatically.
After turning Test Virtual Machine (RVM1 – Test in this case) ON and once you are satisfied that it functions properly, you can always delete the test Virtual Machine from the Replica Server. Before you delete the test Virtual Machine, use “Stop Test Failover” action from the Right Click Context menu. This action will clean up the duplicate files (VHD and configuration files) for the test Virtual Machine.
NOTE: You must have enough resources available on the Replica Server in order to start the test Replica Virtual Machine and enough storage for “Test Failover” operation to create/store VHD files.
| Tip: | Only one “Test Failover” operation is allowed at one time for a Replica Virtual Machine. However, you can perform multiple “Test Failover” operations for different Replica Virtual Machines at the same time. |
| Tip: | Since the “Test Failover” operation is performed at the Replica Site, there is no impact on the Primary Virtual Machine which continues to serve the client requests. |
Planned Failover (PFO)
A “Planned Failover” action is available to be performed on the Primary Virtual Machine running on the Primary Server. This action can be performed when you know that Primary Server or Primary Site will go down for some maintenance purpose and you want to move the virtualized workloads to the Replica Server or Replica Site with minimum downtime. This type of failover operation is performed from the Right Click context menu on the Replica Virtual Machine as shown in the Figure 1.23 below.
Figure 1.23 – “Planned Failover” action on Right Click Context Menu of Primary Virtual Machine
When you click on the “Planned Failover” action, it shows the following screen shown in the Figure 1.24 below:
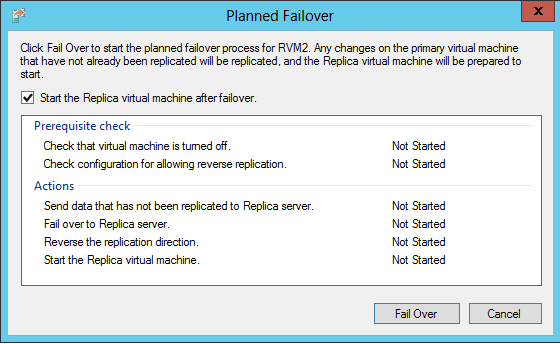
Figure 1.24 – “Planned Failover”
There are a number of prerequisites checks and actions performed when you click the ‘Fail Over” button located on the above Figure 1.24. Prerequisites include checking to make sure the Primary Virtual Machine is turned off and reverse replication is allowed from Replica to Primary Server.
The checkbox “Start the Replica Virtual machine after failover” allows you to turn on the Replica Virtual Machine on the Replica Server.
Note: The “Planned Failover” operation requires manual intervention and must be performed by an administrator. This is similar to Live Migration or Shared-Nothing Live Migration Planned Failover. The only difference is that there will be little downtime in case of “Planned Failover” performed in the Hyper-V Replica environment.
A few actions are performed which are listed in Figure 1.24.
The “Primary Virtual Machine” must be turned off and the Primary Server (this server) must be configured to accept the replication from the Replica Server before the planned failover operation can start. If none of the conditions are true, an error message will be displayed as shown in Figure 1.25 below.
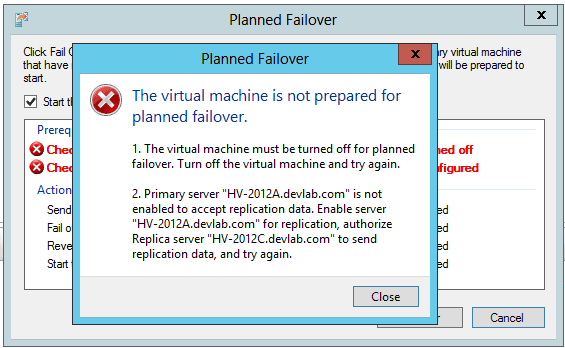
Figure 1.25 – “Planned Failover” Error message for Primary Virtual Machine at Primary Server
The following requirements must be met before the “Planned Failover” operation can start:
- Primary Server is configured to accept replication
- The Primary Virtual Machine is turned off
Usually, in a Hyper-V Replica environment, it is the Replica Server which accepts replication packets from a Primary Server running in production site but not the vice-versa – in some cases it is required by the Hyper-V Replica to reverse replicate the virtualized workload. The “Reverse Replicate” action requires this type of configuration, this will be touched on again later in this article.
A “Planned Failover” operation initiated for a Primary Virtual Machine is initiated manually by an administrator. Since it is a “planned event”, Hyper-V Primary Server knows what all actions need to be taken for a Primary Virtual Machine. This is what happens as part of the operation:
- An administrator initiates the “Planned Failover” action from a Right Click context menu of Primary Virtual Machine
- Hyper-V server process (VMMS.exe) is notified of the action
- VMMS.exe talks to Hyper-V VSS Writer to create a snapshot of the Primary Virtual Machine
- Hyper-V VSS Writer creates a “Standard Replica” backup copy.
- The Replica Server is notified of the event.
- “Standard Replica” backup copy is sent to the Replica Server
- The Replica Server applies the backup copy it has received and starts the Replica Virtual Machine
In case of a Planned Failover, there is no data loss. Since the Primary Server is informed of the action, it takes the necessary actions on the Primary Virtual Machine ensuring no data loss occurs because they are sent to Replica Server.
Unplanned Failover (UFO)
The “Unplanned Failover” operation is performed on the Replica Virtual Machine running on the Replica Server and must be used only if you are experiencing issues with:
- Primary Server alone
- Primary Site where the Primary Servers resides
- Primary Virtual Machine which cannot be brought online
- Network connectivity issues for the Primary Virtual Machine
The objective of performing the unplanned failover action is to resume the services at the Replica Site as soon as possible.
Note: “Unplanned Failover” operation is unplanned and occurs without your notice.
Unplanned Failover appears as the “Failover” action on the Right Click Context Menu of the Replica Virtual Machine as shown in the below figure 1.26.
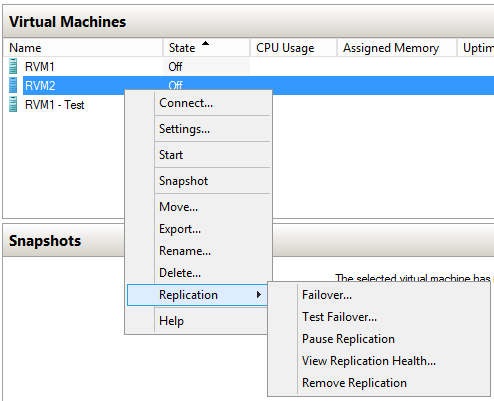
Figure 1.26 – “Failover” (unplanned failover) Action on Right Click Context Menu Of Virtual Machine
| Tip: | “Failover”, “Cancel Failover” and “Reverse Replication” actions are related to each other which are explained in this section. |
Clicking the “Failover” button brings up the following screen:
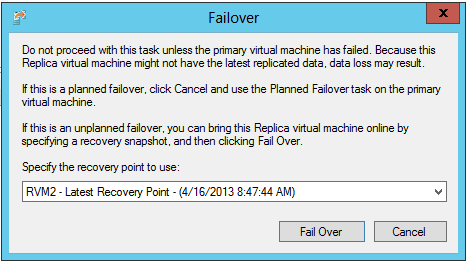
Figure 1.27 – Selecting Recovery Points for Virtual Machine
Failover allows you to select the recovery point if you enabled for the Primary Virtual Machine.
| Tip: | Always select the latest recovery point from the drop down list to restore the Replica Virtual Machine from a latest recovery point. |
Planned vs Unplanned Failover Types
In the case of a “Planned Failover”, the Hyper-V Primary Server is notified of the operation/action so it takes necessary actions for the primary Virtual Machine. On the other hand, “Unplanned Failover”, which is performed at the Replica Server, does not provide any notification to the Replica Server.
If the Replica Server is notified of a failure on the Primary VM, then there’s no difference between Hyper-V Replica and Windows Failover Clustering.
Since the Replica Server is not notified of any issues with the Primary Virtual Machine in an unplanned failover, it maintains a list of recovery points or backup copies you can choose to recover the Virtual Machine to resume its services.
An “Unplanned Failover” must be performed only when one of the following conditions is true:
- The Primary Site is experiencing some issues and cannot be contacted.
- Clients cannot connect to the Primary Virtual Machine and you need to restore the services as soon as possible on the Replica Virtual Machine running on Replica Server.
Note: The Primary Virtual Machine at Primary Server site must be turned off before you can use the “Unplanned Failover”.
| Tip: | Any test Replica Virtual Machine, created by the “Test Failover” action, will be deleted when you use “Failover” action on the Replica Virtual Machine. |
| Tip: | There is no need to turn on the Replica Virtual Machine on Replica Server as the Failover operation will automatically turn it on. |
Cancel Failover and Reverse Replication
“Cancel Failover” and ‘Reverse Replication” actions are available on the Replica Virtual Machine on which you initiated the “Failover” action. These two actions are shown in the below Figure 1.28.
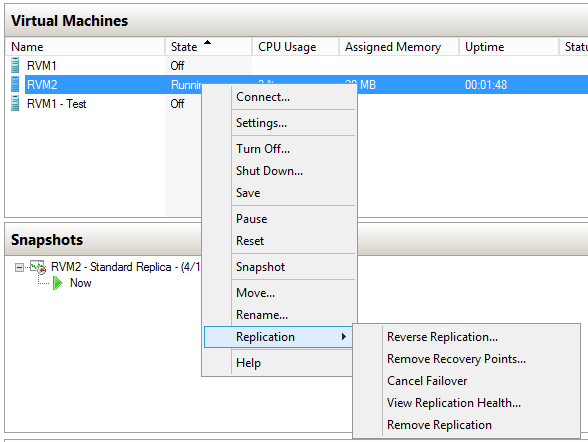
Figure 1.28 – “Cancel Failover” and “Reverse Replication” options for Virtual Machine
“Cancel Failover” action allows you to cancel the failover and turn off the Replica Virtual Machine. The “Cancel Failover” action is created in a situation where a Replica Virtual Machine restored from a recovery point is not working normally. You can always initiate the “Cancel Failover” action to revert back the changes and then start over with a different recovery backup copy this time.
“Reverse Replication” is a manual failback option provided with Replica Virtual Machine! You may wonder; Why not have automatic failback? Well, Hyper-V Replica is a disaster recovery solution and not a high availability solution. Microsoft may develop further the Hyper-V Replica components in the next few years to provide the failback functionality but it is not implemented in the current version of Hyper-V Replica.
“Reverse Replication” action just allows you to failback the load from Replica Server to Primary Server. Clicking on the “Reverse Replication” brings the following screen as shown in the figure 1.29 below:
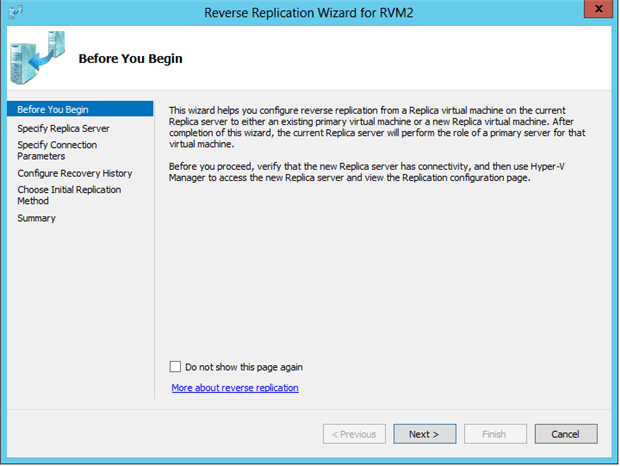
Figure 1.29 – “Reverse Replication” wizard
As stated in figure 1.29, this is the same wizard which you used to enable a Virtual Machine for replication earlier in this article. The configuration pages provided in this wizard are similar to those when you enable a Virtual Machine to participate in the Hyper-V Replica.
The wizard checks to see if the destination server is able to accept the incoming replication traffic generated from this server and this is where it is required for Primary Server to become a Replica Server.
Note: “Planned Failover” and “Reverse Replication” actions can be performed only if Primary Server is allowed to accept incoming replication requests.
You might want to remove all the recovery points associated with a Replica Virtual Machine. You would want to do that if recovery points are corrupted or you just don’t need them. To remove all the recovery points, select “Remove Recovery Points” action, as shown on the Right Click menu in Figure 1.29 above. When you click this action, a warning message will be displayed which requires your confirmation before recovery points associated with this Replica Virtual Machine can be removed from the local disk.
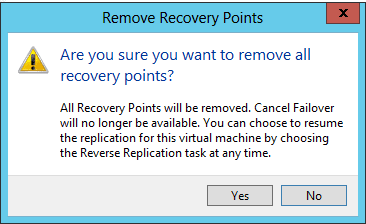
Figure 1.30 – “Remove recovery points” confirmation message
Recovery Points for a Replica Virtual Machine can be removed only if the Virtual Machine has been failed over using “Failover” action. The “Remove Recovery Points” action does not provide you a list of available recovery points rather it deletes all the recovery points associated with this Virtual Machine at a time.
As suggested in the Figure above, “Cancel Failover” option will no longer be available on the Right Click Context Menu if all recovery points are deleted.
| Tip: | Remove recovery points for a Virtual Machine if you want to start over or if you think there is no use of all the recovery points of a Virtual Machine. |
To summarize, the following actions are available on the Right Click Context Menu of Primary and Replica Virtual Machines:
|
Right Click Context Menu Actions |
Available On Replica Virtual Machine |
Available on Primary Virtual Machine |
Description |
|
Test Failover |
Yes |
No |
Test to see if Replica Virtual Machine can come online successfully at DR site. Creates a test virtual machine at the DR site. |
|
Planned Failover |
No |
Yes |
Used to failover from Primary to Replica Server |
|
Pause/Resume Replication |
Yes |
Yes |
Pause or Resume Replication for Virtual Machine |
|
View Replication Health |
Yes |
Yes |
Shows replication health of the Virtual Machine |
|
Remove Replication |
Yes |
Yes |
Remove replication for Virtual Machine |
|
Reverse Replication |
Yes< |
No |
Used to reverse replicate from Replica to Primary Server |
|
Cancel Failover |
Yes |
No |
Used to cancel the failover operation |
|
Remove Replication Points |
Yes |
No |
This Action can be used to remove all Recovery Points |
Table 1.0 – Right Click Context Menu Actions
Conclusion
In the final part of this article series, we learned the actions available on Right Click context menu on Virtual Machines. I also covered the different types of failover available in Hyper-V Replica environment and what they do when recovering a virtual machine.
This document contains proprietary information and is protected by copyright law.
Copyright © 2026 Red Gate Software Limited. All rights reserved
Load comments