
The series so far:
In a previous article, I wrote about how to use parameters within your PowerShell scripts. It turns out that it was the most popular article I’ve written so far for Simple-Talk. I appreciate all the votes and page views. However, as I was writing my article on Adding Help to Your PowerShell Scripts, I found myself diving deeper into how you can use parameters. I realized I had barely scratched the topic of parameters and PowerShell, hence this article.
A bit of this will be a recap from that article on help, but I will then expand upon parameter usage and passing in PowerShell. Even then, I suspect I will not cover every possible detail. PowerShell is a deep and rich scripting language that I’m still learning more about every day.
Boolean vs Switch
In my previous article on Adding Help, I gave an example of both Boolean and switch. I will very quickly recap them here.
This script uses a Boolean parameter.
|
1 2 3 4 5 6 7 8 9 10 11 12 13 14 15 |
param([boolean] $help ) # # Author: Greg D. Moore # Date: 2020-02-18 # Version: 1.0 # Show boolean help # if ($help -eq $true) { write-host "This is help for this program. It does nothing. Hope that helps." } else { write-host "Do nothing." } |
This script uses switch which you can compare to the previous script.
|
1 2 3 4 5 6 7 8 9 10 11 12 13 14 15 |
param([switch] $help ) # # Author: Greg D. Moore # Date: 2020-02-18 # Version: 1.0 # Show switch help # if ($help) { write-host "This is help for this program. It does nothing. Hope that helps." } else { write-host "Do nothing." } |
They both act in very similar fashions except you cannot assign an actual value to a switch datatype. If it’s not included on the command line when calling the script, it’s treated as false. If it’s included on the command line, regardless of what you try to assign to it, it will be treated as true.
If you create the above script and save it as Switch_help.ps1 or download it from here, you can play with trying to pass different values to the –help parameter. You will find they all give the same results.
Parameter Definitions
With that out of the way, I want to recap how to define a parameter and build upon it. Start with the script below (note all scripts are available on Github.).
Save it as simplest.ps1.
|
1 2 |
param($foo) Write-host $foo |
Run it like this:
|
1 |
.\simplest.ps1 -foo BAR |
You should get:
![]()
This is just as you’d expect and is about the simplest script you can write with a parameter.
Now save the following script as simplest_bad.ps1.
|
1 2 3 |
write-host "before parameter!" param($foo) Write-host $foo |
If you save this and try to run it, you should get the following error:

This example shows that the param keyword has to be the first line in a script. (Note when discussing functions, this changes a bit. I most likely will cover this in a future article).
In my first article on parameters and in the examples above with $help, I explicitly defined the datatype for a parameter. Generally, I prefer doing so for parameters. Below is a short script to illustrate this:
|
1 2 |
param($foo) Write-host $foo.GetType().Name |
Save that as simplest_gettype.ps1 and then run it with various data types.
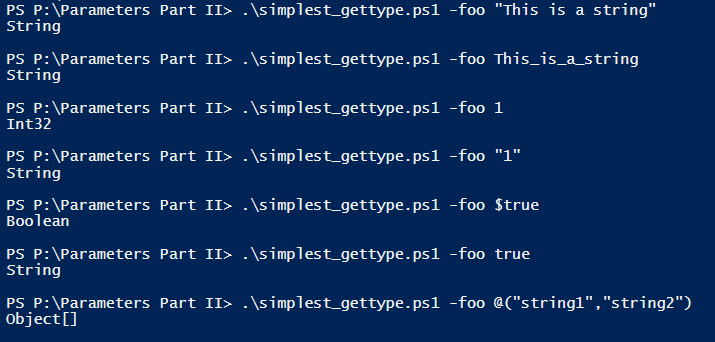
For the most part, the datatype makes make sense. PowerShell is generally pretty good at guessing the data type. However, it’s important to notice that $true is considered as a Boolean and true is considered a string. If you absolutely need to check if the user entered a $true or $false value, I highly recommend the use of Boolean (or switch) as shown at the start of this article.
As the above example shows, you can pass an object to a script. This can be done a couple of ways that may be useful.
Save the following script as Passing_Object.ps1.
|
1 2 3 |
param ($foo=@{firstname='';lastname=''}) write-host $foo.firstname write-host $foo.lastname |
Run as follows:

You can also define an object first and pass that. For example, if you define an object first and pass that to your script, it will work also:

As seen in my article on Help, besides defining the datatype for a parameter, you can also force a parameter to be mandatory. You can also provide default values for a parameter.
Save the following script as Default_Example_1.ps1:
|
1 2 |
param([parameter(mandatory)] [string] $dbserver ) write-host "You picked $dbserver!" |
If you run this in the PowerShell ISE, you will see:

In my help article, I had a slight variation on this. You may find that not only do you want to make a particular parameter mandatory, but you only want to allow specific values. Save the following script as Default_Example_2.ps1:
|
1 2 |
param([parameter(mandatory)] [validateset("ProdDB_Server","DevDB_Server")] [string] $dbserver ) write-host "You picked $dbserver!" |
Now when you try to run it in the PowerShell ISE, you should see:

Note that in PowerShell ISE, the valid values are displayed. This is not necessarily true of all editors. If you enter an invalid value you will see something like:

It is possible to have multiple and different validation sets. I explore that a bit more in the help article.
ValidateSet Caveat
Enter the script below and save it as ValidateSet_Caveat_1.ps1:
|
1 2 3 4 5 6 |
param([parameter(mandatory)][validateset('Good','Bad')] $status) Write-host "Status is $status" $status = 'Ugly' Write-host "Status is still $status" $status = 'Good' Write-host "Status is now $status" |
Run it and select Bad:

You will get:
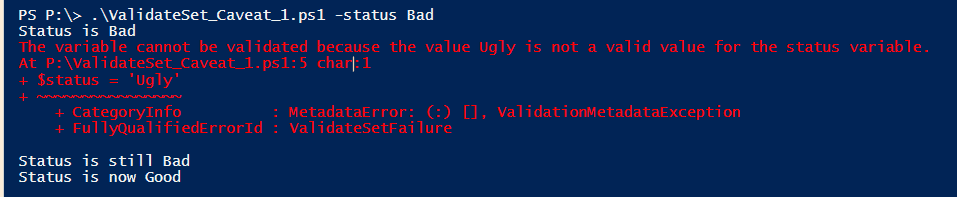
The error message explains the issue clearly.
Save the following script as ValidateSet_Caveat_2.ps1:
|
1 2 3 4 5 6 7 |
param([validateset('Lorca','Georgiou','Pike','Kirk')] $Captain, $color) [validateSet('red','yellow')] $alert = 'red' [validateSet('good','bad')] $status Write-host "Captain $Captain has declared $alert alert and our status is $status!" $alert = $color $status = 'REALLY BAD' Write-host "Now Captain $Captain has declared $alert alert and our status is $status!" |
Note the $Captain parameter is no longer mandatory. This script should show several interesting details about the use of ValidateSet.
Run the following first:
|
1 |
.\ValidateSet_Caveat_2.ps1 -color yellow |
Your result will be:
![]()
Note that while you provided options for the set, since it wasn’t mandatory, you weren’t prompted to enter a Captain’s name. In addition, even though you did define a ValidateSet for $status, it wasn’t used. As a result, in the first message, no $status is shown, and in the second message, a status is shown that wasn’t part of the ValidateSet.
Now if you decide you want to be the Captain of a starship, you might try something like:
|
1 |
.\ValidateSet_Caveat_2.ps1 -color yellow -Captain Moore |
That only results in:

This result makes sense because you’re trying to assign a value to $Captain at the same time it’s declared, but you’re also telling PowerShell what the valid values are and your name isn’t one of them.
Now try
|
1 |
.\ValidateSet_Caveat_2.ps1 -color black -Captain Pike |

Evidently, all knowledge of the Spore Drive has been declared top secret, and you can’t have a black alert. But you can set a standard alert color.
|
1 |
.\ValidateSet_Caveat_2.ps1 -color yellow -Captain Pike |
![]()
When using ValidateSet, keep in mind that it only is effective if you assign a valid value at the time you declare the variable. Otherwise, any value can be used (as shown by the $status in the above script).
The above examples are useful and applicable if you are running your scripts and typing in the parameters by hand, but, what if you want to run a script and pass it data from another source.
Pipelined Parameters
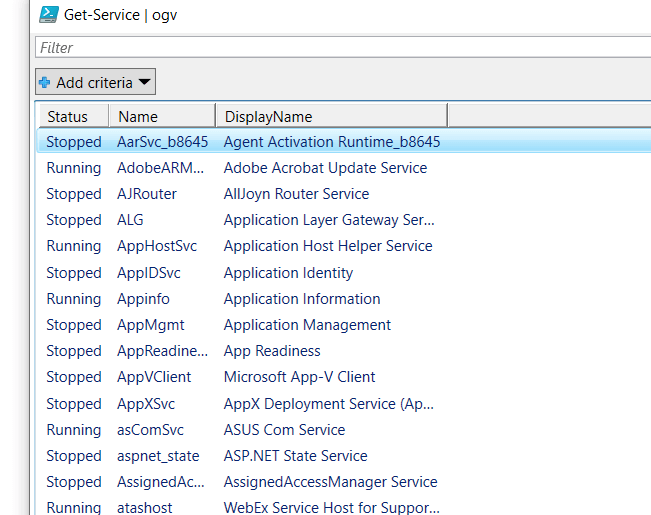
Most PowerShell cmdlets let you use the pipe | symbol to pass data. For example, run the following script:
|
1 |
Get-Service | ogv |
You should see a window similar to the following show up:
You might be tempted to do something like:
|
1 |
"test" | .\simplest.ps1 |
You will find that nothing happens, but this is simple to fix.
Save the following script as Piped_Variable.ps1:
|
1 2 |
param([parameter(ValueFromPipeline)] $piped1) Write-host $piped1 |
First, you can run it as follows:
![]()
It works as you’d expect.
Now, try this:
![]()
It also works as you’d expect, but what if you want to pass in multiple values? You could try:
![]()
That didn’t work as you might hope.
Have no fear. PowerShell does have a way of handling this. At first, the solution will look more complicated than you might need, but I think you’ll quickly agree that the solution is fairly useful.
Save the following script as Piped_Variable_2.ps1:
|
1 2 3 4 5 6 7 8 9 10 11 12 13 |
param([parameter(ValueFromPipeline)] $piped2) begin #Note the begin block is optional! { Write-host "Will only run once at the start!" } Process #This is the part that does all the work { Write-host $piped2 } end #Note that the end block is also optional! { Write-Host "Will only run at the end" } |
Run it like this:
|
1 |
"foo", "bar" | .\Piped_Variable_2.ps1 |
You will see the following:
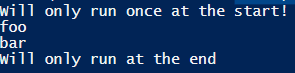
This does exactly what you would expect and want: it runs the begin block once at the start, and the end block once at the end, but the Process block runs multiple times as expected. Below is a more useful example:
|
1 2 3 4 5 6 7 8 9 10 11 12 13 |
param([parameter(ValueFromPipeline)] $addends) begin #Note the begin block is optional! { $sum=0 } Process #This is the part that does all the work { $sum+=$addends } end #Note that the end block is also optional! { Write-Host "The sum of your numbers is $sum" } |
Save the above script as Piped_Addition.ps1and run it as:
|
1 |
1, 5, 67 | .\Piped_Addition.ps1 |
You should get the following as a result:
![]()
You may be curious as to what happens if you try to pass in variables in the standard manner, i.e. after the cmdlet:
|
1 |
.\Piped_Addition.ps1 -addends 4 |
This will work as expected:
![]()
However, you may be a bit surprised when you run this:
|
1 |
.\Piped_Addition.ps1 -addends 4,5 |
It doesn’t work.

When you pass in parameters to that function, PowerShell treats the 4,5 as an object as the error suggests.
You could write the above piped addition program as:
|
1 2 3 4 5 6 7 |
param( $addends) $sum=0 foreach ($addend in $addends) { $sum+=$addend } Write-Host "The final value is $sum" |
Save it as Nonpiped_addition.ps1 and then run it as:
|
1 |
.\Nonpiped_addition.ps1 4,5 |
You will get:
![]()
What if you want to be able to handle the user doing either? Your first attempt will probably look something like the following:
|
1 2 3 4 5 6 7 8 9 10 11 12 13 14 15 16 17 18 19 20 21 22 23 24 25 26 27 28 29 30 31 32 33 |
param([parameter(ValueFromPipeline)] $addends) begin #Note the begin block is optional! { $sum=0 if ($addends.count -gt 0) { write-host "Values are not piped!" $piped = $false } else { $piped = $true Write-Host "Values are piped!" } } Process #This is the part that does all the work { if ($piped) { $sum+=$addends } else { foreach ($addend in $addends) { $sum+=$addend } } } end #Note that the end block is also optional! { Write-Host "The sum of your numbers is $sum" } |
Save it as Piped_Addition_2.ps1 and run it like this:
|
1 |
2,3 | .\Piped_Addition_2.ps1 |
You will get:
![]()
Supply the parameters like this:
|
1 |
.\Piped_Addition_2.ps1 4,3 |
You will get:
![]()
If you try to send the parameters both ways:
|
1 |
4,4 | .\Piped_Addition_2.ps1 4,3 |
This does not work. You can’t tell PowerShell to accept a parameter as both piped AND non-piped.

However, one of the things that I continue to find amazing about PowerShell is that the authors gave a lot of thought about how as a programmer I might want to do things AND to keep things simple. You might already be thinking that could be a simpler way to do the above and there is. In fact, an earlier example came close to solving the problem.
Save the following script as Piped_Addition_3.ps1.
|
1 2 3 4 5 6 7 8 9 10 |
param([parameter(ValueFromPipeline)] $addends) Process { foreach ($addend in $addends) { $sum+=$addend } Write-Host "In Process block: Total = $sum" } |
Run it with the following input:
|
1 |
3,5,4 | .\Piped_Addition_3.ps1 |
You will get the following results:
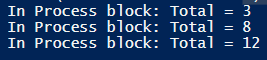
This is what you would expect from the original piped addition example, but what happens if you run the following?
|
1 |
.\Piped_Addition_3.ps1 -addends 4,8,1 |
You will get:
![]()
Note that since the Write-Host is outside of the foreach loop, you only see it once.
It’s worth taking time to understand what exactly is happening here.
When you send piped input to a script (or a function), the Process block gets called for each individual value passed to it. This means $addends consists of a single value in the foreach loop. In the first example, Process gets called three times because there are three separate values piped in: 3,5, and 4.
When passing the parameters by name, you are actually passing in an object of type System.Array, and Process gets called just once (because there’s only one System.Array being passed to it). However, the foreach gets called three times because the System.Array consists of three values: 4,8, and 1.
This becomes obvious if you add one line to the above script and resave it as Piped_Addition_4.ps1 and run it:
|
1 2 3 4 5 6 7 8 9 10 |
param([parameter(ValueFromPipeline)] $addends) Process { $addends.gettype() # Let's reveal the datatype here! foreach ($addend in $addends) { $sum+=$addend } Write-Host "In Process block: Total = $sum" } |
While Piped_Addition_2.ps1 may seem like the obvious way to go, once you realize how the parameters are being passed, you should realize why Piped_Addition_3.ps1 works and is far simpler to write. You will also notice for simplicity’s sake, I eliminated the begin and end blocks since they weren’t necessary.
Multiple Piped Parameters
The above example is useful if you want to pass in a variable number of parameters for the same purpose; for example, you want to pipe in two different parameters.
Your first attempt might look like this:
|
1 2 3 4 5 |
param([parameter(ValueFromPipeline)] [string] $name, [parameter(ValueFromPipeline)] [string] $Provider) process { Write-Host "The name is: $name and provider is $Provider" } |
Save this as Piped_ByName_1.ps1and run it as:
|
1 |
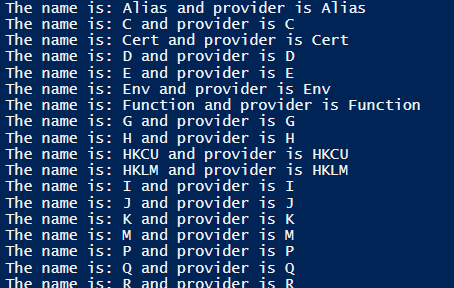
"bob", "ted" | .\Piped_ByName_1.ps1 |
You’ll get:
![]()
Which makes sense as this is the behavior you saw with the named addition examples above. It passes each value into the Process block, and even though you asked for two values, it only read one from the pipeline at a time.
You might try:
|
1 |
"bob,mary", "ted" | .\Piped_ByName_1.ps1 |
But that’s no better:
![]()
It might dawn on you to try to pass in an object:
|
1 |
@{name='Greg';provider='YES'} | .\Piped_ByName_1.ps1 |
But that’s no better either.
![]()
Before giving up entirely though, try the following:
|
1 |
get-psdrive | .\Piped_ByName_1.ps1 |
Your results will look similar to:
The fact that you could pass in the output from a cmdlet and get something semi-useful hopefully piqued your curiosity. Before I give the complete solution, you should run this code:
|
1 |
Get-PSDrive | get-member |
You will see the following:
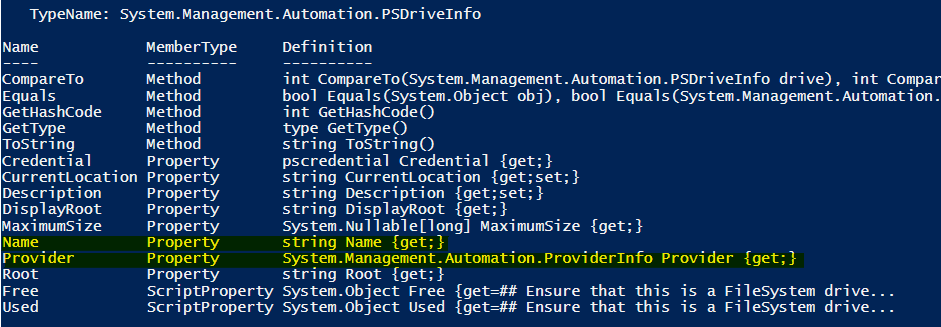
I’ve highlighted two lines since that’s what you want in your script.
Save the following script as Piped_ByName_2.ps1:
|
1 2 3 4 5 |
param([parameter(ValueFromPipeLineByPropertyName)] [string] $name, [parameter(ValueFromPipeLineByPropertyName)] [System.Management.Automation.ProviderInfo] $Provider) process { Write-Host "The PSDrive name is: $name and provider is $($Provider.Name)" } |
You will notice that now the parameters use ValueFromPipeLineByPropertyName instead of ValuefromPipeline and that the datatype for $Provider matches what get-member provided.
Run this command:
|
1 |
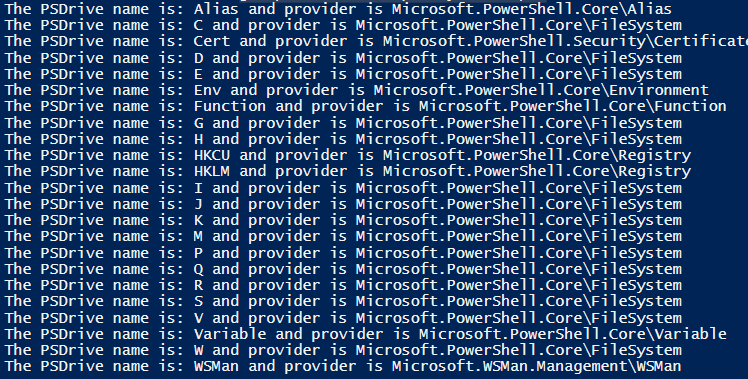
get-psdrive | .\Piped_ByName_2.ps1 |
You will get:
Note you can still call the script with named parameters:
|
1 |
.\Piped_ByName_2.ps1 -name C -Provider ($provider=(get-psdrive c)).Provider |
That may seem like a trivial example since you’re hardcoding the name of the drive, but you could also do something like this:
|
1 2 |
$drive="env" .\Piped_ByName_2.ps1 -name $drive -Provider ($provider=(get-psdrive $drive)).Provider |
You’ll get this back:
![]()
In an earlier article on Help, I showed how using the –Full or -Showwindow parameter would provide a lot more detail. This is particularly useful if you’re trying to write a script and want to know how cmdlets can handle parameters. It will allow you to see what the names of properties are of other cmdlets so that you can use them in the pipeline to pass to your own cmdlets. In theory, you can take the named property of one cmdlet and pass it to one that you write. Note, however, that this is not always accurate.
Save the following script as Piped_byName_3.ps1:
|
1 2 3 4 5 6 7 8 9 10 11 12 13 |
param([parameter(ValueFromPipeLineByPropertyName)] [string] $name, [parameter(ValueFromPipeLineByPropertyName)] [System.Management.Automation.ProviderInfo] $Provider, [parameter(ValueFromPipeLineByPropertyName)] $free, [parameter(ValueFromPipeLineByPropertyName)] [System.Nullable[long]] $MaximumSize) process { if ($free -ne $null) { Write-Host "The PSDrive name is: $name and provider is $($Provider.Name) and free space is $([math]::round($($free/1GB),2)) GB out of $MaximumSize" } else { Write-Host "The PSDrive name is: $name and provider is $($Provider.Name)" } } |
Run this as:
|
1 |
Get-PSDrive | .\Piped_ByName_3.ps1 |
You will get something like:

You’ll note it doesn’t show the maximum size.
While the help suggests you should be able to get the maximum size of a drive from get-psdrive, the reality is you can’t. To prove that run:
|
1 |
Get-PSDrive C | format-list * |
You’ll see that it returns data for Used, Free, and more, but not for the Maximum size. I think the easiest solution would be to add up Used and Free space and display that. I leave that as an exercise for you to figure out.
I do want to draw your attention to one detail in PowerShell that I absolutely love: the fact that you can divide by 1GB (or even 1MB and 1TB) $($free/1GB) works just as you’d expect!
Mixing Pipelined and Passed Parameters
As a final script, I will partially contradict something I said above. I noted you couldn’t pass in the parameter both via pipeline and as a passed parameter. That’s not quite true. You can’t pass in the same parameter both ways, but you can combine the usage. Below is an example:
|
1 2 3 4 5 6 7 8 9 10 11 12 13 |
param([parameter(ValueFromPipeLineByPropertyName)] [string] $name, [parameter(ValueFromPipeLineByPropertyName)] [System.Management.Automation.ProviderInfo] $Provider, [parameter(ValueFromPipeLineByPropertyName)] $free, $buymore) process { if ($free -ne $null) { Write-Host "The PSDrive name is: $name and provider is $($Provider.Name) and free space is $([math]::round($($free/1GB),2)) GB" if ($([math]::round($($free/1GB),2)) -lt $buymore) { write-host "==================> Time to think about upgrading! $name" -ForegroundColor Red } } } |
Save this as Check-FreeDisk.ps1 and run it as before:
|
1 |
Get-PSDrive | .\Check-FreeDisk.ps1 |
It will pretty much run as you might expect, though in this case, I’ve changed it slightly only to show actual storage devices.

Now try running:
|
1 |
Get-PSDrive | .\Check-FreeDisk.ps1 -buymore 100 |
You should see something like:

Try running the code without the named parameter:
|
1 |
Get-PSDrive | .\Check-FreeDisk.ps1 100 |
You will get very different results from what you expect!

Basically, PowerShell is capturing the first passed parameter and using that! Fortunately this is an easy fix, simply move the $buymore parameter to the start of the list of parameters.
|
1 2 3 4 5 6 7 8 9 10 11 12 13 |
param( $buymore, [parameter(ValueFromPipeLineByPropertyName)] [string] $name, [parameter(ValueFromPipeLineByPropertyName)] [System.Management.Automation.ProviderInfo] $Provider, [parameter(ValueFromPipeLineByPropertyName)] $free) process { if ($free -ne $null) { Write-Host "The PSDrive name is: $name and provider is $($Provider.Name) and free space is $([math]::round($($free/1GB),2)) GB" if ($([math]::round($($free/1GB),2)) -lt $buymore) { write-host "==================> Time to think about upgrading! $name" -ForegroundColor Red } } } |
Save this as Check-FreeDisk_2.ps1 and run it:
|
1 |
Get-PSDrive | .\Check-FreeDisk_2.ps1 |
You’ll get what you expect:

Try both of these examples:
|
1 2 |
Get-PSDrive | .\Check-FreeDisk_2.ps1 -buymore 100 Get-PSDrive | .\Check-FreeDisk_2.ps1 100 |
Each one will result in:

This is most likely what you want. In general, put parameters that you don’t necessarily expect a user to specifically name first. Note this can obviously get more complicated when you want to allow the same parameter to be passed by the pipeline or as part of calling the cmdlet (as in the addition examples above).
Conclusion
When I started this article, I thought it would be a sequel and conclusion to my previous article. However, as I dove deeper, I realized I’m still haven’t touched upon everything there is to know about Parameters, including using parameters in functions, the use of cmdletbinding, how to work with some of the default parameters that PowerShell offers such as –verbose, -erroraction, etc. I suspect there’s at least one more article in the works.
Thanks again for your support and hopefully this article will approach the popularity of the first.
This document contains proprietary information and is protected by copyright law.
Copyright © 2026 Red Gate Software Limited. All rights reserved
Load comments