
I was starting to get annoyed: I had all my trace files neatly separated into separate folders, but as I’d checked Enable File Rollover when I set up Profiler, it was creating multiple copies of the same trace file. To make things trickier, there were three shifts of DBAs, and each was using different trace settings. I tried to bring together the various trace files columns into the same, single file. As you might have guessed, this was really hard to do!
As the cherry on the top of this frustrating puzzle, some of our servers were very busy, and so the possibility of speedily importing the trace files into SQL Server tables was negated by the overhead it would have generated, so I had to handle the import to SQL Server at a later stage. Although it’s a simple procedure to run fn_trace_gettable for one file, when you have multiple files it quickly becomes complicated to generate a uniform and repeatable script… more so if you have to merge all the different trace files.
It was then that I decided to use PowerShell.
When I began to think of a solution, one of the requirements was to have SQL Server tables generated automatically ($filetotable). There was no problem in setting this parameter, but I wanted to centralize all the files in a single table and, as I mentioned, these files could come with different events and columns.
This became a problem when I began to see how many lines of code and conditions that this solution would require. To be fair, I was thinking in procedural terms, as I previously wrote my functions in Visual Basic. I’d forgotten one of the main features of PowerShell: Consistency.
Why should I write all this code, if the output of a cmdlet is an object and can be the input of the next cmdlet? With that in mind… let’s check out the code I came up with, as well as a few examples.
First let’s cover the parameters; the functions work with 4 parameters, one of them (the first) being mandatory.
- $TraceFileName – A mandatory String specifying the full SQL Server trace file path e.g. “C:\Temp\Profiler.trc” or “C:\temp\*.trc”
This parameter specifies which trace file needs to be read. If you want to use more than one file, which as I said may each come with different events and columns, specify that all *. trc files in a given location will be read. Otherwise, just select the one file.
- $FileToTable – An optional boolean flag instructing the function to insert all data into SQL tables, divided according to .trc file.
A little more detail: this parameter specifies whether the files read will be sent to tables in SQL Server, where the function will set up different tables for each file, with the name “POWERSHELLTRACETABLE_” followed by the name of the trace. We will see below that if this parameter is set to true, then we need to pass the name of the Server and Database for these files. If not specified, the default values will be used.
- $ServerName – The optional server name string. If this is not specified and $FileToTable is set to true, then default server will be used when importing the .trc files.
- $DatabaseName – the optional database name string. As with $ServerName, if this is not specified and $FileToTable is set to true, then TEMPDB will be used when importing the .trc file.
Get-SQLProfiler Script Code
|
1 2 3 4 5 6 7 8 9 10 11 12 13 14 15 16 17 18 19 20 21 22 23 24 25 26 27 28 29 30 31 32 33 34 35 36 37 38 39 40 41 42 43 44 45 46 47 48 49 50 51 52 53 54 55 56 57 58 59 60 61 62 63 64 65 66 67 68 69 70 71 72 73 74 75 76 77 78 79 80 81 82 83 84 85 86 87 88 89 90 91 92 93 94 95 96 97 98 99 100 101 102 103 104 105 106 107 108 109 110 111 112 113 114 115 116 117 118 119 120 121 122 123 124 125 126 127 128 129 130 131 132 133 134 135 136 137 138 139 140 141 142 143 144 145 146 147 148 149 150 151 152 153 154 155 156 157 158 159 160 161 162 163 164 165 166 167 168 169 170 171 172 173 174 |
Function Get-SQLProfiler () <# ---------------------------------------------------------- Load SQL SERVER Profiler Traces Files. (.trc) ---------------------------------------------------------- Version 1.0 Laerte Poltronieri Junior www.laertejuniordba.spaces.live.com $TraceFileName = MANDATORY String Full SQL SERVER Trace File Path "C:\Temp\Profiler.trc" or "C:\temp\*.trc" $FileToTable = OPTIONAL Boolean Flag to insert all data into SQL tables, divided by .trc file $ServerName = OPTIONAL Server Name String - If not especified and $FileToTable = true default server will be used $DatabaseNe = OPTIONAL Database Name String - If not especified and $FileToTable = true TEMPDB will be used #> { [CmdletBinding()] PARAM( [Parameter(Position=1,Mandatory=$true, ValueFromPipelineByPropertyName=$true,HelpMessage="SQL Server Profiler Trace File")] [Alias("FullName")] [ValidateScript({$_ -match ".TRC"})] [String] $TraceFileName, [Parameter(Position=2,Mandatory=$false, ValueFromPipelineByPropertyName=$true,HelpMessage="Flag to insert into SQL Table. Default False")] [Alias("InsertFile")] [switch] $FileToTable = $false, [Parameter(Position=4,Mandatory=$false, ValueFromPipelineByPropertyName=$true,HelpMessage="Server Name Default Localhost")] [Alias("SvrName")] [String] $ServerName = $env:COMPUTERNAME, [Parameter(Position=5,Mandatory=$false, ValueFromPipelineByPropertyName=$true,HelpMessage="Database Name Default TEMPDB")] [Alias("DbName")] [String] $DatabaseName = "TEMPDB" ) begin { $verbosePreference="continue" if ($fileToTable -AND $servername -eq $env:COMPUTERNAME -and $DatabaseName -eq "TEMPDB" ) { $msg = "Server and Database parameters are not informed default values will be used : Server " + $env:COMPUTERNAME + " Database : TEMPDB" write-warning $msg } [reflection.assembly]::LoadWithPartialName("Microsoft.SqlServer.ConnectionInfoExtended") | out-null [reflection.assembly]::LoadWithPartialName("Microsoft.SqlServer.ConnectionInfo") | out-null [reflection.assembly]::LoadWithPartialName("Microsoft.SqlServer.Smo") | out-null } process { try { # Verify if was passed multples .trc $MultipleFiles = ($TraceFileName.substring($TraceFileName.length - 5, 5) -eq "*.trc") #Setup Final Result and line number $LineNumber = 1 $FinalResult = @() # Get All .trc files (one or various) foreach ($TraceFilePath in Get-ChildItem $TraceFileName -ErrorAction Stop ) { try { #get trace name to create table $TraceFileNameTRC = ($TraceFilePath.PSChildName).trim() $TraceFileNameTRC = $TraceFileNameTRC.Trim() [String] $TraceFilePathString = $TraceFilePath $TableName = "PowerShellTraceTable_" + $TraceFileNameTRC.substring(0,$TraceFileNameTRC.length -4) $TraceFileReader = New-Object Microsoft.SqlServer.Management.Trace.TraceFile $TraceFileReader.InitializeAsReader($TraceFilePathString) if ($TraceFileReader.Read()-eq $true) { while ($TraceFileReader.Read()) { $ObjectTrace = New-Object PSObject $ObjectTrace | add-member Noteproperty LineNumber $LineNumber $ObjectTrace | add-member Noteproperty TraceFile $TraceFileNameTRC $TotalFields = ($TraceFileReader.FieldCount) -1 for($Count = 0;$Count -le $TotalFields;$Count++) { $FieldName = $TraceFileReader.GetName($Count) $FieldValue = $TraceFileReader.GetValue($TraceFileReader.GetOrdinal($FieldName)) if ($FieldValue -eq $Null){ $FieldValue = ""} $ObjectTrace | add-member Noteproperty $FieldName $FieldValue } $FinalResult += $ObjectTrace $LineNumber ++ } if ($FileToTable) { try { $SQLConnection = New-Object Microsoft.SqlServer.Management.Common.SqlConnectionInfo $SQLConnection.ServerName = $ServerName $SQLConnection.DatabaseName = $DatabaseName $TraceFileWriter = New-Object Microsoft.SqlServer.Management.Trace.TraceTable $TraceFileReader.InitializeAsReader($TraceFilePathString) $TraceFileWriter.InitializeAsWriter($TraceFileReader,$SQLConnection,$TableName) while ( $TraceFileWriter.Write()) {} } Catch { $msg = $error[0] write-warning $msg } Finally { $TraceFileWriter.close() } } } } Catch { $msg = $error[0] write-warning $msg } Finally { $TraceFileReader.close() } } Write-Output $FinalResult } Catch { $msg = $error[0] write-warning $msg } Finally { $TraceFileReader.Dispose $TraceFileWriter.Dispose $SQLConnection.Dispose } } } |
You can download this script from the top of this article or from my SkyDrive. Now, let’s do some tests! I created a function module containing just this function and imported it into my powershell profile, just to make our test easier. So, to import this module, I type the following in my PowerShell profile:
|
1 |
Import-Module -Name C:\temp\Get-SQLProfiler.psm1 -WarningAction SilentlyContinue -ErrorAction Stop |
Reading One Trace File and not Insert into SQL table.
Let’s say we have a SQL Server profiler trace file at C:\Temp\ProfilerTraces\TSQL.trc which looks something like this:
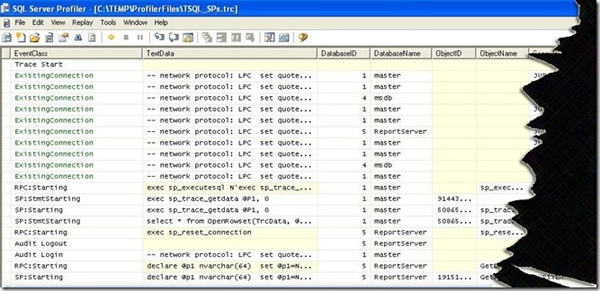
SQL Server trace file.
This file contains the events and columns of the SQL Server Profiler TSQL template, and if we execute:
|
1 |
Get-SQLProfiler "C:\TEMP\ProfilerFiles\TSQL.TRC" |
…we’ll get this result:
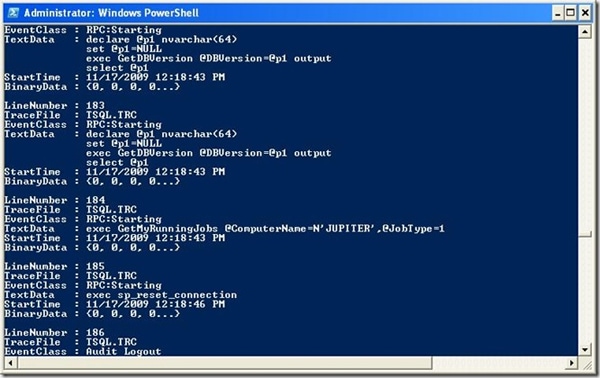
Figure 2. The sample trace file, processed by the Get-SQLProfiler function.
The LineNumber and TraceFile properties will be in each resulting object of this function, the former being (obviously) the line number, which increases incrementally, and the latter being the name of the trace. Remember, these properties match the columns in the trace file, even if I’m merging files with different columns and events.
Let’s see just the LineNumber, TraceFile, EventClass and TextData properties, filtering for just the lines smaller than or equal to 5:
|
1 |
Get-SQLProfiler "C:\TEMP\ProfilerFiles\TSQL.TRC" | where-object {$_.LineNumber -le 5} | select LineNumber, TraceFile ,EventClass ,TextData | format-table |
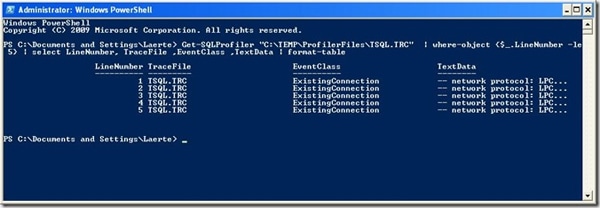
Figure 3. The trace file, filtered and displaying just a subset of properties.
Reading One Trace File and Insert into SQL table.
With the previous example, we’d have the same result if the $FiletoTable parameter was set to $true, but it would mean that we would now have a SQL Server table containing this data:
|
1 |
1: Get-SQLProfiler "C:\TEMP\ProfilerFiles\TSQL.TRC" $true | where-object {$_.LineNumber -le 5} | select LineNumber, TraceFile ,EventClass ,TextData | format-table |
As we’ve not specified the server and database, a warning message is displayed, informing us that the function is using default values:
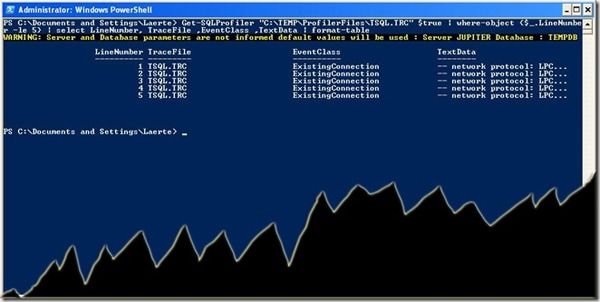
Figure 4. the Get-SQLProfiler function displays a warning when it is forced to use default values.
And the resulting SQL Server table will look something like this:
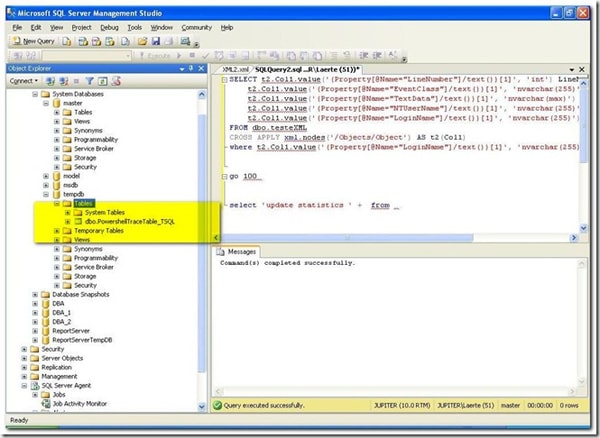
Figure 5. The SQL Server table created by Get-SQLProfiler, containing the requested data.
Reading Multiple Trace Files and Insert into SQL table.
Let’s say we have a SQL Server Profiler trace file rollover (like the one I described at the start of this post). If you want to merge your results, simply enter the path where the trace files are stored:
|
1 |
1: Get-SQLProfiler "C:\TEMP\ProfilerFiles\Rollover\*.TRC" $true | select LineNumber, TraceFile ,EventClass ,TextData | format-table |
And you can see in the figure below shows when the file being read changes:
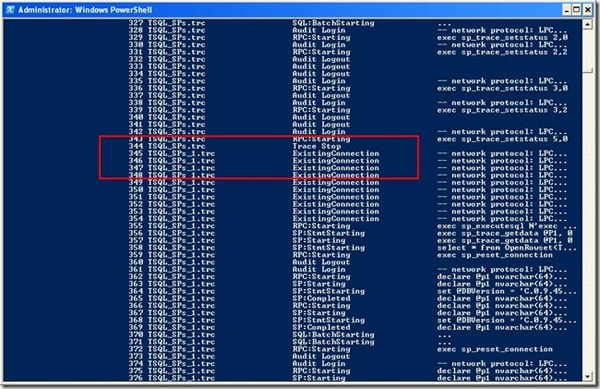
Figure 6. Reading multiple .trc files using Get-SQLProfiler.
As I mentioned, Get-SQLProfiler will created one SQL table for each trace file. However, if you want all the trace files placed in a single table, save the result of the cmdlet into an XML (or txt) file, which you can import soon after the invoke-sqlcmd. I have an example demonstrating this below.
Reading Multiple Trace Files With Different Events and Columns
We can also use Get-SQLProfiler to merge two trace files with different columns. In the example here, I merge the files TSQL_SP.trc and TSQL_Locks.trc.
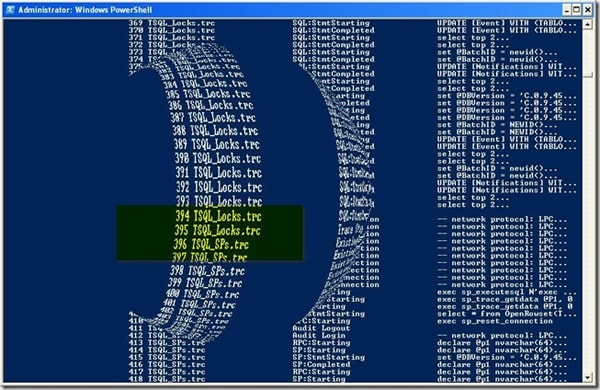
Figure 7. Merging files with different columns using Get-SQLProfiler.
Aha, I can hear you thinking:
“Well that’s all well and good Laerte, but if I merge multiples files with different setups, how can I now find the available properties using Get-SQLProfiler?”
Simple: apply a filter for a single row, such as linenumber = 1, because LINENUMBER and TRACEFILE will always be commonly available in Get-SQLProfiler:
|
1 |
1: Get-SQLProfiler "C:\TEMP\ProfilerFiles\Merge\*.TRC" | where-object {$_.LineNumber -le 1} | format-table |
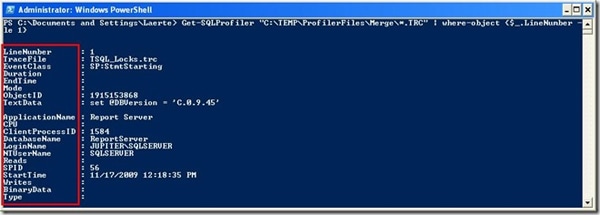
Figure 8: Determining which properties are representing in the merged data.
Now you just need to get the complete list, choose the fields you’re interested in, and specify them in the | select parameter. Remember that when merging multiple files with the $FiletoTable option set to $true, Get-SQLProfiler creates several tables, one for each file.
“But Laerte, I wanted to centralize everything into one file.“
I confess that I wanted to do this through a parameter when I first started writing this solution, and was intimidated by how much code I thought it would require. Yet, as I said, PowerShell can resolve this situation with just two more lines of code, and without having to bloat my function. First I create a table with an XML column; for my tests, I’ll put it in tempdb:
|
1 2 3 4 5 6 7 8 9 10 11 12 13 14 15 16 17 18 19 20 21 22 23 |
USE [tempdb] GO /****** Object: Table [dbo].[PowerShellProfileTable_XML] Script Date: 11/18/2009 02:27:39 ******/ If EXISTS (Select * FROM sys.objects WHERE Object_id = Object_ID(N'[dbo].[PowerShellProfileTable_XML]') And type In (N'U')) DROP TABLE [dbo].[PowerShellProfileTable_XML] GO USE [tempdb] GO /****** Object: Table [dbo].[PowerShellProfileTable_XML] Script Date: 11/18/2009 02:27:42 ******/ Set ANSI_NULLS On GO Set QUOTED_IDENTIFIER On GO CREATE TABLE [dbo].[PowerShellProfileTable_XML]( [XML] [xml] NULL ) On [PRIMARY] GO |
Now let’s get our PowerShell to work; we just save our merged output to XML (and we can still choose which properties we want to focus on), and then we can import the resulting file into SQL Server:
|
1 2 3 |
(Get-SQLProfiler "C:\TEMP\*.TRC" | Select LIneNumber,EventClass,TextData,NTUserName,LoginName | ConvertTo-Xml -NoTypeInformation).save("c:\temp\test.xml") $XML= "insert into PowerShellProfileTable_XML values ('" + ((Get-Content "C:\Temp\test.xml") -replace "'", "''") + "')" invoke-sqlcmd -ServerInstance $env:COMPUTERNAME -database "master" -query $xml |
Now, with a simple Xquery, we can list all of the data in the XML files:
|
1 2 3 4 5 6 7 8 |
Select t2.Col1.value('(Property[@Name="LineNumber"]/text())[1]', 'int') LineNumber, t2.Col1.value('(Property[@Name="EventClass"]/text())[1]', 'nvarchar(255)') EventClass, t2.Col1.value('(Property[@Name="TextData"]/text())[1]', 'nvarchar(max)') TextData, t2.Col1.value('(Property[@Name="NTUserName"]/text())[1]', 'nvarchar(255)') NtUserName, t2.Col1.value('(Property[@Name="LoginName"]/text())[1]', 'nvarchar(255)') LoginName FROM dbo.testeXML CROSS APPLY xml.nodes('/Objects/Object') As t2(Col1) where t2.Col1.value('(Property[@Name="LoginName"]/text())[1]', 'nvarchar(255)') Like '%laerte%' |
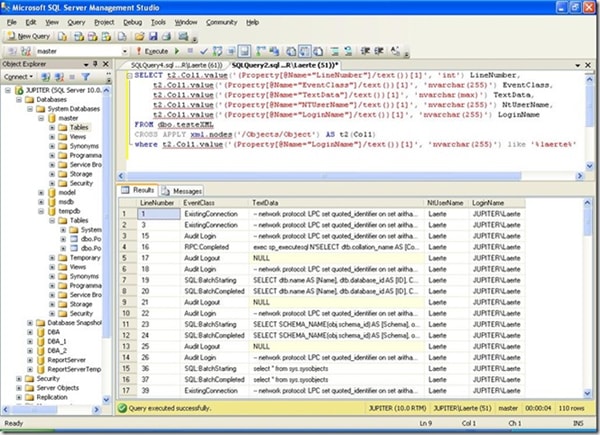
Figure 9. Querying the merged data of multiple trace files.
The beauty of this solution is that I don’t need to apply any more parameters to handle this, as the consistency characteristic of PowerShell does it all for me; I just need to pipe and save. Now we can read our trace files, save them to XML, filter them by any property, and then merge and import them into a SQL Table…and do so effortlessly.
However, being who I am, I’ve kept tinkering with module, and I’ll briefly walk through some of the final adjustments I’ve made for the (at the time of writing) latest version, which you can download at the top of this article.
The first change I made was to remove the parameters for Get-SQLProfiler to insert results into a SQL Server table, as I wanted to see if it was useful to only insert the data into one common table after applying filters (or manipulating the data any way you want). Remember, if you want to use different tables for each .TRC file, just use the fn_trace_gettable TSQL function.
So, now that I was filtering and manipulating my data before moving it into a table, I created another function, Save-InfoToSQLTable, to actually take care of the insert. So, with this latest version of the module, you can filter, sort, do essentially whatever you want to your data, and then insert your curated dataset into a SQL Server table.
Let’s see some examples of how this works:
Read All Traces found in C:\Profiler\Compras\ and filter for dbo.fc_pco_round_000 in TextData:
|
1 |
dir "c:\Profiler\Compras\*.trc" | Get-Sqlprofiler | Where-Object { $_.textdata -like '*dbo.fc_pco_round_000*' } |
Create the SQL Server table and save the filtered data into it (Table Name created by the function):
|
1 |
dir "c:\Profiler\BlockedProcess_210510_1.trc" | Get-Sqlprofiler | Where-Object { $_.textdata -like '*dbo.fc_pco_round_000*' and $_.reads -ge 100000 and $_.spid -eq 90} | Save-InfoToSQLTable -ServerName Vader -DatabaseName Testes -NewTable |
Create the SQL Server table and save the filtered data into it (Table Name specified via a parameter):
|
1 |
dir "c:\Profiler\BlockedProcess_210510_1.trc" | Get-Sqlprofiler | Save-InfoToSQLTable -ServerName Vader -DatabaseName Testes -newtable -TableName TestProfiler |
Saving the data into a SQL Server table which has already been created:
|
1 |
Get-Sqlprofiler -TraceFileName "c:\Profiler\compras\prf-compras_1.trc" | Save-InfoToSQLTable -ServerName Vader -DatabaseName Testes -TableName Teste |
Saving the data into a SQL Server table which has already been created with a UserName and Password:
|
1 |
Get-Sqlprofiler -TraceFileName "c:\Profiler\compras\prf-compras_1.trc" | Save-InfoToSQLTable -ServerName Vader -DatabaseName Testes -TableName Teste -Username UserName -PassWord YourPassword |
Before we finish, there are some considerations which you should bear in mind:
- This module only works with PowerShell X86.
- If you’re use large files, use I suggest you use T-SQL and the fn_trace_gettable function. In my tests, the T-SQL was superior in terms of upload speed.
I see use-case of this module as being a situation where you have small files (e.g. during a rollout) and want to filter by various conditions, such as seen in the example above. Once you’ve already filtered the data, you can save it for easy access at a later date.
Thanks to my friend Shay Levy who, as always, takes time to share his immense knowledge. Jeffrey Hicks too, who offered a lot of tips on mandatory parameters in functions, as well as my SQL Server Day buddy Felipe Ferreira for his XQuery advice, and obviously Chad Miller, the master of PowerShell with SQL Server.
This document contains proprietary information and is protected by copyright law.
Copyright © 2026 Red Gate Software Limited. All rights reserved


Load comments