
When you’re responsible for a domain of hundreds of workstations and other devices, you’re not likely to have much spare time, and so you’re unlikely to forget that printers tend to be the most time-consuming devices to administer.
We were in just that predicament: we had to install and share hundreds of printers. We had to manage settings, configure security, update the print-drivers and so on. At the time, we were using login scripts and many print servers. We just couldn’t afford to spend the time on all that work so we automated as much as we could. By using Group Policy and PowerShell plus the standardization provided by the Print Management MMC, printers can be almost fun to maintain!
In this guide, we will cover how you can use Group Policy to install, share, and manage printers. We will walk-through some tips about the advanced features that the Print Management MMC provides. Finally, we will detail how PowerShell can create printer connections, configure drivers, and manage security.
Group Policy and Printer Installation
There are a variety of ways to deploy a printer with Group Policy, and the most common choices are to use either Logon scripts, Group Policy Printer Connections or Group Policy Preferences. It is this last technology which packs the most power and is the simplest to use.
To prevent any security issues with driver installation, it is best to enable ‘Package, Point, and Print’ settings. Launch the ‘Group Policy Management Console’ (GPMC) and create a new ‘Group Policy Object’ (GPO) in which to store your printer deployments and settings. In this guide, my GPO will be named Domain Printers. Edit this GPO and navigate to ‘Computer Configuration/Policies/Administrative Templates/Printers‘. Enable ‘Point and Print Restrictions‘, enter your print server names, and set both drop down menus to ‘Do Not Show Warnings or Elevation Prompts‘.

Enable ‘Package Point and Print – Approved Servers‘ and enter the fully qualified domain name (FQDN) of your print servers. You will need one test printer installed on your print server. This can be a simple IP printer with any generic driver. For demonstrations, I will use a fake IP address and the HP Universal Print Driver. This will let you see the printer deployment in action if you don’t have a physical printer to play with.
With some planning on your part, Group Policy can also make it easier for your users to find the printers near them. Think about how each of your printers will be named. Will they be named by their location or by a department? Printers are named by their location in our organization. Each location has a dedicated organizational unit (OU) and a site-specific GPO linked to it.
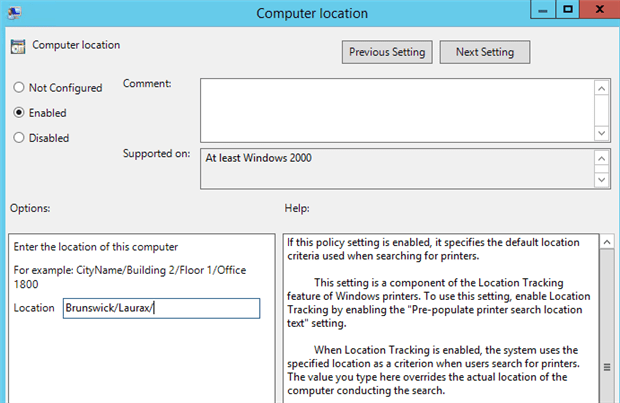
In each GPO, we enable Computer Configuration/Policies/Administrator Templates/Printers/Computer location and set a location (as seen in the screenshot above). Setting this setting allow your users to find printers based on their physical location.
How to Use Group Policy Printer Preferences
To use Group Policy Preferences (GPP) Printers, your domain will need to meet a few requirements. First, your client workstations should be running Windows 7 or higher. GPP Printers will work on XP and Vista but it requires several Client-Side Extension updates first. Group Policy is client-driven. Your domain controllers are irrelevant when using these Preferences. You will also need at least one print server with a few printers installed. Group Policy will pull any needed printer drivers from this server.
GPP Printers can be deployed as a computer or user connection. Computer connections, in most cases, should be your standard. They are faster to install and easier to manage. User connections are simpler to setup initially but they install for every new user that logs into a computer. This can significantly slow down your login times and frustrate end users. There are two snags to user connections.
- You need to ensure that particular printers are always set as the default print option
- You use printer queue management software to control end user printing
Because user connections are simpler, let’s start by deploying a user-side printer. Within your Printers GPO, navigate to User Configuration/Preferences/Control Panel Settings/Printers. Right click on Printers and select New – Shared Printer.
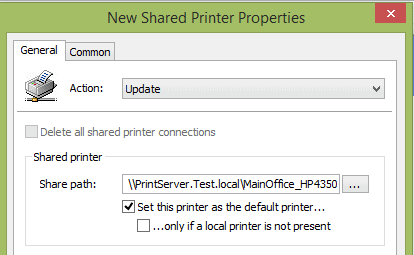
Ensure that the Action type is either ‘Update‘ or preferably ‘Create‘. This will ensure that the printer doesn’t reinstall on sequential logons for the same user. For your share path, enter the printer’s UNC. For example: \\PrintServer.Test.local\MainOffice_HP4350. If the printer should be the default printer, check that option now.
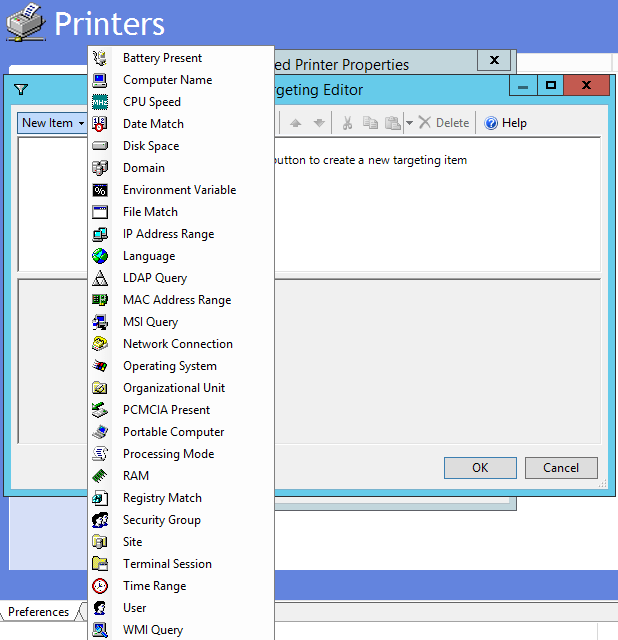
Currently, this printer will install for all users that the GPO is linked to. All but the smallest shops will find this deployment unacceptable. Like other Group Policy Preferences, we can use Item Level Targeting (ILT) to filter printer installations to certain objects.
Select the ‘Common‘ tab, check Item level Targeting, and choose the ‘Targeting‘ button. From here, we have to decide how our printer installation will be filtered. We can allow the installation for only certain Operating Systems, certain users, or even certain computer names. The two more common methods (and easiest to maintain) are Organizational Unit filters and Security Group filters.
Personally, I find filtering by security group easier than Organizational Unit. Because we have so many users, we clump them into large OUs and then divide them by security groups. Filtering by groups also allow you to restructure/rename OUs without breaking printer installations. In the Targeting Editor, I will add a new Security Filter and browse to my HR Department group.
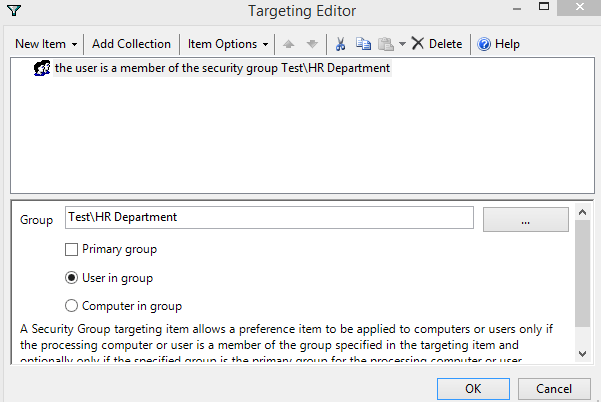
The configuration above will install a shared (user connection) printer for users in the HR Department security group. If we want to take advantage of faster and less intrusive installs, our printers will need to be setup as computer connections.
For now, select your user-side printer and press the Red ‘Stop‘ icon in the menu bar. This will disable this printer connection and prevent an accidental install. A disabled preference should be shaded out. Now navigate to Computer Configuration/Preferences/Control Panel Settings/Printers. Right click and select ‘New – TCP/IP Printer‘. Enter your printer’s IP address, a local printer name, and your printer path (which we used above).

Under common, add an ILT to filter this printer’s installation. I prefer to create a security group that is named after the printer and then adding computers directly to it. Finally, press ‘Ok‘ and right-click on your newly-created printer. Select ‘Rename‘ and use the Local Name value to name your printer preference. This method will make it easier to find printers and will help to standardize your preference-layout. Because this is a computer-side preference, you will need to link your GPO to an OU containing computers. After a reboot, the printer will install!
Using Print Management to Streamline Maintenance
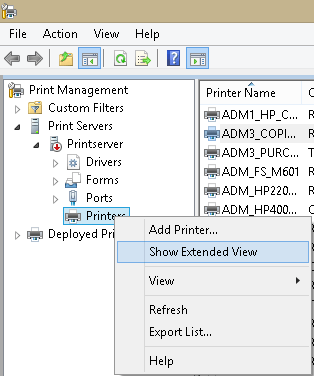
The Print Management MMC, in Windows 7 and above, will be your obvious resource for troubleshooting printer issues. After launching the MMC, right-click on ‘Print Servers‘ and select ‘Add/Remote Servers‘. Add any print server that you wish to manage. The next change that we will make allows for remote printer management in one console. For each server listed, right-click on the Printers container and select ‘Show Extended View‘.
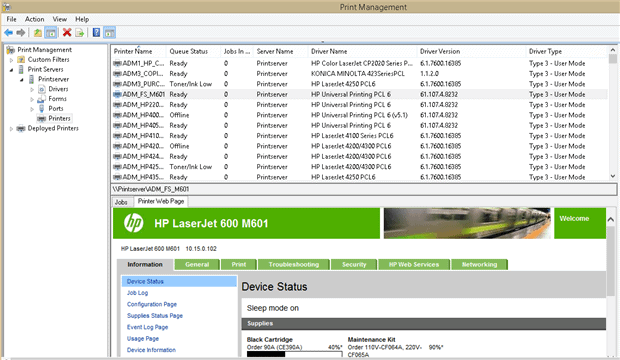
When you select a printer, you will notice two tabs in the bottom pane. The second tab will allow you to access your printer’s web-management portal within the Print Management MMC. You can change security settings, IPs, check error codes, and much more without launching a separate browser. The screenshot below shows the web portal within our MMC.
As your domain environment grows, you will likely need to start using Custom Filters. These can allow you to quickly view subsets of the installed printers or drivers. Your console will come with four built-in filters. These allow you to see a global view of all printers, drivers, devices with errors, and devices with queued jobs. You can create your own custom filters in Print Management by right-clicking on ‘Custom filters‘ and selecting the filter type that you need.
Remember when we mentioned printer locations above? Wouldn’t it be nice to be informed when a printer doesn’t have a location assigned to it so that we can create one? Let’s create a new printer filter to do this. Name your filter ‘Printers Missing Location‘ and check the ‘Display Total Numbers‘ box. Set the Field to ‘Location‘, the Condition to ‘Not Contains‘, and the value to ‘/‘
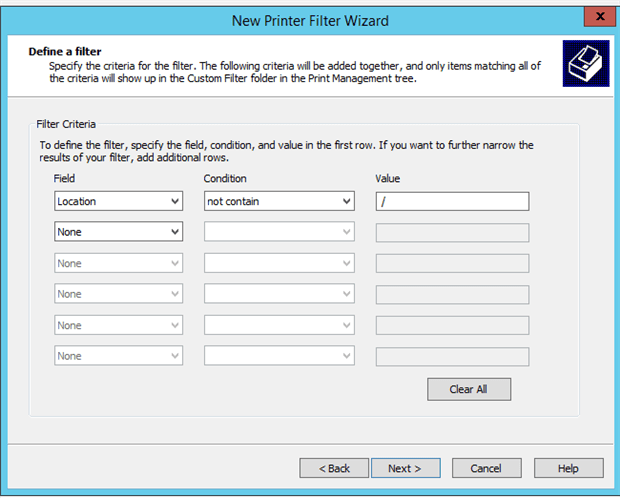
All printers with a proper location will have at least one forward slash set under their general properties. Printers without a location will show up in this filter. If desired, you can set notifications or actions for custom filters. For example, you could have an email sent to the helpdesk with certain printers go offline. Internally, we use this for our financial department printers.
Using PowerShell to Make Printer Installations Easier
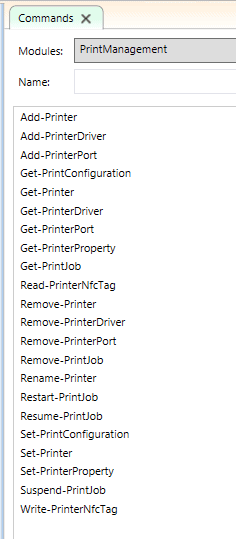
Any machine with the Print Management MMC also has access to the Print Management PowerShell module. You can do nearly everything in PowerShell that you can do in the Print Management GUI. Just take a look at the list of available cmdlets:
Whenever I start playing with a new module, I find it easier to start with the GET- cmdlets. Let’s run Get-Printer. If you want to target a remote print server, you can use the near universal parameter –ComputerName to query that machine.

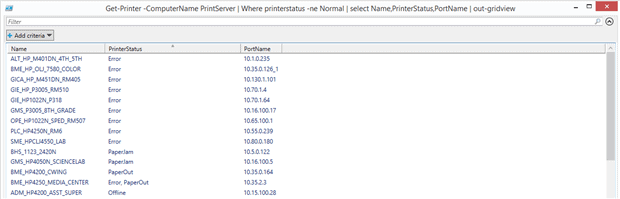
By piping Get-Printer to Get-Member, we can see the properties that are available for us to manipulate. Of particular interest is the PrinterStatus member. Let’s generate a list of printers that are not ready to print.
Get-Printer –ComputerName PrintServer | Where PrinterStatus -ne Normal | select Name,PrinterStatus,Portname | Out-GridView
 The Print Management module can also automate common changes. For example, driver/printer setting changes across multiple devices. In our environment, some printers fail to install because the local client is unable to locate a unique print processor. We can change the print processor manually by opening up the printer’s properties, selecting ‘advanced‘ and choosing ‘Print Processor‘.
Setting the print processor to the default WinPrint can also be done with PowerShell. By using the Get-Printer cmdlet and filtering for any printer with an incorrect print processor, we can generate a list of printers that require an update. We can then pipe that list to the Set-Printer cmdlet. It has a –PrintProcessor parameter. Our command would look like:
Get-Printer –ComputerName PrintServer | Where PrintProcessor -ne “WinPrint” | Set-Printer –ComputerName PrintServer –PrintProcessor WinPrint
When this script is set as a scheduled task, we no longer have to worry about printers with incorrect settings. This concept can be extended to ensure that locations are set, correct drivers are picked, etc. PowerShell eliminates the repetitive nature of printer management!
Managing Printers – The Easier Way
Group Policy, PowerShell, and the Print Management MMC have made managing printers so much easier! In this guide, we covered streamlined deployments of printer connections, automated ways to generate reports, and quicker methods to change printer settings.
This document contains proprietary information and is protected by copyright law.
Copyright © 2026 Red Gate Software Limited. All rights reserved
Load comments