
For many, computer viruses and malware are a way of life. You get infected, you clean it, you get infected (again), you clean it (again). Rest assured, this pattern can be broken – and broken with two built-in technologies. In our organization, we went from regularly having 50+ new viruses a day, to zero infections over a two year period. In this article, we are going to walk through User Account Control (UAC) and AppLocker, and best practices for implementing them. Let’s make life a little easier!
A Little UAC History
Remember when Windows Vista was released? Remember the backlash against the interface changes, driver support, and User Account Control (UAC)? It was pretty brutal! I will gladly admit (as I did then) that I really liked Vista. My favorite feature was easily UAC!
Imagine life before UAC. Every application, every process ran in the same security context as the logged in user. If you were an administrator, every process was running with the keys to your system. It didn’t matter if it was a background process (such as spooler or search) or a foreground process (such as Explorer or Notepad). Applications that only needed standard rights were always ran with maximum permissions.
Why is this bad though? Imagine that you have a new car. It has two speeds, 1 MPH and 150 MPH. Before UAC, you drove at 150 MPH and would crash. It was not a matter of if but when. With UAC, you are in charge of the speed controls.
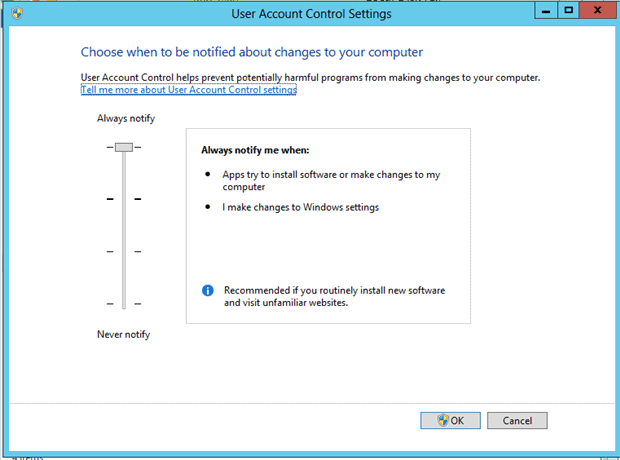
Managing UAC
By default, UAC is automatically enabled from Windows Vista and above. If your organization runs with UAC turned off, clearly identify why this was done. In the vast majority of cases that I’ve seen, UAC was initially turned off by an IT administrator. This setting was either set in a deployed custom image or was changed by Group Policy.
Before enabling UAC, you will want to establish a test group containing a sample of your environment. Next, you will need an accurate report of software used in your environment. If you do not have this information, you can download Microsoft’s Application Compatibility Toolkit (ACT). After deploying the ACT client, you will be able to see every software and driver installed in your environment. If desired, you can easily expand the scope to your entire organization. ACT will automatically color code your software inventory based on its compatibility.
For an application to be fully compatible with Windows 7 and Windows 8, it must not trigger UAC when regularly used. In other words, a standard user can use it. The three compatibility levels are green, yellow, and red. Any software marked as green can be excluded from your report as it is fully compatible (and has been externally tested to ensure this). Software that is coded yellow has potential problems. The normal cause of this warning is lack of information. You will want to run each application on a test computer with UAC turned on. If the application runs as expected, you can reclassify it as a green application. You will probably notice some yellow applications that have additional notes. These applications are known to work with UAC but may require some modifications. These modifications can include special file/registry permissions or an installed SHIM. Finally, you will have your red applications. These are programs with known issues. While they may not all be UAC related, it would be wise to address them now. You will want to upgrade, substitute, or discontinue these programs. In our environment, most red applications could be substituted for a similar compatible program. Now that you are able to run UAC without breaking existing processes, you will likely want a central way to manage it. To do this, we will use the Group Policy Management Console (GPMC), part of the Remote Server Administration Toolkit (RSAT).
Group Policy Management Console
In Group Policy Management Console, create a new Group Policy Object (GPO) name UAC Configuration. To simplify our environment, we are going to confine are UAC configuration to a single policy. There are ten specific ways that we can configure UAC. Each setting can be found at Computer Configuration/Windows Settings/Local Policies/Security Options.
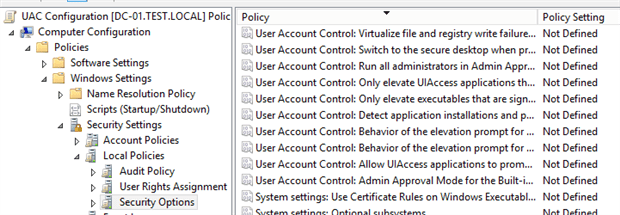
Regardless of your environment, you will want to consider enabling these options:
- Admin Approval Mode for the Built-In Administrator Account
- Behavior for the Elevation Prompt for Administrators: Prompt for Credentials on Secure Desktop
The first option is a must if you use the domain administrator account. It will enable UAC on your most critical account. The second option is incredibly useful for confirmation purposes. It requires a user to type their password before an application can be ran as an administrator.
If your environment is just enabling UAC, you will likely get negative feedback from users who previously had unrestricted access. Do them a favor and configure “Behavior of the elevation prompt for standard users” to automatically deny elevation requests. Instead of getting an angry call about IT blocking them from installing software, you’ll get a more polite call about an application that does nothing. Of course, you’ll know that UAC is secretly suppressing this install.
Managing AppLocker
“Another Site is Down”
It was September 18th and we were in our third day of fighting a virus outbreak. The total infected count had almost reached 1000 machines. Our current infected count was less than 20. What we didn’t know was that an infected domain laptop was connecting to one of our larger sites. In less than 5 minutes, 550 machines were infected. The entire site was down.
This was the paradigm shift for our organization. Management was finally convinced that something had to be done. We were given the go ahead to do whatever was necessary. Along with a complete restructuring on how permissions were delegated, we implemented AppLocker with whitelisting.
AppLocker with a Whitelist
With the release of Windows 7, Microsoft completely overhauled Software Restriction Policies with the introduction of AppLocker. If you have ever used Software Restriction Policies, you fully understand the inherit limitations. While it was easy to block or allow specific applications, creating global whitelists or global blacklists was nearly impossible. Further, these policies lack flexibility in who they applied to or how they were deployed. AppLocker, available in Windows 7/8 Enterprise, addressed these limitations and added some essential features.
What is so important about a Whitelist? With a traditional antivirus, malware is detected through definition files. Malicious software is caught when it is known or when it behaves a certain way, so blacklists are always limited because malware constantly changes. In terms of security, the real power of AppLocker rests in the ability to create a whitelist. A whitelist comprises of known trusted software. Anything not on the whitelist is not allowed to run. Suddenly, you no longer have to worry about updating definitions or the latest threat!
Setting Up AppLocker
Once again, we are going to turn to Group Policy. Create a new Group Policy Object (GPO) named AppLocker Configuration. We will store our domain’s general AppLocker settings in this GPO. Be sure that this GPO is not linked to an Organizational Unit (OU) at this time. Edit the GPO and navigate to Computer Configuration/Windows Settings/Security Settings/System Services. Select the Application Identity service and set it to Automatic.
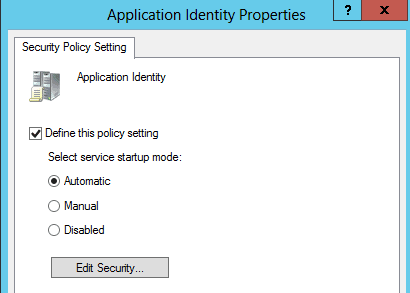
Enabling the AppLocker Service
If you are not on a Server OS (2008 R2+) or an Enterprise Client OS, you won’t see this service. After enabling the service, navigate down to the Application Control Policies node and expand AppLocker.
The OS you edit the GPO from will determine what AppLocker can control. If possible, edit this GPO from a Windows 8/Server 2012 machine in order to get the most out of AppLocker. With AppLocker, we can control four types of programs: executables (.exe, .com); a variety of scripts (.bat, .cmd, .js, .ps1, .vbs); DLLs files (optional); and MSIs (and MSPs). For right now, we are only concerned with executables and scripts as they comprise the bulk of threats.
Our first step is to configure how AppLocker will run. If you haven’t, select the main AppLocker node. Next, select Configure Rule Enforcement. We are going to select the enforcement options for Executables and Scripts. Because this is a test environment, we are going to leave Enforce Rules as the default method. If this was a production environment and if you were unsure if any applications are used outside the default rule locations, you would want to change this to Audit Only.
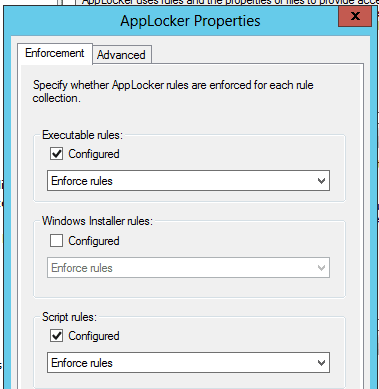
AppLocker Enforcement Properties
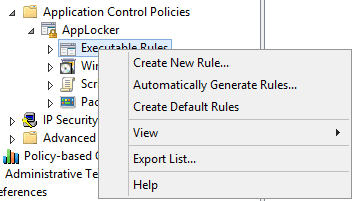
Our next step is to configure our default (white list rules). Select the Executable Rules node – right click and choose Create Default Rules.
You should now have three new rules. Before continuing, select the Scripts Rules node and generate the default rules for that node as well.

The default AppLocker rules for Executables
Notice that the Condition column for each rule specifies “Path”. Let’s break down a rule. Take the default rule “All files located in the Program Files folder”. The rule literally states “Allow Everyone to Run Any Executable (.EXE/.COM) that has a location of C:\Program Files\* (and if needed, C:\Program Files (x86)\*). When your environment deploys software centrally, you can see how simple AppLocker is to maintain.
Let’s say that you have a legacy software that installs to the root of a drive (C:\). With AppLocker enabled, it obviously will not be allowed to run. With just the default rules, the legacy application does exist in C:\Windows\* or C:\Program Files\*. For these unique applications, we will need to create a specific application rule.
Creating a new rule
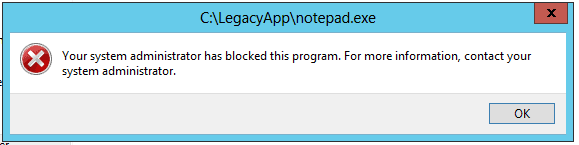
Creating a new rule is easy. As an example, we are going to create a new folder in root of C:\. We will then copy notepad.exe to this folder and use it as our legacy application. Once we have linked our GPO and restarted our test machine, we can log in as a standard user to test AppLocker. When you try to launch the legacy application, you should receive this error message:
Now that we’ve verified that AppLocker is doing its job, let’s create an exception for the legacy app. Right click on Executable Rules and select Automatically Generate Rules. While you can manually create rules by selecting Create New Rule, rules create automatically will always adhere to Microsoft’s best practices.

Selecting Automatically Generate Rules will launch a Rule wizard, in the wizard change the browse location to the LegacyApp folder and select Next. You can now choose the rule type. Rules can be one of three types: Certificate, Hash, or Path rule. When creating a rule, you should always try to create a digitally signed (certificate) rule first. If the files are not signed, you will have to choose between a hash or path rule. You will generally choose a hash rule if the executable is rarely updated. Because a hash rule only applies to a very specific version of a file, updating a program will require you to also update the hash rule. A path rule is your final option. It should normally be a last resort and should never apply in a folder where a standard user can write to.
Knowing the rule types, we can select the default rule type in the Rule wizard. We can then press Next and finally create our rule.

Your executable rule list should now list your new rule. After running a Group Policy Update on our test machine, our legacy application will now run.

Conclusion
AppLocker is an incredibly powerful security tool. By implicitly denying all untrusted applications, you can secure your organization against the unknown. When paired with User Account Control, users are unable to install or execute malicious (or just unwanted) applications. If you haven’t, begin rolling out (or tightening) both of these technologies. I assure you, it will make your IT life much easier!
This document contains proprietary information and is protected by copyright law.
Copyright © 2026 Red Gate Software Limited. All rights reserved
Load comments