
The series so far:
Git is a shell of code hosted in an operating system and capable of processing commands to track and version the content of a tree of directories. Git can work on a single machine under the control of a single user, but it is designed to connect multiple instances running on physically distant machines. More, any repository being tracked locally can be connected to a remote repository. Data can be transferred between local and remote repositories using the set of commands made aptly available.
Git was born to track and version source code files, but by no means it is limited to text files written in some programming language. Although managing the codebase of one software project is the most common use case, nothing stops you from using Git to manage the various stages of a book project or a graphic work. As long as your work creates and updates digital files, Git is here to help.
In this article, you’ll play with the basic Git commands and see how to use them to track and version the constituent files of a sample project. The article focuses on the command-line interface because it’s the quickest way to get a firm grasp of the Git workflow.
Initializing a Repository
Once installed on a computer, Git can be used interchangeably through a number of programming interfaces, including Git Bash and Git GUI. On the Windows platform, you can also have two more options to choose: Git CMD and PowerShell. Git Bash is the native command-line interface of Git whereas Git GUI is a visual shell capable of the same basic operations. To launch it, just type git gui in a command window.
When you run Git GUI on a non-monitored directory, it shows the main menu: creating a new repository, cloning, or just opening an existing repository.
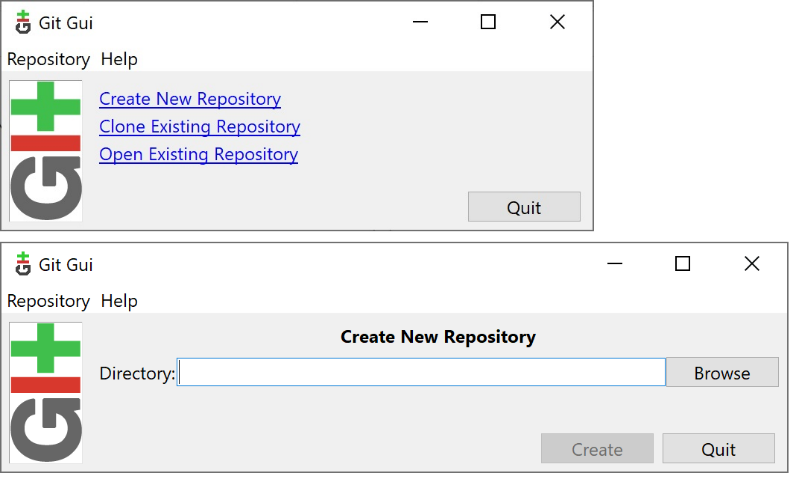
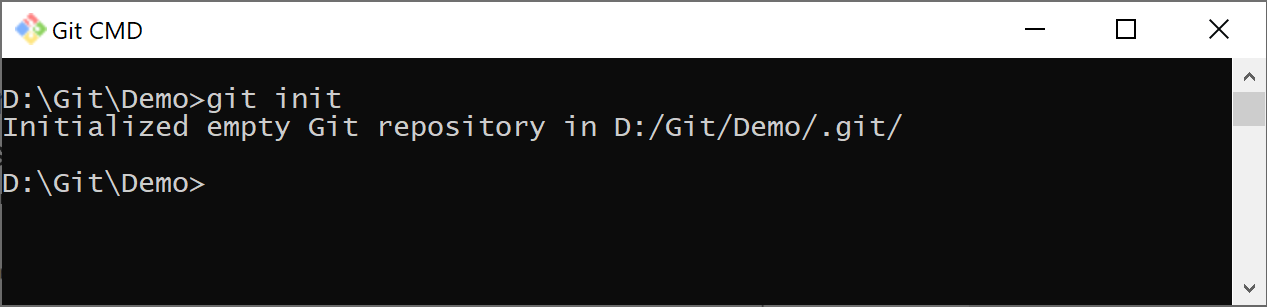
To create a new repository, you need to enter the path to the directory. If you want to do it from the command line, then the command to type in is the following:
|
1 |
git init |
Here’s how the system would handle it in Git CMD—the dedicated Windows console shell for Git.
The net effect of creating a new Git repository on a file system directory is the creation of a hidden .git subfolder where several configuration files are stored telling the runtime how to deal with what happens within the boundaries of the subtree. In Windows, to snoop into the hidden .git folder, you turn on the Hidden Files view in Windows Explorer and head to the folder. Here’s what you see.
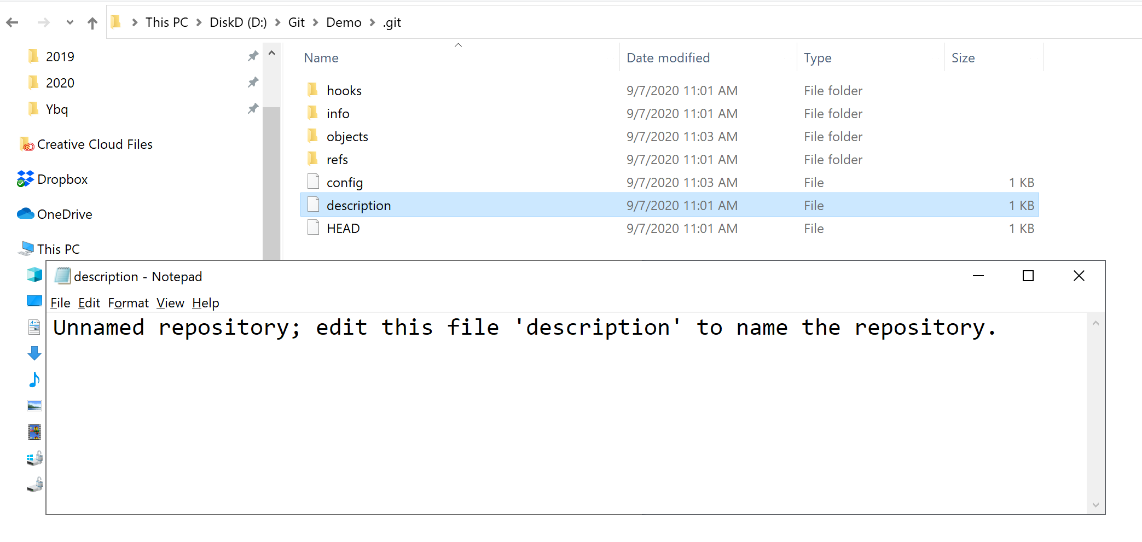
A number of files and subfolders contain all that’s needed to run the Git monitor on the content. In particular, the file named description contains the public name of the repository. You can edit its content through a text editor to give it a meaningful description. The HEAD file you can see in the figure is also worth some remarks. The contents of the HEAD file refer to the current state of the files that you have in the local repository. It’s a pointer to the copy of the files you’re currently working with and the next you’ll save back to the repository.
There are a couple of terms frequently used when explaining the purpose of the HEAD file: one is commit, and the other is checkout. With the term commit, one refers to the state of the stored files at a given time, when the git commit command (namely, a save-changes command) was issued. HEAD is, therefore, a pointer to the latest version of the files. With the term checkout, instead, one refers to the action of switching between different versions of a Git entity such as individual files, entire commits, or branches. When created, a branch is a fork of the current committed state.
In a freshly created and empty repository, the HEAD file contains the following:
|
1 |
ref: refs/heads/master |
It reads like the HEAD references the file refs/heads/master, which is expected to contain the unique identifier (hash) of the most recent commit on the primary (master) branch. In an empty repository, the master file in the refs/heads directory doesn’t just exist.
Now learn how it changes when adding some content to the repository.
Populating a Repository
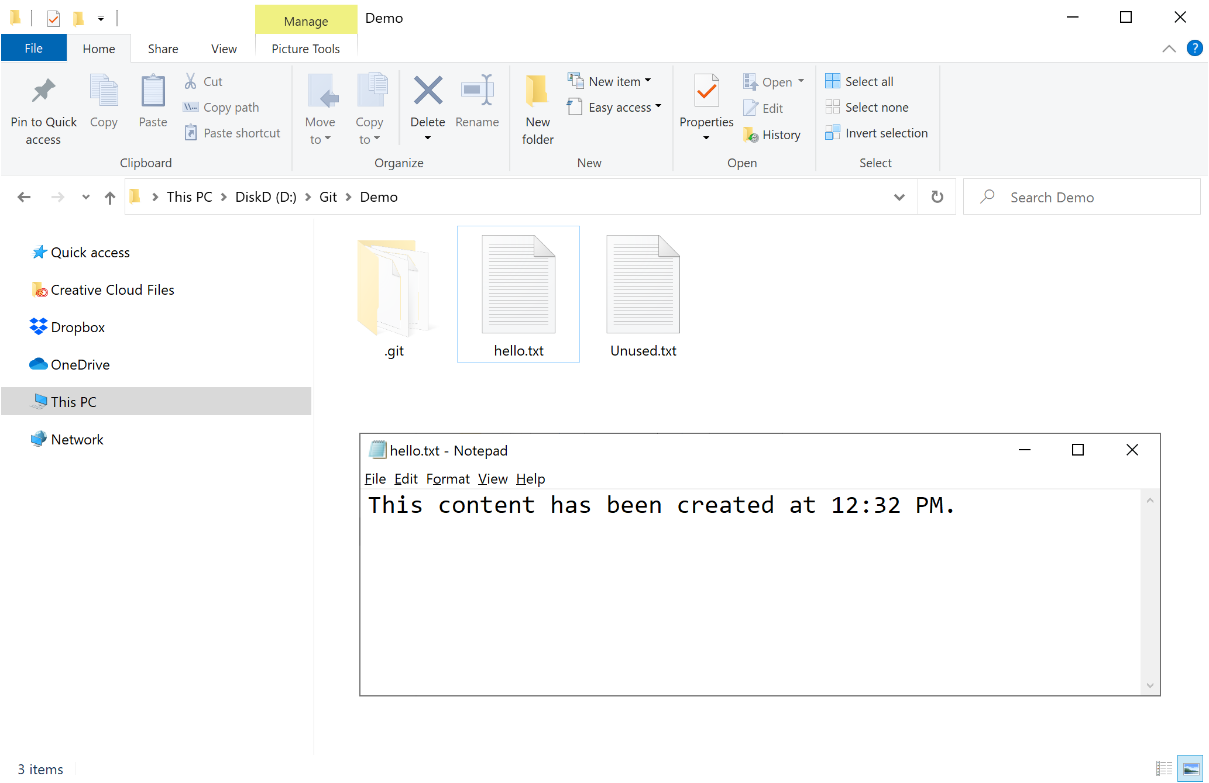
Create a text file in the monitored folder, say hello.txt, and give it some default content such as the timestamp to easily track it back. If you open Git GUI on the sample folder, you should see what’s in the figure.
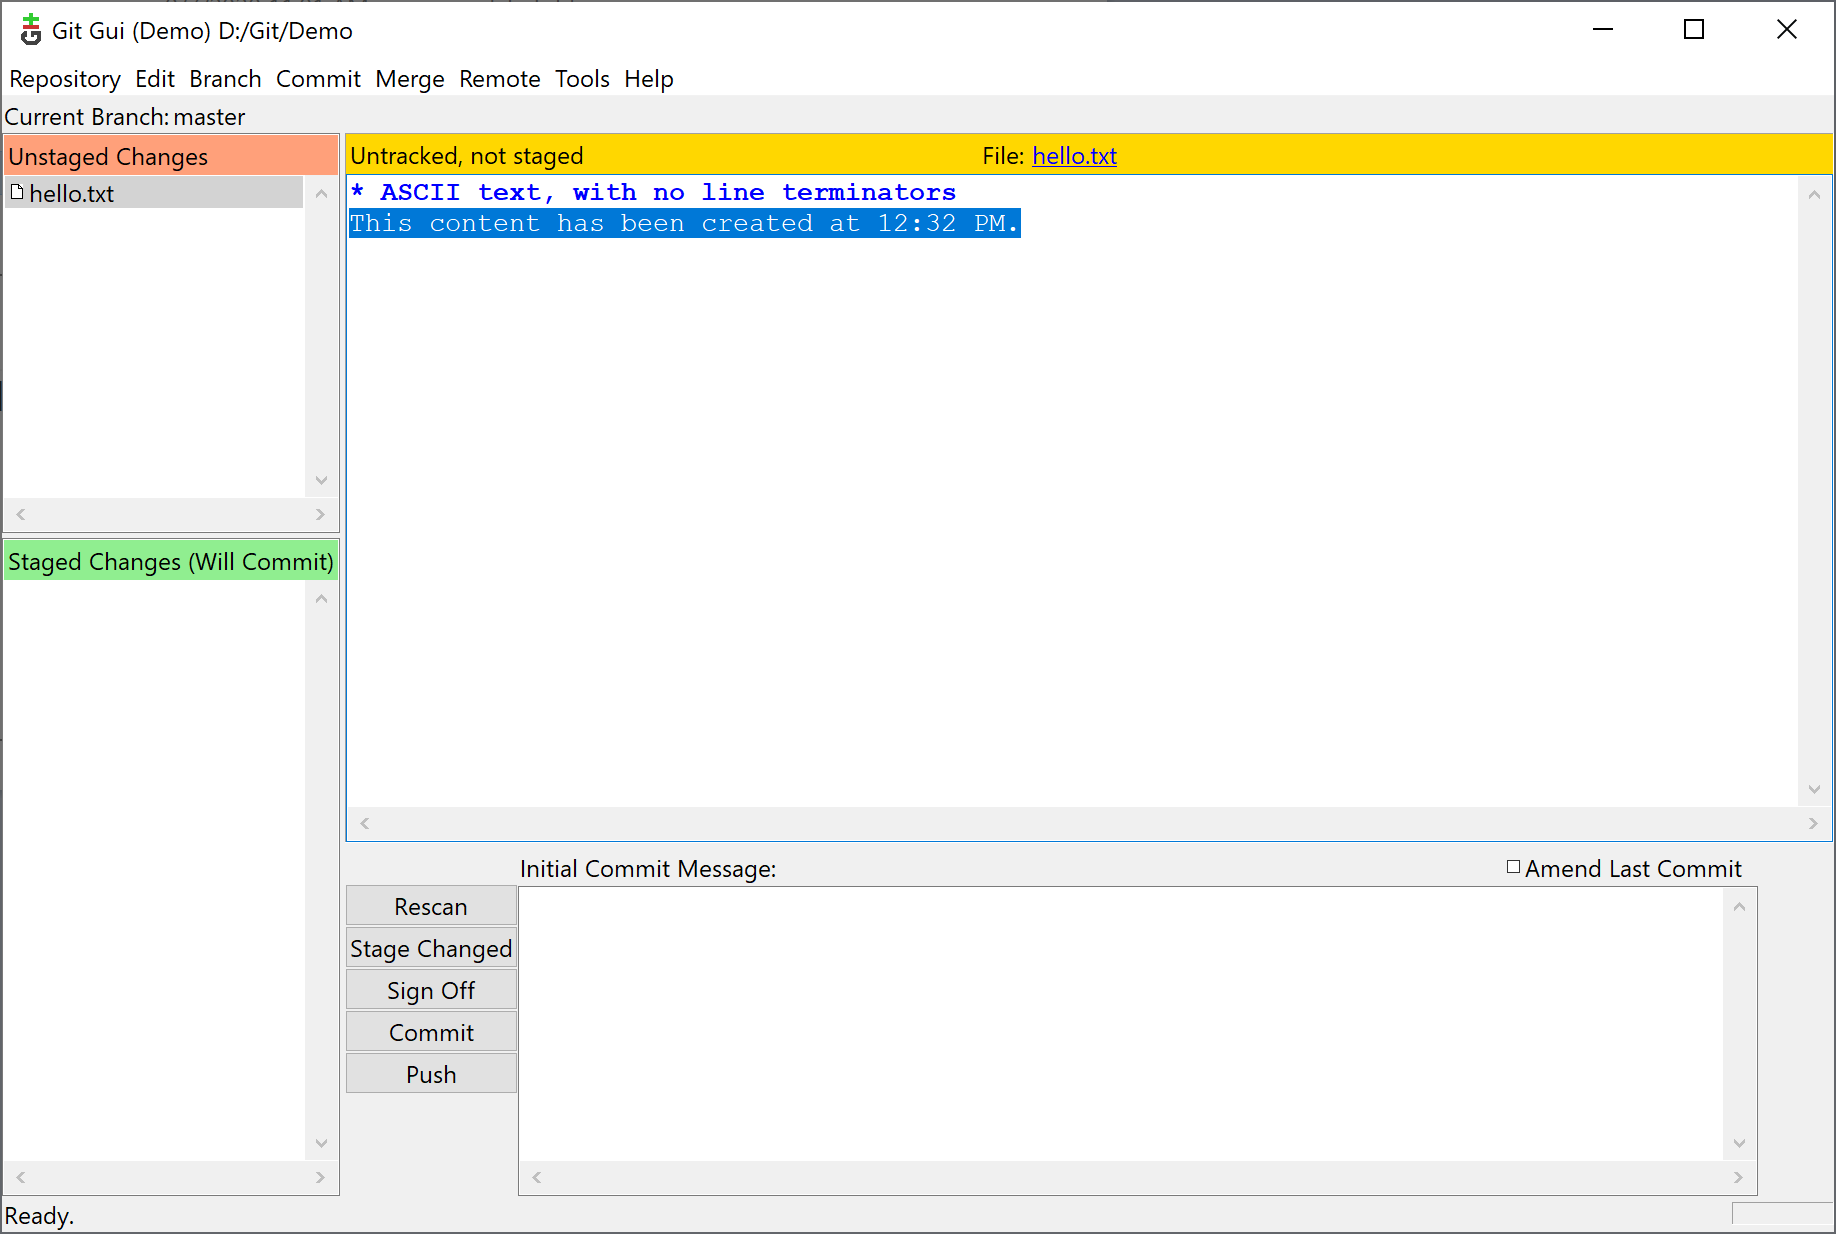
On the left side of the window, you see two docked lists showing unstaged and staged changes. Unstaged changes refer to files in the folder that are detected as new or modified but have not yet been added to the list of changes you intend to commit at some point in time. The content you commit is any content you may possibly switch back in the future or may use as the starting point for new and independent lines of development (branches). As an author, if you know that the current stage of the hello.txt file is destined to change because, in some way transitory or incomplete, you keep it in the unstaged list. On the other hand, if you believe that the file will need to make it to the next commit, then you add it to the stage list. You can keep editing it, but next time you commit the state of the file will be permanently saved and identified with a unique hash.
To move the file to the list of staged changes from the command line, you use the command:
|
1 |
git add hello.txt |
You can also click Stage changed in the git GUI app.
To remove a file from the list of pending changes to be committed later, you use the command:
|
1 |
git reset hello.txt |
When issuing the git reset command if you don’t specify the name of the file then all pending changes are removed from the list of staged changes. Once you commit pending changes that have been stage, use the git commit command to perform the commit. You’ll also have to supply a commit message for each commit
|
1 |
git commit hello.txt -m"Initial commit" |
The git log command will let you inspect the history of the repository.
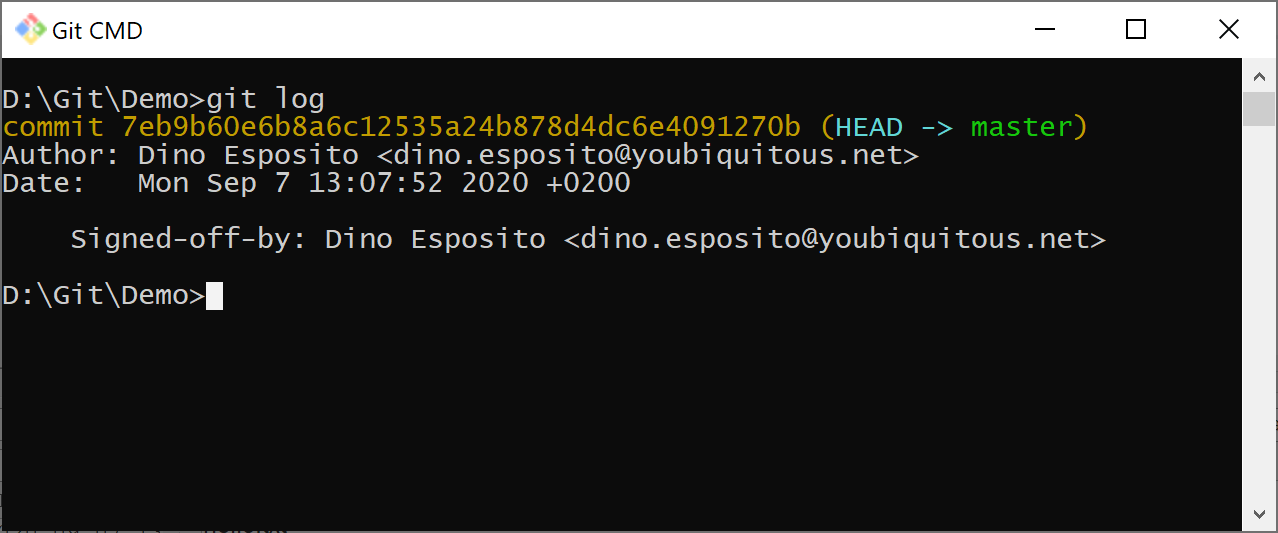
Each commit is given a unique identifier that unambiguously references the chunk of changes being made. The log command has many flavors, the most relevant of which as summarized below.
|
git log |
Displays the entire history of the repository |
|
git log -n N |
Displays last N commits |
|
git log –oneline |
Displays the entire history of the repository in a compact way, only one line per commit |
|
git log –stat |
Displays also which files were altered and the relative number of lines that were added or deleted |
|
git log –author=pattern |
Displays the commits by a given author |
Now see what happens when another change is made to the same hello.txt file. The Git GUI application now displays the following. Note that you may have to click Rescan to see the changes.
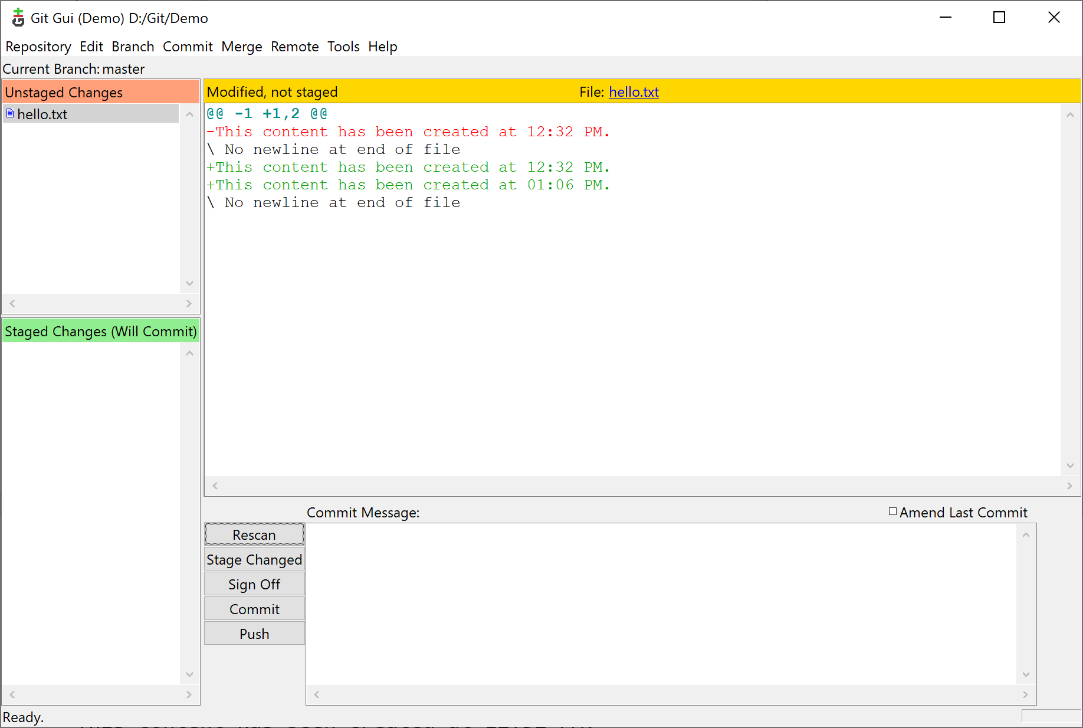
The unstaged change is described as the removal of the line below.

And the addition of the following lines:

After moving changes to the staging area and placing a commit command you get the following log.
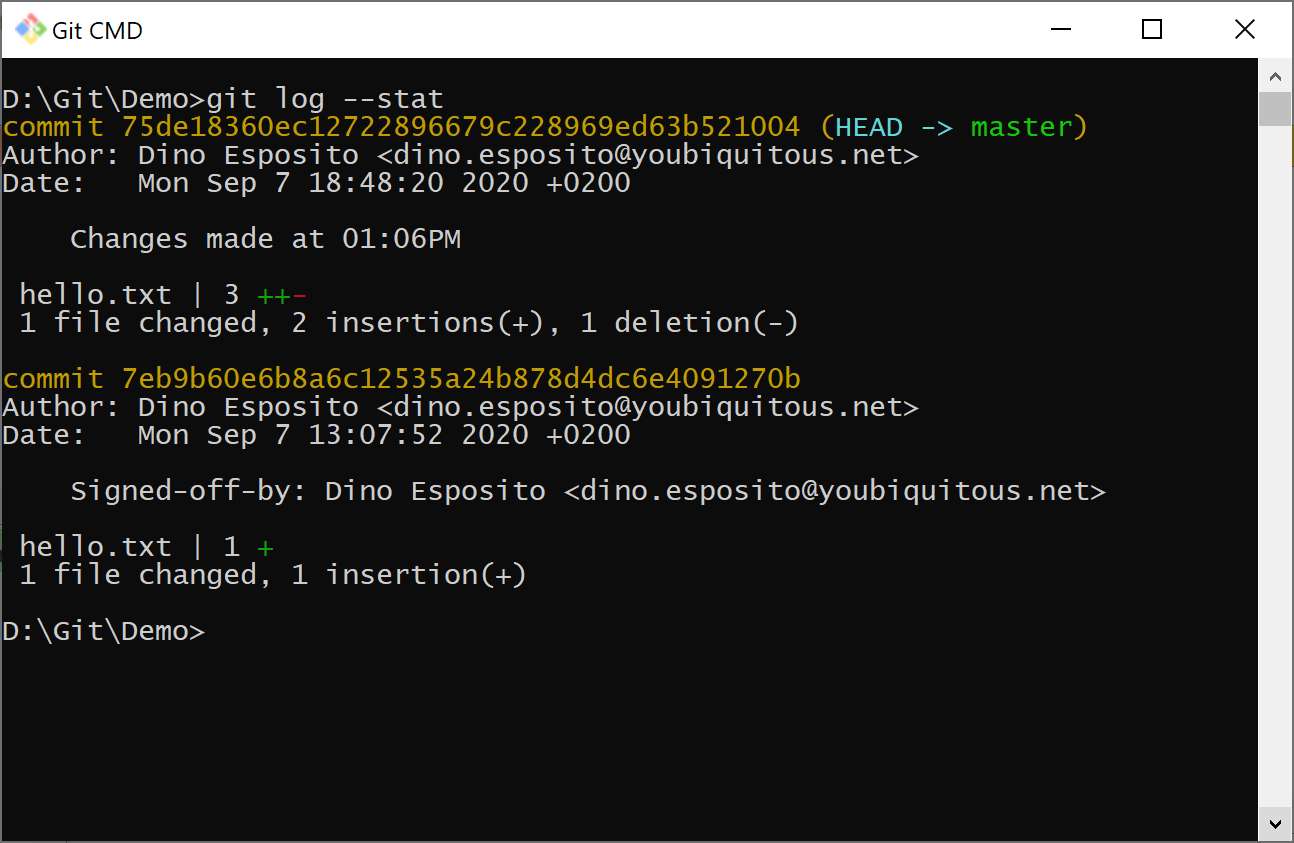
The log shows the two commits that have occurred, each identified by its unique GUID. The head of the repository points to the master (primary) branch. The last commit is labeled as “Changed made at 01:06PM” which was the text of the commit message. The notes of the latest commit also indicate that one file was changed because some content was inserted.
When it comes to inspecting the content of a repository, you might also want to look into the git status command. The command represents the state of the directory and the staging area with pending changes. The output shows which changes have been slated for commit and which have not. It also shows which files in the working folder are not currently tracked by Git. Note that the output of the status command does not include any information about the historical sequence of commits.
Selecting Files to Track
By default, all files created in a Git-tracked subtree are subject to the action of the tool. It doesn’t mean, however, that you can’t cherry-pick some files and tell Git to ignore them when performing a commit. A text file named .gitignore, placed in the root directory of the repository, instructs the Git engine about files and folders to ignore during a commit. Note that the .gitignore file does not affect files already in the repository. Each line of the .gitignore file defines a pattern for files to ignore. Usually, the file affects a single repository. However, you can also define global ignore rules, for all repositories on a machine, as below:
|
1 |
git config --global core.excludesfile ~/.gitignore_global |
The ignore file itself is treated as a file in the repository, and you might want to commit it if you intend to share the ignore rules with anybody who may happen to clone your repository later.
The content of a .gitignore file is critical. Here’s a very basic example of what you can put it in it. In brief, it contains a list of wildcard paths and patterns for locating the files in the subtree to ignore.
|
1 2 |
# Ignore all files whose name matches "unused" unused.* |
Any line that begins with # is treated as a comment and ignored. You can find several predefined and validated examples of ignore files at https://github.com/github/gitignore and can create a starter ignore file for a given operating system, IDE or programming language visiting the https://www.toptal.com/developers/gitignore.io web site.
As mentioned, all files already checked in at the time the ignore rules are defined are unaffected. In this case, you must untrack them from Git. Here’s the command you need:
|
1 |
git rm --cached filename |
Ignore rules are not the only way to select which files will be considered for the commit and which not. Another substantially equivalent mechanism passes through the use of the exclude file. When a Git repository is created, a text file named exclude is automatically created in the .git/info folder. Its content is equivalent to .gitignore and follows the same syntax rules. The difference between ignore and exclude rules is that ignore rules are devised to be shared among project members having access to the repository, whether remote or cloned. Exclude rules remain local to the repository and are meant to be mostly personal rules.
Going to a Specific Revision
The crucial benefit of Git is that it keeps track for you of multiple revisions of the same files. From the command line, the git log command lets you see the list of revisions, each identified by a hash code. How would you access a specific revision of the project that was created a while back? You use the checkout command with the hash code of the commit.
|
1 |
git checkout hashcode |
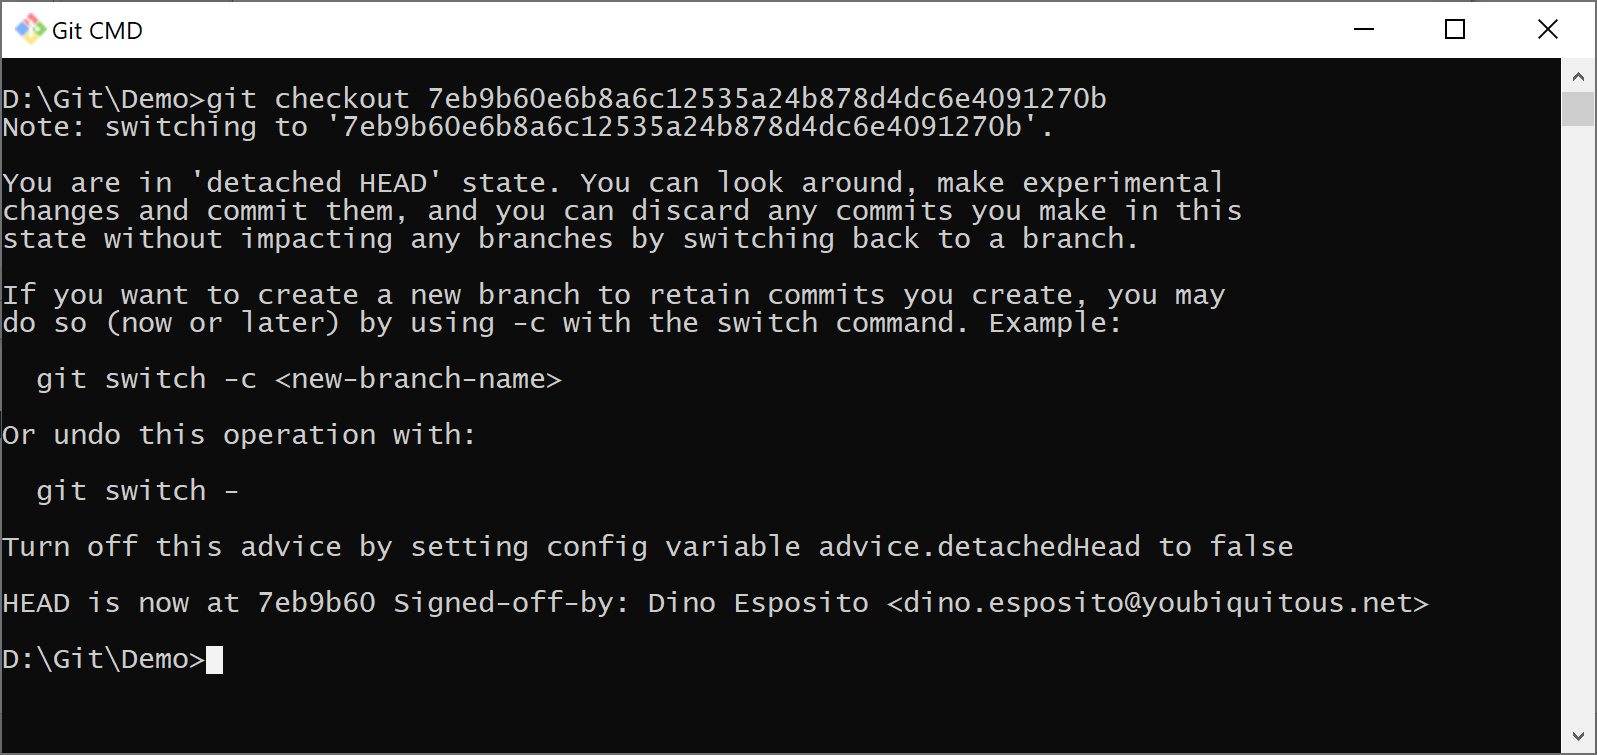
When running the git log command, you see the hash code 7eb9b60… referencing the first sample commit where the hello.txt file contained only one line of text.

Here’s the command to switch the repository back to on older state and gain access to the files in the repository at the time of the given commit.
|
1 |
git checkout 7eb9b60e6b8a6c12535a24b878d4dc6e4091270b |
Here’s the output.
The Windows folder now shows a hello.txt file and no other tracked file like .gitignore. In the figure below, you see the unused.txt file because it’s marked to be ignored by Git. The content of the hello.txt is the expected old one.
When Git receives the checkout command, it then places all files in the specified revision in the working folder. In this case, it just replaced the latest hello.txt with an older version of it. What you do next depends on the reason that led you to check out an older version of the project. If you want to save a copy of the files, all you do is copy the file to a different folder and go. The new folder is disconnected from Git (or it could even be a new distinct Git repository) and can be managed as appropriate.
However, when you checkout an older commit the state of repository changes, as the output of the command shows.
|
1 |
git checkout 9605a5c08 |

After the checkout of a commit, the repository is in a detached HEAD state. The detached HEAD state is legitimate but potentially dangerous. The reason is that when you checkout a specific commit from a repository, the HEAD pointer—namely, the reference to the current working revision in the repository, is not updated. This means that the files in the working area of the repository and the pointer are no longer in sync. Is this a problem? Well, the moment you edit any of the checked-out files and force to commit changes back, these changes won’t belong to any revision and will likely be lost if you later check out another revision. In other words, commits out of a detached HEAD state are not tracked and can hardly be retrieved later. The only way to check them outat a later time is by remembering the exact hash code—a GUID—of the latest commit. Here’s an example:
|
1 |
git checkout 4505ddc08 |
To revert to the master repository that you left when checked out an earlier commit, use the command below. Note though that the command switches back the HEAD pointer to master and loses all of the intermediate changes on the older commit.
|
1 |
git checkout master |
To avoid the detached HEAD issue entirely, you should use another key concept of Git—the branch. The branch is an independent and fully supported line of development of the project. It has a name and can be created upon checkout. Branching is a crucial topic, though, and deserves its own space to be appropriately described. I’ll get into that in the next article.
Summary
In the end, the Git workflow is straightforward. You initialize a repository on an existing folder, you work on it creating and editing files, track files you’re interested, and commit changes. Any committed change represents the snapshot of the project you want to preserve, or return to, later. To switch back to a previous version and to inspect the status of the repository, you have other dedicated commands. This is the essence of Git and to perform all these actions, you can count on a number of visual and command-line tools. In the next article of this series, I’ll focus on a few more specific and advanced Git commands such as branch, stash and merge.
This document contains proprietary information and is protected by copyright law.
Copyright © 2026 Red Gate Software Limited. All rights reserved
Load comments