
We DBAs tend to make a meal out of provisioning SQL Server instances. We just aren’t used to the idea of being able to get a SQL Server instance up and running without a lengthy setup and the installation of all those prerequisites. However, our Ops friends, especially the Linux people, just smile and shake their heads when they see us staring at the SQL Server installation screens. They save a lot of time by using Docker. We can do the same thing, using PowerShell to script the process.
Why is it now so important to be able to provision instances so quickly? It is because it makes for a more reliable release of software if the tests and experiments that are done in dev, test and CI/CD systems are maintained in separate isolated instances to be sure of avoiding the consequences of something breaking an instance. With Docker, you can start as many fresh clean instances of SQL Server on a host as you need just by running docker run. When you are finished with them, you can tear them back down again without any messy residuals. This is where it is most useful to have SQL Server in its own container.
You can run SQL Server in a Linux environment using a Linux Docker, using Docker Enterprise Edition to run a supported version of SQL Server in Linux in containers. You can also run SQL Server in Windows Docker on Windows 10 or Windows server 2016. It’s also possible to run SQL Server in Docker on a Mac!
Docker Overview
So, what is Docker? Docker is an open-source platform, written in Go, which is a high-performance language from Google. Go gives Docker extreme portability because the compiled application doesn’t rely on external dependencies.
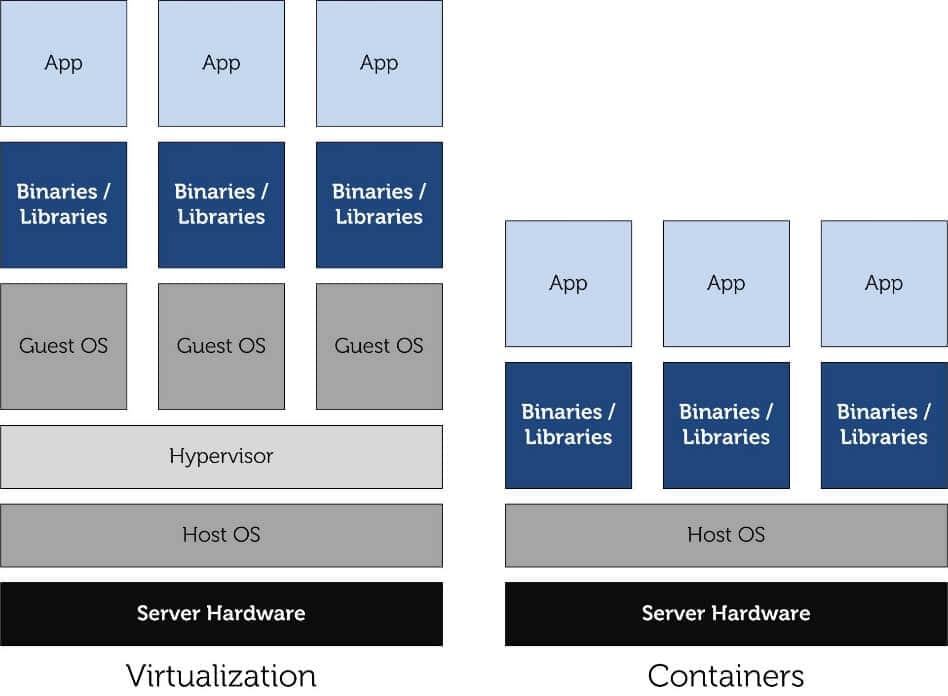
Docker allows administration in isolated systems. Docker is not a virtualization engine, because it uses common Kernel Libraries (host and container) resources rather than having its own isolated resources. In virtualization, we have the full Operating system, and in Docker we have only the Kernel Libraries – in Windows Nano Server
Because most of us SQL Server DBAs are more comfortable with Windows, we will want to take advantage of the fact that we can run SQL Server in a Docker container on Windows Server and Windows 10. As it is Windows, we can script it all out in PowerShell. Here, I’ll be showing how to do it using an Azure Virtual Machine running Windows Server 2016, PowerShell, and Docker. The script will work without the virtual machine if you prefer to do it that way.
Before you start, create your machine, virtual or not, install Windows Server 2016 and then follow the PowerShell code step by step in Admin mode (‘Run as Adminstrator’)
Setting up Docker
At the time of this writing, Docker have made two versions of Docker for Windows available. For Windows 10, use the Docker Community Edition. Since this article is about using Windows Server 2016, you will install the Docker Enterprise Edition for Windows Server if you care to follow along.
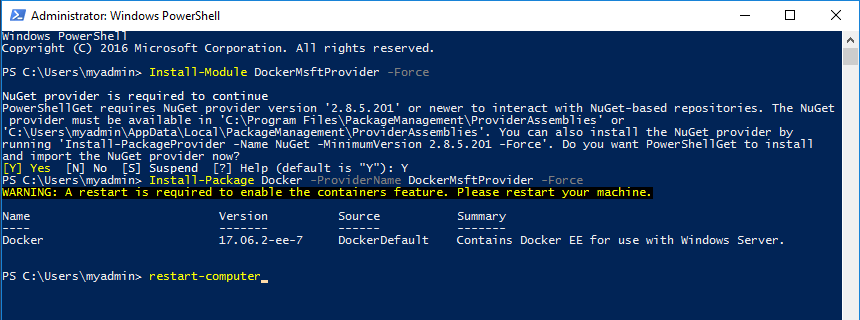
Start up a PowerShell command window running as an administrator and run the following commands to download and install the latest version of Docker:
|
1 2 |
Install-Module DockerMsftProvider -Force Install-Package Docker -ProviderName DockerMsftProvider -Force |
If prompted to install any prerequisites such as NuGet, type in Y and restart once the installation is complete.
Testing your Docker Install
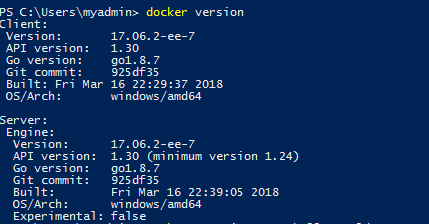
Check the Docker version by running this command:
|
1 |
Docker version |
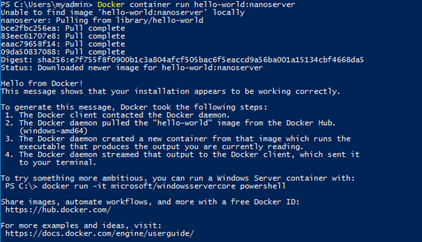
Then you can test out Docker by downloading a container that they have for that purpose called hello-world:nanoserver.
|
1 |
Docker container run hello-world:nanoserver |
Docker checks first to see whether the image is already there. If not, it downloads it and runs it.
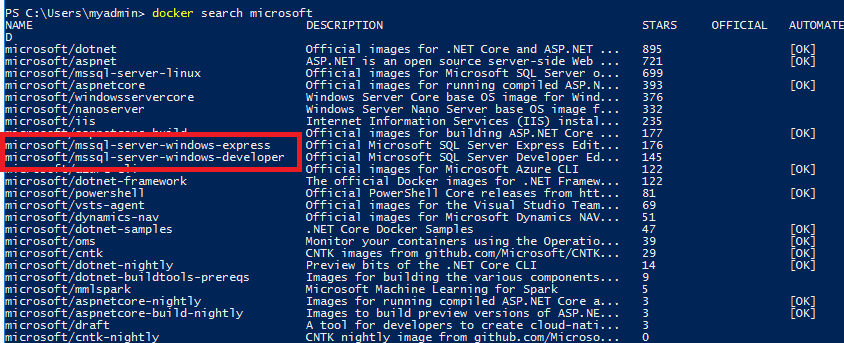
Checking the Microsoft Repository and Download SQL Server
Now that Docker is successfully installed and running, you can begin creating a SQL Server container. Check the Microsoft repository at Docker:
|
1 |
docker search microsoft |
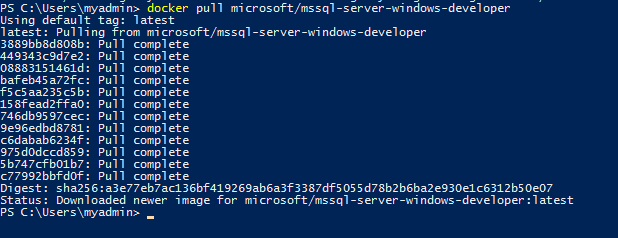
Download the SQL Server repository locally. These are big files.
|
1 |
docker pull microsoft/mssql-server-windows-developer |
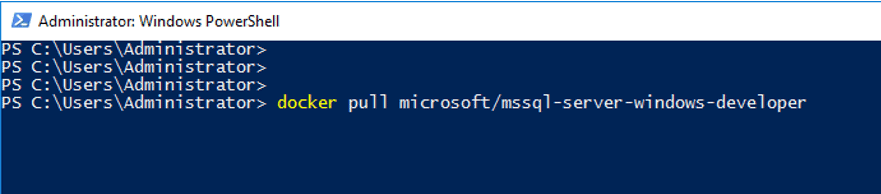
The latest mssql images, for example, are over 12 GB in size. Even ‘Hello World’ takes over a GB. It may take quite a few minutes to download the image.
Check the local repository images that were downloaded:
|
1 |
Docker images |

Spin up a SQL Server Instance
Once the image has been downloaded, it’s time to spin up the SQL Server instance. From an elevated PowerShell session, you can use the docker run command to set the required properties and run the instance. Here is an explanation of the parameters:
- ——name (provide a friendly name for the container)
- —d (executes the container in background)
- —p (port mapping)
- port:port (14331:1433) – Here we are mapping the port of the container (14331) with the 1433 port to SQL. We are doing that because we will create 2 SQL Server containers. If you will be connecting to SQL from the OS host or only one container you can map as 1433:1433 as each container has its own IP. As we are connecting externally also (from my physical machine too) there is only one IP (the OS host VM). What will differentiate the container is the port.
- —e (creates environment variables under the container execution runtime)
- sa_password ( assign the SQL Server SA password – s@12345)
- ACCEPT_EULA (pass Y)
Run this command and modify the password if you wish.
|
1 |
Docker run --name sql01 -d -p 14333:1433 -e sa_password=s@12345 -e ACCEPT_EULA=Y microsoft/mssql-server-windows-developer |

Once that is complete, check which containers are executing.
|
1 |
docker ps |

Connecting to the SQL Server
To connect to SQL Server from inside the VM, you need to know the IP of the container. Inspect <container name> will return a lot of information. You need to find the correct node in the JSON document and save it in a variable
|
1 |
docker inspect sql01 |
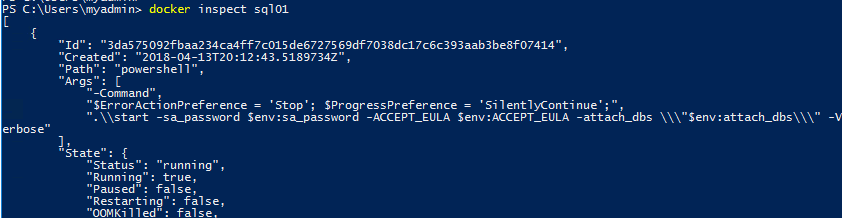
As this is returning a large JSON document, you can do better than to search through it. Instead, you can access the value you require with this script.
|
1 2 3 4 5 6 7 8 |
$Container_1 = docker inspect sql01 | ConvertFrom-Json | select -ExpandProperty SyncRoot | select -expand netWorkSettings | select -ExpandProperty Networks | Select -ExpandProperty nat | Select IPAddress $Container_1 |
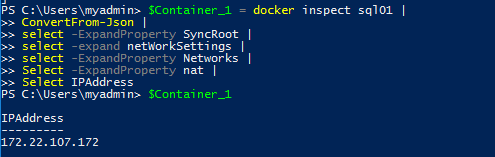
NOTE: Each time your container is started, be that a host server reboot or a restart of the container, the IP address can change
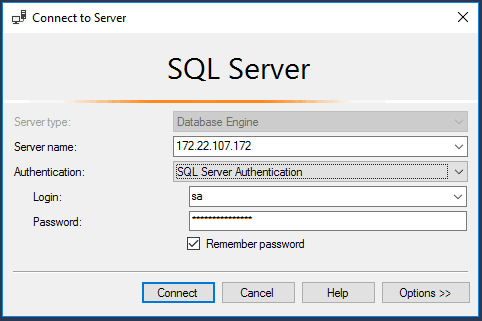
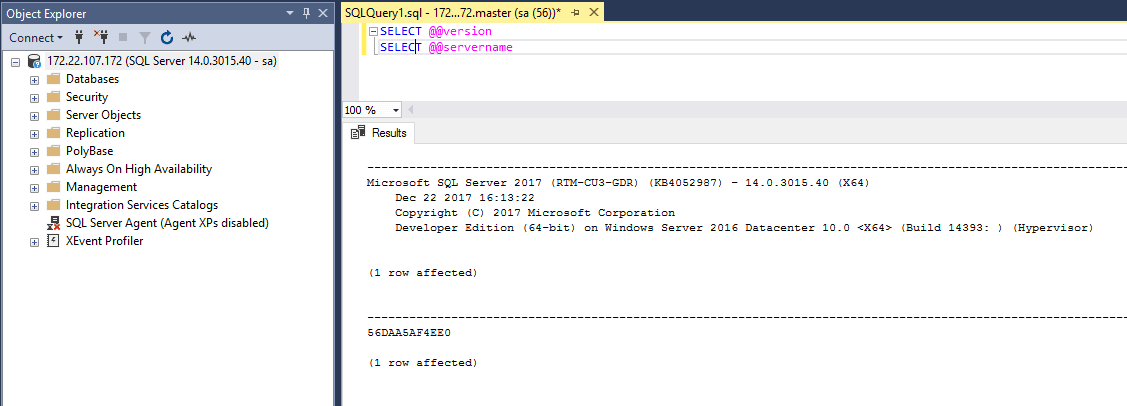
Now you can connect to SQL Server using SSMS from within the virtual machine using the container’s internal IP. Substitute your own IP and use sa with the password you provided when spinning up the instance. Of course, you will need SSMS installed on the VM.
And we have confirmed that it’s working!
Accessing the Container Outside the VM
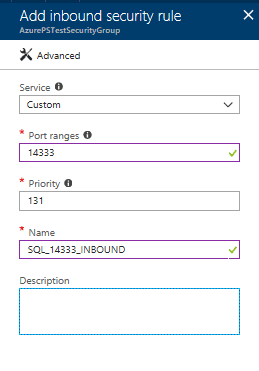
To access the container externally, you will need to open the firewall port you used when creating the container. This example used port 14333.

If you are working in an Azure VM, you must also add the port to the Network Interface in the Azure Portal on the Networking page of your VM. Set the port up as a Custom port in both the Inbound and Outbound security rules.
You will also need to determine the external IP of the VM. If running in Azure, you can find the IP on the Networking page of the VM. If you are following along using another method, just determine the IP you use to connect to your VM.
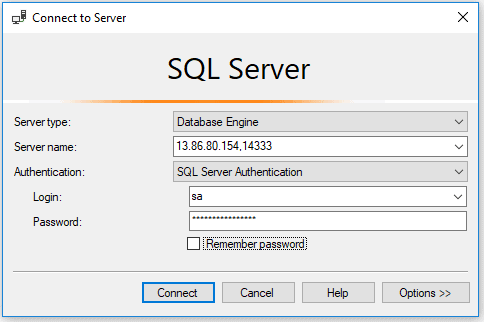
Now you can connect to SQL Server, passing the container port to differentiate between the containers. In this example, 13.86.80.154,14333.
Managing the Container
Whenever you restart the VM, you will find that the containers are no longer running. If you run the docker ps command used earlier to view the running containers, you’ll see this after a restart.
|
1 |
Docker ps |

The containers are not gone, they are just not running. You can add the -a switch to see all containers, regardless of status.
|
1 |
Docker ps -a |

To start a container, use the docker container start command.
|
1 |
docker container start sql01 |
You can also stop, restart, remove, and more with the Docker container command. For example, this script stops the SQL Server instance and then removes it.
|
1 2 |
Docker container stop sql01 Docker container rm sql01 |

The ability to quickly create and tear down instances is probably the biggest advantage of using Docker to host SQL Server.
If you removed sql01 by following the last example, run this command to create it once more so you can follow along with the rest of the article.
|
1 |
Docker run –-name sql01 -d -p 14333:1433 -e sa_password=s@12345 -e ACCEPT_EULA=Y microsoft/mssql-server-windows-developer |
If your container must run automatically after a restart of the host, you can add the restart flag to the command.
Managing the SQL Server Instance
You will find that managing the SQL Server instance is similar to managing a traditional instance, but since the container runs in its own space, there are a few differences. Since the container lives in its own space, it cannot see outside that space. For example, it cannot directly backup to a folder outside the container. To demonstrate, first list the directory contents of the C:\ drive on the VM.
|
1 |
Dir c:\ |
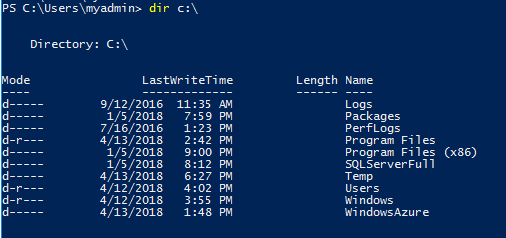
You will probably see a different set of folders than what I see on my VM. Now, connect a PowerShell session directly to the container by running this command:
|
1 |
Docker exec -it sql01 PowerShell |
The PowerShell window will change, and you will see a new session running from inside the container. Run the ls or dir command to see the folder contents.
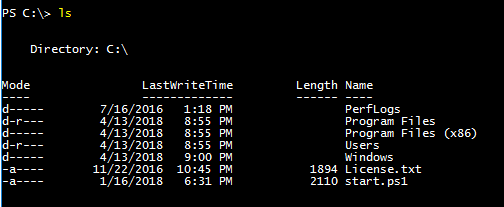
The folder list is very different than that of the VM since you are viewing inside the container.
Copy a Backup File to the Container
To backup and restore databases hosted by the instance running in a Docker container, you will need to provide a way to move files between the instance and the host. Follow these instructions to learn one way to do this.
- On the host machine, create a C:\Temp folder if one does not exist.
- Download the WideWorldImporters_Full.bak file to the C:\Temp folder.
- Make sure you have a PowerShell session running that is connected to the container.
- Create a C:\Temp\Backup folder in the container
123Md TempCD TempMD Backup
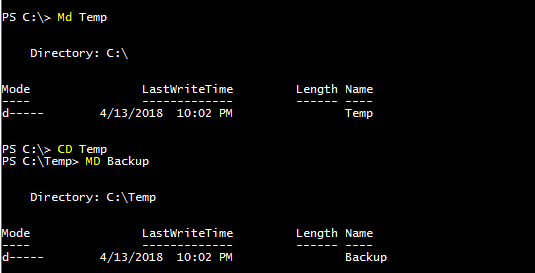
- You can then switch back to the host in the PowerShell Session using Exit.
1Exit

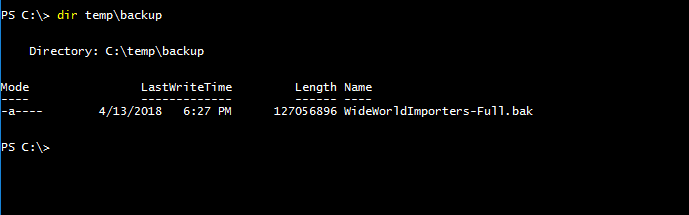
- Now that the directory is created, you can use docker to copy the .bak file to the backup folder in the container using the docker cp command. Note that the directory and file names are case sensitive.
1Docker cp C:\Temp\WideWorldImporters-Full.bak sql01:C:\Temp\Backup

- Connect back to the container.
1docker exec -it sql01 PowerShell

- In the new PowerShell session, look for the file.
1Dir temp\backup
Restoring the Database
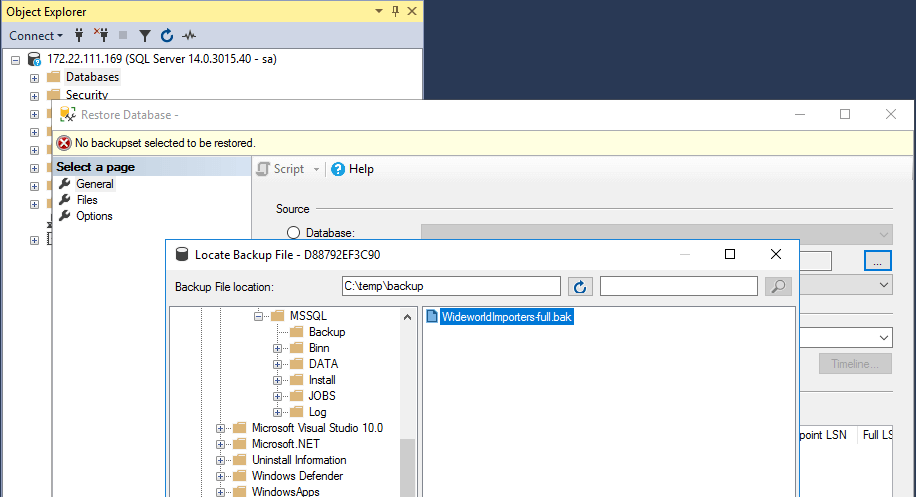
Now that the file is in a place that the SQL Server instance can see it, you should connect with SSMS and do a restore as usual. If you wish to connect from within the VM, you will probably need to determine the IP address again using the script from the earlier section within a PowerShell session running in the host:
|
1 2 3 4 5 6 7 8 |
$Container_2 = docker inspect sql01 | ConvertFrom-Json | select -ExpandProperty SyncRoot | select -expand netWorkSettings | select -ExpandProperty Networks | Select -ExpandProperty nat | Select IPAddress $Container_2 |
The restore can be done as usual from within SSMS:
Creating a Backup Volume
Instead of backing up to a folder inside the container and then copying the file to the host, another way to manage backups is to mount a volume to the container that can be accessed by both the host and the container. When doing this, you must create a new container.
- Connect to PowerShell running in the VM and run this command which creates a new Docker volume called SQLBackups.
1Docker volume create –name SQLBackups

- Find the location of the new volume. By default, volumes are created at the hidden location C:\ProgramData\docker\volumes

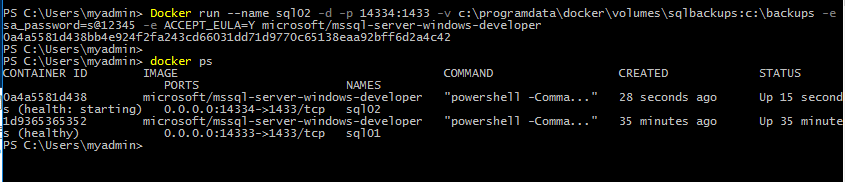
- Now you will create a new container called sql02 that will be able to use the new volume. The command uses the v switch to map the volume on the host to the container.
1Docker run --name sql02 -d -p 14334:1433 -v c:\programdata\docker\volumes\sqlbackups:c:\backups -e sa_password=s@12345 -e ACCEPT_EULA=Y microsoft/mssql-server-windows-developer
- Copy the WorldWideImporters backup file to the new volume.
1copy c:\temp\WideWorldImporters-Full.bak C:\ProgramData\docker\volumes\sqlbackups

- Connect to the new container with PowerShell.
1docker exec -it sql02 PowerShell

- Look for the backup file within the container.
1Dir backups
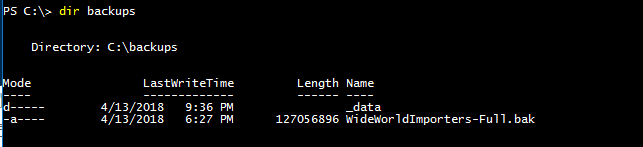
Now there is a folder that both the host and container can see. The SQL Server instance can backup directly to the backups folder. If you actually wanted to use one of these mounted volumes for the database files (mdf, ldf, ndf) you could as well.
Conclusion
When Microsoft announced support for SQL Server on Linux and Docker, it was obvious that the world of the DBA was changing. This was smart on Microsoft’s part as it can possibly get SQL Server in shops that wouldn’t have considered it in the past.
This article showed how to get Docker running on a server and how to create a container running SQL Server. It then discussed how to work with the container and with the instance. Be sure to take a look at the Docker documentation to get more ideas on how to better manage SQL Server running on Docker.
I would like to thank my good friend Anderson Alves de Souza for the initial research.
This document contains proprietary information and is protected by copyright law.
Copyright © 2026 Red Gate Software Limited. All rights reserved


Load comments