
SSIS (SQL Server Integration Services) provides built-in source components for common data sources (OLE DB, ADO.NET, Flat File, Excel, XML, REST), but sometimes the source format or protocol isn’t covered – a custom REST API with specific authentication, a proprietary file format, a message queue, an obscure database.
Custom source components fill this gap: C# classes inheriting from Microsoft.SqlServer.Dts.Pipeline.PipelineComponent, decorated with [DtsPipelineComponent] attributes, and deployed to the GAC (Global Assembly Cache) so Visual Studio’s SSIS designer can discover and use them.
This article walks through the following:
- How to create a Class Library project targeting the SSIS version’s required .NET Framework;
- Referencing Microsoft.SqlServer.DTSPipelineWrap and DTSRuntimeWrap;
- How to inherit from PipelineComponent and override key methods – ProvideComponentProperties (defines component metadata like description and icon), Validate (validation logic), PreExecute (one-time initialisation), PrimeOutput (the main execution method that generates output rows), and PostExecute (cleanup);
- How to define the output buffer’s columns via ComponentMetaData.OutputCollection;
- Strong-naming the assembly and deploying to the GAC via gacutil.exe;
- How to use the custom component in an SSIS data flow task.
Note: Component development requires matching the target SSIS version’s .NET Framework (SSIS 2019/2022 typically uses .NET Framework 4.x). For ASP.NET Core / .NET 5+, custom components aren’t supported – SSIS remains a .NET Framework product.
Overview
SQLServer Integration Services (SSIS) is the Microsoft platform for building enterprise-level data integration and data transformation solutions. Integration Services can extract and transform data from a wide variety of sources such as XML data files, flat files, and relational data sources, and then load the data into one or more destinations. Integration Services is so versatile because it has the ability to connect to disparate data sources built into its object model. In this article, we will look at how to extend this object model by building a custom data source, using a working example.
What is an SSIS component?
SSIS components are one of the basic building blocks of the SSIS framework, and can be found in the SSIS toolbox in SQLServer Data Tools. In this article we will be specifically looking at data flow components. These can read data from external data sources, transform it, and write it back to other data destinations. SQLServer Data Tools have some examples of data flow components, including the OLE DB Source, Lookup transformation and the Character Map transformation components.
Under the hood, an SSIS data flow component is a .Net class that inherits from the PipelineComponent class, which is part of the overall SSIS Object Model. It overrides the various methods of PipelineComponent , such as those for creating inputs/outputs, adding custom properties to the component etc. The compiled class library is placed in a subfolder in the SQLServer installation folder. SQLServer Data Tools automatically recognizes any class libraries in this folder that implement PipelineComponent , and makes the component available in the SSIS Toolbox.
Building the component class
We will start by first building a bare-bones data source component, and then deploying it so that you can use it in your Integration Services package. I’ve already mentioned that a data source component is used to read data from an external data source, but at this stage it won’t actually do anything. In the next stage, once we are satisfied that we can deploy it, we’ll get it doing something useful.
Before we get into the details of building the class, note that the following description assumes that you are using Visual Studio 2012 and SQLServer Data Tools 2012. If you are using an older version of either tool, you would have to adjust accordingly. I have tried to highlight specific tools between different versions wherever possible.
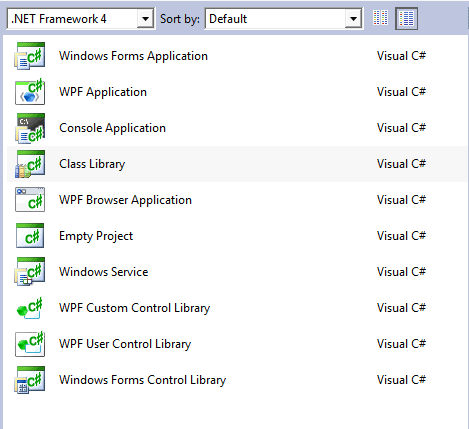
With that in mind, start by launching Visual Studio, and create a new class library project, as shown in Figure 1. You can name the project CustomSSISComponent . Make sure that you select .Net Framework 4 as the .net version. The code I have presented here uses C#, but you can write it just as easily in Visual Basic also.
Rename the Class1.cs file in the project to CustomSSISComponent.cs . You will also need to reference the following assemblies in your project:
|
Assembly to import |
Namespace to import |
Can be found at |
|
Microsoft.SqlServer.PipelineHost |
Under the GAC_MSIL folder in the GAC |
|
|
Microsoft.SqlServer.DTSPipelineWrap |
Under the GAC_MSIL folder in the GAC |
|
|
Microsoft.SqlServer.ManagedDTS |
Under the GAC_MSIL folder in the GAC |
|
|
Microsoft.SqlServer.DTSRuntimeWrap |
Under the GAC_32 folder in the GAC |
|
|
System.ServiceModel |
System.ServiceModel |
Part of the .Net framework. |
* Note that the GAC is at %windowsfolder%\Microsoft.Net\Assembly in .Net framework 4.0.
* Since we are building the component with .Net framework 4.0, make sure you refer to the assemblies at %windowsfolder%\Microsoft.Net\Assembly.
Modify the CustomSSISComponent.cs file to add the following class definition for a custom Integration services component:
|
1 2 3 4 5 6 7 8 9 10 11 12 13 14 15 16 17 18 19 20 21 22 23 24 25 26 27 28 29 30 31 32 33 34 35 36 37 38 39 40 41 42 43 44 45 |
using System; using System.Collections.Generic; using System.Linq; using System.Text; using Microsoft.SqlServer.Dts.Pipeline; using Microsoft.SqlServer.Dts.Pipeline.Wrapper; using Microsoft.SqlServer.Dts.Runtime; using Microsoft.SqlServer.Dts.Runtime.Wrapper; using System.ServiceModel.Syndication; using System.Data; using System.Xml; namespace CustomSSISComponent { [DtsPipelineComponent(DisplayName = "CustomSSISComponent", ComponentType = ComponentType.SourceAdapter)] public class CustomSSISComponent : PipelineComponent { public override void AcquireConnections(object transaction) { base.AcquireConnections(transaction); } public override void PrimeOutput(int outputs, int[] outputIDs, PipelineBuffer[] buffers) { base.PrimeOutput(outputs, outputIDs, buffers); } public override void PreExecute() { base.PreExecute(); } public override DTSValidationStatus Validate() { return base.Validate(); } public override IDTSCustomProperty100 SetComponentProperty(string propertyName, object propertyValue) { return base.SetComponentProperty(propertyName, propertyValue); } public override void ProvideComponentProperties() { base.ProvideComponentProperties(); } } } |
This class inherits from PipelineComponent , which is the base class for all Integration Services data flow components. The DTSPipelineComponent attribute provides the name of the component to be shown in the SSIS Toolbox in SQLServer Data Tools, and also specifies the type of the component.
We will delve into the details of the overridden methods later in this article. Since at this stage we have not provided implementations for any of the overridden methods, the component will not actually do anything. However, we can still deploy it and add it to the SSIS Toolbox.
Special considerations for VS 2012
If you are using Visual Studio 2012 to launch your SSIS packages, then follow these additional steps:
- In solution explorer, right-click on the project name and select ‘Add‘ ‘New Item‘. In the dialog box that comes up, select “Resources File“, and click “Add”. This will add a new resource file to your project, called
Resource1.resx, and launch the resource editor. - In the resource editor, click on “Add Resource” from the top menu, and select “Add New Icon” from the dropdown list.
- Leave the name as
Icon1and click ‘Add‘. This will add a new icon fileIcon1.icounder the “Resources” folder in your project. - In the class library file created earlier, replace the line
1DtsPipelineComponent(DisplayName = "CustomSSISComponent", ComponentType = ComponentType.SourceAdapter)]
with the line below :
1[DtsPipelineComponent(DisplayName = "CustomSSISComponent", ComponentType = ComponentType.SourceAdapter, IconResource = "CustomSSISComponent.Resources.Icon1.ico")] - In the solution explorer, right-click on your project name and select ‘Properties‘.
- On the Application tab, click the “Icon and manifest” radio button, and select the
Icon1.icofile from the drop-down list. - Save and rebuild the project.
Deploying the custom component
Follow these steps to deploy your custom SSIS component:-
- Sign the assembly with a strong name. You can either do this after building the assembly, or at build time by providing the key/value file (.snk file) in the project properties. You can find details on signing an assembly on MSDN.
- Copy the strongly-named assembly to
{{ SQLServer Installation Folder}}\110\DTS\ PipelineComponents. On 32-bit machines, if your SQLServer installation is at the default path, this path translates toC:\Program Files\Microsoft SQLServer\110\DTS\ PipelineComponents.On 64-bit machines, the path isC:\Program Files (x86)\Microsoft SQLServer\110\DTS\ PipelineComponentsIf you are developing a component for SQLServer 2008, replace the folder 110 with 100 in the above path.
- Next, launch the Visual Studio developer console, and install the strongly-named assembly to the GAC using the following command –
123C:\gacutil -u CustomSSISComponentC:\gacutil -i {Solution Root folder}\CustomSSISComponent\CustomSSISComponent\bin\Debug\CustomSSISComponent.dll /fThe above uninstalls any previous versions of the assembly and reinstalls the newer version of the DLL.
If you have multiple versions of the .Net framework installed on your computer, it is important that you use the correct version of gacutil.exe to add the file to the GAC. Since we developed the component using .Net framework 4.0, the gacutilversion should also be.Net framework 4.0.
- Launch a new instance of SQLServer Data Tools, and create a blank Integration Services package.
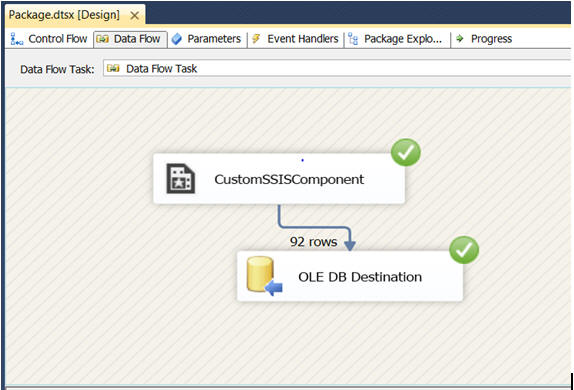
- Open the package in package designer, and click on the “Data Flow” tab (shown below):

- You should be able to see your custom data source component in the SSIS Toolbox:
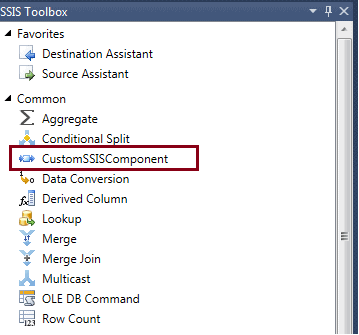
If everything was configured correctly, the custom component should automatically appear in the SSIS toolbox. If you don’t see it, try adding it manually, via ‘Tools‘ ‘Choose Toolbox Items‘ ‘Browse to your component DLL‘.
Reading from a data source
Now that we are confident that we can build and deploy a custom Integration Services component, we will be creating a sample SSIS source custom component that reads from an RSS data feed. Conceptually, it is similar to the other source components that ship with Integration Services, such as the OLE DB Source or ADO .Net Source component, but the data source in this case is an RSS data feed.
An RSS feed is basically data served in a well-formed XML feed over the internet. I will not get into the format, structure etc. of RSS since that is outside the scope of this article. But let us take a quick look at the .Net helper classes that we will be using to read from an RSS source.
System.ServiceModel.SyndicationFeed- is the .Net class that represents an RSS feed (e.g. a blog feed, newspaper feed etc.). A
SyndicationFeedconsists of one or moreSyndicationItemobjects -examples ofSyndicationItemare blog posts, news articles etc. SyndicationItem- represents an individual RSS item. We will be accessing the following properties on the
SyndicationItem:-
Title– The title of the feed item.PublishDate– Publication date of the itemURL– the url for the item
The component will be reading data from the
SyndicationItemobjects, and the properties mentioned above (Title, PublishDate, URL), will be available in the SSIS data flow.
With this basic information, add the following method to your CustomSSISComponent class. This method reads syndication items from an RSS endpoint, and returns all the items for that feed.
|
1 2 3 4 5 6 7 8 9 10 11 12 13 14 15 16 17 18 19 20 21 22 23 24 25 26 27 28 29 |
public DataTable GetRSSDataTable(String propertyValue) { DataTable dt = new DataTable(); try { XmlReader reader = XmlReader.Create(propertyValue); SyndicationFeed feed = SyndicationFeed.Load(reader); dt.Columns.Add("Title", Type.GetType("System.String")); dt.Columns.Add("PublishDate", Type.GetType("System.DateTime")); dt.Columns.Add("URL", Type.GetType("System.String")); foreach (SyndicationItem item in feed.Items) { DataRow dRow = dt.NewRow(); dRow["Title"] = item.Title.Text; dRow["PublishDate"] = item.PublishDate.DateTime; dRow["URL"] = item.Id; dt.Rows.Add(dRow); } return dt; } catch (Exception e) { throw e; } } |
Save the updated file – we will be adding more code in a little bit. The above method reads data from an RSS data source, and returns a datatable with all the data from the source.
Note: Although I have used RSS as a data source here, you can read data from a third party application, or even a cloud-based platform like Salesforce.com.
In the subsequent sections below, I will be covering the individual structures that have to be built when building a custom SSIS component. On a very high level, it involves the following –
- Creating a custom property on the component for the URL of the RSS feed.
- Create an output and add output columns to it. Remember that we are creating an “input” component that reads from an external data source. Consequently, we need to explicitly create the “output” on which the component can send data to the next component in the SSIS pipeline.
- Send the data read from the external data source to the output.
Create component outputs and properties
All Integration Services components have 0 – N inputs and outputs. An input represents a connection point between two components. When an output of one component is connected to the input of another component, it establishes the flow of data between components. We need to explicitly create any inputs/outputs and custom properties for our component.
The best place to do this is the overridden ProvideComponentProperties method. This method is called only once, when the component is added to the SSIS package designer. In the CustomSSISComponent.cs file created above, modify the method definition as below:-
|
1 2 3 4 5 6 7 8 9 10 11 12 13 |
public override void ProvideComponentProperties() { base.ProvideComponentProperties(); base.RemoveAllInputsOutputsAndCustomProperties(); IDTSCustomProperty100 rsspath = ComponentMetaData.CustomPropertyCollection.New(); rsspath.Description = "The path of the RSS feed"; rsspath.Name = "RSS Path"; rsspath.Value = String.Empty; IDTSOutput100 output = ComponentMetaData.OutputCollection.New(); output.Name = "Output"; } |
The method is adding a custom property called RSS Path to store the URL of the RSS feed that the component will read from. Also, since we are developing a custom source component, we are also adding one output to the component.
Couple of things to note here:-
- Though we have added an output, we have not added any output columns yet. We will be adding these later in the article.
- The data type of the
RSS Pathcustom property is determined the first time you assign a value to the property – in this case since the initial value was an empty string, the property data type is string.
Compile and re-deploy the component using the steps listed in the “Deploying the custom component” section above. Close SQLServer Data Tools and re-open the empty Integration Services package that you created above, and add a new Data Flow component.
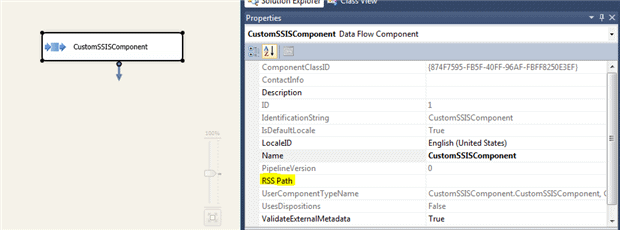
You should now be able to drag your custom component on the package designer, and also update the RSS Path custom property.
Building output columns
In the previous section, we saw how to add an output to our custom Integration Services source component. The next step is to add columns to the output that we added earlier. There are two rules to keep in mind when adding output columns:-
- The number of columns should match with that being read from the data source. Since we will be reading three fields from the RSS feed (Title, Publish Date, and URL), we need three output columns in the output.
- The data types of the columns should be compatible with that being read from the data source.
Replace the SetComponentProperty method with the below:-
|
1 2 3 4 5 6 7 8 9 10 11 12 13 14 15 16 17 18 19 20 21 22 23 24 25 26 27 28 29 30 31 32 33 34 35 36 37 38 39 40 41 42 43 44 45 46 47 48 49 50 51 52 53 54 55 56 57 58 59 60 61 62 63 64 65 66 67 68 69 70 71 72 73 |
public void AddOutputColumns(String propertyValue) { DataTable dt = GetRSSDataTable(propertyValue); if (dt != null) { //Check if there are any rows in the datatable if (dt.Rows != null && dt.Rows.Count > 0) { DataTable schemaDT = dt.CreateDataReader().GetSchemaTable(); foreach (DataRow row in schemaDT.Rows) { IDTSOutputColumn100 outputCol = ComponentMetaData.OutputCollection[0].OutputColumnCollection.New(); bool isLong = false; DataType dType = DataRecordTypeToBufferType((Type)row["DataType"]); dType = ConvertBufferDataTypeToFitManaged(dType, ref isLong); int length = ((int)row["ColumnSize"]) == -1 ? 1000 : (int)row["ColumnSize"]; int precision = row["NumericPrecision"] is System.DBNull ? 0 : (short)row["NumericPrecision"]; int scale = row["NumericScale"] is System.DBNull ? 0 : (short)row["NumericScale"]; int codePage = schemaDT.Locale.TextInfo.ANSICodePage; switch (dType) { case DataType.DT_STR: case DataType.DT_TEXT: precision = 0; scale = 0; break; case DataType.DT_NUMERIC: length = 0; codePage = 0; if (precision > 38) precision = 38; if (scale > precision) scale = precision; break; case DataType.DT_DECIMAL: length = 0; precision = 0; codePage = 0; if (scale > 28) scale = 28; break; case DataType.DT_WSTR: precision = 0; scale = 0; codePage = 0; break; default: length = 0; precision = 0; scale = 0; codePage = 0; break; } outputCol.Name = row["ColumnName"].ToString(); outputCol.SetDataTypeProperties(dType, length, precision, scale, codePage); } } } } public override IDTSCustomProperty100 SetComponentProperty(string propertyName, object propertyValue) { if (propertyName == "RSS Path" && ComponentMetaData.OutputCollection[0].OutputColumnCollection.Count == 0) { AddOutputColumns(propertyValue.ToString()); } return base.SetComponentProperty(propertyName, propertyValue); } |
The goal of the AddOutputColumns ( ) method above is to identify the columns coming from the data source (GetRSSDataTable () ), and add the corresponding output columns to the Output. Here is a step by step description of what it is doing:
- Read the data from the RSS data source using the
GetRSSDataTable()method that we defined earlier, and extract the schema of the resulting data table – we use theGetSchemaTable()method of thedatatableto get the schema. - Each row in the schema describes one column in the
datatable. For each such row, add an output column to the component output usingComponentMetaDataÂ.OutputCollection[0]Â.OutputColumnCollectionÂ.New(). - Next, we map the
datatablecolumn data type to a corresponding Integration Services data type. Integration Services has its own data type model, which is separate from the .Net data types.
For e.g., a String data type in .Net can be aDT_STRorDT_WSTRtype in Integration Services. Since output columns on Integration Services components use only Integration Services data types, we need to assign a compatible data type to the output column, depending on the type of data that will be flowing through it.
We use the following two methods to map the column data type to a corresponding type in the Integration Services object model:-DataRecordTypeToBufferType– given a managed data type (of typeSystem.Type), this method returns the corresponding Integration Services data type (of typeMicrosoftÂ.SQLServerÂ.DtsÂ.RuntimeÂ.WrapperÂ.Datatype).ConvertBufferDataTypeToFitManaged– accepts an Integration Services data type as argument, and returns the Integration Services data type that is appropriate for managed code.
- The two-step approach shown in the code above is required to get the correct Integration Services data type for a managed type. The reason we have two steps is that the
DataRecordTypeToBufferTypedoes not always return a type that can be used – for e.g., for a Boolean data type, theDataRecordTypeToBufferTypemethod returns the Integration Services typeDT_BOOL. However, the call toConvertBufferDataTypeToFitManagedgets the correct type, which isDT_I4. - In addition to identifying the correct Integration Services data type, your code will also have to set the precision, scale, length and codepage properties on the output column. All these properties, except codepage, are available in the
datatableschema object. However, certain properties (e.g. length) may not be available for some columns, in this case, make sure you assign a default value (in this case, I’ve added a default length of 1000). - Next, we use a switch statement to assign the correct values for length, precision, scale and codepage. A complete list of requirements for all applicable data types can be found here. The switch is required because different data types have different requirements of length, precision and scale, as shown below:
DataType
Length
Scale
Precision
CodePage
DT_DECIMAL
0
Greater than 0 and less than or equal to 28.
0
0
DT_CY
0
0
0
0
DT_NUMERIC
0
Greater than 0 and less than or equal to 28, and less than Precision.
Greater than or equal to 1 and less than or equal to 38.
0
DT_BYTES
Greater than 0.
0
0
0
DT_STR
Greater than 0 and less than 8000.
0
0
Not 0, and a valid code page.
DT_WSTR
Greater than 0 and less than 4000.
0
0
0
- Finally, set the output column name to the column name from the data table, and call the
SetDataTypePropertiesmethod to set the precision, length, scale and codepage properties for the output column.
The AddOutputColumns ( ) method is invoked from the SetComponentProperty () method because I want to add output columns only when the “RSS Path” property is set to a legitimate RSS path. Alternatively, since we already know the three columns we will be reading from the RSS feed, we could also have added the output columns in the ProvideComponentProperties method itself.
At this stage, build and redeploy your custom component using the steps in the “Deploying your custom component" section above, and add it again to a test Integration Services package. You should be able to see the RSS Path custom property in the component properties – set the RSS Path property to http://rss.cnn.com/rss/cnn_topstories.rss – this will trigger the call to AddOutputColumns() .
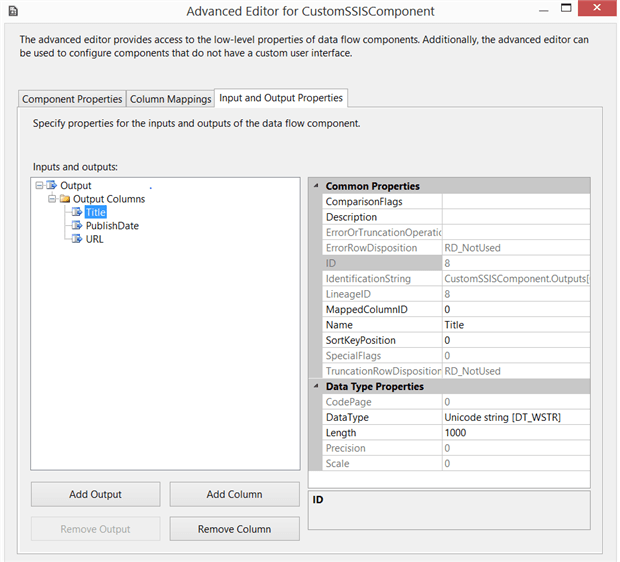
Inspect your component properties, and you should be able to see the output columns on the Input and Output properties tab. Note how the data types for each column are Integration Services data types as a result of the type conversion that we discussed earlier.
Output column mapping
During package execution, a data source component extracts data from an external source and writes it to one or more similar data buffers. The data buffers are supplied by the Integration Services runtime, and are tabular structures with rows and columns. However, no direct mapping exists between the component output columns and the columns in the data buffers. To understand why, look at the sample package below:
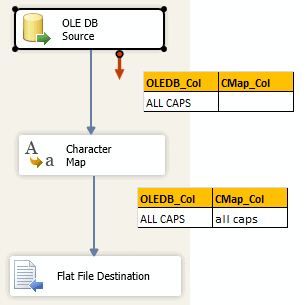
In this sample package, we have an OLE DB Source that reads data – in this case, it reads a single column of data called OLEDB_Col . It is followed by a Character Map transformation that adds a new column called CMap_Col that converts the data in OLEDB_Col to all lower case letters. Finally, data is written to a file via the Flat File Destination component.
A single data buffer is created for all 3 components in the package – this is so that the Integration Services runtime does not have to incur the overhead of adding new columns during package execution for each component to the buffer. The downside of this is that the buffer has to accommodate the columns used by all the components – in this example, the buffer for OLE DB Source contains the column CMap_Col even though the OLE DB Source has nothing to do with it.
Because the columns in the buffer may be different than the output columns on the component, your component should always explicitly map its output columns to columns in the data buffer, so that it does not accidentally overwrite columns that are meant for other components. The best place to do this is in the PreExecute method, since it is called only once just prior to package execution. Modify the PreExecute method in the component code as below:-
|
1 2 3 4 5 6 7 8 9 10 11 12 13 14 15 16 |
public int[] mapOutputColsToBufferCols; public override void PreExecute() { base.PreExecute(); IDTSOutput100 output = ComponentMetaData.OutputCollection[0]; mapOutputColsToBufferCols = new int[output.OutputColumnCollection.Count]; for (int i = 0; i < ComponentMetaData.OutputCollection[0].OutputColumnCollection.Count; i++) { // Here, "i" is the column count in the component's outputcolumncollection // and the value of mapOutputColsToBufferCols[i] is the index of the corresponding column in the // buffer. mapOutputColsToBufferCols[i] = BufferManager.FindColumnByLineageID(output.Buffer, output.OutputColumnCollection[i].LineageID); } } |
In this method, we iterate through the output columns for our source component, and add the index of the corresponding column in the data buffer to the map – an array in this case. The key method here is BufferManager.FindColumnByLineageId , which finds the matching column in the data buffer based on the output column’s Lineage Id.
Sending rows to the output
The final step in building our component is to define the runtime method PrimeOutput , which is responsible for sending rows to the output buffers during package execution. Note that the PrimeOutput method is a runtime method, and is called only at package execution time. The process of reading data from the external data source, and writing it to the data buffers should be implemented in this method. Replace the blank PrimeOutput method in your implementation withwith the below method definition”:- to your component:-
|
1 2 3 4 5 6 7 8 9 10 11 12 13 14 15 16 17 18 19 20 21 22 23 24 |
public override void PrimeOutput(int outputs, int[] outputIDs, PipelineBuffer[] buffers) { base.PrimeOutput(outputs, outputIDs, buffers); IDTSOutput100 output = ComponentMetaData.OutputCollection.FindObjectByID(outputIDs[0]); PipelineBuffer buffer = buffers[0]; DataTable dt = GetRSSDataTable(ComponentMetaData.CustomPropertyCollection["RSS Path"].Value.ToString()); foreach (DataRow row in dt.Rows) { buffer.AddRow(); for (int x = 0; x < mapOutputColsToBufferCols.Length; x++) { if (row.IsNull(x)) buffer.SetNull(mapOutputColsToBufferCols[x]); else buffer[mapOutputColsToBufferCols[x]] = row[x]; } } buffer.SetEndOfRowset(); } |
- The
PrimeOutputmethod takes as parameters the total number of outputs on the component, an array with the IDs of all outputs, and an array of buffers which are used by these outputs. - Since we have only one output on our component, we locate the only output with the
FindObjectByIdmethod. - Read data from the RSS feed into a
datatable, and iterate through the rows. - For each row from the
datatable, create a new row in the buffer and write its contents. Locate the corresponding column in the buffer using themapOutputColsToBufferColsarray created duringPreExecute. - When all the rows have been written to the buffer, call the
SetEndOfRowsetmethod to signal that the component is done writing rows to the output.
When SetEndOfRowset is called, the Integration Services runtime flushes out any remaining rows in the buffer and moves processing to the next component in the package.
Deploy the component using the steps detailed earlier – you should now be able to use it just like any other data source component in an SSIS package. For example, in the below screenshot, I’m using the component to read data from an RSS data source and load it into a SQLServer table.
Conclusion
In this article, we built a custom Integration Services source component using the Integration Services object model. We also looked at some of the common design techniques that apply towards building custom Integration Services components, in addition to looking at the steps required to deploy the component.
The most important aspect of custom components is that they give you fine grained control over the behavior of your component. Custom components are most useful in scenarios where you want to read data from unconventional data sources for which data source components are not supplied by SQLServer Data Tools, especially if you have the same data access logic repeated many times across different SSIS packages.
I would encourage you to dig deeper into custom components and explore ways they can be helpful on the projects you work on. The code to go with this article can be found, zipped, in the link at the head of this article.
Simple Talk is brought to you by Redgate Software
This document contains proprietary information and is protected by copyright law.
Copyright © 2026 Red Gate Software Limited. All rights reserved
Load comments