
SQL Server temporal tables (also called system-versioned tables) automatically track the full history of data changes. When you modify a row in a temporal table, SQL Server saves the previous version to a linked history table with start and end timestamps. You can then query data as it existed at any point in time using FOR SYSTEM_TIME AS OF, BETWEEN, CONTAINED IN, FROM…TO, or ALL.
Common use cases include audit trails (tracking who changed what and when), slowly changing dimensions (SCD Type 2), point-in-time recovery, and trend analysis. This guide provides practical recipes for creating, querying, and managing temporal tables in SQL Server 2016 and later.
Introduction
Temporal, or system-versioned, tables were introduced as a database feature in SQL Server 2016. This gives us a type of table that can provide information about the data that was stored at any specified time rather than just the data that is current. ANSI SQL 2011 first specified a temporal table as a database feature and this is now supported in SQL Server.
The most common business uses for temporal tables are:
- Slowly changing dimensions. The temporal tables provide a simpler way to querying data that is current for a specified period of time, such as time slicing data, that well-known problem on Data Warehousing databases.
- Data Auditing. The temporal tables provide an audit trail to determine when data was modified in the “parent” table. This helps to meet the requirements of regulatory compliance and to do data forensics when needed by tracking and auditing data changes over time.
- Repairing or recovering record level corruptions. Establishing a way of ‘undoing’ a data change on a table’s row without downtime in case a record is accidentally deleted or updated. Therefore, the previous version of the data can be retrieved from the history table and inserted back into the ‘parent’ table. – This helps when someone (or because of some application errors) accidentally deletes data and you want to revert to it or recover it.
- Reproducing financial reports, invoices and statements with the correct data for the date of issue of the document. Temporal tables allow you to query data as it was at a particular point in time to examine the state of the data as it was then.
- Analyzing trends by understanding how the data changes over time with the ongoing business activity, and to calculate trends in the way that data changes over time.
In the dark days before SQL Server 2016 was introduced, the data-logging mechanism had to be established explicitly in a trigger. To give a simple example, we would need to automate the maintenance of the history for the Department table with following structure, starting with the Department table itself:
|
1 2 3 4 5 6 7 8 9 10 11 |
CREATE TABLE dbo.Department ( DeptID INT NOT NULL, DeptName VARCHAR(50) NOT NULL, ManagerID INT NULL, ParentDeptID INT NULL, Created DATETIME NOT NULL CONSTRAINT DF_Department_Created DEFAULT GETDATE(), CONSTRAINT PK_Department_DeptID PRIMARY KEY CLUSTERED(DeptID ASC) ON [PRIMARY] ) ON [PRIMARY]; GO |
The next step is to create a Department_Log table with two additional columns that provide the history of changes
- LogDate
- LogAction
|
1 2 3 4 5 6 7 8 9 10 11 |
CREATE TABLE dbo.Department_Log ( DeptID INT NOT NULL, DeptName VARCHAR(50) NOT NULL, ManagerID INT NULL, ParentDeptID INT NULL, Created DATETIME NOT NULL, LogDate DATETIME NOT NULL, LogAction VARCHAR(10) NOT NULL ) ON [PRIMARY]; GO |
When the logging ‘history’ table is ready, we can create the trigger to log the changes for the UPDATE and DELETE actions:
|
1 2 3 4 5 6 7 8 9 10 11 12 13 14 15 16 17 18 19 20 21 22 23 24 25 26 27 28 29 30 |
CREATE TRIGGER dbo.tr_Department_Log ON dbo.Department FOR UPDATE, DELETE AS BEGIN SET NOCOUNT ON; IF (SELECT COUNT(1) FROM inserted JOIN deleted ON Inserted.DeptID = Deleted.DeptID ) > 0 BEGIN INSERT dbo.Department_Log (DeptID, DeptName, ManagerID, ParentDeptID, Created, LogDate, LogAction) SELECT Deleted.DeptID, Deleted.DeptName, Deleted.ManagerID, Deleted.ParentDeptID, Deleted.Created, GETDATE(), 'UPDATED' FROM deleted; END; ELSE BEGIN INSERT dbo.Department_Log (DeptID, DeptName, ManagerID, ParentDeptID, Created, LogDate, LogAction) SELECT Deleted.DeptID, Deleted.DeptName, Deleted.ManagerID, Deleted.ParentDeptID, Deleted.Created, GETDATE(), 'DELETED' FROM deleted; END; SET NOCOUNT OFF; END; GO |
To demonstrate how the Department_Log table works with the trigger, I updated three times the row where DeptID = 1, then deleted this row and finally, last update set DeptName column the to its original value.
|
1 2 3 4 5 6 7 8 9 10 11 12 13 14 15 16 17 18 19 20 21 22 23 |
update dbo.Department SET DeptName = '' where DeptID = 1 update dbo.Department SET DeptName = 'Engineering IT' where DeptID = 1 update dbo.Department SET DeptName = 'Engineering WEB' where DeptID = 1 DELETE dbo.Department where DeptID = 1 INSERT dbo.Department(DeptID, DeptName) SELECT DeptID,DeptName FROM Department_Log WHERE DeptID = 1 and LogAction = 'DELETED' update dbo.Department SET DeptName = 'Engineering' where DeptID = 1 select DeptID, DeptName,Created,LogDate,LogAction from Department_Log |
The result from Department_Log table shown in the next figure: 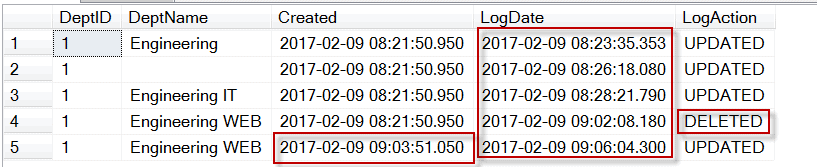
The temporal tables feature of SQL Server 2016 can dramatically simplify the logging mechanism. This article provides step-by-step instructions on how to accomplish system-versioned tables.
To migrate a table into the temporal table, a temporal table option can be set on an existing table. To create a new temporal table, you just need to set the temporal table option to ON (for example, SYSTEM_VERSIONING = ON). When the temporal table option is enabled, SQL Server 2016 generates the “historical” table automatically, and internally maintains both parent and historical tables, one for storing the actual data and the other for the historical data. The temporal table’s SYSTEM_TIME period columns (for example SysStartTime and SysEndTime) enables the mechanism to query data for a different time slice more efficiently. The updated or deleted data moves into the “historical” table, whilst the “parent” table keeps the latest row version for updated records.
What is the catch?
The most important considerations, restrictions and limitations of Temporal Tables are:
- In order to relate records between the Temporal Table and the history table, you must have a primary key in the Temporal Table. However, the history table cannot have a primary key.
- The datetime2 datatype must be set for the SYSTEM_TIME period columns (for example SysStartTime and SysEndTime).
- When you create a history table, you must always specify both the schema and table name of the temporal table in the history table.
- The PAGE compression is the default setting for the history table.
- The Temporal Tables support blob data types, (nvarchar(max), varchar(max), varbinary(max), ntext, text, and image), that could affect the storage costs and have performance issues.
- Both temporal and history tables must be created in the same database. You cannot use a Linked Server to provide the Temporal Tables.
- You cannot use constraints, primary key, foreign keys or column constraints for the history tables.
- You cannot reference Temporal Tables in indexed views that have queries that use the FOR SYSTEM_TIME clause
- The SYSTEM_TIME period columns cannot be directly referenced in INSERT and UPDATE statements.
- You cannot use TRUNCATE TABLE while SYSTEM_VERSIONING is ON.
- You are not allowed to directly modify the data in a history table.
Please reference to Books Online for complete considerations and limitations list:
Creating a Temporal Table
I have shown how to create temporal and history tables in one DDL script in Listing 1. As I mentioned earlier, the columns SysStartTime and SysEndTime with data type datetime2 for both column is required for a temporal table. The column SysStartTime has to be GENERATED ALWAYS AS ROW START NOT NULL specification, and SysEndTime has to be GENERATED ALWAYS AS ROW END NOT NULL. You’re not obliged to provide a default for those columns, but I would recommend it. Both SysStartTime and SysEndTime columns have to be specified in the PERIOD FOR SYSTEM_TIME column (as MSDN defined PERIOD, in other publications PERIOD calls clause).
Note: The system-versioned columns do not necessarily have to be named as SysStartTime and SysEndTime, but the column names should be selected to reflect the function of time-capturing. The options GENERATED ALWAYS AS ROW START/END and PERIOD FOR SYSTEM_TIME (nameFrom, nameTo) enables the temporal table feature.
|
1 2 3 4 5 6 7 8 9 10 11 12 13 14 |
CREATE TABLE Department ( DeptID INT NOT NULL PRIMARY KEY CLUSTERED, DeptName VARCHAR(50) NOT NULL, ManagerID INT NULL, ParentDeptID INT NULL, SysStartTime DATETIME2 GENERATED ALWAYS AS ROW START CONSTRAINT DF_Department_SysStartTime DEFAULT SYSUTCDATETIME() NOT NULL, SysEndTime DATETIME2 GENERATED ALWAYS AS ROW END CONSTRAINT DF_Department_SysEndTime DEFAULT CONVERT( DATETIME2, '9999-12-31 23:59:59' ) NOT NULL, PERIOD FOR SYSTEM_TIME(SysStartTime, SysEndTime) ) WITH (SYSTEM_VERSIONING = ON (HISTORY_TABLE = dbo.DepartmentHistory)); |
Listing 1: Creating the temporal and history tables
After the temporal table is created, the underlined history table is created automatically, (Figure 1) as well as a CLUSTERED INDEX with both SysStartTime and SysEndTime (or the name that has been chosen to define system-versioning) column will be created for history table, Listing 2.
|
1 2 3 4 5 |
CREATE CLUSTERED INDEX ix_DepartmentHistory ON dbo.DepartmentHistory (SysStartTime ASC, SysEndTime ASC ) ON [PRIMARY]; |
Listing 2: Creating the clustered index
If a new column must be added to the temporal table, then ALTER TABLE … ADD column DDL needs to be allowed, and the new column will be mirrored automatically on the history table.
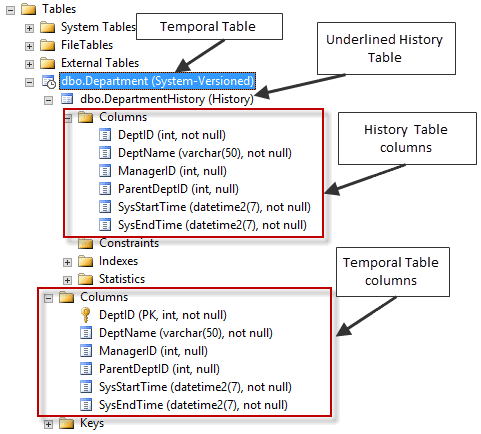
Figure 1: Showing newly created temporal and history tables in Object Explorer.
However, it’s not possible to use DROP TABLE DDL for a temporal table. First, SYSTEM_VERSIONING has to be turned OFF.
|
1 |
ALTER TABLE Department SET (SYSTEM_VERSIONING = OFF); |
Listing 3: Disabling SYSTEM_VERSIONING on Department table.
When SYSTEM_VERSIONING is set to OFF, both temporal and history tables become regular tables. The DROP TABLE command can then be used for those tables.
Read also:
Temporary tables in SQL Server
In-memory optimized tables in SQL Server
Converting a database to In-Memory OLTP
Setting existing table to system-versioned table
SQL Server allows you to convert an existing table into a temporal table. In order to perform this task, you need to make sure that a primary key exists on the table, and if it does not already exist, then you need to create one. Then the table has to be altered with two datetime2 data type columns and also the option GENERATED ALWAYS AS ROW START/END has to be applied with …
PERIOD FOR SYSTEM_TIME (nameFrom, nameTo).
Both options have to be completed with ALTER command. The second ALTER command enables the SYSTEM_VERSIONING property, and optionally (I recommend providing it explicitly), provide a name for the HISTORY_TABLE property, Listing 4.
For example, let’s set the existing table Department_Exist to a temporal table. Run Listing 4, then run Listing 5. Refresh the Table icon to see the result, as in Figure 2.
|
1 2 3 4 5 |
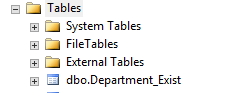
CREATE TABLE Department_Exist ( DeptID int NOT NULL PRIMARY KEY CLUSTERED , DeptName varchar(50) NOT NULL , ManagerID INT NULL , ParentDeptID int NULL ) |
Listing 4: Creating table Department_Exist.
|
1 2 3 4 5 6 7 8 9 10 11 |
ALTER TABLE dbo.Department_Exist ADD SysStartTime datetime2 GENERATED ALWAYS AS ROW START CONSTRAINT DF_Department_Exist_SysStartTime DEFAULT SYSUTCDATETIME() NOT NULL, SysEndTime datetime2 GENERATED ALWAYS AS ROW END CONSTRAINT DF_Department_Exist_SysEndTime DEFAULT CONVERT (DATETIME2, '9999-12-31 23:59:59') NOT NULL, PERIOD FOR SYSTEM_TIME (SysStartTime, SysEndTime) GO ALTER TABLE dbo.Department_Exist SET (SYSTEM_VERSIONING = ON (HISTORY_TABLE = dbo.Department_ExistHistory)) GO |
Listing 5: Adding the system-versioned columns, and enable the system-versioned on the Department_Exist table.
 Existing table |
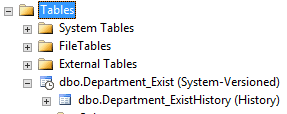 Converted to temporal table |
Figure 2: Comparing side-by-side Department_Exist after converted to a Temporal table.
Check the metadata of the temporal tables:
|
1 2 3 4 5 6 7 8 9 10 11 |
-- List temporal tables, temporal_type = 2 SELECT tables.object_id, temporal_type, temporal_type_desc, history_table_id, tables.name FROM sys.tables WHERE temporal_type = 2 -- SYSTEM_VERSIONED_TEMPORAL_TABLE -- List temporal tables and history tables SELECT h.name temporal_name, h.temporal_type_desc, h.temporal_type, t.name AS history_table_name, t.temporal_type, t.temporal_type_desc FROM sys.tables t JOIN sys.tables h ON t.object_id = h.history_table_id |
Converting an In-Memory Optimized OLTP Table to a System-Versioned Table
Although the process of converting an In-Memory Optimized OLTP table to a system-versioned table is similar, there are some differences that we need to cover and demonstrate in this section.
You need to be aware of some specific details when converting the in-memory optimized table to the system-versioned table:
- The In-memory optimized tables must be durable (DURABILITY = SCHEMA_AND_DATA).
- In-Memory optimized history table is created as disk-based.
- Queries that affect only the parent table can be used in natively-compiled T-SQL modules. You cannot use Temporal queries using the FOR SYSTEM TIME clause in natively compiled modules, but it is possible to use the FOR SYSTEM TIME clause with in-memory optimized tables in ad hoc queries and non-native modules.
- An internal In-memory optimized staging table is automatically created to accept the most recent changes (INSERT, DELETE) on changes to the in-memory optimized parent table when SYSTEM_VERSIONING = ON.
- Data from the internal In-memory optimized staging table is regularly moved to the disk-based history table by the asynchronous data flush task. This data flush mechanism has a goal of keeping the internal memory buffers at less than 10% of the memory consumption of their parent objects. DMV sys.dm_db_xtp_memory_consumers will help to track the total memory consumption.
- A data flush can enforce a by calling sys.sp_xtp_flush_temporal_history @schema_name, @object_name stored procedure.
- When SYSTEM_VERSIONING = OFF, or when the schema of the system-versioned table is modified by adding, dropping or altering columns, the entire contents of the internal staging buffer is moved into the disk-based history table.
- Querying of historical data is, effectively, done under SNAPSHOT isolation level and always returns a union between in-memory staging buffer and the disk-based table without duplicates.
- ALTER TABLE operations that change the table schema internally must perform a data flush, which may slow down the operation.
Creating new In-Memory Optimized OLTP with System-Versioned Table option enabled
The DDL for creating a new in-memory optimized table with the temporal table options is very close in its syntax to a traditional disk-based table. The in-memory optimized table syntax has the WITH block to set MEMORY_OPTIMIZED and DURABILITY properties initially. Therefore, the SYSTEM_VERSIONING property needs to be added separated by a comma, as in Listing 7.
|
1 2 3 4 5 6 7 8 9 10 11 12 13 14 15 16 17 18 19 |
CREATE TABLE dbo.InMemory ( UniqueName varchar(50) NOT NULL PRIMARY KEY NONCLUSTERED HASH WITH (BUCKET_COUNT = 131072), City varchar(32) NULL, State_Province varchar(32) NULL, LastModified datetime NOT NULL , SysStartTime datetime2 GENERATED ALWAYS AS ROW START CONSTRAINT DF_InMemory_SysStartTime DEFAULT GETDATE() NOT NULL , SysEndTime datetime2 GENERATED ALWAYS AS ROW END CONSTRAINT DF_InMemory_SysEndTime DEFAULT CONVERT (DATETIME2, '9999-12-31 23:59:59') NOT NULL , PERIOD FOR SYSTEM_TIME (SysStartTime,SysEndTime) ) WITH ( MEMORY_OPTIMIZED = ON , DURABILITY = SCHEMA_AND_DATA, SYSTEM_VERSIONING = ON (HISTORY_TABLE = dbo.InMemory_History) ) |
Listing 7: Creating new In-Memory Optimized OLTP with System-Versioned Table option enabled
Adding the System-Versioned Table option to an existing In-Memory Optimized OLTP Table.
It is more difficult to convert an existing in-memory optimized OLTP table to the system-versioned table, as we show in Listing 8.
To demonstrate this mechanism let’s create the table:
|
1 2 3 4 5 6 7 8 9 10 11 |
CREATE TABLE dbo.InMemoryExist ( UniqueName varchar(50) NOT NULL PRIMARY KEY NONCLUSTERED HASH WITH (BUCKET_COUNT = 131072), City varchar(32) NULL, State_Province varchar(32) NULL ) WITH ( MEMORY_OPTIMIZED = ON , DURABILITY = SCHEMA_AND_DATA ) |
Listing 8: Creating new In-Memory Optimized OLTP table
When the table has been created, we need to add the temporal table options before any data is added to the table, as in Listing 9:
|
1 2 3 4 5 6 7 8 9 10 11 |
ALTER TABLE dbo.InMemoryExist ADD SysStartTime datetime2 GENERATED ALWAYS AS ROW START CONSTRAINT DF_InMemoryExist_SysStartTime DEFAULT SYSUTCDATETIME() NOT NULL, SysEndTime datetime2 GENERATED ALWAYS AS ROW END CONSTRAINT DF_InMemoryExist_SysEndTime DEFAULT CONVERT (DATETIME2, '9999-12-31 23:59:59') NOT NULL, PERIOD FOR SYSTEM_TIME (SysStartTime, SysEndTime) GO ALTER TABLE dbo.InMemoryExist SET (SYSTEM_VERSIONING = ON (HISTORY_TABLE = dbo.InMemoryExist_History)) GO |
Listing 9: Adding temporal table options
If the table already contains data, then the process of converting the table to the system-versioned table is more complicated.
If InMemoryExist was created with the system-versioned option, then we need to drop the InMemoryExist and InMemoryExist_History tables:
|
1 2 3 4 5 6 |
ALTER TABLE InMemoryExist set (SYSTEM_VERSIONING = OFF) GO DROP TABLE InMemoryExist GO DROP TABLE InMemoryExist_History GO |
We recreate the table (use the code sample, Listing 8, provided above in this section). Then we insert data into the InMemoryExist table:
|
1 2 |
INSERT InMemoryExist select NEWID(),name, type_desc from sys.objects where is_ms_shipped = 0 |
When you run the code to add temporal table options, listing 9, then the following errors will be thrown:
|
1 2 3 |
Msg 13575, Level 16, State 0, Line 21 ADD PERIOD FOR SYSTEM_TIME failed because table 'database.dbo.InMemoryExist' contains records where end of period is not equal to MAX datetime. Msg 13510, Level 16, State 1, Line 29 |
Cannot set SYSTEM_VERSIONING to ON when SYSTEM_TIME period is not defined.
To avoid these errors, we need to add system-versioning options in more detailed steps:
|
1 2 3 4 5 6 7 8 9 10 11 12 13 14 15 16 17 18 19 20 21 22 23 24 25 26 |
--Step 1. Adding nullable the columns ALTER TABLE dbo.InMemoryExist ADD SysStartTime datetime2 NULL GO ALTER TABLE dbo.InMemoryExist ADD SysEndTime datetime2 NULL GO --Step 2 Adding the default constraints ALTER TABLE InMemoryExist ADD CONSTRAINT DF_InMemoryExist_SysStartTime DEFAULT GETDATE() FOR SysStartTime; GO ALTER TABLE InMemoryExist ADD CONSTRAINT DF_InMemoryExist_SysEndTime DEFAULT CAST('9999-12-31 23:59:59.9999999' AS DATETIME2) FOR SysEndTime; --Step 3 Updating the column UPDATE dbo.InMemoryExist SET SysStartTime = '19000101 00:00:00.0000000' ,SysEndTime = '99991231 23:59:59.9999999' GO --Step 4 Setting NOT NULL to the columns ALTER TABLE dbo.InMemoryExist ALTER COLUMN SysStartTime datetime2 NOT NULL GO ALTER TABLE dbo.InMemoryExist ALTER COLUMN SysEndTime datetime2 NOT NULL GO --Step 5 Adding PERIOD FOR SYSTEM_TIME option ALTER TABLE InMemoryExist ADD PERIOD FOR SYSTEM_TIME (SysStartTime, SysEndTime) GO --Step 6 Setting SYSTEM_VERSIONING property ALTER TABLE InMemoryExist SET (SYSTEM_VERSIONING = ON (HISTORY_TABLE = dbo.InMemoryExist_History)) GO |
Now the InMemoryExist table is enabled for system-versioning processes.
Read also: State transition constraints
Specifying DATA_CONSISTENCY_CHECK property
You ought to set SYSTEM_VERSIONING with DATA_CONSISTENCY_CHECK = ON to enforce data consistency checks on existing data. However, the DATA_CONSISTENCY_CHECK property currently has a memory leak profile when it used . If you decided to enable DATA_CONSISTENCY_CHECK for the temporal tables, then make sure that your instance has Cumulative Update 1 for SQL Server 2016.
Here is an example of enabling the DATA_CONSISTENCY_CHECK property on existing tables:
|
1 2 3 4 |
ALTER TABLE InMemoryExist SET (SYSTEM_VERSIONING = ON (HISTORY_TABLE = dbo.TableName_History, DATA_CONSISTENCY_CHECK = ON)) For a new table, DATA_CONSISTENCY_CHECK property enables after HISTORY_TABLE property separated by a comma. WITH (SYSTEM_VERSIONING = ON (HISTORY_TABLE = dbo.DepartmentHistory, DATA_CONSISTENCY_CHECK = ON)); |
Conclusion
The Temporal Table is a very useful SQL Server 2016 feature with which to automate row-versioned processes. It simplifies the task of archiving data and can also be a real fix to utilize a slowly-changing dimension for the data warehouse databases. Because it is so easy to set up new as well as existing tables, the Temporal Table feature is a good choice to implement with SQL Server databases.
Fast, reliable and consistent SQL Server development…
FAQs: Temporal Tables in SQL Server
1. How do you create a temporal table in SQL Server?
Add two DATETIME2 columns for the period start and end, define a PERIOD FOR SYSTEM_TIME clause, and enable SYSTEM_VERSIONING with a history table: CREATE TABLE dbo.Employee (… SysStart datetime2 GENERATED ALWAYS AS ROW START, SysEnd datetime2 GENERATED ALWAYS AS ROW END, PERIOD FOR SYSTEM_TIME (SysStart, SysEnd)) WITH (SYSTEM_VERSIONING = ON (HISTORY_TABLE = dbo.EmployeeHistory)). SQL Server automatically manages the history table.
2. How do you query temporal table history in SQL Server?
Use the FOR SYSTEM_TIME clause: AS OF (point-in-time snapshot), FROM…TO (open interval), BETWEEN (inclusive), CONTAINED IN (fully within range), or ALL (entire history). Example: SELECT * FROM dbo.Employee FOR SYSTEM_TIME AS OF ‘2024-01-15’ returns data as it existed on that date.
3. What is the difference between temporal tables in SQL Server and PostgreSQL?
SQL Server temporal tables are built into the engine with automatic history management via SYSTEM_VERSIONING. PostgreSQL does not have native temporal tables in the SQL Server sense; instead, you implement temporal functionality using triggers, range types (tstzrange), and extensions like temporal_tables or pg_temporal. The concept is the same but the implementation differs significantly.
This document contains proprietary information and is protected by copyright law.
Copyright © 2026 Red Gate Software Limited. All rights reserved
Load comments