
When I teach my session on “Best Practices Every DBA Should Know”, I recommend the following best practices:
- The sooner you detect potential data corruption, the less data you will lose should any problems arise, so run DBCC CHECKDB nightly on every one of your databases.
- To verify that your backups are good, regularly restore them to a different SQL Server instance. While most backups are good, they can become corrupt for many different reasons, and won’t restore.
As soon as I make these recommendations, I know what most of my audience is thinking:
- DBCC CHECKDB is very resource intensive and takes too long to run. I don’t have a large enough maintenance window to do this each night for all of the databases I manage, especially the large ones that need to be up 24/7. I’ll just run DBCC CHECKDB occasionally, or when I think the database is acting a little weird.
- I don’t have time to test restores of all my backups. Besides, most backups work, so why go to all that effort when the odds of having a bad backup are slim?
Because these lines of thought are so common, I remind my audience that, as DBAs, we are the protectors of our organizations’ data. It is our responsibility to take every step we can to ensure that data entrusted to us is protected. Even if the odds that a problem could occur are slim, eventually those odds will catch up with you. If you haven’t taken all of the proper precautions, then it is your fault when data is lost.
I admit it’s not always easy to implement these two best practices. At least, it wasn’t until now. With the introduction of Red Gate Software’s SQL Backup Pro 7, you get a new feature called Automatic Backup Verification. Essentially, this feature creates jobs to:
- Automatically restore backups onto a test server
- Test the backups to ensure they can be restored
- Run DBCC CHECKDB on the restored database
This ensures that every database is checked for corruption on a daily basis.
Once the jobs are set up, any database you choose will be automatically verified. Not only does this help ensure your data is good, it offloads DBCC CHECKDB, a resource-intensive process, from your production databases onto a test server.
How Does Automatic Backup Verification Work?
To get started, you need to use SQL Backup Pro 7 to set up backup jobs for full, differential (if desired), and transaction log backups. You can use any schedule you like. When the backups are taken, they are automatically compressed and optionally encrypted. This greatly reduces the space needed to store the backups and the time it takes to perform them.
As you set this up, you will generally designate an attached storage device, such as a DAS or SAN, where backups are to be stored. As part of this job, SQL Backup Pro 7 allows you to specify a test SQL Server instance. It will move your backups across to this server and run Automatic Backup Verification there.
You can use any server that has enough space to hold a restored database. It can be a dev/test server, or any unused or underused server you have available. The backups are moved across the network to this test server after they backups have been taken and stored on the attached storage device.
Once the backups are on the test server, a scheduled Automatic Backup Verification job restores the database, tests whether it can be restored, and runs DBCC CHECKDB on the restored database. The results are logged and the now-verified database can be automatically deleted, or retained if you want to use it for development or testing.
That’s all there is to it. Once you have set up Automatic Backup Verification, the hard work is done for you. It saves time, reduces the load on the production server, and ensures that your backups and databases are tested as thoroughly as possible.
How Do You Set Up Automatic Backup Verification?
Let’s assume that you have configured SQL Backup Pro 7 to create full, differential (if appropriate), and transaction log backups on a set schedule, and that the backup job has been configured to copy the backups to a test server. The ability to automatically copy a backup to another server has been a feature of SQL Backup Pro for many years. It’s commonly used to store multiple backups in different locations for additional backup protection.
Once a backup job is running and backups are being copied to a test server, it’s time to configure Automatic Backup Verification. The setup for Automatic Backup Verification is a one-time process. To show you how it works, I’m going to take you through the “Schedule Restore Jobs” wizard step-by-step. Once the wizard is completed and the Automatic Backup Verification job is created, everything happens automatically.
The “Schedule Restore Jobs” wizard is accessible from the SQL Backup Pro 7 main screen:
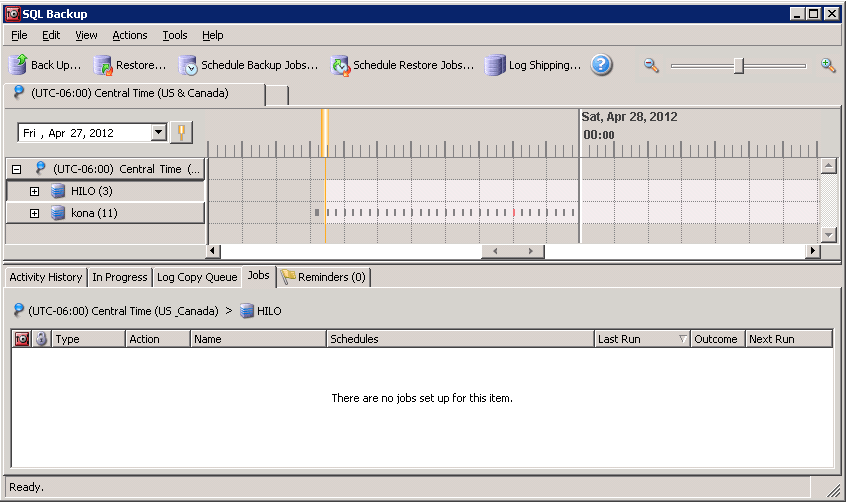
Figure 1: The main screen includes the “Schedule Restore Jobs” icon, which is used to start the wizard.
After clicking the icon, the “Schedule Restore Jobs” wizard begins, as shown in figure 2.
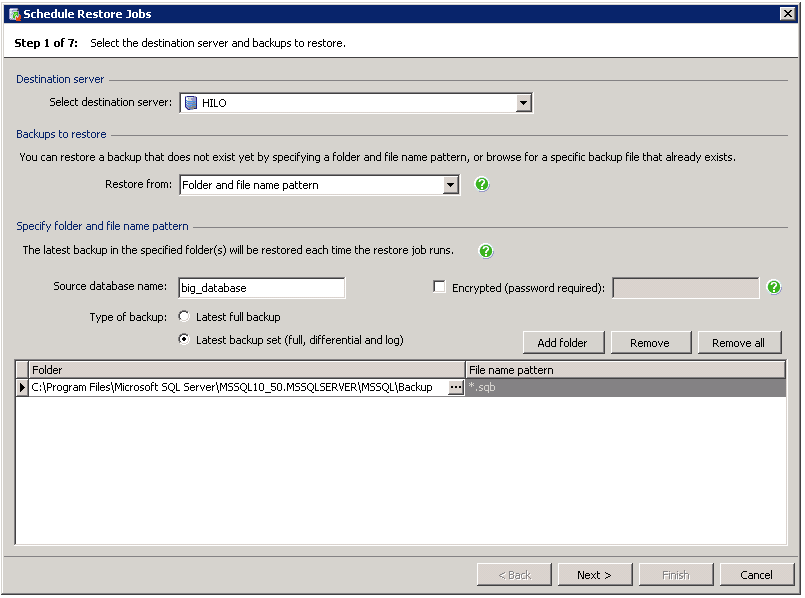
Figure 2: The first screen in the “Schedule Restore Jobs” wizard.
The first step is to select a “Destination Server” from the “Select Destination Server” drop-down box. This is where you want to perform the test restore and run DBCC CHECKDB. In my example, it is a test server named “Hilo”.
Next, we configure “Backups to Restore” from the “Restore From” drop-down box. The drop-down has two options: “Folder and File Name Pattern” or “Specific Backup Files”. I expect most of you will need to select “Folder and File Name Pattern”, which means that Automatic Backup Verification will use the naming patterns of backup files to figure out which files belong with each other. For example, if you have a full backup, a differential backup, and multiple transaction log backups from a single database, it will figure out which files go together and should be restored together, based on similarity of names.
If you prefer to specify the names of the backup files manually, select “Specific Backup Files.” I prefer to let the application do the hard work, so I have selected “Folder and File Name Pattern”.
Next, you need to specify the “Source Database Name”. In my example it is “big_database”. If that database has been encrypted, you will also have to specify the password so that it can be decrypted upon restore. This is not the case in my example.
The next option is “Type of Backup”. You can choose “Latest Full Backup” or “Latest backup set”. This gives you the option of restoring and testing full backups only, or the full backup, plus any differential and transaction log backups. I want to restore everything, so I have selected “Latest Backup Set”.
The last option is “Folder”. This is the path where the backup files that will be restored are located. Generally, this will be filled in for you with the default backup location for your test instance. If you have stored the backups in an alternative location, use the “Browse” icon to locate and specify the location. My backups are stored in the default location, so I leave this setting as it is. Click “Next” to continue.
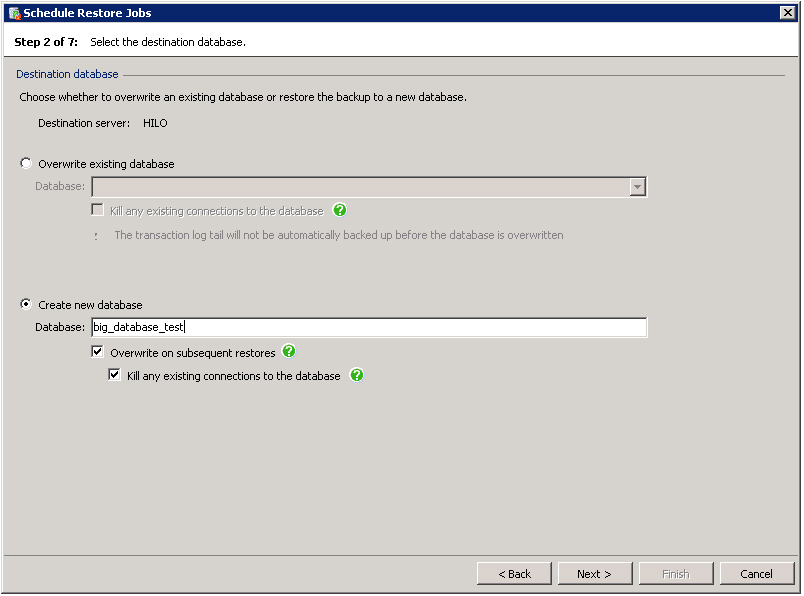
Figure 3: Selecting the name of the destination database.
The next choice is whether you want to “Overwrite Existing Database” or “Create New Database”. The first option allows you to overwrite an existing database, but this is only possible if the database already exists. If you want to drop your database after the test restore and DBCC CHECKDB are done, then you don’t need this option. If you prefer not to drop a database after each test, perhaps because this is a dev/test server that will be used by developers, then this option can be used. My choice is to “Create a New Database” as I plan to drop the database after each test in order to conserve disk space.
When you choose “Create a New Database”, you need to give the database a name. In other words, you have the opportunity to rename your restored database so you don’t get confused with your production version. This is what I have done in figure 3.. When you’re done here, click “Next” to continue.
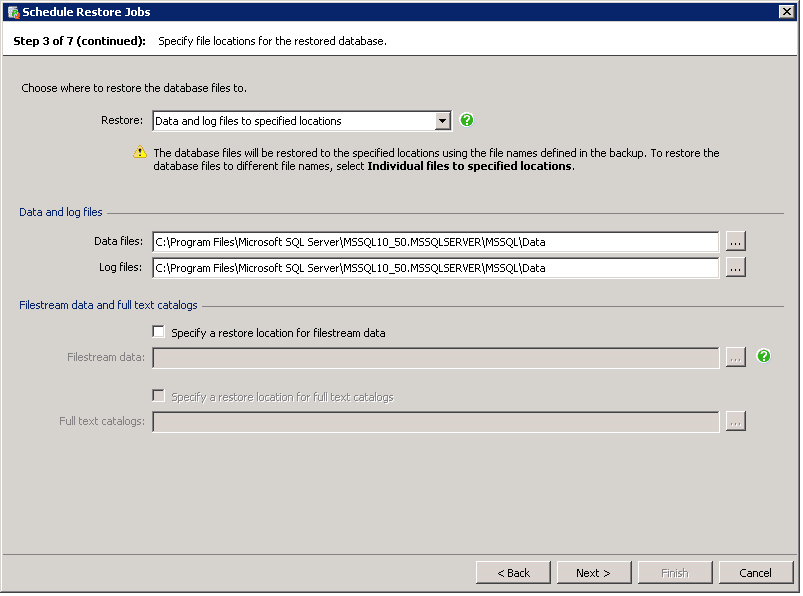
Figure 4: Choose where the backups will be restored to.
As you probably know, databases are restored by default to the same physical path as they were originally created from. We are restoring to a new server, so the odds are that the original database path and the path on the test server are not the same. If this is the case, you can choose to restore “Data and Log Files to Specified Locations” in the “Restore” dropdown box. This means that you specify where the restores are to be located on the test server. This not only includes the MDF and LDF file locations, but any Filestream data as well.
In my example, I am choosing to restore the database to a different location than the one on the production server. If the path is the same on both servers, you can choose another option from the “Restore” drop-down box called “All Files to Default Locations”, which is not shown on the above screen. Click “Next” to continue.
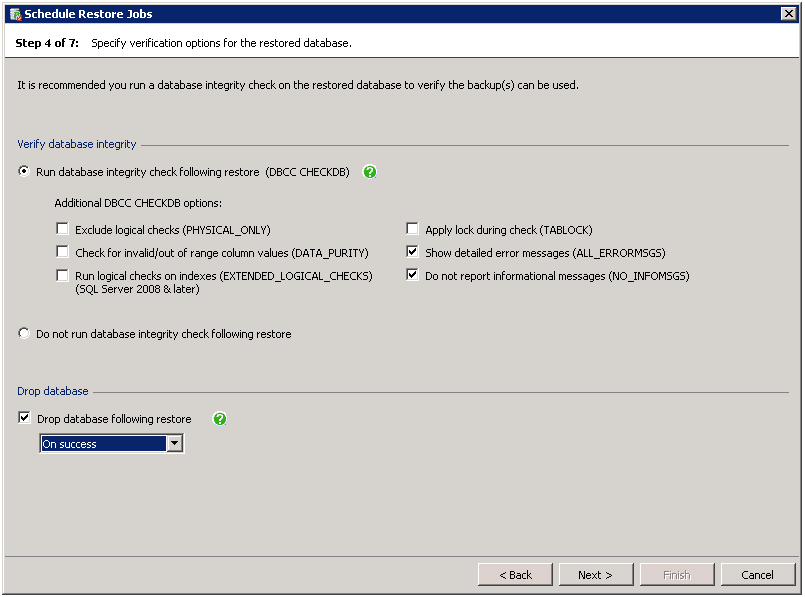
Figure 5: Choose the DBCC CHECKDB options.
This screen allows you to determine which DBCC CHECKDB options you want to run on the database after it is successfully restored on the test server. I have kept the default settings from SQL Backup Pro 7.
As I mentioned earlier, you can have the database automatically dropped after it is tested. I have selected “On success” from the “Drop Database Following Restore” drop-down box. This works like it sounds. The database is only dropped if it passes the DBCC CHECKDB without any issues. If DBCC CHECKDB finds a problem, then the database is kept, so you can investigate exactly what the problems are.
Once you’re done here, click “Next” to continue.
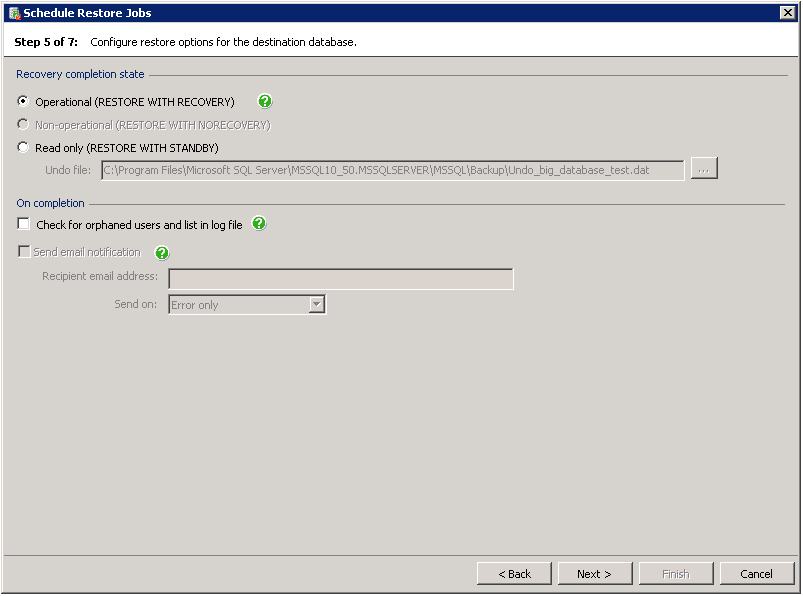
Figure 6: Choose whether or not you want to restore the database so that it is operational.
In my scenario, I just want to check the restore and see if it passes the DBCC CHECKDB test, then drop the database. Because of this, I have chosen the “Operational” option. This restores all your backup files (full, differential, transaction log) and puts the database in operational mode.
One more option I would recommend implementing is to set up email notifications if any restores or DBCC CHECKDB error messages occurred. You can do that by checking “Send email notification” and entering your details.
Once you’ve picked these settings, click “Next” to continue.
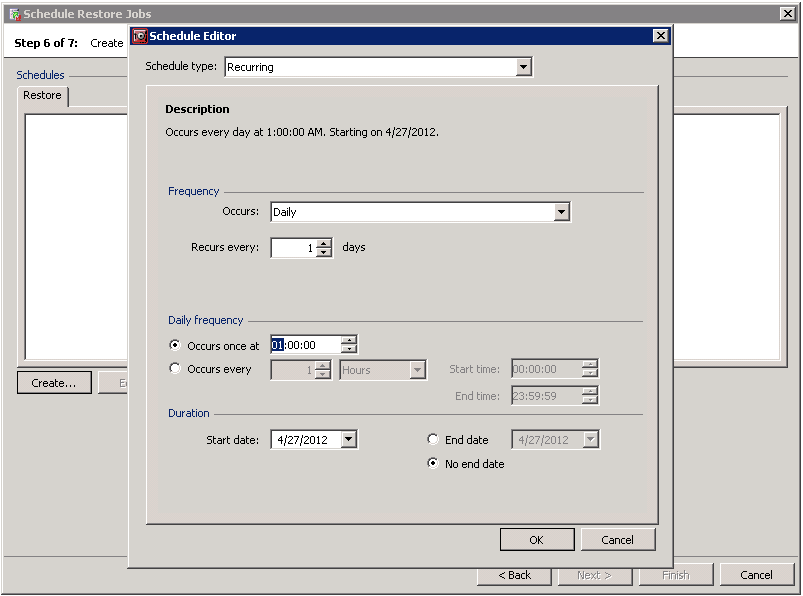
Figure 7: Schedule when Automatic Backup Verification runs.
Automatic Backup Verification should be run after a full database backup has been completed, so you should schedule so that it occurs after your backup jobs. If any differential or transaction log backups were made between the time of the full backup and the Automatic Backup Verification, they will automatically be included. Click “OK”, then “Next” to continue.
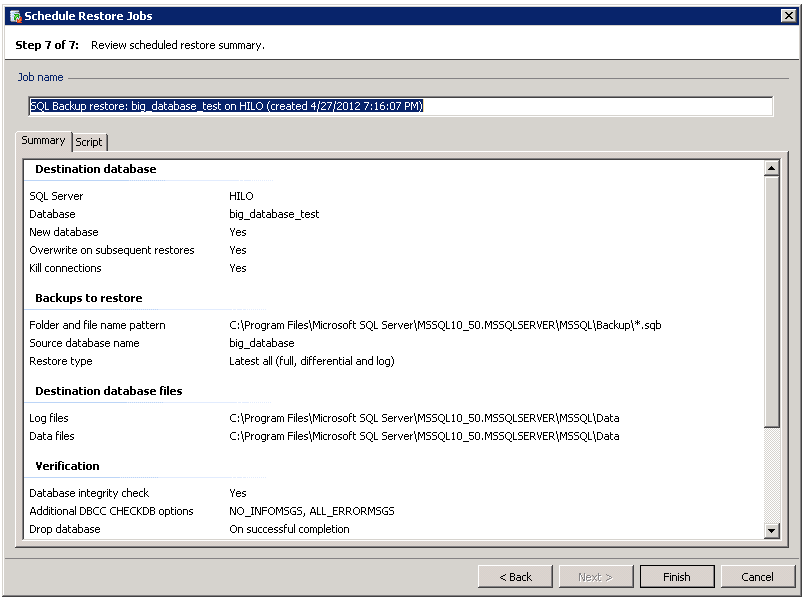
Figure 8: Summary screen.
The last screen of the wizard summarizes your choices. Once you click “Finish”, the job will be created. At that point the Automatic Backup Verification process will proceed on the schedule you created.
This may seem like a lot of screens, but once you understand your options you can complete them all within a minute.
What Happens When Automatic Backup Verification Runs?
When the Automatic Backup Verification job runs, you really won’t know it is happening, unless you bother to look at the “In Progress” screen in SQL Backup Pro 7 or watch Management Studio as the job runs.
Once the job is complete, you can view the “Activity History” tab at the bottom of the SQL Backup Pro 7 main screen, as shown in figure 9.
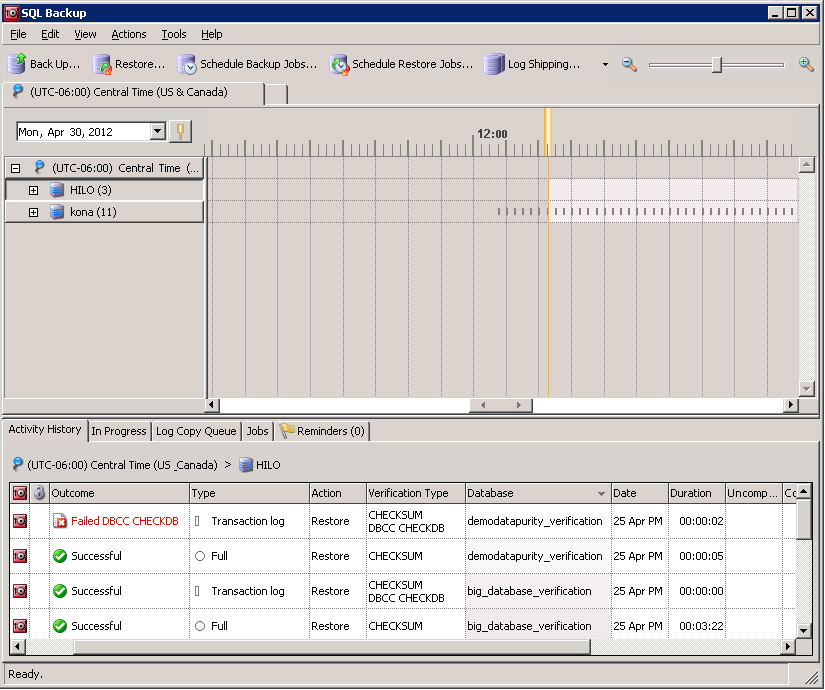
Figure 9: The “Active History” tab is used to find out if your restore and DBCC CHECKDB tests failed or succeeded.
Let’s take a moment to carefully review the “Active History” tab, starting at the bottom of the screen. The last entry shows that the big_database_verification database was restored using a full backup, that it was successful, and that a CHECKSUM was run during the restore.
The next to the last entry shows that the big_database_verification database transaction log was successfully restored. This time around a CHECKSUM and a DBCC CHECKDB were run during the restore.
While the screen may seem to indicate that the DBCC CHECKDB was only run on the transaction log, this is not the case. DBCC CHECKDB can only be run after the full backup, any differential backups, and any transaction log backups have been fully restored and the database made fully operational. In this example, a full backup was first successfully restored, one transaction log backup was successfully restored, then DBCC CHECKDB was run on the fully operational database, and it ran successfully. We can be positive that the backup is good and that it doesn’t have any problems which DBCC CHECKDB can detect.
What happens when a DBCC CHECKDB on a restored database fails? That is what you see in the top two entries of the “Active History” tab. The database, demodatapurity_verification (provided by Paul Randal), has been purposely corrupted so that DBCC CHECKDB can find errors. In the second line, it appears that the full database restore was successful. But the top line shows that a transaction log was restored, DBCC CHECKDB was run on the fully restored and operational database, and that it failed. In this case, we know this database has a problem and, as the DBA, you need to figure out what to do next.
For a detailed account of what happened you can click on the error message, as in figure 10.
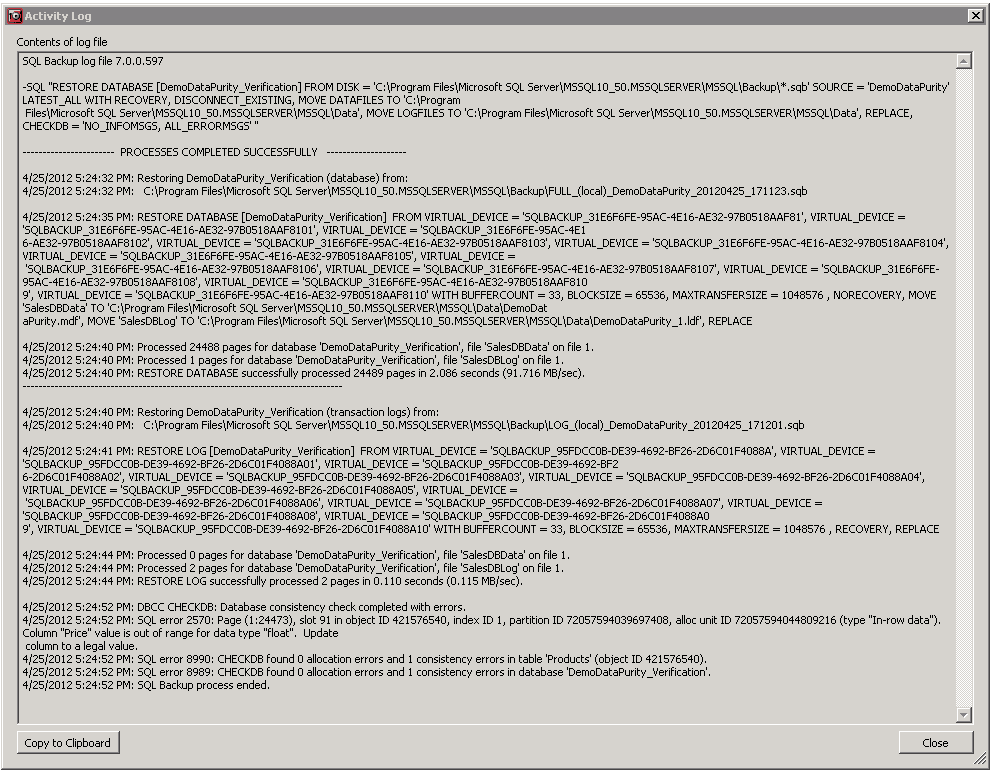
Figure 10: Detailed activity log messages are available to help you identify problems.
It might take you a little time to review the error message, but it should include enough information to help you begin to work out what is wrong with the database.
Summary
SQL Backup Pro 7 Automatic Backup Verification is easy to implement, and makes database restore verification and DBCC CHECKDB verification automatic. Now, no DBA has the excuse that they don’t have the time or resources to ensure that both of these critical best practices are implemented.
To test this for yourself, you can download a free evaluation copy of SQL Backup Pro 7, and see how it works in your environment.
Load comments