
Sometimes when working with very large sets of data, you may not want to return all of the data at once. I discussed using TOP in my previous article, which allowed you to only get a number of rows from the start of the results from a query. However, if you want to see the rows after that top set,
paging of data takes that further to let you scroll through a set of data one page at time. So, you might want to fetch the first 100 rows, then another 100, then the rest of the rows, etc.
This article will show you how to page through a set of results using the OFFSET and FETCH options of the ORDER BY clause.
Sample Data
Before showing some different paging options, I will create some test data using the code in Listing 1.
|
1 2 3 4 5 6 7 8 9 10 11 12 13 14 15 16 17 18 19 20 21 22 23 24 |
-- Create test data USE tempdb; GO DROP TABLE IF EXISTS TestData; GO CREATE TABLE TestData ( ID INT IDENTITY, CityName VARCHAR(20), StateName VARCHAR(20), Founded SMALLINT); --Insert rows of test data INSERT INTO TestData VALUES ('Seattle','Washington',1851), ('Redmond','Washington',1871), ('Bellevue','Washington',1953), ('Spokane','Washington',1881), ('Tacoma','Washington',1872), ('Portland','Oregon',1851), ('Grants Pass','Oregon',1887), ('Salem','Oregon',1842), ('Bend','Oregon',1905); |
Listing 1: Creating Sample Data
In Listing 1, a table named TestData was created that contains a list of cities. This data will be used in the different paging examples below. If you want to follow along and run the example code in this article you can create the sample TestData on your test instance of SQL Server.
Page through data in T-SQL
In order to page through a page of data using T-SQL the OFFSET and FETCH options of the ORDER BY clause are used. SQL Server starts returning data from a specific row based on the OFFSET value and returns a specific number of rows based on the FETCH value.
Using the OFFSET and FETCH options of the ORDER BY clause is a better option for paging then using a server-side cursor.
Syntax for the OFFSET and FETCH
Below is the syntax for the ORDER BY clause as found in the Microsoft Documentation.
|
1 2 3 4 5 6 7 8 9 10 11 12 13 14 |
ORDER BY order_by_expression [ COLLATE collation_name ] [ ASC | DESC ] [ ,...n ] [ <offset_fetch> ] <offset_fetch> ::= { OFFSET { integer_constant | offset_row_count_expression } { ROW | ROWS } [ FETCH { FIRST | NEXT } {integer_constant | fetch_row_count_expression } { ROW | ROWS } ONLY ] }} |
The <offset_fetch> option is an optional item that is used in conjunctions with the ORDER BY clause to page through a set of data. It has two components:
OFFSET and FETCH.
The OFFSET option identifies the number of rows in an ordered row set to skip before rows are returned. The FETCH option is optional and identifies the number of rows that will be returned. If the FETCH option is not specified all rows from the OFFSET location to the end of the ordered set are returned.
To show how the OFFSET and FETCH clauses let’s go through a few different examples.
Using the OFFSET option
The OFFSET option of the ORDER BY clause is used to identify the number of rows to skip in a record set before rows are returned. The value can be from 0 (zero) or any number up to the number of rows in the set. When zero (0) is used no rows are skipped, as shown when the code in Listing 2 is executed.
|
1 2 3 4 |
SELECT * FROM TestData ORDER BY ID OFFSET 0 ROWS; |
Listing 2: Skipping zero rows.
When Listing 2 is executed the output showing in Report 1 is created.
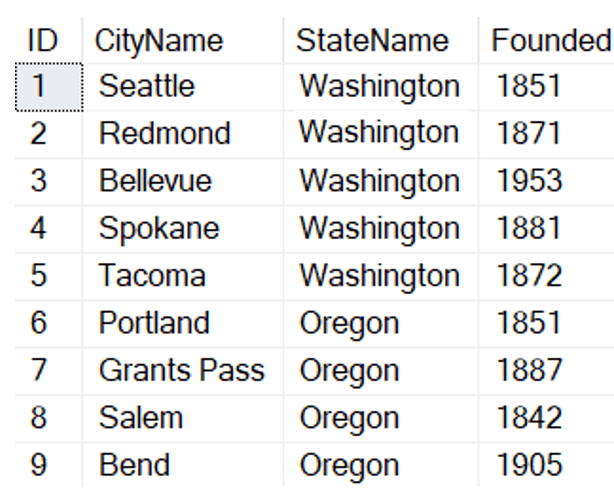
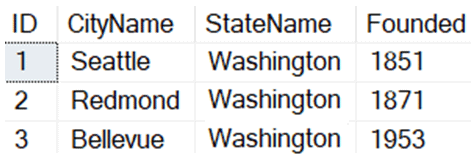
Report 1: Output when Listing 2 is run.
As you can see when Listing 2 is run every row in table TestData is returned. In Listing 2 no rows were skipped because 0 (zero) was used for the OFFSET value and the FETCH option is not provided so all rows are returned from the sample data table.
Suppose the first 5 rows based on ID values needed to be skipped when selecting data. To meet that requirement the code in Listing 3 could be executed.
|
1 2 3 4 5 |
-- Skipping 5 rows DECLARE @Skip INT = 5; SELECT * FROM TestData ORDER BY ID OFFSET @Skip ROWS; |
Listing 3: Skipping 5 rows
The code in Listing 3, this time, specified that 5 rows would be skip. by using a variable instead of a constant. When Listing 3 is executed Report 2 is produced.
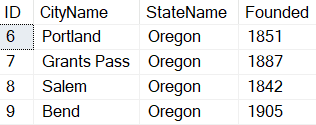
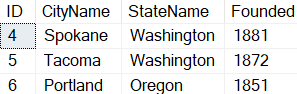
Report 2: Output created when Listing 3 is run.
By reviewing the output, in Report 2, you can see only the records with the ID value of greater than 5 and a StateName value of “Oregon” are displayed this time. That is because the first 5 rows in the TestData table based on the ID value were skipped before the rest of the test data table rows are returned using the SELECT statement.
Each example so far has only shown how to skip rows. If you want to limit the number of rows displayed the FETCH option needs to be used.
Using the FETCH option
Assume you what to skip no rows in the record set, but only display just the first three rows of data based on the ID column value. If this was the requirement, then the code in Listing 4 could be executed.
|
1 2 3 4 5 6 7 8 9 |
-- Display first 3 rows DECLARE @Skip INT = 0; DECLARE @Fetch INT = 3; SELECT * FROM TestData ORDER BY ID OFFSET @Skip ROWS FETCH NEXT @Fetch ROWS ONLY; |
Listing 4: Displaying the first 3 rows
In Listing 4 another variable was declared @Fetch, which identifies the number of rows to return. It was set to the value 3. When the code in listing 4 is executed the output in Report 3 was produced.
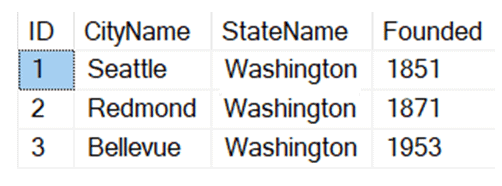
Report 3: Output created with Listing 4 is run.
By reviewing Report 3 you can see that zero rows were skipped, as identified by the OFFSET value. Plus, only the first 3 rows of the TestData table based on the ID column were displayed, because the FETCH option variable @Fetch was set to 3.
Suppose you wanted to display the first three cities in Oregon based on the ID column value. To accomplish this requirement the code in Listing 5 could be run.
|
1 2 3 4 5 6 7 8 9 10 11 |
-- Display first 3 Oregon Cities DECLARE @Skip INT; DECLARE @Fetch INT = 3; SELECT TOP (1) @SKIP = ID - 1 FROM TestData WHERE StateName = 'Oregon'; SELECT * FROM TestData ORDER BY ID OFFSET @Skip ROWS FETCH NEXT @Fetch ROWS ONLY; |
Listing 5: Displaying first three cities in Oregon.
When the code in Listing 5 is executed the results in Report 4 is displayed
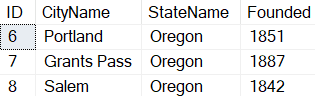
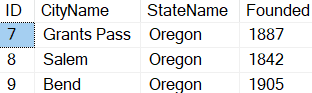
Report 4: Results displayed with Listing 5 is run.
In Listing 5 the @Skip variable was set programmatically using a SELECT statement. That statement identified the ID value for the first row that had “Oregon” set as the StateName. By programmatically setting the @Skip variable, all of the Washington state cities were skipped. Only the first 3 Oregon state rows were displayed because the @Fetch variable was set to 3.
Paging through data with a loop
The examples in the prior sections showed how to use the OFFSET and FETCH options to identify the rows to skip and display from the sample data table. By changing the OFFSET and FETCH values between calls to SQL Server an application can page through a table of data. This is particularly useful when you need to display one page at a time while paging through a table with a large number of rows. By using the OFFSET and FETCH options of the ORDER BY clause will minimize the amount of data transmitted back to the client, by only sending one page data at a time to the application.
To simulate paging through the sample data my example will use a WHILE loop. The code in Listing 6 pages through the sample data displaying 3 rows of data at a time. Keep in mind while you review this example a client application would normally perform the operations of looping through data one page at a time.
|
1 2 3 4 5 6 7 8 9 10 11 12 13 14 15 16 17 18 19 20 |
-- Paging through sample data DECLARE @Skip INT = 0 ; DECLARE @Fetch INT = 3; DECLARE @LoopCnt INT; SELECT @LoopCnt = COUNT(*) / @Fetch FROM TestData; WHILE @LoopCnt > 0 BEGIN SET @LoopCnt = @LoopCnt - 1; SELECT * FROM TestData ORDER BY ID OFFSET @Skip ROWS FETCH NEXT @Fetch ROWS ONLY; -- Adjust the rows to skip SET @SKIP = @SKIP + @Fetch; END |
Listing 6: Paging through sample data 3 rows at a time
The first time through the WHILE loop the rows in Report 5 are displayed. This is because the @Offset value is set to zero and the @Fetch option is set to 3.
Report 5: First time through the loop.
Before the second time through the loop the @Skip value is increased by the value of 3 that is contained in the @Fetch variable. The rows in Report 5 are displayed for the second time the loop is executed.
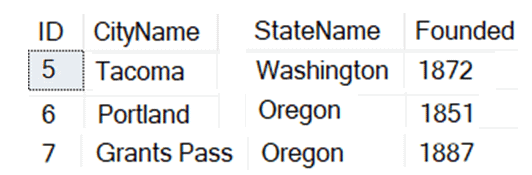
Report 6: Second time through loop.
Before the last time through the loop the @Skip is increased again by 3. Report 7 shows the rows displayed for the third time through the loop.
Report 7: Last time through the loop.
As you can see by adjusting the @Skip variable between each time through the loop the next set of 3 rows where displayed.
A caveat: Changes to underlying data
One of the biggest concerns when paging data is that you are not holding any locks or version control of the results. Each execution of the SELECT statement fetching rows is executing the query again. This could be an issue for hard to optimize query, but there is one more interesting issue with that. Changes to the results of your query.
Aany change to the underlying data can cause you to see rows again, or perhaps miss rows. For example, consider the following set of statements in Listing 7:
|
1 2 3 4 5 6 7 8 |
-- Display first 3 rows DECLARE @Skip INT = 0; DECLARE @Fetch INT = 3; SELECT * FROM TestData ORDER BY ID OFFSET @Skip ROWS FETCH NEXT @Fetch ROWS ONLY; GO |
Listing 7: Showing the effect of changing rowsets
This returns the output you see in report 8:

Report 8: Result from fetching first three rows
Next, in Listing 8, I will delete the row with ID = 3, and then run the statement that an application would execute if paging through these rows. It is the same code as in Listing 7, but I skipped 3 rows instead of 0.
|
1 2 3 4 5 6 7 8 9 10 11 12 |
DELETE FROM TestData WHERE ID = 3; GO -- Display first 3 rows DECLARE @Skip INT = 3; DECLARE @Fetch INT = 3; SELECT * F ROM TestData ORDER BY ID OFFSET @Skip ROWS FETCH NEXT @Fetch ROWS ONLY; |
Listing 8: Removing an already fetched row, then fetching next rows
In report 9, you can see that the ID value starts at 5 instead of 4, like you may have expected. When rows are inserted, you may end up with the same row returned multiple times.
Report 9: Shows that row with ID=4 has been skipped.
If you require to get absolutely all of the rows from your SELECT statement, it can be useful to store the results in a temporary table and page through it. Another method of handling this is using SNAPSHOT isolation level.
Summary
In this article you learned how to use the OFFSET and FETCH options of the ORDER BY clause to page through an ordered set of records. The OFFSET option was used to skip a specific number of rows in the ordered set. Whereas the FETCH option was used to identify the number of rows to FETCH from the record set. By controlling these two different options a client application could programmatically page through the rows of data a page at a time. Next time you need to page through a set of rows in a table consider whether using the OFFSET and FETCH options of the ORDER BY clause will meet your paging requirements.
This document contains proprietary information and is protected by copyright law.
Copyright © 2026 Red Gate Software Limited. All rights reserved
Load comments