
What is Mutation Testing?
How do you know that you can trust your unit tests? How do you know that they’re really telling you the truth? If they don’t find a bug, does that really mean that there aren’t any? What if you could test your tests?
Mutation testing is one way that you can test those tests. Mutation testing involves deliberately altering a program’s code, then re-running a suite of valid unit tests against the mutated program. A good unit test will detect the change in the program and fail accordingly.
There has recently been a resurgence of interest in Mutation testing, which was actually first conceived of by Richard Lipton in 1971, resulting in mutation testers appearing on many different platforms. Some notable examples are Java’s μJava, Ruby’s Heckle, C++’s Insure++, and of course, C#’s Nester.
How Does Mutation Testing Work?
In a nutshell, mutation testing works in the following way. First you start with a piece of production code that’s well covered by unit tests. Once you’ve verified that all tests pass for a given piece of code it’s time to apply your mutation to your target assembly.
The extent of the mutation that you apply to your code can span many levels; some of the more common mutations simply involve replacing a logical operator with its inverse. For example, == can become != while < can become >=. In more complex mutations you may go so far as to rework the order of execution of code or even remove some lines of code completely. However, as mutations of this level can often cause compiler errors, it’s often easier to initially stick with the simpler mutations that I’ve mentioned.
After your code has been mutated, it’s time to re-run your original suite of unit tests against it. If your tests are well written, any test that covers the mutated program code should fail. However, if your tests succeed in spite of the mutated program code then your tests are creating false positives and need to be revisited.
Building Your Own Mutation Tester
Although there are a few mutation testers available for .NET, the best way to learn any technique is by writing your own. Over the next few paragraphs, we’ll walk through building our own simple mutation tester to test the test suite of a simple program.
Something to Mutate
But before we can build our mutation tester, we need a program to test. FirstBank, available here, is a simple banking library we can use as our guinea pig.
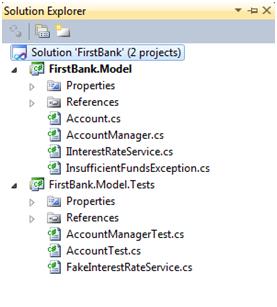
Let’s take a moment to familiarize ourselves with FirstBank. First, we’ll note that there are two projects in the solution. The first project, FirstBank.Model contains the production code for a simple Account, AccountManager, and an exception to represent when an account has insufficient funds to perform an action. There’s also an interface defined for an interest rate service. The second project, FirstBank.Model.Tests, simply contains the unit tests which target the first project.
Let’s take a closer look at the Account class.
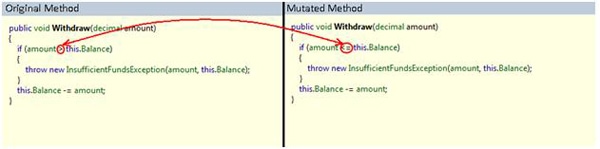
The Account class has two methods-Withdraw() and Deposit(), as well as a single property-Balance. The Deposit() method simply accepts an amount from the caller and adds it to the account’s current balance. The Withdraw() method accepts an amount from the caller and deducts it from the account’s current balance. However, the Withdraw() method also has a check to ensure that the caller isn’t attempting to withdraw more than the account’s current balance. In the event that the caller asks for more than the current balance an exception of type InsufficientFundsException is thrown.
|
1 2 3 4 5 6 7 |
public void Withdraw(decimal amount) { if (amount > Balance) throw new InsufficientFundsException(amount, Balance); Balance -= amount; } |
Now that we’re familiar with the key parts of the FirstBank solution, let’s move onto our mutation tester.
MutantPower
MutantPower is a very simple mutation tester that simply inverts any Boolean conditionals that it finds in the code. I’ve intentionally kept MutantPower simple for two reasons. First, MutantPower is only really intended to be run against the FirstBank solution therefore it only needs to handle the few branching operations it encounters within that solution. Secondly, the simpler we keep the MutantPower codebase the easier it’ll be for us to talk about. MutantPower relies heavily on the Mono Project’s Cecil library to handle both traversing the object graph and the IL manipulation of .NET assemblies. You can download the source code for MutantPower here.
Why Cecil?
Cecil was created as part of the Mono Project, which is an open source implementation of the .NET framework. Cecil is used heavily in many of Mono’s own development tools such as the Mono debugger and Gendarme, which is an FxCop-like static analysis tool. Although Cecil is actually an open source implementation of .NET’s Reflection.Emit library and has very similar capabilities, I tend to prefer Cecil over Reflection.Emit since it offers some more advanced functionality. In addition, since it’s not necessary for Cecil to actually load the target assembly into memory, Cecil tends to perform noticeably faster than Reflection.Emit.
MutantPower begins by loading the target assembly, passed as a command line parameter, into a ModuleDefinition object. It then iterates through all of the types it finds in the module. In our example, these are types such as Account, AccountManager, and InsufficientFundsException. Note that we ignore any type which is actually an interface, such as IInterestRateService. The reason for this is that although interfaces do have members, those members do not have bodies so they have no IL to manipulate. Therefore interfaces are of little interest to a mutation tester.
|
1 2 3 4 5 6 7 8 9 10 11 12 13 14 |
var module = ModuleDefinition.ReadModule(inputAssembly); foreach (var typeDefinition in module.Types) { if (typeDefinition.IsInterface) continue; foreach (var methodDefinition in typeDefinition.Methods) { foreach (var instruction in methodDefinition.Body.Instructions) { . . . } } } |
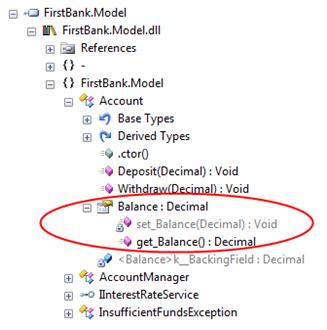
Within each type we also iterate though that type’s methods. This allows us to examine all methods of a class, regardless of visibility. What about properties? In C# properties are actually just syntactic sugar around specially named methods. So, in the IL world in which we’re working now, properties simply show up as just another method. For example, when we reflect over the Account class’s Balance property we see that the property actually exists in IL as two separate methods named get_Balance() and set_Balance(Decimal).
Finally, within each method we iterate though the IL statements that comprise its body. You may have noticed that the FirstBank solution contained no abstract classes. However, if we were dealing with a solution that did we would want to take special care here to ignore any abstract methods. Just as interfaces contain no method bodies and thus are of little interest to a mutation tester, abstract methods are also missing method bodies and would be of just as little interest.
Note the code…
|
1 2 3 4 5 |
if (instruction.OpCode == OpCodes.Brtrue_S) instruction.OpCode = OpCodes.Brfalse_S; else if (instruction.OpCode == OpCodes.Brfalse_S) instruction.OpCode = OpCodes.Brtrue_S; |
This is the heart of our mutator. This section of code replaces any instance of if (true) with if (false) and vice versa. Obviously this is a very simple mutator, but if we wanted to extend this to handle some of the other mutations mentioned in the beginning of the article, such as inverting logical comparisons, this is where we could do it.
Finally, after all of the Boolean operators found have been inverted we save the newly mutated assembly back out to disk.
Running Your New Mutation Tester
Before we begin mutating our assembly, we must first make sure our code is in a good state to begin with. To do this, we need to run our unit tests against our original, un-mutated assembly.

As you can see, all of our tests pass without incident. Now that we know we’re starting from a clean slate, it’s time to mutate.
Our mutator accepts the assembly to be mutated as a command line argument which means that we can call the mutator like so.

Once the mutator has completed you should have two assemblies in your output folder, FirstBank.Model.dll and FirstBank.Model_backup.dll. FirstBank.Model_backup.dll is actually your original unharmed assembly whereas FirstBank.Model.dll is your assembly after the mutations have been applied. It’s important that the mutated version of the assembly retain the same name as the original assembly. This is so that unit tests that were compiled against it can find the mutated assembly to retest.
If we examine both assemblies using Red Gate’s .NET Reflector®, it becomes easy to spot the differences between the mutated version and the original version of the assembly. Looking in the Account.Withdraw() method of the original assembly (FirstBank.Model_backup.dll) we can see the code is still checking for insufficient funds and throwing the InsufficientFundsException as expected. However, if we examine the same method in our newly mutated assembly (FirstBank.Model.dll) we see that the code is actually doing the opposite of what we would expect. In fact, the InsufficientFundsException is only thrown if the amount that the account holder has requested is less than or equal to their current balance!
You may be wondering why inverting the Boolean operators true and false resulted in the operator > becoming <=. To answer this question we’ll have to examine the underlying IL that results from the C# code above.
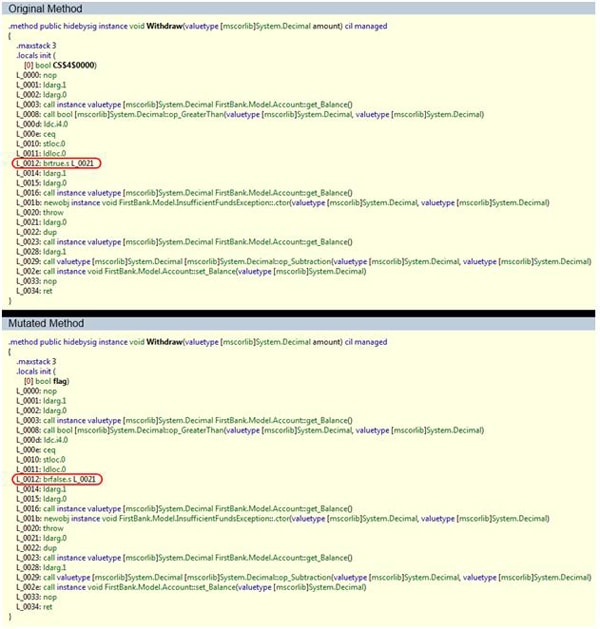
Take a look at line L_0012 in both sections of IL. This is really the only line of code between the two versions of the Account.Withdraw() method that exhibited any significant change. That change, as expected, was an inversion of the brtrue.s command to the brfalse.s command (the .s suffix simply denotes the value we’re evaluating is stored as an 8-bit short).
A full explanation of IL is well beyond the scope of this article, but in a nutshell the brtrue.s and brfalse.s commands on line L_0012 simply evaluate the result of the op_GreaterThan() command executed on line L_0008, which is stored in location 0. Then, based on whether this value is true or false, line L_0012 instructs the runtime to continue to line L_001b, which throws the InsufficientFundsException, or to skip the exception completely and go directly to line L_0021, which continues with the execution of the balance deduction.
The only difference between the two methods is that the original Withdraw() method skips throwing the exception if the results of the op_GreaterThan() operation are true (the balance is greater than the amount requested) whereas the mutated Withdraw() method skips throwing the exception if the results are false (the balance is less than or equal to the amount requested).
The interesting part is that our mutation didn’t actually change the logical operator we used, but instead it changed the control flow resulting from the execution of that operator.
Let’s see how this new mutation affects our previously 100% green test suite.
After running our test suite against our mutated assembly we see that we now have a mixture of both passing and failing tests. Unlike traditional unit testing, we actually strive for 100% of our tests failing when doing mutation testing. Why? Because if our tests failed after the code was mutated then we know they’re serving us well as regression tests by detecting changes in logic.
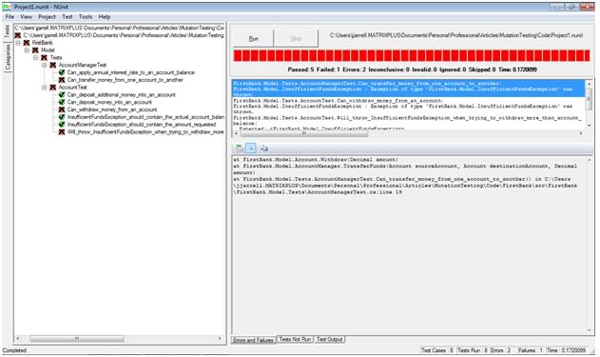
Let’s start by looking at which tests failed.
AccountTest.Can_withdraw_money_from_an_account
This test failed because the Withdraw() method threw an InsufficientFundsException even though the caller was trying to withdraw less than their current account balance. However, this is exactly the behavior our mutated code now prescribes so this test successfully caught the mutation.
AccountTest.Will_throw_InsufficientFundsException_when_trying_to_ withdraw_more_than_account_balance
This test also failed but for the opposite reason than the test above. In this test the caller was able to withdraw more than their account balance without triggering an exception. Although this likely made the caller quite happy, their bank was likely less than thrilled with this new ‘feature’. This test also appears to be behaving exactly how we would expect it to..
AccountManagerTest.Can_transfer_money_from_one_account_to_another
Finally, a test in the AccountManagerTest suite failed as well. This may seem a bit unexpected at first since we only mutated code in the Account.Withdraw() method. However, once we examine the AccountManager.TransferFunds() method the reason becomes obvious. The TransferFunds() method actually calls the Account.Withdraw() method. This means that this test failed for the same reason as the AccountTest.Can_withdraw_money_from_an_account method above.
In the vernacular of mutation testing, we would say that the mutant we introduced in the Account.Withdraw() method was ‘killed’ by these three tests.
Now let’s take a look at the tests that passed.
-
AccountManagerTest.Can_apply_annual_interest_rate_to_an_account_balance, -
AccountTest.Can_deposit_money_into_an_account, -
AccountTest.Can_deposit_additional_money_into_an_account
These three tests all still passed…er, failed. Does that mean they failed our mutation test? At first glance, yes. However, upon closer inspection it looks as if all of these tests actually focus on the Account.Deposit() method which wasn’t actually mutated. That means that there were no changes in the code targeted by these unit tests for these tests to detect so they can be ignored for this mutation. In a way, you could think of this as the concept of mutation coverage. Mutation coverage, similar to code coverage, is a metric that tells you how much of your program code was actually affected by the mutator.
However, let’s look at the last two tests which still passed-
-
AccountTest.InsufficientFundsException_should_contain_the_actual_account_balance -
AccountTest.InsufficientFundsException_should_contain_the_amount_request.
The false positives reported by these tests actually point to a more insidious problem. These tests cover code that was mutated by our mutator, the Account.Withdraw() method. The fact these tests continue to pass even after the code they target has changed tells us that these aren’t effective tests. When we execute one of these tests under the debugger the reason for the false positive becomes obvious. This test catches the InsufficientFundsException thrown by the Withdraw() method and examines the values it carries. If the contained values don’t match the expected outcome then the test fails. But what if the InsufficientFundsException is never thrown? In this case, such as when the guard clause at the beginning of the Account.Withdraw() method has been inverted by our mutator, the exception is never caught and its contained values are never examined for validity. Since the only assert in the test exists in the unexecuted catch clause the test simply passes without incident.
To make this a stronger test, we need to fail the test if the InsufficientFundsException is never thrown. The classic testing pattern for this is to simply place an Assert.Fail() immediately after the method that should throw the exception. If the exception is thrown then the execution will immediately be transferred to the catch clause and the Assert.Fail() won’t be executed. However, if the exception is not thrown then the Assert.Fail() will execute immediately after the method and fail the test. The example below demonstrates this pattern applied to the
AccountTest.InsufficientFundsException_should_contain_the_actual_account_balance.
|
1 2 3 4 5 6 7 8 9 10 11 12 13 14 15 16 |
[Test] public void InsufficientFundsException_should_contain_the_actual_account_balance() { var account = new Account(); account.Deposit(50.0m); try { account.Withdraw(75.0m); Assert.Fail(); } catch (InsufficientFundsException e) { Assert.AreEqual(50.0m, e.AccountBalance); } } |
After applying this fix to both tests demonstrating false positives, we can repeat the mutation process and test run. Now we can see that these tests no longer demonstrate false positives, meaning that these mutants have been ‘killed’.

Future Work
As an additional exercise, you can try to extend the MutantPower mutator we used in our example to handle more complex mutations such as inverting logical operators, reordering statement execution, or completely deleting certain statements from your code. Perhaps you’ll discover a mutation that affects the Account.Deposit() or AccountManager.ApplyInterest() methods. If so, then you can determine just how strong the tests covering these methods are and what you can do to improve them.
You may also want to consider additional uses for program mutators, such as a creating a fuzz tester for penetration testing your software.
Hopefully this article has piqued your interest in mutation testing and given you the tools to begin to think about how you can apply mutation testing in your day-to-day work.
Load comments