
Contents
- Practical PowerShell: Pruning File Trees
The Get-ChildItem cmdlet is arguably the fundamental workhorse of PowerShell. Get-ChildItem is analogous to ls in Unix/Linux or dir in DOS in that it allows you to view the contents of your filesystem. The documentation summary simply states “Gets the items and child items in one or more specified locations.” There is a reason that it does not say files and folders: In PowerShell, locations may be folders, and items may be files, but unlike Linux or DOS, a location in PowerShell may also be in your registry, GAC, variables, environment or elsewhere. But that extraordinary design capability is the basis of another story.
Get-ChildItem provides options that let you clamber recursively through a directory tree, include or exclude system items, or filter your output with included or excluded targets. These options provide the flexibility to get a lot out of this cmdlet, even though they seem few in number. At the time of writing, PowerShell V3 is nearing release. This version adds a few new parameters: -Directory to exclude files; -File to exclude directories; -Attributes to filter by selected attributes; -Hidden, -ReadOnly, and -System to filter by those particular attributes. But for me, Get-ChildItem still seemed to be missing some crucial functionality. My wish-list included being able to filter out those files that were not under source control, which is a feature I use extensively in my series of articles on Subversion. Most importantly, I need to be able to exclude entire subtrees, hence the topic of this article.
With this article I am going to reverse my usual approach by starting with the practical application and then work backwards towards the theory. This provides you what you need to be immediately productive, so that you can then stop reading as soon as you have run out of time or interest in understanding everything behind it.
I’ll start by revealing the not very surprising ending: the new cmdlet I’ve written, Get-EnhancedChildItem, extends the capabilities of Get-ChildItem to include, among others, the -ExcludeTree parameter. Please refer to the Get-EnhancedChildItem API for the details of how to use it, and use the download page to get the code.
Revealing the Problem
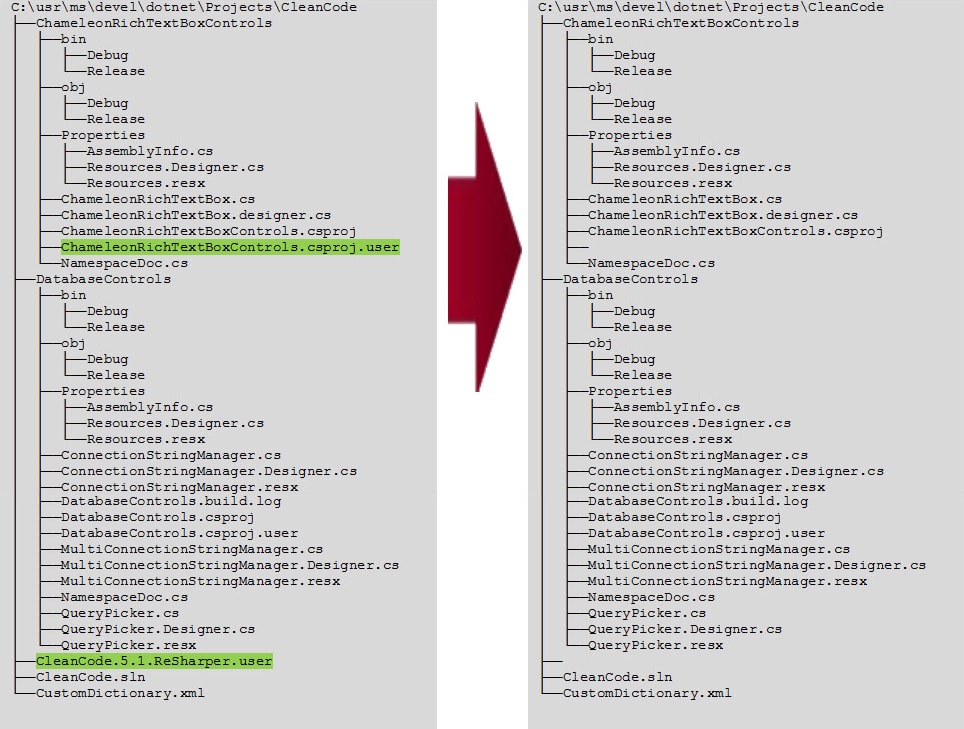
Consider first excluding files from a directory listing. By using the standard -Exclude parameter with an argument of *.user, you can filter out two files in this example; the left side shows the unfiltered result and highlights the items that are filtered out on the right side when the -Exclude parameter is applied. Also, the output shown here is a pretty-printed version of output from Get-ChildItem that illustrates the relevant points more clearly than the raw output of the cmdlet. These examples also assume the use of the -Recurse parameter to grab all files and directories under the current directory (click for enlarged image).
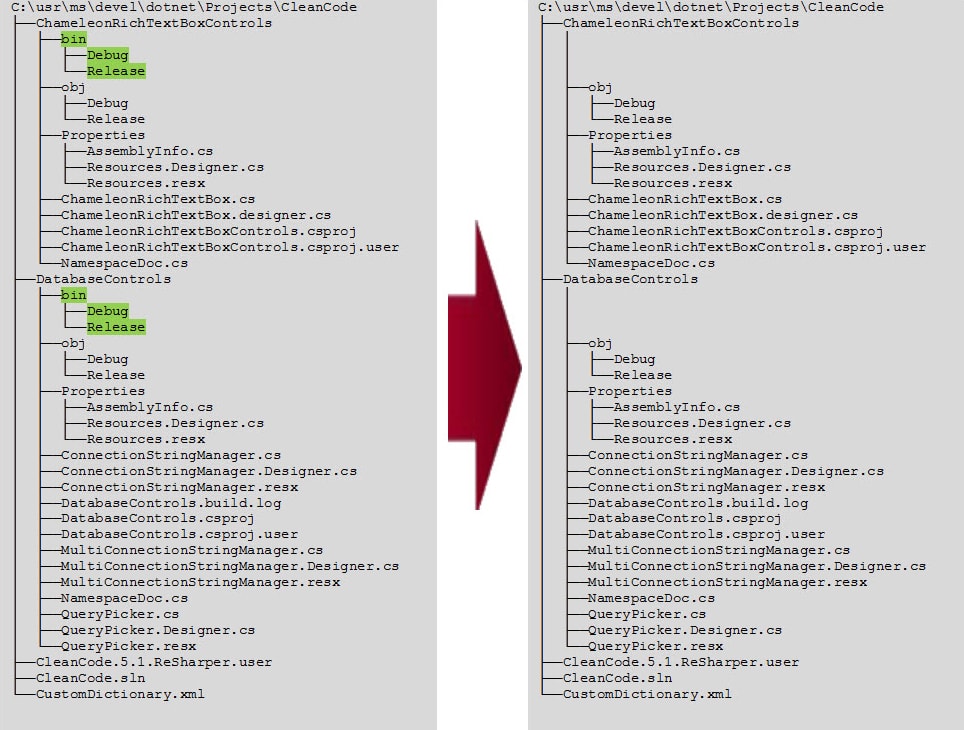
Now consider what happens when applying a similar filter to exclude a directory, e.g. -Exclude bin:

The subdirectories named bin are filtered out but their children are not! And therein lies both the problem and the window of opportunity for the new -ExcludeTree parameter.
What Tree Pruning Can Do For You
With Get-EnhancedChildItem, you can substitute -ExcludeTree bin for -Exclude bin to yield the filtering that most of us would expect and prefer: where the entire subtree rooted at each bin instance is filtered out.
Also, just like Exclude, ExcludeTree accepts wildcards so that, if you used bin* instead of bin, that would prune not only instances of bin but also bin-backup, bin2, etc.
I’d like to mention up-front that Get-EnhancedChildItem works in both PowerShell V2 and V3 but-in its current implementation-it works better in V2 than V3. Why? As mentioned earlier, PowerShell V3 introduced several new parameters for Get-ChildItem that are specific to the FileSystem provider. To have provider-specific parameters requires making them dynamic parameters. And dynamic parameters are not exposed by the meta-programming utility used to generate the extensible base script for Get-ChildItem. Thus, in PowerShell V3, Get-EnhancedChildItem is not a superset of Get-ChildItem because it does not support the new, dynamic parameters. (For more on dynamic parameters see the eponymous section on the PowerShell about_Functions_Advanced_Parameters help page.)
Adding your own Customizations to Get-ChildItem
With a short look behind the scenes at Get-EnhancedChildItem you will quickly be able to add customizations of your own. Get-EnhancedChildItem calls Get-ChildItem, passing through any standard parameters you specify, and then pipes the output through additional dynamic filters required by any of its custom parameters you specify. Consider this command:
|
1 2 |
Get-EnhancedChildItem -Recurse -Force -Svn -Exclude *.txt -ExcludeTree doc*,man -FullName -Verbose |
That invocation includes several Get-ChildItem standard parameters (Recurse, Force, Exclude), several Get-EnhancedChildItem custom parameters (Svn, ExcludeTree, FullName), and one common parameter (Verbose). Here are the first few lines of output-present only because the Verbose switch was included:
|
1 2 3 4 5 6 7 |
VERBOSE: [[ Get-ChildItem @PSBoundParameters | FilterExcludeTree | FilterSvn | FilterFullName ]] VERBOSE: Parameters to Get-ChildItem = [[ VERBOSE: Recurse = True VERBOSE: Force = True VERBOSE: Exclude = *.txt VERBOSE: Verbose = True VERBOSE: ]] |
The first line shows the dynamic code generated from the Get-EnhancedChildItem invocation; it always begins with a call to the underlying Get-ChildItem cmdlet and the output is piped to filters appropriate to the parameters you specify on the command line. The remaining lines above show the parameters that are passed through to the Get-ChildItem cmdlet (via the PSBoundParameters variable).
Each of the custom parameters (Svn, ExcludeTree, FullName) adds a filter to the output chain, as shown above. Thus, to add your own custom behavior your main task is writing an appropriate filter. The key to this is to realize that the output stream from Get-ChildItem consists of a collection of System.IO.DirectoryInfo and System.IO.FileInfo objects (in the context of the FileSystem provider). So any downstream filters may make use of properties of these objects.
Example 1: FilterContainersOnly
This is one of the simplest possible of filters, and corresponds to the -ContainersOnly switch. (This switch is not used in the prior example but its simplicity makes it is a good place to start.)
|
1 2 3 4 |
filter FilterContainersOnly() { if ($_.PSIsContainer) { $_ } } |
In this case, the filter examines the PSIsContainer property. If it is true-indicating the object is a directory-the object is passed through, otherwise nothing is emitted and the object does not propagate any further.
Example 2: FilterSvn
A bit more complicated filter, this corresponds to the -Svn switch, letting you filter out any files and folders that are not under Subversion source control.
|
1 2 3 4 5 6 |
filter FilterSvn() { $svnStatus = (svn status --verbose --depth empty $_.FullName 2>&1) $svnFilter = ($svnFilter -notmatch "^[?I]|is not a working copy") if ($svnFilter) { $_ } } |
The first line invokes the svn status command on the current file or folder, embodied in the FullName property of either DirectoryInfo or FileInfo objects. The depth parameter specifies to check only the current item, not its descendants. The verbose parameter forces it to report even if the item is up-to-date. Finally, the stderr stream is wrapped into the stdout stream in preparation for validating in the next line.
The second line runs a regular expression comparison to see if the status returned indicates the file is not a Subversion-controlled item. The svn status command returns a status line beginning with a question mark (?) for unversioned files or the letter “I” for ignored files, both of which constitute non-Subversion-controlled files. Additionally, because the filter is repeatedly invoked on every item returned by the base Get-ChildItem-including non-versioned descendants of non-versioned folders-svn status fails on such items, returning a warning of the form “svn: warning: W155007: ‘filename‘ is not a working copy”. Those children must be considered non-versioned as well, of course; hence, the latter part of the regular expression in the filter above.
The final line uses the results of the previous comparison as a gate to emit or to suppress the current object downstream.
Example 3: FilterExcludeTree
This filter corresponds to the -ExcludeTree parameter, the main focus of this article.
|
1 2 3 4 5 6 7 8 9 10 11 |
filter FilterExcludeTree() { $target = $_ Coalesce-Args $Path "." | % { $canonicalPath = (Get-Item $_).FullName if ($target.FullName.StartsWith($canonicalPath)) { $pathParts = $target.FullName.substring($canonicalPath.Length + 1).split("\"); if ( ! ($excludeList | where { $pathParts -like $_ } ) ) { $target } } } } |
This filter, unlike the previous two, uses external data-the script-level $excludeList variable defined in the preamble of the Get-EnhancedChildItem code to contain the value of the ExcludeTree parameter. It also uses a supplementary function, Coalesce-Args (found in this post by Keith Dahlby), which merely sends the current directory down the pipe in the event that the invocation did not specify any paths.
This code begins by remembering the current file or folder under investigation (remember that the goal of the filter is to determine whether the current item should be excluded as per your specification of the ExcludeTree parameter) because subsequent lines reuse the $_ automatic variable.
Next, the code identifies which of those paths that you specified to trawl is an ancestor of the current item, because you can specify multiple paths rather than just a single path, as in Get-EnhancedChildItem doc,xml,man . . . Once it finds the ancestral path, the two innermost lines make the judgment of whether the path to the current item should be excluded or not. This decision is complicated by the fact that it is possible that some component of the path higher up may have the same name as a component you want to exclude, but those higher components need to be ignored. An illustration will make this much clearer. Assume this path exists (notice that it has two path components of the same name, highlighted in red):
\usr\testdir\subdir2\subdir2-child\subdir2-grandchild\subdir2\doc
Now consider this sequence:
|
1 2 |
cd \usr\testdir\subdir2\subdir2-child Get-EnhancedChildItem . -ExcludeTree subdir2 |
The typical PowerShell algorithm I found for pruning examines the path looking for the exclusion target (subdir2) anywhere in the path. But because your current directory has an ancestor of the same name (subdir2), then every file in this subtree has subdir2 in its path and hence all files will be excluded (pruned). I call this the ancestor trap. Consider the suggested algorithms in this StackOverflow post. The author ajk provides this succinct code (substitute your directory name to prune for the ExcludeDir placeholder):
|
1 2 |
Get-ChildItem -Recurse | ? { $_.FullName -notmatch '\\ExcludeDir($|\\)' } |
That code is clean and elegant. It can even be manipulated to support multiple prune targets by using standard regex notation, e.g. use (ExcludeDir1|ExcludeDir2) in place of ExcludeDir. But it falls prey to the ancestor trap if ExcludeDir happens to occur higher up the path.
The FilterExcludeTree code used in Get-EnhancedChildItem avoids the ancestor trap by stripping the prefix of the current item above the current directory before evaluating it. Here’s the code from FilterExcludeTree refactored so that you can exercise it in isolation:
|
1 2 3 4 5 6 |
$excludeList = @("stuff","bin","obj*") Get-ChildItem -Recurse | % { $pathParts = $_.FullName.substring($pwd.path.Length + 1).split("\"); if ( ! ($excludeList | where { $pathParts -like $_ } ) ) { $_ } } | % { $_.fullname } # use this last pipe just to get more concise output |
The algorithm posted by Keith Hill in the same StackOverflow post works well (once it incorporates a bug fix shown below) and also avoids the ancestor trap. Also, it is more efficient than either my approach or ajk’s approach in that it stops traversing a subtree when it finds a prune target (so one can allow it the “deficiency” of requiring several more lines of code to implement :-). The only drawback-through no fault of its own-is that a recursive algorithm cannot be incorporated into the command chaining strategy I designed into Get-EnhancedChildItem. His code appears below, though I have shortened it slightly by eliminating a redundancy as well as included a bug fix that prevented the algorithm from recursing past 2 levels:
|
1 2 3 4 5 6 7 8 9 10 11 12 13 |
function GetFiles($path = $pwd, [string[]]$exclude) { foreach ($item in Get-ChildItem $path) { if ($exclude | Where {$item -like $_}) { continue } $item if (Test-Path $item.FullName -PathType Container) { GetFiles $item.FullName $exclude } } } |
If you want to experiment with any of these algorithms on different test cases, my New-FileTree function, also available in my open source library, might be useful. It takes a list of files and directories and generates a tree (albeit the files are empty). Here is an example test scenario that lets you experiment with the ancestor trap:
|
1 2 3 4 5 6 7 8 9 10 11 12 13 14 15 16 17 18 19 20 21 22 23 24 25 26 27 28 |
New-FileTree @" sample\stuff\readme.txt sample\stuff\main\Form.cs sample\stuff\main\Lib.cs sample\stuff\main\program.cs sample\stuff\main\bin\Form.obj sample\stuff\main\bin\Lib.obj sample\stuff\main\bin\Program.exe sample\stuff\main\new_objs\NewForm.cs sample\stuff\main\objs\NewForm.cs sample\stuff\main\projects\doc1.txt sample\stuff\main\projects\doc2.txt sample\stuff\main\projects_A\doc1.txt sample\stuff\main\projects_A\doc2.txt sample\stuff\main\stuff\Form.obj sample\stuff\main\stuff\Lib.obj sample\stuff\main\stuff\root\readme.txt sample\stuff\main\stuff\root\main\Form.cs sample\stuff\main\stuff\root\main\Lib.cs sample\stuff\main\stuff\root\main\program.cs sample\stuff\main\stuff\root\main\bin\Form.obj sample\stuff\main\stuff\root\main\bin\Lib.obj sample\stuff\main\stuff\root\main\bin\Program.exe sample\stuff\main\stuff\root\main\new_objs\NewForm.cs sample\stuff\main\stuff\root\main\objs\NewForm.cs sample\stuff\main\stuff\root\main\stuff\Form.obj sample\stuff\main\stuff\root\main\stuff\Lib.obj "@ | % { $_.FullName } |
Notice that this test scenario includes the stuff component up to three distinct places in the path! Once you have built that file tree, then change your current directory to sample\stuff or sample\stuff\main and try to exclude all descendant stuff trees. Here’s an invocation for Get-EnhancedChildItem, for example:
|
1 |
Get-EnhancedChildItem -Recurse -ExcludeTree stuff -NoContainersOnly -FullName |
I mentioned earlier that Get-ChildItem emits DirectoryInfo and FileInfo objects in the context of the FileSystem provider; i.e., if and only if your current location is in file system space as opposed to environment space or registry space or function space. (If you are in registry space, for example, Get-ChildItem emits RegistryKey objects.) The ExcludeTree parameter depends upon getting DirectoryInfo or FileInfo objects (it needs, among others, the FullName property); hence it is designed to work only with the FileSystem provider. When a parameter only works with a selected subset of providers it should technically be defined as a dynamic parameter rather than a static parameter. That way, if you inadvertently use it with the wrong provider, PowerShell will balk, informing you such a parameter does not exist. (The new Directory, File, Hidden, etc. parameters for Get-ChildItem in PowerShell V3, for example, are defined as dynamic parameters.) Therefore, the ExcludeTree parameter should technically be defined as a dynamic parameter but I chose to make it static mainly because of the discoverability issue: it is difficult to discover a dynamic parameter even exists (even Get-Help will not tell you!) unless you read the documentation(!), and one of the elegant features of PowerShell is that it is inherently easy to discover things without the documentation.
Infrastructure for Customizing Get-EnhancedChildItem
Though creating the filter is the heart of the customization process, there is just a bit of book-keeping work needed to complete adding a customized filter to Get-ChildItem.
Step 1: Hooking up your filter
The first obvious step is that you must hook up the filter you created. Take a look at the Connecting Filters region in the Get-EnhancedChildItem code, reproduced here:
|
1 2 3 4 5 6 7 8 9 10 11 12 13 14 15 16 |
#region Connecting Filters if ($ExcludeTree) { $filters += "FilterExcludeTree" $script:excludeList = $ExcludeTree } if ($Svn) { $filters += "FilterSvn" } if ($ContainersOnly) { $filters += "FilterContainersOnly" } elseif ($NoContainersOnly) { $filters += "FilterNoContainersOnly" } # These two must be last. # Thus, must process the -Name parameter here rather than # pass it through to base cmdlet. if ($FullName) { $filters += "FilterFullName" } elseif ($Name) { $filters += "FilterName" [Void]$PSBoundParameters.Remove("Name") } #endregion Connecting Filters |
Observe that each of my introduced parameters is examined in turn. If the parameter is present, one or more actions are performed. At a minimum, this means adding the filter name to a list of filters. That list is initialized with the base command just before the code region above:
|
1 |
$filters = @("$wrappedCmd @PSBoundParameters") |
And just after the code region, this list of filters is joined into a single command string to execute:
|
1 |
$code = [string]::join(" | ", $filters) |
Two other lines in the above code region are worthy of note. First, when you specify -ExcludeTree, the code needs to remember its argument; thus, its value is stored in the script-level $excludeList variable that is accessed by the FilterExcludeTree function, as seen earlier.
Second, notice that the commentary for the last two parameters examined, FullName and Name, indicate they must be last. Generally speaking, the order of examining parameters is irrelevant as long as each filter returns the same type of object as output that it received as input, i.e. either a System.IO.DirectoryInfo or System.IO.FileInfo object. But the standard Name parameter of Get-Child-along with the custom FullName parameter of Get-EnhancedChildItem-violate this rule, returning a string object. Thus, if either of these is specified it must be the final filter in the chain. And that is the very reason why I need to handle the Name parameter here instead of passing it through to Get-Child. That is done with two steps: adding the FilterName function to the command pipeline and removing the Name parameter from the set of passed parameters to inhibit Get-ChildItem from attempting to process it.
I should point out that PowerShell V3, which is not yet released at the time of writing, includes Directory and File parameters that perform the same function as ContainersOnly and NoContainersOnly in Get-EnhancedChildItem. I chose the latter names based on a reference implementation by Andy Schneider (more on this later) and this enhancement request on Microsoft Connect.
Step 2: Add your parameter(s) to the $introducedParameters list.
You will find this variable defined near the top of the script, itemizing each of my custom parameters (i.e. those parameters that are not supported by the underlying Get-ChildItem):
|
1 2 3 4 5 6 |
$introducedParameters = ` "ExcludeTree", ` "Svn", ` "ContainersOnly", ` "NoContainersOnly", ` "FullName" |
Earlier you saw that the list of parameters passed to Get-ChildItem is a subset of the parameters passed to Get-EnhancedChildItem. The code uses the $introducedParameters list to reduce the parameter list to just those that Get-ChildItem supports. Thus, any custom ones must be added to this list. The one-line function RemoveIntroducedParameters removes any parameters on this list from the list of parameters supplied during invocation of Get-EnhancedChildItem.
Step 3: Add your parameter(s) to the cmdlet signature
As with any PowerShell function, you must declare your new parameters in the signature. This may be as simple as just a parameter name but I recommend at a minimum also including its type (a .NET framework type name). Where appropriate, you should also include a default value.
Of the five parameters I introduced four of them are Boolean and one is a string array. A Boolean parameter is a special case: though you could use a Boolean type it is cleaner to use a Switch type (as shown below). Jeffery Hicks elaborates on this point in his post Bool vs. Switch. Essentially, using Switch allows you to just use -MyBoolParam whereas using a Boolean requires writing -MyBoolParam:$True. In either case, though, the parameter is automatically set to false if not specified at invocation (reference: Switch Parameters on MSDN) so no explicit default value is needed here for the Switch parameters:
|
1 2 3 4 5 6 7 8 9 10 11 12 13 |
[System.String[]] ${ExcludeTree} = @(), [Switch] ${Svn}, [Switch] ${ContainersOnly}, [Switch] ${NoContainersOnly}, [Switch] ${FullName} |
You can, of course, add further specification to your parameters. If you examine the Get-EnhancedChildItem code, you will see, for example, some parameters specifying position, alias, mandatory, etc. See the standard PowerShell help texts about_Parameters and about_Functions_Advanced_Parameters for further details.
Step 4: Document your added functionality
It is always good practice to document your API, even if only for internal use, but definitely when you produce a library for public use. There are two areas to consider: the parameter-specific descriptions, and the general functionality description. Here is the parameter-specific help included with Get-EnhancedChildItem:
|
1 2 3 4 5 6 7 8 9 10 11 12 13 14 15 16 17 18 19 |
.PARAMETER ExcludeTree Excludes not just a matching item but also all its children as well. Wildcards are permitted. .PARAMETER Svn Ignores files and folders that are not Subversion-aware. .PARAMETER NoContainersOnly Returns only non-containers (files). Mutually exclusive with -ContainersOnly. .PARAMETER ContainersOnly Returns only containers (directories). Mutually exclusive with -NoContainersOnly. .PARAMETER FullName Retrieves only the full names of the items in the locations. If you pipe the output of this command to another command, only the item full names are sent. Mutually exclusive with -Name. |
With that in place you can query help for a specific parameter, for example:
|
1 |
Get-Help Get-EnhancedChildItem -Parameter ExcludeTree |
…which returns this text:
|
1 2 3 4 5 6 7 8 9 |
-ExcludeTree Excludes not just a matching item but also all its children as well. Wildcards are permitted. Required? false Position? named Default value Accept pipeline input? false Accept wildcard characters? []> |
If your parameter can be completely explained in isolation, the parameter-specific help text may be sufficient. But, in general, you should describe your new functionality in the broader context of the function, in the .DESCRIPTION section.
Customizing Any Cmdlet
Previous sections detailed how to tinker with Get-EnhancedChildItem, introducing further customizations beyond Get-ChildItem for your own purposes. This section discusses where the remaining bits of code not yet discussed, the arcane bits(!), originated from, and thus provides the techniques to customize any cmdlet.
The MetaProgramming PowerShell library developed by Jeffrey Snover, the inventor of PowerShell, provides the New-ProxyCommand cmdlet. The synopsis in the help text for this cmdlet is decidedly understated: Generate a script for a ProxyCommand to call a base Cmdlet adding or removing parameters. In other words, it provides a base script for extending an existing cmdlet allowing you to easily customize it. Generating the base script is simple:
|
1 |
New-ProxyCommand ExistingCmdletName [options] > YourCmdletFile.ps1 |
The options are, well, optional. The principal ones to know are AddParameter and RemoveParameter, used to tailor the signature during creation of the script. But once you have generated the script into a file, you can edit it manually to add or remove parameters later as your needs change. RemoveParameter is self-contained, simply omitting the named parameter from the signature. AddParameter adds a new parameter but, as you have seen, you still have to implement the new functionality behind it.
Once you have a new file (e.g. YourCmdletFile.ps1) you can use it in its “raw” form by simply executing the file, e.g.:
|
1 |
.\YourCmdletFile.ps1 [options] |
But assuming you want to reuse this code, it makes sense to wrap the generated code into a function so you have a new, named cmdlet. This is trivial to do. The generated file has the sections indicated below in black: just add the two red lines, substituting the name of your new cmdlet:
|
1 2 3 4 5 6 |
Function NewCmdletName { Parameters Begin-block Process-block End-block } |
Andy Schneider, in his blog post Using Proxy Commands in PowerShell, shows this for the very same cmdlet under discussion here, Get-ChildItem. I mention it here because you may want to review that code before browsing Get-EnhancedChildItem; the former is easier to digest because it only includes two simple parameters and does not have all the bells and whistles of Get-EnhancedChildItem. (It is, in fact, where I started this whole exploration!)
Be aware, though, that New-ProxyCommand does not script dynamic parameters, as I mentioned earlier in the article. If you want your new cmdlet to be a superset of the base cmdlet, you must manually add the dynamic parameters to your new script’s signature. Depending on how particular you want (or need) to be, you could add these as regular parameters (but thereby exposing possible incorrect functionality if the user invokes these on an invalid provider) or as dynamic parameters (requiring more coding on your part).
Conclusion
When I was first starting to learn PowerShell I was quite surprised that Get-ChildItem did not include an option to prune subtrees. Once I had enough experience under my belt I set off on an adventure (almost anything substantial in PowerShell is an adventure the first time you do it!) to provide this vital enhancement. Along the way I developed a flexible strategy for extending the cmdlet with several new filtering choices, and I was eager to share this with the developer community. Thanks to Simple-Talk for providing a venue for me to do this.
This document contains proprietary information and is protected by copyright law.
Copyright © 2026 Red Gate Software Limited. All rights reserved
Load comments