
Managing SQL exceptions in .NET applications
You can develop for obvious exceptions. Code reviews may catch some of the ones you missed. And your QA team can chip away at your application to uncover a lot more. But nothing exposes errors like deploying your application into production and letting real users give it a savage beating. As much as we’d like to think that we can release error-less software, the fact is that it’s next to impossible. Don’t get me wrong, releasing error-free software is a valiant pursuit and one that every developer should strive towards, but the reality is that code is complex, end-users tend to find ways to do things that defy both logic and reason, and you can’t account for the nearly infinite number of scenarios that can occur when the two mix. The question is, how can you effectively respond to those unforeseen issues?
Obviously, you should have a logging solution in place to keep a record of production exceptions and important supplemental information to help you pinpoint the error back in your development environment. The exception type, exception message, inner-exception chain, stack trace, page on which the exception occurred, query string values, form values, and server variables are invaluable pieces of the information that can help you locate an issue and identify why an error occurs in a particular scenario. But one of the things I’ve always wanted, in addition to that information, is a field containing the SQL statements executing when a data-access exception occurs. Having a record of the offending SQL gives you the ability to check input values for validity and also to re-execute the script in SQL Server Management Studio, both of which provide a great deal of insight when you are tracking a bug in production. In this article, you will learn how to do just that, by building SQL exception logging into your Data Access Layer.
Please note that this article builds on the concepts introduced in my article .NET Application Architecture: the Data Access Layer and the code in the associated demo application. Please take a look at this original article if you have any questions about what a Data Access Layer is, or how it is implemented. Also note that there is a PDF file accompanying the demo application that covers the original Data Access Layer demo code in great detail. That PDF is included in the demo application for this article, available from the Code Download link in the box to the right of the article title, in case you need to reference it.
The real-world scenario
Not too long ago, I was working with a client to help resolve a few maintenance issues on their website. They had a decent logging solution in place to capture detailed exception information, but there was one exception that was fairly elusive. It only happened once every ten or fifteen days, the error message was fairly obscure, and the QA team could not find a way to reproduce it in the test environment (it only happened in production). To make things even more confusing, users who experienced the issue only seemed to experience it once. We have logs showing that they hit the page, received the error, then hit the page again (probably on a Refresh) and everything ran just fine. We knew it was a data-access issue because of the message, but aside from saying that there had been an error executing a command, the exception message was basically useless. It was quite an enigma. So we hatched a plan to capture the SQL command name and the input values for that command any time that particular exception came up, and it helped us track down the issue. This article is an extension of that concept.
Solution architecture: objectives and overview
If you read .NET Application Architecture: the Data Access Layer, then Figure 1 should look familiar: it shows a high-level overview of the various tiers and layers in a web application. Our focus is the Data Access Layer (DAL), which resides in the Business Tier and handles all communication between the various Business Objects and the Data Tier.
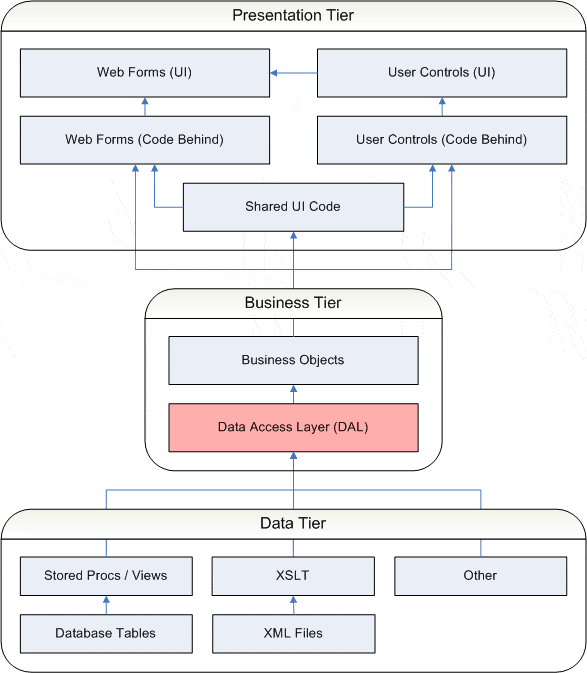
Figure 1 – Three-tiered ASP.NET application with sub-tiers (layers)
The objective of the DAL is to expose information from the Data Tier to the Business Objects without tying the Business Objects to any particular data source. It does this by using data-source-specific calls to retrieve data from a particular data store, places the data in a non-data-source specific variable or object, then passes the information to a Business Object for use in some operation. Changing from one data source to another (say Oracle to SQL Server) is simply a matter of making a new DAL to access the new data store and putting the data into the format the Business Objects expect. You never need to touch the business objects when making the switch.
SQL error logging in the DAL
Our objective in this endeavor is to log any SQL statements that result in a data-access exception. So the first question we need to answer is, where do we put that logging code? Since we’re talking about data access exceptions, and since the DAL is highlighted in Figure 1, you may have surmised, through inductive reasoning, that the logging code resides in the DAL. And you would be correct. Which leads to the next, more important, question: why? Take another look at Figure 1. Notice that all communication from the Data Tier goes through the DAL. This means that that the DAL is the only place in your application where a data-access exception is even feasible. Inside the DAL there are a number of data service classes (or partial classes, if you so choose), each of which contains data-access methods.
Figure 2 depicts this architecture. Although there may be a large number of these classes and data access methods, all the classes inherit their basic data-access functionality from a single base class. By placing the SQL logging code in the data service base class, we can give all SQL logging capabilities to the entire DAL with relative ease.
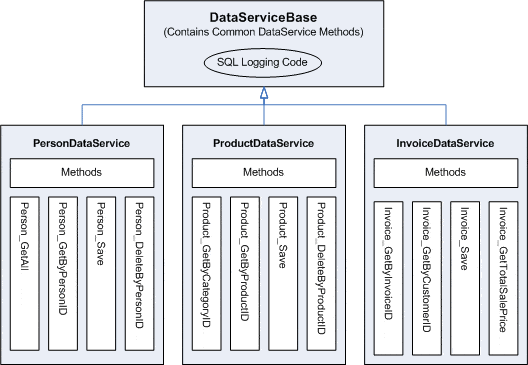
Figure 2 – Breaking down the Data Access Layer (DAL) into multiple Data Service classes
Logging the error in the application
Finally, we have to consider how to expose the logged SQL to the application, so the application can store it to an appropriate location. Logging the SQL is really a three-part process:
- Capture the SQL that was executing when the exception occurred
- Pass the captured information back to the application
- Get the application to log the information somewhere
Whenever a SQL statement fails, your application throws an exception. That exception travels back up the call stack until it finds an appropriate catch statement that handles the exception or the exception reaches the .NET runtime. We want to pass our SQL statement along with that exception so your application can log them both. To do this, we’ll create a custom exception wrapper with a field to store the SQL statement. When a data-access exception occurs, we’ll store the SQL statement in the custom exception wrapper, wrap the actual data-access exception with our exception, and let our exception, along with the SQL statement, propagate back up through the call stack. Then all you have to do is set up your application to catch the exception and log it along with the SQL statement that accompanies it.
A note on transactional support and configuration
One issue that came to mind while I was putting the code for this article together was the fact that some SQL statements occur within a transaction. If that is the case, and you just capture the SQL statement that caused the error, without providing the rest of the SQL statements that preceded it in the transaction, then you may not be getting everything that you need to effectively track down an issue. However, if you want to capture all of the SQL in a transaction, it means you have to log all the “good” statements that lead up to the bad statement, and chances are that a “bad” statement won’t happen very often. So you’ll be doing a lot of logging to ensure the information is available when you need it, but most of it will simply be discarded because you won’t need it that often. And that is not good for performance.
But there may be a time when the benefit of tracking down an error outweighs the performance cost, so we’ll make full transactional logging a configurable setting in the web.config in case you ever really need it. And while we’re at it, we’ll also put in a configuration setting that allows you to turn off SQL statement logging altogether. The configuration settings will be stored in the <appSettings> section of the web.config, as shown in Listing 1.
Listing 1 – Configuration settings for SQL Logging in the appSettings section of the web.config
|
1 2 3 4 5 6 7 8 9 10 |
<?xml version=”1.0″?> <configuration> <appSettings> <add key=”SqlLogging” value=”true” /> <add key=”SqlFullTxnLogging” value=”true” /> </appSettings> … </configuration> |
At this point you should have a good high-level overview of the solution, so we’ll shift gears and begin looking at the actual implementation details next.
Building the SQL statement logger
As mentioned at the start, the concepts and code in this article build off the DAL that I built and described in .NET Application Architecture: the Data Access Layer. In the sections that follow I discuss how to modify that original code base to add SQL exception logging support to your DAL. We begin by creating the SqlWrapperException class, which is the only new class in the solution. Then we will focus on adding SQL logging support to the DataServiceBase class by doing the following:
- Adding new private fields to the DataServiceBase class to help with SQL logging
- Adding the SqlLogging and SqlFullTxnLogging properties to manage SQL logging configuration values from the web.config
- Adding the ErrorSQL property and helper methods to help manage the SQL statement log
- Adding static methods to help manage logging during database transactions
- Update the constructor to support logging during database transactions
- Add the BuildSQL method that actually logs the SQL statement
- Update the ExecuteNonQuery and ExecuteDataSet methods to use the BuildSQL method to log SQL when an exception occurs
So, let’s jump into the code.
Capturing SQL statements using the SqlWrapperException class
We’ll begin by building the SqlWrapperException class, our custom exception wrapper that stores the SQL statement which caused the exception. I put the class in the Demo.Common assembly because it is referenced by the business objects, the DAL, and the application. Listing 2 contains the code for the SqlWrapperException class.
Listing 2 – Demo.Common.SqlWrapperException class
|
1 2 3 4 5 6 7 8 9 10 11 12 13 14 15 16 17 18 19 20 21 22 23 24 25 26 27 28 29 30 31 32 33 34 35 36 37 38 |
using System; namespace Demo.Common { [Serializable] public class SqlWrapperException : Exception { ///////////////////////////////////////////////////////// private string _sql = string.Empty; ///////////////////////////////////////////////////////// public string SQL { get { return _sql; } set { _sql = value; } } ///////////////////////////////////////////////////////// public SqlWrapperException(string sql, Exception inner) : base(inner.Message, inner) { this.SQL = sql; } } } |
The SqlWrapperException class inherits its base exception functionality from the System.Exception class. It’s marked as Serializable because Microsoft says it’s a best practice (presumably because there are a number scenarios where exceptions need to be serialized). Other than that, this class is pretty simple. It has a private field named _sql to store the SQL statement value, and a public property named SQL that exposes that field. There is a single constructor that accepts two parameters: the SQL statement that you want to log and the data-access exception thrown while trying to execute that statement. The call to base(inner.Message, inner) sets the Message property of the SqlWrapperException equal to the Message property on the original exception, and assigns the InnerException property of the SqlExceptionWrapper to the original data-access exception. This effectively wraps the data-access exception with our custom exception wrapper. The constructor then sets the SQL property of the exception wrapper so the SQL statement can travel along with the exception to wherever it ultimately needs to go.
New SQL exception logging fields in the DataServiceBase class
Since this article builds off the demo application from my previous article, I’m just going to cover what you need to add to the DataServiceBase class to add support for SQL exception logging instead of going back over everything that it does. Listing 3 shows the four new fields the class uses for SQL statement logging.
Listing 3 – New fields in the DataServiceBase class
|
1 2 3 4 5 6 7 8 9 10 11 12 13 14 |
//////////////////////////////////////////////////////////////////////// // Fields for SQL Error Logging //////////////////////////////////////////////////////////////////////// private StringBuilder _errorSQL = null; //Stores SQL Text private static int _sqlLogging = -1; //Toggle SQL Logging private static int _sqlFullTxnLogging = -1; //Toggle Full Trans. Logging private static Dictionary<int, StringBuilder> _sqlTxnSBMapping = new Dictionary<int, StringBuilder>(); //Stores StringBuilders |
The first field, _errorSQL, is a StringBuilder that stores the logged SQL statement. I opted to use a StringBuilder because the code needs to do a lot of string concatenation to build the SQL statement, a situation in which the StringBuilder's performance is far better than regular fixed-length string. After that, we have two static configuration fields, _sqlLogging and _sqlFullTxnLogging. These fields store values that determine whether or not SQL logging is enabled and whether or not to use full transactional logging, respectively. Although both of these fields are integer variables, they actually represent Boolean data, but we’ll discuss that in more detail when we take a look at the properties that expose these values. Last, we have a static Dictionary field named _sqlTxnSBMapping. A Dictionary object allows you to reference values in the Dictionary based on a key. In this case, our key is an integer, and our value is a StringBuilder object. What the _sqlTxnSBMapping field allows us to do is associate a StringBuilder object (the Dictionary value) with a particular database transaction (the Dictionary key). Why isn’t the key a SqlTransaction then? Because we store the hash value (an int) of the SqlTransaction as the key and not the actual SqlTransaction object itself.
Configuring logging with the SqlLogging and SqlFullTxnLogging properties
We want to make the SQL statement logging capabilities of this demo configurable so they can be turned on and off. We already have the fields that we need to store the values, _sqlLogging and _sqlFullTxnLogging, so now we have to create a way to get the settings from the web.config. I opted to put that code directly in the properties that expose those fields. The only problem is that we’re dealing with configurable Boolean values. Configurable Boolean values have three states: un-initialized, true (on), and false (off). But a Boolean variable only has two states: true and false. That’s why the _sqlLogging and _sqlFullTxnLogging fields are integers. We use -1 to represent un-initialized, 0 to represent false, and 1 to represent true. Listing 4 shows how this all plays out inside the SqlLogging property.
Listing 4 – SqlLogging property (new property in the DataServiceBase class)
|
1 2 3 4 5 6 7 8 9 10 11 12 13 14 15 16 17 18 19 20 21 22 23 24 25 26 |
//////////////////////////////////////////////////////////////////////// public static bool SqlLogging { get { if (_sqlLogging == -1) { bool value = Convert.ToBoolean( ConfigurationManager.AppSettings[“SqlLogging”]); _sqlLogging = value ? 1 : 0; } return _sqlLogging == 1 ? true : false; } set { _sqlLogging = value ? 1 : 0; } } |
Inside the Get portion of the property, the code begins by checking to see if the _sqlLogging field is equal to -1. If so, it indicates that it is in its un-initialized state and we need to get the appropriate configuration value from the web.config. Inside the if block, we acquire the SqlLogging value from the appSettings section of the web.config, convert that string value to a bool value, then store it in the value variable. What happens if you don’t have a SqlLogging setting defined in the appSetting section? Then the ConfigurationManager returns a null value for AppSetting["SqlLogging"] and Convert.ToBoolean interprets the null value as false. So if you don’t specify the settings, then it’s the same as setting them to false. Then the code determines if _sqlLogging is equal to 1 and, if so, returns true. Otherwise it returns false. The Set portion of the property is fairly simple. It takes the value assigned to the property and sets _sqlLogging to 1 if the value is true, or 0 if the value is false.
Listing 5 contains the code for the SqlFullTxnLogging property. It’s basically the same code that you saw for the SqlLogging property, but it checks to see if SqlLogging is enabled before running any of the code that initializes and returns the SqlFullTxnLogging value. If SqlLogging is not enabled, then SqlFullTxnLogging returns false because disabling SqlLogging disables all logging. If SqlLogging is enabled, then it runs through the same logic that we discussed for the SqlLogging property to determine if SqlFullTxnLogging is enabled.
Listing 5 – SqlFullTxnLogging property (new property in the DataServiceBase class)
|
1 2 3 4 5 6 7 8 9 10 11 12 13 14 15 16 17 18 19 20 21 22 23 24 25 26 |
//////////////////////////////////////////////////////////////////////// public static bool SqlFullTxnLogging { get { if (SqlLogging) { if (_sqlFullTxnLogging == -1) { bool value = Convert.ToBoolean( ConfigurationManager.AppSettings[“SqlFullTxnLogging”]); _sqlFullTxnLogging = value ? 1 : 0; } return _sqlFullTxnLogging == 1 ? true : false; } else { return false; } } set { _sqlFullTxnLogging = value ? 1 : 0; } } |
Managing the SQL statement log
One other property and two minor methods relating to the _errorSQL StringBuilder need to be discussed. First, we’ll talk about the ErrorSQL property shown in Listing 6. This is a fairly simple property that exposes the _errorSQL field and ensures that the ErrorSQL property always returns a valid reference to a StringBuilder object. If _errorSQL is null, it simply creates a new StringBuilder object and assigns it to the _errorSQL field before returning _errorSQL as the result of the property.
Listing 6 – ErrorSQL property (new property in the DataServiceBase class)
|
1 2 3 4 5 6 7 8 9 10 11 12 13 14 15 16 |
/////////////////////////////////////////////////////////// public StringBuilder ErrorSQL { get { if (_errorSQL == null) { _errorSQL = new StringBuilder(); } return _errorSQL; } set { _errorSQL = value; } } |
Next we have the GetSqlStatementForException method. When a data-access exception occurs in the DAL, you need to take the SQL statement (or statements) stored in the ErrorSQL StringBuilder and place it into the SqlWrapperException. You also need to clear the ErrorSQL StringBuilder when you do this, because the possibility exists that you could reuse the same DataService class for another call after an exception occurred (assuming the first exception was handled gracefully). The code in Listing 7 begins by checking to see if _errorSQL is null. If not, it stores the value of _errorSQL in a temp variable, clears the StringBuilder, then returns the temp value as the result of the function. If _errorSQL is null, the method simply returns an empty string. Also note that I chose to make this a private method because it’s fairly specific to how we’re using it inside the class. If you want to expose it publicly, feel free to do so.
Listing 7 – GetSqlStatementForException function (new method in the DataServiceBase class)
|
1 2 3 4 5 6 7 8 9 10 11 12 13 14 |
/////////////////////////////////////////////////////////// private string GetSqlStatementForException() { if (_errorSQL != null) { string value = _errorSQL.ToString(); _errorSQL.Length = 0; return value; } else { return string.Empty; } } |
And last, we have the ClearSqlStatementLog method shown in Listing 8. This method just gives you an efficient way to clear any SQL statements in the _errorSQL StringBuilder. You could accomplish the same thing by calling ErrorSQL.Clear(), but remember that ErrorSQL will create a new StringBuilder if _errorSQL is null. ClearSqlStatementLog allows you to avoid inadvertently creating a StringBuilder. We never really use this in the demo app, but it’s there in case you ever need it.
Listing 8 – ClearSqlStatementLog (new method in DataService class)
|
1 2 3 4 5 6 7 8 |
//////////////////////////////////////////////////////////// public void ClearSqlStatementLog() { if (_errorSQL != null) { _errorSQL.Length = 0; } } |
Now, on to more important things.
Beginning, committing, and rolling back a transaction via the DataServiceBase class
There are two constructors for the DataServiceBase class: a parameterless constructor, and a constructor that accepts a transaction. One of the features of this SQL logging demo is that it can log all of the SQL statements that run in a given transaction. It is possible, and fairly likely, that you will have different Data Service classes participating in a given transaction. Listing 9 shows one possible scenario:
Listing 9 – Multiple Data Service classes participating in a transaction
|
1 2 3 4 5 6 7 8 9 10 11 12 13 14 15 |
//Create some objects Person person = new Person(“Bob”); Car car = new Car(“Corvette”); //Save those objects using a transaction SqlTransaction txn = cnx.BeginTransaction(); // Passed txn to the PersonDataService new PersonDataService(txn).SavePerson(person); // Passed txn to the CarDataService new CarDataService(txn).SavePersonCar(person, car); txn.Commit(); |
Remember, SQL statements are stored in the StringBuilder object associated with the ErrorSQL property in a DataService class. So the question is, how do you share a StringBuilder between different DataService classes? One option is to pass the StringBuilder object around all over the place, but that would make for some pretty nasty code. Instead, we’re going to store StringBuilder objects in a static property and associate those StringBuilder objects with a particular transaction. And this is the entire reason the _sqlTxnSBMapping Dictionary field exists. Whenever we instantiate a DataService that uses a transaction, we can use the _sqlTxnSBMapping Dictionary to look up the appropriate StringBuilder object for that transaction. But that means that you need a structured way of adding the StringBuilder to the Dictionary when you begin a transaction, and a structured way of removing the StringBuilder when you commit or roll back the transaction.
So, there are three new static methods on the DataServiceBase class that assist you in that endeavor: BeginTransaction, CommitTransaction, and RollbackTransaction. Listing 10 shows the code for all three of these methods.
Listing 10 – BeginTransaction, CommitTransaction, and RollbackTransaction (new static methods in the DataServiceBase class)
|
1 2 3 4 5 6 7 8 9 10 11 12 13 14 15 16 17 18 19 20 21 22 23 24 25 26 27 28 29 30 31 32 33 34 35 36 37 38 39 40 41 42 43 44 45 46 47 48 49 50 51 52 53 54 55 |
//////////////////////////////////////////////////////////// public static IDbTransaction BeginTransaction() { SqlConnection txnConnection = new SqlConnection(GetConnectionString()); txnConnection.Open(); SqlTransaction txn = txnConnection.BeginTransaction(); if (SqlFullTxnLogging) { StringBuilder sbTemp = new StringBuilder(); _sqlTxnSBMapping.Add(txn.GetHashCode(), sbTemp); sbTemp.AppendLine(“BEGIN TRANSACTION”); } return txn; } //////////////////////////////////////////////////////////// public static void RollbackTransaction(IDbTransaction txn) { if (txn != null) { if (SqlFullTxnLogging) { StringBuilder sbTemp; if (_sqlTxnSBMapping.TryGetValue( txn.GetHashCode(), out sbTemp)) { sbTemp.Append(“ROLLBACK TRANSACTION”); _sqlTxnSBMapping.Remove(txn.GetHashCode()); } } txn.Rollback(); } } //////////////////////////////////////////////////////////// public static void CommitTransaction(IDbTransaction txn) { if (txn != null) { if (SqlFullTxnLogging) { StringBuilder sbTemp; if (_sqlTxnSBMapping.TryGetValue( txn.GetHashCode(), out sbTemp)) { sbTemp.Append(“COMMIT TRANSACTION”); _sqlTxnSBMapping.Remove(txn.GetHashCode()); } } txn.Commit(); } } |
When you call BeginTransaction, the method needs to create the StringBuilder object that’s going to capture the SQL for the duration of that entire transaction. It also needs to associate that StringBuilder object to the transaction in the _sqlTxnSBMapping dictionary. In the bolded BeginTransaction code, you can see the if statement that checks to see if full transaction logging is enabled. If so, the method creates the new StringBuilder then adds it to the dictionary. Notice that it uses the txn.GetHashCode() method to generate the int value used as the dictionary key. Then it outputs BEGIN TRANSACTION to the StringBuilder so your SQL will run in a transaction when you copy and paste it into a query window. Once the StringBuilder is in the static _sqlTxnSBMapping dictionary, the individual DataService instances can easily share that StringBuilder. We’ll see how, when we get to the constructor changes in a moment.
Next we have the RollbackTransaction and CommitTransaction code. These are identical methods except that one commits the transaction, and one rolls the transaction back. In the bolded code for each method, you can see if the if statement that runs when full transaction logging is enabled. It starts by declaring a StringBuilder variable, then calls _sqlTxnSBMapping.TryGetValue in an attempt to find the StringBuilder associated with the transaction passed into the method. If it finds the StringBuilder in the dictionary, it then loads that object into the sbTemp variable and appends ROLLBACK TRANSACTION or COMMIT TRANSACTION depending on which method you called. Finally, it removes the StringBuilder object from the dictionary because you are, in theory, done with the transaction.
So, here’s the deal. If you want the full transaction logging to work appropriately, you need to use these methods to manage your transactions. Failing to call BeginTransaction means that you may not get all of the SQL statements from the transaction in your SQL log, and failing to call CommitTransaction or RollbackTransaction means that the _sqlTxnSBMapping will have orphaned StringBuilder objects hogging up memory. And if you are doing transactions within transactions, then you will need to write some custom code that stores parent-to-child relationships between transactions because, if I account for that here, then this article is just going to get that much longer. This should suffice for most needs. Listing 11 shows an updated example of how you use these new methods in your code.
Listing 11 – Multiple Data Service classes participating in a transaction with transaction logging
|
1 2 3 4 5 6 7 8 9 10 11 12 13 14 15 16 17 18 19 20 |
//Create some objects Person person = new Person(“Bob”); Car car = new Car(“Corvette”); //Save those objects using a transaction SqlTransaction txn = DataServiceBase.BeginTransaction(); try { // Passed txn to the PersonDataService new PersonDataService(txn).SavePerson(person); // Passed txn to the CarDataService new CarDataService(txn).SavePersonCar(person, car); DataService.CommitTransaction(txn); } catch(Exception ex) { DataService.RollbackTransaction(txn); } |
Now let’s take a look at the updates to the constructor.
Acquiring the StringBuilder for the transaction in the DataService constructor
One of the DataService constructors accepts a transaction and associates that transaction with the DataService. Any commands that execute through the DataService occur within the context of that transaction. And when full transaction logging is enabled, that means we need to acquire the StringBuilder associated with that transaction so we can log the SQL in the appropriate place. Listing 12 shows the updates to the constructor, which allow it to acquire the appropriate StringBuilder object.
Listing 12 – Locating the StringBuilder associated with a transaction
|
1 2 3 4 5 6 7 8 9 10 11 12 13 14 15 16 17 18 |
//////////////////////////////////////////////////////////// public DataServiceBase(IDbTransaction txn) { if (txn == null) { _isOwner = true; } else { _txn = (SqlTransaction)txn; _isOwner = false; if(SqlFullTxnLogging) { _sqlTxnSBMapping.TryGetValue( _txn.GetHashCode(), out _errorSQL); } } } |
The code in bold shows the updates made to the transaction constructor. As you can see, the if statement checks to see if full transaction logging is enabled and, if so, the code looks for the StringBuilder associated with the transaction in the dictionary. If there is no StringBuilder in the dictionary it means that you did not call BeginTransaction to start the transaction. When your DataService goes to log a SQL statement, it will call the ErrorSQL property, which automatically creates a StringBuilder object and assigns it to _errorSQL. So, the SQL statements the DataService executes will still be logged, but you may not get to see a complete log of the statements in the transaction if an exception occurs.
Logging SQL statements with the BuildSQL method
The BuildSQL method is responsible for taking a SqlCommand object and producing the SQL statement that gets attached to the SqlWrapperException. Although there’s a lot of code in this method, the majority of it has to do with formatting the SQL statement appropriately. So it’s lengthy, but not overly complex. This particular method focuses on creating SQL statements to run stored procedures. You can modify it to write both stored procedure statements as well as ad hoc SQL statements if you so choose (all you have to do is switch the logic based on the cmd.CommandType property). There are four sections of code in the BuildSQL method:
- Validating the CMD object
- Declaring output parameters
- Writing the EXEC statement
- Writing out the stored procedure parameters and values
In Listing 13 you will find all of the code for the BuildSQL method. Bolded comments indicate the starting point for each of the four sections outlined above. We’ll discuss each section of code in more detail after the listing.
Listing 13 – BuildSQL method (new method in the DataServiceBase class)
|
1 2 3 4 5 6 7 8 9 10 11 12 13 14 15 16 17 18 19 20 21 22 23 24 25 26 27 28 29 30 31 32 33 34 35 36 37 38 39 40 41 42 43 44 45 46 47 48 49 50 51 52 53 54 55 56 57 58 59 60 61 62 63 64 65 66 67 68 69 70 71 72 73 74 75 76 77 78 79 80 81 82 83 84 85 86 87 88 89 90 91 92 93 94 95 96 97 98 99 100 101 102 103 104 105 106 107 108 109 110 111 112 113 114 115 116 117 118 119 120 121 122 123 124 125 126 127 128 129 130 131 132 133 134 135 136 137 138 139 140 141 142 143 144 145 146 147 148 149 150 151 152 153 |
/////////////////////////////////////////////////////////////////////// protected void BuildSQL(SqlCommand cmd) { //SECTION 1 – Validating the CMD Object if (cmd == null) { ErrorSQL.AppendLine(“/* Command was null — cannot display ” + “SQL for a null command */”); return; } //SECTION 2 – Declaring Output Parameters if (ErrorSQL.Length > 0) ErrorSQL.AppendLine(); for (int index = 0; index < cmd.Parameters.Count; index++) { if (cmd.Parameters[index].Direction != ParameterDirection.Input) { ErrorSQL.Append(“DECLARE “); ErrorSQL.Append(cmd.Parameters[index].ParameterName); ErrorSQL.Append(” “); ErrorSQL.Append(cmd.Parameters[index].SqlDbType. ToString().ToLower()); //Check to see if the size and precision need to be included if (cmd.Parameters[index].Size != 0) { if (cmd.Parameters[index].Precision != 0) { ErrorSQL.Append(“(“); ErrorSQL.Append(cmd.Parameters[index]. Size.ToString()); ErrorSQL.Append(“,”); ErrorSQL.Append(cmd.Parameters[index]. Precision.ToString()); ErrorSQL.Append(“)”); } else { ErrorSQL.Append(“(“); ErrorSQL.Append(cmd.Parameters[index]. Size.ToString()); ErrorSQL.Append(“)”); } } //Output the direction just for kicks ErrorSQL.Append(“; –“); ErrorSQL.Append(cmd.Parameters[index].Direction.ToString()); ErrorSQL.AppendLine(); // Set the Default Value for the Parameter // if it’s an InputOutput if (cmd.Parameters[index].Direction == ParameterDirection.InputOutput) { ErrorSQL.Append(“SET “); ErrorSQL.Append(cmd.Parameters[index].ParameterName); ErrorSQL.Append(” = “); if (cmd.Parameters[index].Value == DBNull.Value || cmd.Parameters[index].Value == null) { ErrorSQL.AppendLine(“NULL”); } else { ErrorSQL.Append(“‘”); ErrorSQL.Append(cmd.Parameters[index]. Value.ToString()); ErrorSQL.Append(“‘”); } ErrorSQL.AppendLine(“;”); } } } //Section 3 – Writing the EXEC Statement ErrorSQL.AppendLine(); //Output the exec statement ErrorSQL.Append(“EXEC “); //See if you need to capture the return value for (int index = 0; index < cmd.Parameters.Count; index++) { if (cmd.Parameters[index].Direction == ParameterDirection.ReturnValue) { ErrorSQL.Append(cmd.Parameters[index].ParameterName); ErrorSQL.Append(” = “); break; } } //Output the name of the command ErrorSQL.Append(“[“); ErrorSQL.Append(cmd.CommandText); ErrorSQL.AppendLine(“] “); //Section 4 – Writing Out the Stored Procedure Parameters and Values for (int index = 0; index < cmd.Parameters.Count; index++) { if (cmd.Parameters[index].Direction != ParameterDirection.ReturnValue) { //Append comma seperator (or space if it’s the first item) if (index == 0) { ErrorSQL.Append(” “); } else { ErrorSQL.Append(“, “); ErrorSQL.AppendLine(); ErrorSQL.Append(“\t\t”); } ErrorSQL.Append(cmd.Parameters[index].ParameterName); switch (cmd.Parameters[index].Direction) { case ParameterDirection.Input: ErrorSQL.Append(” = “); if (cmd.Parameters[index].Value == DBNull.Value || cmd.Parameters[index].Value == null) { ErrorSQL.AppendLine(“NULL”); } else { ErrorSQL.Append(“‘”); ErrorSQL.Append(cmd.Parameters[index]. Value.ToString()); ErrorSQL.Append(“‘”); } break; case ParameterDirection.InputOutput: case ParameterDirection.Output: ErrorSQL.Append(cmd.Parameters[index]. ParameterName); ErrorSQL.Append(” OUTPUT”); break; } } } ErrorSQL.AppendLine(“;”); ErrorSQL.AppendLine(“GO”); } |
Section 1 deals with validating the SqlCommand object. All this code does is check to see if cmd is null. If it is null, then the method writes a SQL comment to the ErrorSQL StringBuilder indicating that it could not write out a SQL statement for the command. Then it calls return to exit the method because the method can’t do much with a null command.
Section 2 declares output parameter variables to help in debugging the stored procedure. Many stored procedures return information back from the stored procedure in the form of a return value or an output parameter. If you want to check the values of these outputs, you need a way to reference them after the stored procedure executes, so you need to declare SQL variables to store those outputs. To help out in this endeavor, the BuildSQL method automatically creates variable declarations for all return value and output parameters in your stored procedure. Listing 14 shows an example SQL statement that includes variables to store the return value (@RV) and an output parameter (@PersonID).
Listing 14 – Example of checking output parameters
|
1 2 3 4 5 6 7 8 9 10 11 |
DECLARE @RV int; — Return Value DECLARE @PersonID int; — InputOutput Parameter SET @PersonID = 5; EXEC @RV = [dbo].[Person_Save] @PersonID OUTPUT, @NameFirst = ‘Dave’, @NameLast = ‘Smith’, @DOB = ‘3/22/1975’ SELECT @RV, @PersonID; — Checking the Outputs |
To write the output parameters, Section 2 begins by checking to see if the ErrorSQL StringBuilder contains text. If you have enabled SqlFullTxnLogging then it is possible for SqlError to contain previous SQL statements from the transaction, and you do not want multiple statements to run together because this would be hard to read. So the code adds a line break between the statements to help break them apart and to make the SQL statements easier to read. Next, the code iterates through all of the parameters in the command and runs an if statement that checks to see if the Direction property is anything other than ParameterDirection.Input. If so, it means that the parameter handles some form of output from the stored procedure and that we need to write out a variable to store that output. The first four lines inside the if block output the DECLARE keyword, parameter name, a space, and the variable type. Then the code checks to see if the parameter has a size specified. If so, the method checks to see if the parameter also has a precision. If both the size and precision are specified, then method outputs them both in the form (<size>,<precision>). If only the size is specified, then the method outputs (<size>). Finally, the method appends the ending semicolon, writes a comment indicating the parameter direction, and appends a line break.
Next, the code determines whether or not the parameter’s Direction is set to ParameterDirection.InputOutput. If it is, it means that the stored procedure is expecting a value to come in via the parameter and that the stored procedure can pass a value out via the parameter as well. For simple input parameters, we can declare the parameter values in the EXEC statement (see the @NameFirst parameter in Listing 14). But SQL does not allow you to pass in a value and specify the OUTPUT keyword. So you have to set the parameter value before you call the EXEC statement (see 3rd line of Listing 14). So, if the parameter is an InputOutput parameter, the code outputs the SET statement, the parameter name, and an equals sign. It then checks to see if the parameter value is set to DBNull.Value. If so, it outputs SQL that sets the parameter variable to null. If not, it outputs SQL that sets the parameter variable to the appropriate value. And finally, it appends a semicolon.
Section 3 is responsible for writing out the EXEC statement, and begins by writing out the EXEC keyword. Then it iterates through all of the parameters, checking to determine which parameter, if any, handles the return value. If it finds a parameter whose Direction is ParameterDirection.ReturnValue, it outputs the parameter name and an equals sign. This sets up the parameter to receive the return value of the procedure (refer to Listing 14). Then the code outputs the name of the stored procedure.
Section 4 writes out the stored procedure parameters and their values. The code in this section uses a for loop to iterate through all of the parameters in the command. The if statement directly inside the for loop checks the Direction property of the parameter to make sure we don’t add the return value parameter to the list of stored procedure parameters, because we’ve already accounted for the return value in Section 3. Once the code has determined it’s dealing with a stored procedure parameter, it checks the index of the for loop to see if this is the first parameter in the list. If it is the first parameter, the code appends a space to separate the stored procedure name from the parameter list. If it is not the first parameter, the code appends a comma and a space to separate the parameters. Then it outputs the parameter name. After that, the code checks the Direction property of the parameter. If the parameter is an Input parameter, then the code writes an equals sign and the parameter value to ErrorSQL using the same logic discussed in Section 2. If the parameter is an Output or an InputOutput parameter, the code writes the OUTPUT keyword to indicate that the stored procedure passes a value back out using the parameter. And at the very end, the code writes out a semicolon, a line break, and the GO keyword, to finish off the SQL statement.
Whew! That was the final and biggest addition to the DataServiceBase class. Now we just need to see exactly how to use all of these new properties and methods in the existing code.
Catching exceptions and logging the SQL statements
When you execute a SQL statement and it fails, your code throws an exception. All you have to do is catch the exception, pass the failed command to the BuildSQL method to log the SQL, create a SqlWrapperException to wrap the actual exception, assign the contents of ErrorSQL to the SqlWrapperException, then throw the wrapped exception. This allows the exception to propagate back up to the caller along with the SQL that caused the exception to occur. There are only two places in the DataServiceBase class where we execute SQL commands: the ExecuteDataSet method, and the ExecuteNonQuery method. Listing 15 contains the updated code for the ExecuteNonQuery method.
Listing 15 – Updated ExecuteNonQuery method
|
1 2 3 4 5 6 7 8 9 10 11 12 13 14 15 16 17 18 19 20 21 22 23 24 25 26 27 28 29 30 31 32 33 34 35 36 37 38 39 40 41 42 43 44 45 46 47 48 49 50 51 52 53 54 55 56 57 58 59 60 61 62 63 64 |
////////////////////////////////////////////////////////////////////// protected void ExecuteNonQuery(out SqlCommand cmd, string procName, params IDataParameter[] procParams) { //Method variables SqlConnection cnx = null; cmd = null; //Avoids “Use of unassigned variable” compiler error try { //Setup command object cmd = new SqlCommand(procName); cmd.CommandType = CommandType.StoredProcedure; for (int index = 0; index < procParams.Length; index++) { cmd.Parameters.Add(procParams[index]); } //Determine the transaction owner and process accordingly if (_isOwner) { cnx = new SqlConnection(GetConnectionString()); cmd.Connection = cnx; cnx.Open(); } else { cmd.Connection = _txn.Connection; cmd.Transaction = _txn; } //Execute the command cmd.ExecuteNonQuery(); } catch(Exception ex) { if (SqlLogging) { BuildSQL((SqlCommand)cmd); ErrorSQL.AppendLine (“– A SQL ERROR OCCURED RUNNING THE LAST COMMAND”); if (_txn != null && SqlFullTxnLogging) { ErrorSQL.AppendLine(); ErrorSQL.AppendLine(“ROLLBACK TRANSACTION”); } throw new SqlWrapperException( GetSqlStatementForException(), ex); } else { throw; } } finally { if (_isOwner) { cnx.Dispose(); //Implicitly calls cnx.Close() } if (SqlFullTxnLogging) BuildSQL(cmd); if (cmd != null) cmd.Dispose(); } } |
Inside the catch statement, the code begins by checking to see if SQL logging is enabled. If not, the code simply re-throws the original exception, without worrying about logging anything. If SQL logging is enabled, the code passes the cmd variable to the BuildSQL method. The cmd variable contains the SqlCommand that was executing when the exception occurred, and contains all of the information that needs to be logged. When the BuildSQL method finishes, the StringBuilder in the _errorSQL field contains the SQL log information. It then appends a SQL comment to the log indicating that the last command in the log caused the exception. After that, the code checks to see if there is an active transaction in the _txn variable and if full transaction logging is enabled. If that is the case, then the code appends a ROLLBACK TRANSACTION statement to the SQL log to avoid accidentally committing the SQL during debugging. Then, regardless of whether or not full transaction logging is enabled, it creates and throws a new SqlWrapperException. Notice that it uses GetSqlStatementForException to pass the SQL statement and to clear the SQL log. You will find similar code in the catch block of the ExecuteDataSet method.
And the last bit of code we need to discuss in the ExecuteNonQuery method is the line of bolded code that appears in the final block. When full transaction logging is enabled, you have to log the good statements as well as the bad ones. If the method gets to this line of code, it means that the command succeeded. The line simply checks to see if full transaction logging is enabled and, if so, logs the successful command.
The code in action: demo application
I updated the Person class, PersonDataService, and demo database to have a few more methods and stored procedures that help demo the SQL exception logging capabilities that we’ve been discussing: RandomProcA, RandomProcB, RandomProcC, and RandomProcThrowError. The first three methods work fine. The stored procedure for the fourth one attempts to divide by zero any time it runs, so it will cause your code to throw an exception. Here’s the code from the PersonCreateError.aspx page in the Website project:
Listing 16 – PersonCreateError.aspx Page_Load code
|
1 2 3 4 5 6 7 8 9 10 11 12 13 14 15 16 17 18 19 20 21 22 23 |
protected void Page_Load(object sender, EventArgs e) { try { Person myPerson = new Person(); myPerson.RandomProcThrowError(2, 3, 5, 7, 11, 13); } catch (SqlWrapperException ex) { lblSqlErrorInfo.Text = “<b>An error occured</b>: ” + ex.Message + “<br/><br/><hr/>” + Server.HtmlEncode(ex.SQL).Replace( “\r\n”,”<br/>”) + “<hr/>”; } catch (Exception ex) { lblSqlErrorInfo.Text = “An error occurred but it was not a SQL Wrapper Exception: ” + ex.Message; } } |
Notice that the first catch statement explicitly looks for the SqlWrapperException. If the RandomProcThrowError method throws a SqlWrapperException (I say “if” because you can turn off SQL logging altogether), the code in the first catch blocks executes and displays the statements stored in the SQL property of the SqlExceptionWrapper. If the RandomProcThrowError does not throw a SqlWrapperException, then the second catch block catches the exception. This demonstrates a key point. Somewhere in your exception logging code you will need to check and see if the exception is a SqlWrapperException, and then process the SQL property accordingly, to ensure it gets stored for future reference. Most exception logging tools allow you to store extended exception properties, so it’s just a matter of using the exception logging tool appropriately. You can also check out the PersonCreateErrorInTXN.aspx page to see the output from an exception that occurs within a transaction. The demo application has SQL logging and full transaction logging enabled by default. Feel free to change the settings and rerun the pages to see the various outputs.
Conclusion
You’ve seen the basics for logging exception-causing stored procedures, and you’ve seen how to pass a log of SQL statements back to your application using an exception wrapper. So you’ve got one more tool in your arsenal for tracking down nasty bugs. Remember, if you are worried about performance, then shy away from the full transaction logging because it has to build out SQL statements for every command that executes. SQL logging alone should not affect performance too badly, since it only runs when an exception occurs. If you want, you can always expand on the solution and add support for ad hoc SQL statements or transaction-inside-transaction support. You could even go as far as to add configuration options to turn on full transaction logging for a specific DataService, instead of all of them, to help out in the performance area. At any rate, good luck with it!
Load comments