
Get off my lawn! The crotchety old man inside me gets more and more crotchety each time I deal with the modern JavaScript development experience. I remember the good ol’ days when JavaScript was simple and straightforward. You could toss it in a file and use it in your browser. Nowadays you need a package manager to find all your libraries, a transpiler to make your code work across browsers, and a module bundler to weave the disparate threads of confusion into a beautiful tapestry of perplexity. It can be confusing and frustrating to get started, or at least that was my experience the first time I used Vue JS. Developing in Vue JS is straightforward once you’ve got all your packaging setup and working but getting to that point can be cumbersome.
In this article, I will walk you through how to set up a Vue.js single page application in Visual Studio with a minimal amount of configuration. There is a tendency for JavaScript frameworks and libraries to rely on scaffolding tools for setup and configuration of an application. While this does get you up and running more quickly, it also alleviates you of understanding the settings and often leaves you with a bloated configuration. I was on a project that started out this way, and I had the satisfaction of eventually trimming the 20+ configuration files I started out with down to a much more manageable set of three.
As such, you are going to build this from the ground up to ensure a thorough understanding of the underpinnings of the application. This includes:
- Package Management (Node JS)
- Module Bundling (Webpack)
- Linting (ESLint)
- Transpiling (Babel)
- Managing Configuration Settings for various Environments
- Routing
Our objective is to build the groundwork for a .NET web application that exposes a single page application (SPA) built using Vue.js. The backend will not be implemented but is assumed to consist of Web API controllers that expose data to the application. This will rely on IIS Express to host the application, which allows you to just hit F5 from within Visual Studio to launch the application. With some minor modifications, you can also use the configurations outlined in this article with the webpack development server, or the server that you prefer.
Install Node JS
All the required JavaScript libraries are available as packages, and you will need a tool called Node Package Manager to help pull those packages down and use them. Node Package Manager is included with Node JS, which is a JavaScript runtime engine for your computer. You can download Node JS from their website https://nodejs.org and run the installer. After installing Node JS, you should be able to open PowerShell or a Command Prompt, type npm, and get an output with usage instructions. If that is the case, you can close out PowerShell or the Command Prompt. If not, you will need to troubleshoot the Node JS installation.
If you already have Node JS installed, then please ensure you are running version 8.11.2 or higher, and that Node Package Manager (NPM) is version 6.1.0 or higher. You can determine which versions are installed using the following commands:
- node -v
- npm version
Some earlier editions of Node JS require additional configuration to run the scripts outlined in this article, so ensuring you have the latest editions will save you some trouble.
Install NPM Task Runner
Task Runner Explorer is a built-in Visual Studio tool that allows you to execute Gulp and Grunt tasks. It can also be extended to support NPM tasks by installing the NPM Task Runner extension, which you will want to use to run NPM tasks later in this article. To install, complete the following:
- Click Tools > Extensions and Updates to display the Extension and Updates dialog
- Click Online from the tree on the left
- Type NPM Task Runner into the search box in the upper right-hand side of the dialog
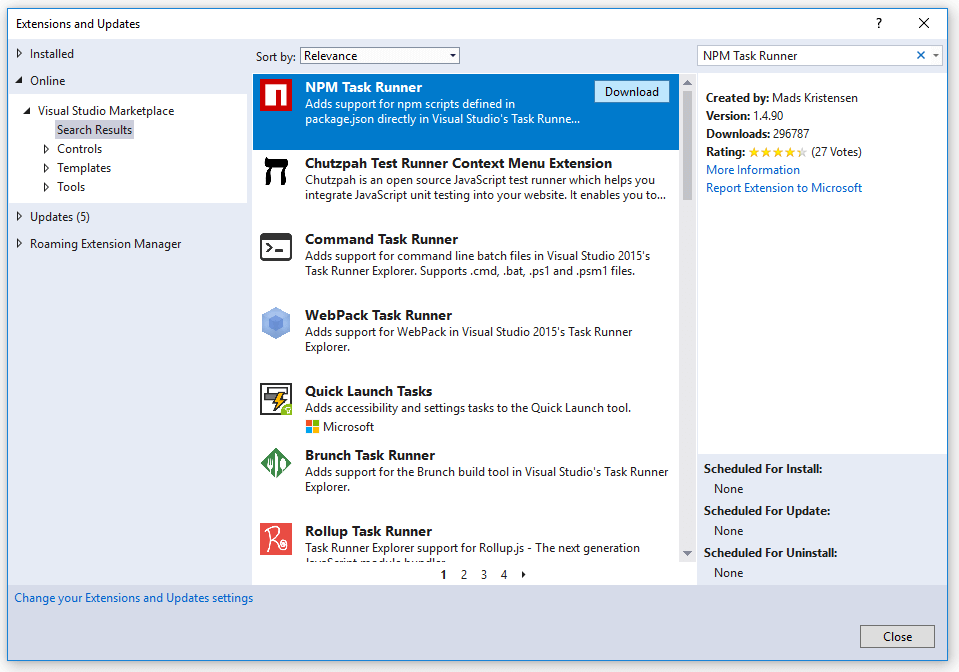
- The dialog should update the list of extensions. and NPM Task Runner should appear in the list
- Click on the NPM Task Runner item to select it and show the download button (if you see a green checkbox
- Click the Download button (this button does not appear until you select the item).
- You may see the screen flicker slightly, and the NPM Task Runner item will be updated with a clock in the upper right corner:
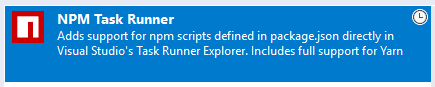
And the following message will appear at the bottom of the dialog:
![]()
- Close all instances of Visual Studio and wait for the VSIX Installer to launch.
- When the VSIX Installer launches, click the Modify (or OK) button to install NPM Task Runner.
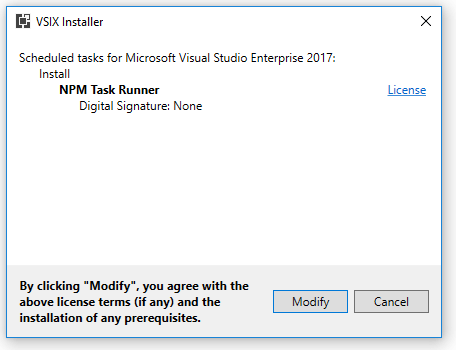
- When the installer finishes, click the Close button to close out the installer.
At this point, the extension is installed and should display NPM tasks once they have been defined in the project.
Create a .NET Core Web Application
Next, you’ll need to create a Visual Studio solution. I’ve opted for a .NET Core Web Application because it provides a cleaner separation for the JavaScript application code and the files that are ultimately deployed to the web server. However, you can accomplish the same thing in another project type; you’ll just want to make sure not to deploy your source application files to the web server.
To make the web application
- Open Visual Studio
- Click File New Project to open the New Project dialog
- Click Installed Visual C# Web from the tree on the left to show the web project templates
- Choose the ASP.NET Core Web Application project template
- Give the application a name and make sure the location is appropriate
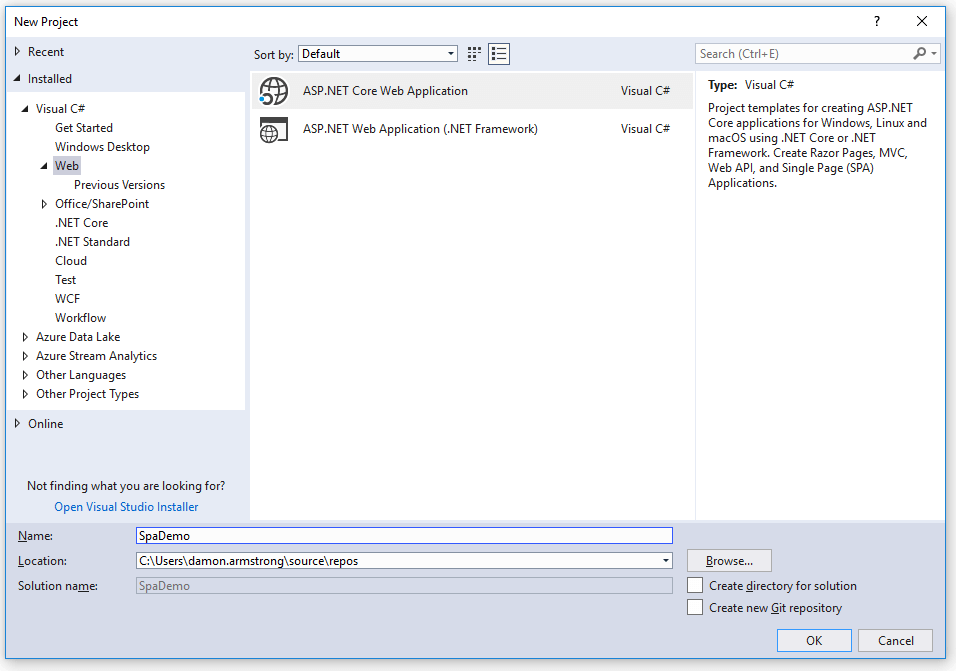
- Click OK to display the New ASP.NET Core Web Application dialog
- Choose the API tile to indicate you want to build a Web API application
- You can choose Web Application or Web Application (Model-View-Controller) if you plan on using functionality from those template types.
- Ensure Enable Docker Support is NOT checked.
- You can opt to Configure for HTTPS if you want to run the application over HTTPS.
- You can opt for whatever authentication is appropriate for your application.
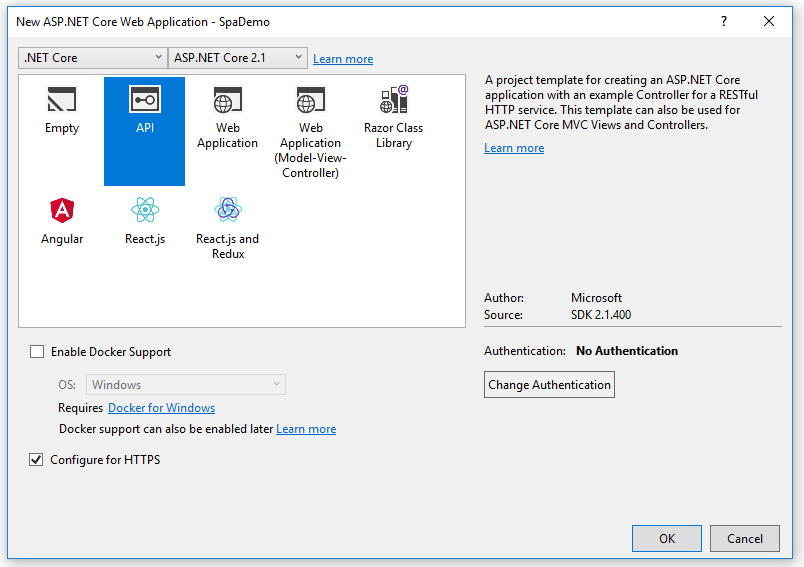
- Click OK to create the project.
Setup Project Structure
Next, you need to set up the project structure. Since you are not going to be building a full-blow SPA in this article, the project structure is minimal.
- Add a new folder to the project called App. All the JavaScript application files are housed under this folder.
- In the App folder, add a new folder called Build. All the build and configuration files are housed under this folder.
- In the App folder, add a new folder called Pages. This stores the page components to demonstrate that routing is working.
- Add a new folder to the wwwroot folder called js. This stores the compiled JavaScript application files (i.e., the bundle)
When it is all said and done, your project should look something like this:

Create the package.json File
Now you need to define all of the JavaScript packages that the application is going to use and to do that you are going to create a package.json file. This is a configuration file for Node Package Manager (NPM) that contains project information, package dependency information, and NPM script definitions. To add the file:
- Right click on the project in Solution Explorer and Add New Item to display the Add New Item dialog.
- Type npm Configuration File in the search textbox in the upper right-hand corner of the dialog
- This should display an npm Configuration File item with a default name of package.json.
- If it does not, you can also type JSON File to add a JSON file (which you will need to name package.json)
- If a JSON file is not available for some reason, you can add a text file and name it package.json
After creating the file, open it up, and delete any content in the file. Then paste the following content into the package.json file and save it:
|
1 2 3 4 5 6 7 8 9 10 11 12 13 14 15 16 17 18 19 20 21 22 23 24 25 26 27 28 29 30 31 32 |
{ "version": "1.0.0", "name": "spademo", "private": true, "scripts": { "dev": "cross-env NODE_ENV=development webpack --config App/Build/webpack.config.js", "prod": "cross-env NODE_ENV=production webpack --config App/Build/webpack.config.js", "watch": "cross-env NODE_ENV=watch webpack --config App/Build/webpack.config.js" }, "devDependencies": { "babel-core": "6.26.3", "babel-loader": "7.1.5", "babel-preset-es2015": "6.24.1", "css-loader": "1.0.0", "cross-env": "5.2.0", "eslint": "5.5.0", "eslint-friendly-formatter": "4.0.1", "eslint-loader": "2.1.0", "file-save": "0.2.0", "html-webpack-plugin": "3.2.0", "path": "0.12.7", "vue-loader": "15.4.1", "vue-style-loader": "4.1.2", "vue-template-compiler": "2.5.17", "webpack": "4.17.2", "webpack-cli": "3.1.0", }, "dependencies": { "vue": "2.5.17", "vue-router": "3.0.1" } } |
I will break down the contents of this JSON file. The first three lines contain project information that is optional because you are not publicly publishing this package. They were included for the sake of completeness.
- version – this is the version of the application.
- name – the name of the application. This should be lowercase, not start with a dot or underscore, may not contain URL unsafe characters, and must be less than 214 characters long.
- private – marks the package as private so it is not accidentally published.
The next section contains NPM script definitions that allow you to quickly run scripts by name. The name of the script appears on the left (as the JSON property name) and the command to execute appears as a string on the right (as the JSON property value). The names are entirely arbitrary, so you can call a script whatever you want. Obviously, it makes more sense to name it something sensible. There are three scripts defined in this file:
- dev –runs webpack in development mode which packages up the application with additional debugging information. Without this debugging information, debugging the packaged application files is extremely difficult.
- prod – runs webpack in production mode which packages up the application with production optimizations.
- watch – runs webpack in development mode and continuously monitors the source files for changes. When a change occurs, the package is automatically re-bundled to incorporate the change.
Notice that all three scripts are extremely similar. They all start by calling cross-env which is a package that allows setting up environment variables from the windows command line. Each script then sets the NODE_ENV environment variable to a different value, which is stored in the NODE_ENV environment variable. The scripts then call webpack (another package) and tell webpack to use the configuration file located at App/Build/webpack.config.js (which will be defined later on in this article). The configuration settings for webpack use the NODE_ENV to determine which configuration values to use (which is covered in more detail later as well).
After the script section, you can see the dependencies and devDependencies sections where the packages the application depends are identified. There are two sections to differentiate between build-time dependencies (devDependencies) and run-time dependencies (dependencies). Package dependencies are defined the same way in both sections with the package name on the left (as the JSON property name) and the version of the package appearing on the right (as the JSON property value). All the packages in this file use explicit versions, but you can also prefix a version with ^ to automatically use the most recent major version (middle number), or ~ to use the most recent minor version release (third number).
Package Dependency Information
You can see all the dependencies in the package.json file, but what do they all do? Fortunately, finding out what a package does is extremely simple. Google tends to be the best option because if you type npm [package] into the search, it normally brings up the package page from the npm website with all the details on what the package does and how to use it. If Google fails you, you can also go directly to the NPM website and search the packages there. But here is a breakdown of the packages in this application to keep you from having to look them all up:
|
Package |
Description |
|
babel-core |
Babel is a transpiler used to convert ES2015 JavaScript syntax which has limited browser support into ES5 syntax which has more universal browser support. |
|
babel-loader |
Webpack loader used to run script found within the <script> section of a Vue single-file component through the Babel transpiler. This is basically a bridge between Webpack and Babel. |
|
babel-presets-es2015 |
Babel configuration presets for es2015 (ES6) to ES5 JavaScript conversion |
|
css-loader |
Webpack loader for bunding CSS files together. This is a peer dependency for the vue-loader packages and is required even if you are not bundling CSS. |
|
cross-env |
Allows environment variables to be set in the windows command line interface. This is used by the scripts defined in the package.json scripts section. |
|
eslint |
Provides linting support for JavaScript. Linting is the process of checking code for errors. Without this, Webpack just packs up all your code as-is without checking to make sure there are no mistakes. |
|
eslint-friendly-formatter |
Formats lint errors produced by eslint in a more user-friendly manner. |
|
eslint-loader |
Webpack loader used to run script found within the <script> section of a Vue single-file component through eslint to check for errors. This is basically a bridge between Webpack and eslint. |
|
file-save |
Provides a simple way to write text to a file. Used within the webpack configuration file to write application settings to an external file. |
|
path |
Provides common file-path routines and methods like combining and resolving paths. |
|
vue-loader |
Webpack loader for managing Vue single-file components. This is what is responsible for splitting the <template> <script> and <style> sections of a Vue file. |
|
vue-style-loader |
Webpack loader for extracting CSS from the <style> section of a Vue single-file component. This is a peer dependency for the vue-loader package and is required even if you are not working with CSS in Vue files. |
|
vue-template-compiler |
Allows vue templates to be pre-compiled into render functions to avoid runtime-compilation overhead. This is used by vue-loader. |
|
vue |
Vue JS library. |
|
vue-router |
Vue Router library used for single-page-application routing. |
Pulling Down the Packages
Once the package dependencies have been defined, you need to pull them down into the development environment. You can do this manually by opening a PowerShell or command prompt, navigating to the directory containing the package.json file, and typing npm install on the command line. Or you can do it through the Visual Studio Task Runner Explorer. To use the Task Runner Explorer, do the following:
- If Task Runner Explorer is not visible then you will need to show it by clicking View Other Windows Task Runner Explorer
- In Task Runner Explorer, expand the package.json node if it is not already expanded
- Expand the Defaults node if it not already expanded
- Double click the install node, and Task Runner Explorer will run npm install
- A new tab displays showing the output from npm install. It may take a short while to download and extract all the packages to your development environment.
- When it is finished, review the output to determine if it processed successfully. There should be no errors. Sometimes you may see a Process terminated with code 0.
When you run npm install, NPM reads the package.json file and begins building a list of the packages on which your application depends. It then determines if any of those packages have dependencies, and then if any of those dependencies have their own dependencies, and so on it goes until npm has recursively built out a dependency tree based on your initial set of required packages. Npm then downloads all of those packages into the node_modules folder in the same directory where your package.json file resides. As such, the total number of packages that are actually pulled down can be far greater than the number defined in your package.json file. For example, the 15 packages defined here result in more than 500 packages after accounting for all the dependencies. This ends up being 50 MB worth of data (unpacked) and more than 13,000 individual files. Although this may seem overwhelming, these files are not included in your project, and you really don’t need to interact with them for the most part.
NOTE: any time you add a new package to your packages.json file, you will need to run npm install (either manually or from the Task Runner Explorer) to pull the package and any dependencies down.
Creating the Vue Application
Next, you need an application to compile. As mentioned before, this is not a full-blown tutorial about how to use Vue or implement an SPA, so my discussions about the files here will be brief. The application consists of four types of files
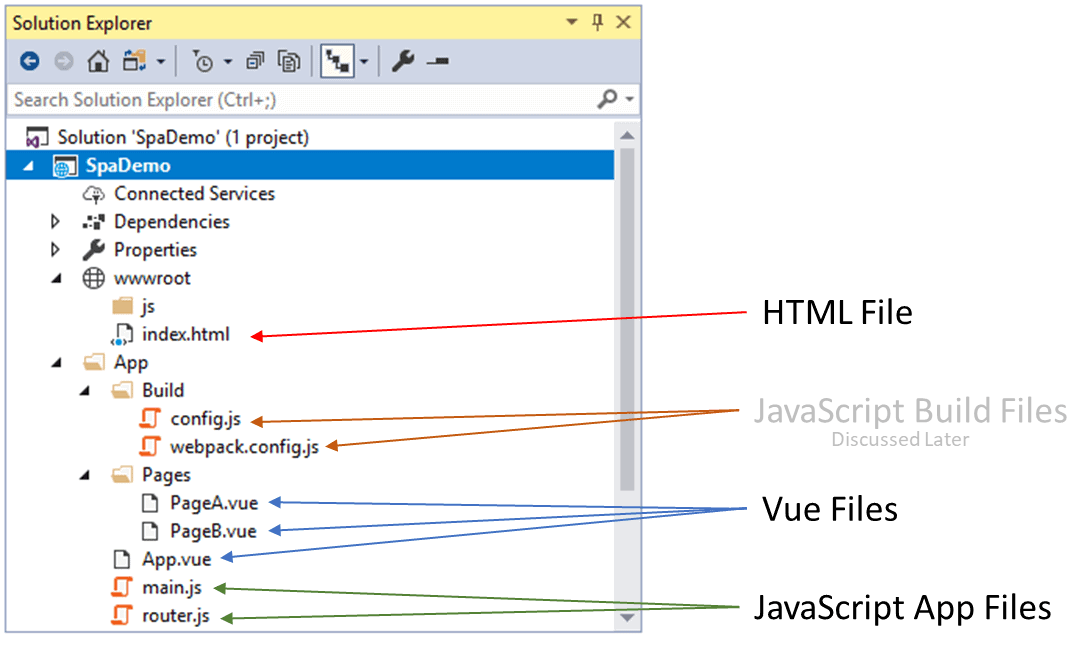
- HTML File – this is the single page of the single page application. Static files that are not part of the build process can be placed in the wwwroot folder. You can also opt to keep them under the App folder and copy them over during the build process if you prefer.
- JavaScript Application Files – these are JavaScript files that drive the application
- Vue Files – single file Vue components representing the application and some dummy pages to prove out the routing.
- JavaScript Build Files – these drive the build process that packages the JavaScript application and will be discussed in more detail later.
In the following sections I will show you the content of these files and provide a bit of commentary briefly outlining what each one does, so go ahead and make placeholders for all these files in your project. To add a file, right click on the folder that is to contain the file, then select Add New Item … from the context menu. This displays the New Item dialog where you can select a file type. You probably will not have a Vue file type, so you can create a JavaScript file and simply rename the file with the .vue extension. Any default content created when the file is added should be removed and replaced by the content shown outlined in this article.
Index.html
As mentioned before, this is the single page of the single page application. Replace any content in the index.html file with the following content.
|
1 2 3 4 5 6 7 8 9 10 11 12 |
<!DOCTYPE html> <html> <head> <meta charset="utf-8" /> <title>SPA Demo</title> </head> <body> <div id="app"> </div> <script src="/js/app-settings.js"></script> <script type="text/javascript" src="/js/bundle.js"></script></body> </html> |
There are three key takeaways from this file. First, Vue needs a target element to bind to, and in this case, that’s going to be the <div id="app">. Below that you’ll then reference two files that are not yet in the project:
- app-settings.js – this file contains application settings. You can think of it like the web.config of your compiled JavaScript application.
- bundle.js – this file contains the compiled / packaged JavaScript application
Both these files are created during the application packaging process, so they do not exist yet. When they are created, however, they will reside in the wwwroot/js folder.
Main.js
This is the entry point into the JavaScript application, so this is the file that you’re going to point webpack at when it’s set up to create the application bundle.
|
1 2 3 4 5 6 7 8 9 |
import Vue from 'vue'; import App from './App.vue'; import Router from './router'; new Vue({ el: '#app', template: '<App/>', components: { App }, router: Router }); |
The first three lines import modules that are needed to set up the application. Vue is the Vue.js library which is one of the devDependencies the is set up in the packages.json file and pulled down into the development environment by running npm install. Next is the App component which is defined in App.vue. And finally, Router imports routing information defined in the router.js file that lets Vue know what to display when navigating to different URLs.
After the imports section, you can see that a new Vue instance is initialized and then tell it to bind to the #app element which is defined in the index.html page. The template and component properties of the Vue constructor object tell Vue that you want to fill the #app element in index.html with the App component defined in App.vue. Last, the router property allows passing the routing information defined in router.js to the Vue instance.
Router.js
This file exists to initialize the Vue router and define which components to display at what URLs.
|
1 2 3 4 5 6 7 8 9 10 11 12 |
import Vue from 'vue'; import VueRouter from 'vue-router'; import PageA from './Pages/PageA.vue'; import PageB from './Pages/PageB.vue'; const routes = [ { path: '/', component: PageA }, { path: '/pagea', component: PageA }, { path: '/pageb', component: PageB }, ] Vue.use(VueRouter); const router = new VueRouter({ mode: 'history', routes: routes }); export default router; |
Once again, start off with imports. This time you import the Vue library, the Vue Router library that manages routing for Vue (and which is also a devDependency in packages.json), and two Vue components with the creative names PageA and PageB (which are imported from PageA.vue and PageB.vue respectively). Next is an array of routes which defines URLs and which component to display, followed by a call to Vue.use(VueRouter) which initializes routing within Vue. After that, you create a new VueRouter instance and pass in the routes defined as well as tell the router how to manage page state information (in this case I’m using ‘history’ mode). And then return that initialized VueRouter instance as the default export of the module.
App.vue
This is the top-level component in the application. In the application, it is an extremely component:
|
1 2 3 4 5 6 7 8 9 10 11 12 13 14 15 16 17 |
<template> <div> Hello from App Vue: <strong>{{</strong> message <strong>}}</strong> <router-link to="/pagea">Go to A</router-link> <router-link to="/pageb">Go to B</router-link> <router-view></router-view> </div> </template> <script> export default { data() { return { message: 'Message from App.vue', }; } }; </script> |
The component displays the message Message from App.vue when rendered on a page. It also has a <router-view> component where the component associated with a URL in the router will be displayed. To demo that functionality, there are two <router-link> components that allow users to switch back and forth from PageA to PageB. You can find out more details about routing in Vue from the Vue Router page.
PageA.vue / PageB.vue
The page components are also extremely simple components that are really just around to demo that the routing works correctly.
|
1 2 3 4 5 6 7 8 9 10 11 12 13 14 15 |
<template> <div> Page A - <strong>{{</strong> message <strong>}}</strong> </div> </template> <script> export default { name: 'PageA', data() { return { message: 'Data from Page A' }; } }; </script> |
This content can be copied into both PageA.vue and PageB.vue, but you will obviously want to update any text in the PageB.vue to say Page B. Like the App.vue, this component just displays a message indicating where the text is defined.
What is Webpack?
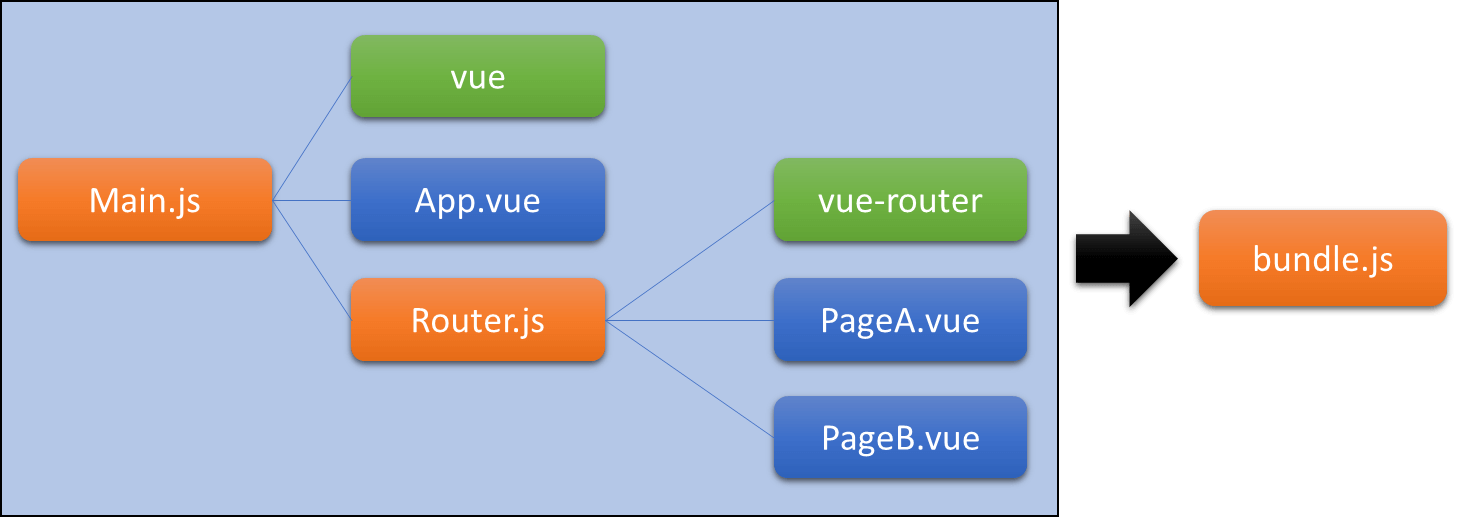
Webpack is a module bundler with a pipeline for applying transformations to application code. To use it, you specify one or more entry points into your application – in this case, the only entry point is the Main.js file. Webpack then reads that file and locates any JavaScript modules that are referenced within it. Then it recursively reads those modules and locates any JavaScript modules on which they depend, and so on and so forth until it has a picture of all the code you used in the application. It then bundles all the code from all those modules into a bundle containing all the code (there are options for splitting up bundles into multiple files that I will not get into here). In this case, this looks something like this:
Most browsers support ES6 and the concept of JavaScript modules, so you don’t necessarily need to use a bundler when building a modern JavaScript application. However, you will probably end up using a bundler for Vue applications for the following three reasons:
- Single-file Vue component support. Developers tend to really appreciate how .vue files allow you to define HTML, script, and CSS for a given component. However, JavaScript cannot natively interpret a .vue file. Webpack contains a loader that reads a .vue file, breaks it down into its constituent parts, and then packages it as a JavaScript module that can be referenced like normal.
- ES5 support. You will probably want to write your application using the latest JavaScript syntax. However, the current version of IE (at the time this was written) and many older versions of browsers do not have ES6 support. Webpack allows you to add a plugin to transpile your code from ES6 into an ES5 format (you will do this using Babel).
- Optimization. Unoptimized bundles initialize about three times faster than the same non-bundled code. Optimized bundles initialize about four times faster (Source). For smaller applications, the differences will be negligible, but for larger applications, you will see some benefit.
The Build Process
With the application files in place, you can finally focus on the build process, which is going to look like this:
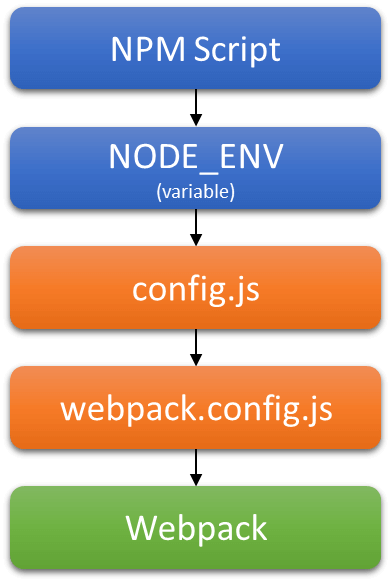
- NPM Script – these are the scripts defined in the package.json file. They are used to set the NODE_ENV variable to indicate the type of build to run.
- NODE_ENV – this is an environment variable that stores the value defined in the NPM script.
- config.js – this is a JavaScript module that exports a JavaScript object containing configuration settings for webpack that vary depending on the
NODE_ENVvalue. - Webpack.config.js – this is a JavaScript module that uses the configuration settings from the
config.jsmodule to set up and export a webpack configuration object. - Webpack – this is a command line utility that reads a webpack configuration and packages an application according to those settings.
NOTE:Node JS uses the Common JS module syntax, not the ES6 module syntax. This means that the module imports and exports syntax is a little bit differently here than in the Vue application.
Config.js
As mentioned before, this file is a Common JS module containing configuration settings that can vary depending on the NODE_ENV setting. Although you could put these configuration settings directly in the webpack configuration file, splitting them out like this has some advantages. The webpack configuration tends to be lengthier and more complicated, so this keeps the document size more manageable. Second, it provides a separation that helps keep people from changing configuration settings in webpack that they should stay away from. Following is the content for the config.js file:
|
1 2 3 4 5 6 7 8 9 10 11 12 13 14 15 16 17 18 19 20 21 22 23 24 25 26 27 28 29 30 31 32 |
const configuration = { // Application settings that can be configured from one environment to the next. These // are output to the app-settings.js file that is then referenced as a plugin within // webpack so they can be changed manually if needed. appSettings: { settingA: 5, settingB: 10 }, // Identifies the type of build that has been requested. Primarily used to vary // settings for different types of builds. buildTarget: process.env.NODE_ENV || 'development', // Specifies whether webpack should watch for changes on the file system and // automatically repack bundles when changes occur. watch: false, // Specifies the webpack mode webpackMode: 'development' }; /******************************************************************************* * Define watch-only settings ******************************************************************************/ if (configuration.buildTarget === 'watch') { configuration.watch = true; } /******************************************************************************* * Define production-only settings ******************************************************************************/ if (configuration.buildTarget === 'production') { // Define production-only settings configuration.webpackMode = 'production'; } //Export the configuration module.exports = configuration; |
This script starts off by creating an object and storing it in the configuration variable. This is the configuration object that will be ultimately exported from this module, and the default values are set up for a development build. The appSettings defined in this configuration are intended for environment-specific settings that will be rendered out to the app-settings.js file referenced from the index.html page. The buildTarget property stores a value indicating the requested build type. Notice that the value comes from process.env.NODE_ENV which will have the NODE_ENV value specified in the npm script. The process object is natively available and provides a variety of process-related metadata including access to environment variables (via the env property). Next, there is the watch property, which is set to false, and the webpackMode property which is set to development.
After the configuration object definition, there are two if statements that check to see if the buildTarget value is watch or production. Within the if statements, the configuration object is altered to account for settings needed for that type of build. If the buildTarget is set to watch, then notice the watch property is flipped to true. If the buildTarget is production, then the webpackMode is set to production. There are only a few configuration settings here because I wanted to keep it simple. You will likely encounter scenarios in your webpack build that will need to change based on the build type, and when that happens just create a variable for them in the configuration object, update them accordingly in the appropriate if statement, and then use the configuration setting value in the webpack configuration file. Also, know that you can modify your appSettings object with environmental specific values as well.
Exporting the module works a bit differently with Common JS modules than ES6 modules. In ES6, you use the export keyword. For Common JS, you have to assign the exported object to module.exports which is what you see being done on the last line of the script.
Webpack.config.js
Finally, it’s time to add the webpack configuration file which drives the webpack process. Like the config.js file, this is a Common JS module. This file is passed into webpack from the npm scripts defined in packages.json file.
|
1 2 3 4 5 6 7 8 9 10 11 12 13 14 15 16 17 18 19 20 21 22 23 24 25 26 27 28 29 30 31 32 33 34 35 36 37 38 39 40 41 42 43 44 45 46 47 48 49 50 51 52 53 54 55 56 57 58 59 60 61 62 63 64 65 66 67 68 |
const config = require('./config'); // Configuration settings const path = require('path'); // Path library used for building file locations const fileSave = require('file-save'); // Utility for writing files to disk const webpack = require('webpack'); // Webpack library const VueLoaderPlugin = require('vue-loader/lib/plugin'); // Plugin used for loading single-component vue files // Output the application settings file if (config.appSettings != null) { // NOTE: the replace regex on the next line removes the quotes from properties. It is rudimentary and can be removed // if it causes issues (because the quotes are technically OK I just think they look bad). var appSettingsOutput = JSON.stringify(config.appSettings, null, 4).replace(/\"([^(\")"]+)\":/g, "$1:"); fileSave(path.join(path.resolve(__dirname, "../../wwwroot/js"), "app-settings.js")) .write("window.appSettings = " + appSettingsOutput); } const webpathConfig = { mode: config.webpackMode, // Specifies whether to use built-in optimizations accordingly (options: production | development | none) entry: "./App/main.js", // Specifies the entry point of the application where webpack begins the packaging process. output: { path: path.resolve(__dirname, "../../wwwroot/js"), // Specifies the output directory for any wepback output files filename: "bundle.js", // Specifies the file name template for entry chunks (TODO: figure out what an entry point chunk is), publicPath: "/js/" // Specifies the page-relative URL to prefix before assets to ensure they can be resolved by a browser. (Notice this value is injected into index.html to refer to the bundle.js file created by webpack). }, resolve: { alias: { vue: 'vue/dist/vue.js' // This is required to avoid the error 'You are using the runtime-only build of Vue where the template compiler is not available. Either pre-compile the templates into render functions, or use the compiler-included build.' } }, module: { rules: [ { test: /\.vue$/, loader: 'vue-loader' }, // Specifies that files with the .vue extension should be processed by vue-loader which is what breaks up a single-file vue component into its constituent parts. { test: /\.js$/, loader: 'babel-loader', query: { presets: ['es2015'] } }, // Specifies that .js files should be run through the babel-loader for ES2015 to ES5 conversion. { test: /\.css$/, use: ['vue-style-loader', 'css-loader'] }, // Specifies that CSS should be included in the bundle from .CSS files as well as processed from the <style> section of vue single-file vue component. // ESLint rules { test: /\.(js|vue)$/, exclude: /node_modules/, loader: 'eslint-loader', enforce: 'pre', include: [path.resolve(__dirname, "App")], options: { eslintPath: path.join(__dirname, '../node_modules/eslint'), fix: true, formatter: require('eslint-friendly-formatter'), emitError: false, emitWarning: false, failOnError: true, failOnWarning: false } } ] }, plugins: [ //////////////////////////////////////////////////////////////////////////////////////////// // Required per manual configuration section of the Vue Loader configuration instructions // located at https://vue-loader.vuejs.org/guide/#vue-cli //////////////////////////////////////////////////////////////////////////////////////////// new VueLoaderPlugin(), new webpack.DefinePlugin({ 'process.env': { NODE_ENV: JSON.stringify(process.env.NODE_ENV || 'development') }, 'appSettings': "window.appSettings" }), ], watch: config.watch, // Flag indicating whether webpack should monitor files and update bundles automatically with any changes watchOptions: { // Specifies watch options for the watching mechanism. ignored: ['node_modules'] // Specifies directories to ignore (optimization). } }; module.exports = webpathConfig; |
That’s probably a lot to take in, but I will break it down into more manageable sections.
Imports
Imports appear on the first few lines of the file. You’ll notice that importing a Common JS module uses the require method with a parameter identifying the desired module. The result of the require method is then stored off in a variable which can be used in the script. The config variable stores the config.js module with the configuration settings. Any of the properties defined on the configuration object from the config.js can be referenced within this script from the config variable. The path variable stores a reference to the path module which gives access to common path functions. The fileSave variable stores the method returned from the file-save module. Everything up to this point has been a normal object, but you can return methods from modules as well. You will use this method in a minute to write text to a file. The webpack variable stores a reference to the webpack module. And last, the VueLoaderPlugin stores the vue-loader plugin which allows webpack to process .vue files.
Managing Configuration Settings
The next section is designed to help manage configuration settings for a compiled application. If you define configuration settings within your application, then they end up packaged up inside the bundle.js file. In production builds, the bundle file is often optimized, minimized, and maybe even uglyfied. This makes locating and modifying configuration settings in a compiled application extremely difficult. Although you can update the settings and recompile the application, I’ve found most QA managers prefer to build an application once and then push that build from DEV to QA to Production because it reduces the possibility of something changing in the build and introducing bugs. To avoid this, you must create a file containing application settings that can be easily updated, then make that available for use in the compiled application.
If you remember back to the configuration object defined in the config.js file, it has an appSettings properties intended to store environment specific configuration settings. All you need to do is write those settings out to a file (in this case app-settings.js) with a bit of modification. This is how the object is defined in the config.js.
|
1 2 3 4 |
appSettings: { settingA: 5, settingB: 10 } |
And this is what you should write out to the app-setting.js file:
|
1 2 3 4 |
window.appSettings = { settingA: 5, settingB: 10 }; |
Webpack allows you to define your own plugins that reference existing variables. You can essentially tell webpack that, when it comes across something called appSettings (or whatever you decided to call it), that it’s supposed to reference window.appSettings. This allows you to define configuration settings externally but still refer to them from within the packaged code (you’ll see this configured later). The only caveat is that app-settings.js has to be loaded before the bundle.js so that window.appSettings is defined when the bundled code runs. Here is the section of code from the example above that writes out the file:
|
1 2 3 4 5 6 7 8 |
// Output the application settings file if (config.appSettings != null) { // NOTE: the replace regex on the next line removes the quotes from properties. It is rudimentary and can be removed // if it causes issues (because the quotes are technically OK I just think they look bad). var appSettingsOutput = JSON.stringify(config.appSettings, null, 4).replace(/\"([^(\")"]+)\":/g, "$1:"); fileSave(path.join(path.resolve(__dirname, "../../wwwroot/js"), "app-settings.js")) .write("window.appSettings = " + appSettingsOutput + ";"); } |
The first thing this script does is check if appSettings is defined. If not, it skips the file writing process. If there are settings to write, it calls JSON.stringify on config.AppSettings to get the textual representation of the appSettings object. Unfortunately, JSON.stringify puts quotes around the property names of objects. There is nothing technically wrong with this, but it’s not quite as easy to read. So this method calls .replace on the string and uses a regular expression to remove the quotes from the property names. As mentioned before, fileSave is actually a method, and you call this method and pass in the name of the file to which you want to write. That file name is constructed by calling path.resolve to get the full path to the wwwroot/js folder in the web application, then calling path.join to join that path and the app-setting.js filename. It then calls write on the file-save instance returned by the fileSave method, which writes out the content of the app-setting.js file. Notice that you are adding the window.appSettings = in this string.
Webpack Configuration Object
Webpack configurations can get extremely complicated if they need to, and all the documentation to make them complicated can be found on the webpack website. My objective was to make this as simple as possible while still getting all the major components of Vue development in place. I think it’s better to start simple and get more complex, as compared to starting off too complex. As such, I fully expect you will need to add a few bits of configuration here and there to accommodate the specifics of your own application. So, let’s get started looking at this minimal configuration.
The first thing you’ll see is the mode property. This can be set to development, production, or none. When no value is set (e.g., null), the value defaults to production. This setting automatically loads certain webpack plugins that optimize the webpack build for development or production builds. Notice that you set the mode property value using config.webPackMode because it’s a setting controlled from the config.js file.
Next, there is the entry property. This defines the webpack entry point for the application. There is a single entry point, Main.js, so was in the string ./App/main.js.
The output property is an object containing settings for the webpack output. Within this object, there are three properties that are set.
path– this contains the path where bundled files should be written. In this case, write them to wwwroot/js in the project. This value MUST be an absolute path, so you will usepath.resolveto get an absolute path from the relative one.filename– this is the filename used to save the bundle. Only one file is produced, so just name it bundle.js. If, however, you have multiple entry points you can also specify some tokens in the string (name, id, hash, chunkhash, contenthash, etc.) to keep the names unique.publicPath– this is the public URL of the output directory. This is important for referencing resources static resources from the server (like images). Since the wwwroot folder in the project represents the root of the application, and you’re putting the files in the js folder beneath the root, use the value is for the public path.
After the output property, you’ll see the resolve property, which controls how modules are resolved. Webpack does a good job defining defaults for the most part, but you’ll run into situations where you need to modify them. One such situation is that Vue ships with two packages. One contains the template compiler, and one does not. By default, webpack references the one that does not have the template compiler, which results in the error You are using the runtime-only build of Vue where the template compiler is not available. Either pre-compile the templates into render functions or use the compiler-included build. To get around that, you need to reference a different version of Vue. This is accomplished through the alias property on the resolve object, which allows providing a name (i.e., alias) that points to a particular resource. In the case, the alias vue refers to the compiler-included build of Vue which is located at vue/dist/vue.js in the node_modules folder. You can also use the alias property to setup named references to folders in your application. This can be helpful if you have a complicated directory structure and helps you avoid having to reference files using long relative paths that have to backtrack through your application directory structure (e.g. ../../../App/Components/).
Under the resolve property is the module property, which controls how modules in webpack behave. What is a module in webpack? Any file that webpack processes can be considered a module. A JavaScript file is a module. A .vue file is a module. Even images and CSS files can be modules. Basically, Webpack starts processing code starting from the entry point you give it. As it encounters module references in your code (e.g., import or require statements in JavaScript, URLs in CSS, image references in HTML pages, etc.) it determines if it can package that module and does so. Webpack does not, however, natively know about every file type – it requires developers to create extensions called loaders to help Webpack know how to package up different types of files. For example, Webpack doesn’t natively support .vue files, but vue-loader plugs into Webpack and enables Webpack to process a .vue file correctly.
Loaders are configured from the rules property in the module object. In general, a rule identifies the loader to use when processing a module and defines a test to determine whether a given file meets the conditions required to be processed by that loader. the configuration contains four rules, three of which are extremely simple:
|
1 |
{ test: /\.vue$/, loader: 'vue-loader' } |
The first rule tests the filename of the module, and if it ends with .vue, it uses the vue-loader to process the module. As mentioned before, the vue-loader is what allows webpack to process .vue files. The string vue-loader resolves back to the vue-loader package pulled down from the package.json file.
|
1 |
{ test: /\.js$/, loader: 'babel-loader', options: { presets: ['es2015'] } } |
The second rule tests the filename of the module and if it ends with .js uses the babel-loader to process the file. This loader is responsible for transpiling ES6/ES2015 code into the ES5 syntax that most browsers support. You will notice there is an options property on this rule. The option property allows you to pass loader-specific options to the loader. In this case, the babel-loader should use the es2015 rule presets to transpile code. The string babel-loader resolves back to the babel-loader package pulled down in the package.json file, and the es2015 preset is available because of the ‘babel-preset-es2015’ package from the packages.json file.
|
1 |
{ test: /\.css$/, use: ['vue-style-loader', 'css-loader'] } |
The third rule tests the filename of the module and if it ends with .css it uses both the ‘vue-style-loader’ and the ‘css-loader’ loaders to process the file. Although not used in this project, these provide the ability to package CSS files and styles defined within single-file Vue component. The use property accepts an array of loaders and can be used to process a single module with multiple loaders.
|
1 2 3 4 5 6 7 8 9 10 11 12 |
{ test: /\.(js|vue)$/, loader: 'eslint-loader', enforce: 'pre', include: [path.resolve(__dirname, "App")], options: { eslintPath: path.join(__dirname, '../node_modules/eslint'), formatter: require('eslint-friendly-formatter'), emitWarning: true, failOnError: true } } |
The fourth and final rule tests the filename of the module, and if it ends in either .js or .vue, then it uses the eslint-loader to process the file. This is the loader that checks JavaScript code for syntax errors, so you know about them up front instead of at runtime. There are some extra properties on this rule that should be discussed, the first of which is the enforce property which manages when the loader execution order. The value pre ensures that ESLint runs on the code before any other loaders process it. Next is the include property, which allows you to specify an array of paths indicating which files you want to be processed by the loader. Webpack expects a full path, so build a full path from the relative path using path.join. Alternatively, you can use the exclude property if you want to exclude certain files. The options property contains eslint-loader configuration settings. The eslintPath identifies the location of the eslint module which this loader uses to perform the linting. The formatter property allows you to specify a formatter for outputting the errors identified by eslint. In this configuration, you use the ‘eslint-friendly-formatter’ which is available from the eslint-friendly-formatter package specified in the packages.json file. Next is the emitWarning setting, which you’ll want to enable. This ensures that warnings are output when running the watch build, so at least some message appears if you write bad code to a file that webpack is watching. Finally, you’ll want to enable the failOnError property to ensure your build stops if an error is encountered.
Next up on the webpack configuration object is the plugins property which allows customizing the webpack build process. the webpack has two plugins, the first of which is:
|
1 |
new VueLoaderPlugin() |
This plugin is required for vue-loader to function appropriately. Behind the scenes, it gathers rules defined for other modules (like JavaScript or CSS modules) and ensures they are applied to the modules built from the .Vue files. If you fail to include it, you’ll see the error vue-loader was used without the corresponding plugin. Make sure to include VueLoaderPlugin in your webpack config.
The next plugin is:
|
1 2 3 |
new webpack.DefinePlugin({ 'appSettings': "window.appSettings" }) |
Webpack allows you to define global constants using the DefinePlugin method, which is used here to define the constant appSettings. You can set these constants to any valid JavaScript expression, and in this case, it’s set it to window.appSettings. This means that whenever you refer to appSettings in the application, it ends up actually referring to the data stored in window.appSettings. You may recall that window.appSettings are defined in the app-settings.js file. It contains configuration settings that must to be able to be modified without recompiling the application. This is the mechanism that bridges the gap between that external file and the compiled codebase.
Finally, you have the watch and watchOptions properties. The watch property is a Boolean flag that specifies whether you want webpack to monitor the source files for the build and automatically repackage if any of the source files change. Here, set the value to config.watch, which is managed by the configuration code in the config.js file. The watchOptions property contains settings that allow you to control various aspects of how source filed are watched. You can set up how often to poll for changes, and how long to wait to compile once changes are noticed. In this case, you’ll want to use the ignored property to avoid watching the node_modules folder because it shouldn’t change very often and it can be quite large.
Configuring .NET Core for a Single Page Application
There are two final tasks to complete before compiling and running the application. The first task is to return index.html regardless of the URL requested to ensure that the user always lands on the single page app. When the app loads, Vue Router reads the URL from the browser and display the appropriate component based on the route configuration defined in the routes.js file. The second task is to enable the application to serve static files, which are needed in order to serve up index.html, bundle.js, and any other static resources you need for the application. Conveniently, both of these tasks can be accomplished in the same method:
- Open Startup.cs in the root of the project
- Add the following line to the top of the file:
using System.IO; - Locate the
Configuremethod - If you enabled HTTPs support for the application, then look for the following line of code:
app.UseHttpsRedirection(); - If you did not, then locate this line of code instead:
app.UseMvc();
Before either of those lines of code, add the following code:
|
1 2 3 4 5 6 7 8 9 10 11 |
app.Use(async (context, next) => { await next(); var path = context.Request.Path.Value; if (context.Response.StatusCode == 404 && !Path.HasExtension(path) && !path.StartsWith("/api")) { context.Request.Path = "/index.html"; await next(); } }); app.UseStaticFiles(); |
The call to app.Use adds a delegate to the .NET Core middleware pipeline. The delegate has two parameters. The first is a reference to the HttpContext for the request, which is not used here. The second is a method delegate named next that, when called, starts execution of the next delegate in the middleware pipeline. In the middleware delegate, the first thing to do is call await next(); which allows the request to process like normal. When it is finished, control returns to the method, and you can check the status of the request. If the request results in a 404 not found error, and the path has no extension, and the path does not start with /api, then you assume this is a request for a URL managed by the single page application. So rewrite the path of the request to point to /index.html, and then process the request again by calling await next() again.
The call to app.UseStaticFiles() is a bit more concise, and as it says, it configures the application to serve static files.
With that in place, you’re ready to run the application.
Setting the Startup URL for the Application
You may need to set the startup URL for your application so that it points to the root of the project. To configure the startup URL:
- Right click on your project
- Select Properties from the context menu
- Click on Debug from the pane on the left of the project properties page
- Look for the label Launch browser: and confirm that the URL is empty
When you hit F5, IIS Express should launch the application at the project root.
Compiling and Running the Application
Visual Studio has no idea that your JavaScript application needs to be compiled. As such, if you hit F5, then Visual Studio is just going to serve up whatever files are there. Since we’ve never run the application, that means that there is no app-settings.js and no bundle.js, so nothing is going to show up. If you have compiled the application before but have updated it, then IIS Express is going to be serving up an old version of your application. You have a couple of options to overcome this:
Manually Build your Application
You can manually build your application from the command line or using Task Runner Explorer. From the command line, you just have to navigate to the directory containing your package.json file and run the command npm run dev (or prod or watch) to run the command associated with the NPM script defined in the package.json file. In Task Runner Explorer, you just double click on the script you want to execute:

This launches a tab with the output from the script execution which you can review to determine if there are any errors. If you run the dev or prod scripts, the script will eventually terminate and let you know the process exit code. If you run the watch script, it will not exit because it remains running to watch the source files for changes. To stop watching, just close the tab.
NOTE: if you cannot see the Task Runner Explorer, you can display it by clicking View – Other Windows – Task Runner Explorer.
Use Build Events to Automatically Compile your Application
If you don’t want to manually compile the application, you can setup build events to compile your application. To do this:
- Right click on your project and select Properties from the context menu. This displays the project properties window.
- Click on the Build Events tab on the left-hand side of the window
- In the Pre-build event command line, enter the following text:
npm run dev- You can specify any NPM script you want here in place of
dev - Do NOT use the
watchscript here (or any script that does not terminate without user intervention). The watch script runs indefinitely while waiting for files to change and will hang the build process.
- You can specify any NPM script you want here in place of
Each time you build your application, it runs that script and compiles your application. The only drawback to this is that your application will get compiled every time you compile your project, even if you haven’t made any changes to the source files.
Run Watch Script on Project Startup
You may have already figured this out, but you can run the watch script manually and just leave it running. This ensures that your application package is updated any time you change a source file and avoids the overhead of recompiling the JavaScript application when you’ve only made changes to the .NET project. If this is the way you want to work, then to make things easier you can set up a binding that automatically launches the watch script when the project opens. To do this:
- In Task Runner Explorer, right click on the watch script
- From the context menu select Bindings Project Open
You’ll notice in the Bindings tab in the Task Runner Explorer window there is new entry indicating that the watch script from the package.json file is bound to the Project Open event. The next time you open the project, the watch script will run automatically.
After you compile the application, you can hit F5 to launch it. And I’m being liberal with the term ‘application’ because it’s a single page that lets you flip between two routes, but it demonstrates that the fundamentals for application development are in place.
Conclusion
Getting started with Vue can be difficult because of the number of pieces that have to come together before you can even get started. In this article you have learned about package management with Node JS and NPM. You’ve setup a build process with NPM scripts. You can code using the latest JavaScript syntax, but your application will be transpiled for compatibility with older or less capable browsers. Your JavaScript code will be linted for syntax errors at build time so you can avoid hitting them at runtime. You have a configuration mechanism in place that allows you to move your code from environment to environment without needing to recompile to account for setting changes. And you’ve got a single page Vue app with routing ready to go. There are several considerations that will need to be accounted for in your application, but at least you have a solid foundation on which to build.
This document contains proprietary information and is protected by copyright law.
Copyright © 2026 Red Gate Software Limited. All rights reserved
Load comments