
In an earlier article, I showed a neat trick to make it easy to display a list of JSON objects as a table. This is very handy but also somewhat simplistic. Sometimes you need more control over the final output. You may also want to update parts of a page based on the result of making an AJAX call. It makes a lot of sense for the Controller on the server to be agnostic of how the data is displayed and simply let your client-side scripts worry about it. As a best practice your controllers should send back the raw data, but that may leave your JavaScript with some heavy lifting to do.
Regardless of why it happens, most web application developers will occasionally find themselves needing to manipulate HTML on the client side.
In this article, we will explore some ways to streamline that work, and hopefully make the notion of generating markup on the client-side a bit less intimidating.
So Why Do I Care?
We want to push functionality to the client in order to create a richer user-interface, It is so much more satisfying from a user perspective to click a button and immediately see the page updated. It is very frustrating to click a button and see the page freeze while POST data is sent back to the server and it then does its magic before sending the page back again. These full page refreshes eat up bandwidth and take time that many users will simply not have the patience to give you.
We want to make the initial page load as quick as possible. Instead of downloading everything from the beginning, a common strategy for making the pages more responsive has been to only download what is immediately needed and then pull the rest when it becomes relevant. This means pulling in content dynamically after the initial page load and then including it into the existing page when the user expresses some interest in it.
Common Items in Our Bag of Tricks
Most of the time, we will only use a couple of different tricks to add our content dynamically. The true power comes from being able to apply and combine these simple tricks creatively.
Any content that we add will eventually be added through DOM manipulation. Fortunately jQuery makes this easier than ever.
JQuery also includes native support for “cloning” existing elements from the UI. Once we have a clone, we can manipulate it as needed and then insert it somewhere in the DOM.
We also have some wonderful libraries for using templates to generate the markup. JsRender and JsViews are emerging as the standard for creating and using templates. The dusty road to developing templates has been full of twists and turns and not without some controversy, but we are finally seeing the dust settle.
Simple DOM Manipulation jQuery Style
We have some basic functions for DOM manipulation:
- append()
- prepend()
- before()
- after()
- wrap()
- unwrap()
- detach()
- empty()
- remove()
Whew! That’s a lot. The differences are often subtle and you can often accomplish the same task in several different ways.
append() will insert the content that you specified at the very beginning of whatever was currently in the matched elements. prepend() will insert the content at the end of the matched elements.
before() will insert the content before the matched element. As you probably already figured out, after() will insert the content after the matched elements. The new content will be either the first or the last child of the matched elements.
As I mentioned before, the difference is subtle. To help to understand this difference, consider the following block of HTML:
|
1 2 3 4 5 6 |
<body> <input type="text" class="requiredBefore" /> <input type="text" class="requiredAfter" /> <div class="requiredAppend">Label</div> <div class="requiredPrepend">Label</div> </body> |
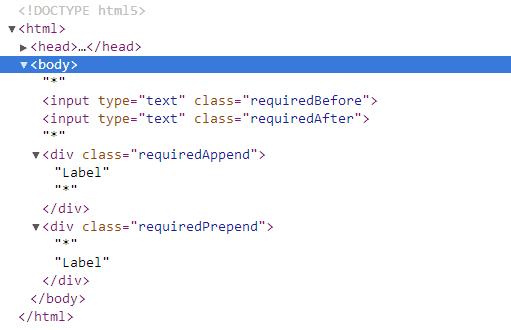
Running the following script on this simple markup:
|
1 2 3 4 5 6 7 8 |
<script> $(document).ready(function () { $(".requiredBefore").before("*") $(".requiredAfter").after("*"); $(".requiredAppend").append("*"); $(".requiredPrepend").prepend("*"); }); </script> |
Will produce a DOM tree similar to this:
The wrap() function will wrap the matched elements with whatever tag you specify. This method will handle the closing tag at the end. This can go a little further than simply wrapping a single tag around the matched elements. Consider this simple html fragment.
|
1 2 3 4 |
<p class = "required"> <label>First Name</label> <input type = "text" /> </p> |
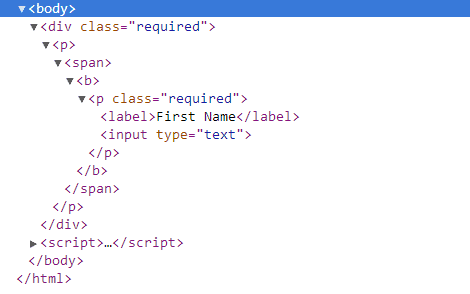
If you run this script:
|
1 2 3 4 5 6 7 |
<script> $(document).ready(function () { $(".required").wrap( "<div class = 'required'><p><span><b>"); }); </script> |
You will get markup like this:
Unwrap() will roll back these changes one level at a time.
detach(),empty(), and remove() all sound like they do the same thing. Detach() removes the matching items from the DOM tree but the objects are still in memory and can easily be added back later, probably somewhere else in the tree. Empty will clear the contents of the matched elements without affecting the matching elements, whereas remove() gets rid of everything.
Send in the Clones
Sometimes when you are creating new content, all you want is a subtle variation on something that is already there. Perhaps you may have a static template that is hidden that you can simply copy and make a couple of changes to and then be ready to show. This can potentially be much easier than creating complex markup from scratch.
Consider the following HTML:
|
1 2 3 4 5 6 7 8 |
<table id="container"" border="1" > <tr id="emptyRow"" class="hidden"> <td class="One"></td> <td class="Two"></td> <td class="Three"></td> </tr> </table> <input type="button" onclick='addRow()' value="Add" /> |
The hidden class will keep the clone able row from being seen and be cloned elements
The addRow() method may look like this:
|
1 2 3 4 5 6 7 8 9 10 11 |
var count = 0; function addRow() { var newRow = $("#emptyRow").clone(); newRow.attr("id", "Row" + ++count); newRow.removeClass("hidden"); newRow.find(".One").append ("<input type = 'text' value = '" + count + "'/>"); newRow.find(".Two").append("Row " + count + ": Cell 2"); newRow.find(".Three").append("Row " + count + ": Cell 3"); $("#container").append(newRow); } |
The very first line creates the clone. The rest of the method modifies the clone to meet our needs.We can fairly easily build up a complex table. The contents for each of the data cells can be whatever you need. Creating the clone will always be the same, but the complexity of the rest of the method will depend on the actual changes that you need to make.
At a minimum, you need to make sure to change the id attribute and ensure that the newly-cloned item is visible.
JsRender For the Win
Cloning may be all you need for many tasks, especially if the adjustments to the clone are minor. When you need to make more substantial changes, then JsRender is a better option. This is a separate library from jQuery, and it is not included when you start a new project: instead, you will need to download it from github.
One of the biggest advantages that JsRender gives you is that the template and the script to manipulate it are coupled together. You just pass in a JSON object to the render method.
To duplicate the functionality from our clone example, the template would look similar to this:
|
1 2 3 4 5 6 7 8 9 10 11 12 13 |
<script id="rowTemplate"""" type="text/x-jsrender"> <tr id="gt;id}}"" > <td class="One"> <input type = "text" value = {{>One}}> </td> <td class="Two"> {{>Two}} </td> <td class="Three"> {{>Three}} </td> </tr> </script> |
And our addRow method may look like this:
|
1 2 3 4 5 6 7 8 9 10 |
var count = 0; function addRow() { count++; var data = { id: count, One: count, Two: "Row: " + count + ": Cell 2", Three: "Row: " + count + ": Cell 3" }; var newRow = $("#rowTemplate").render(data); $("#container").append(newRow); } |
Usually you will get the JSON data from an AJAX call, so the code that is required to run and display nearly any template will look like the last two lines of this addRow script.
Now there are a couple of things worth noting about the rowTemplate script. First off, aside from a little bit of JsRender syntax, it looks very similar to regular HTML. We don’t have all of the confusion of nested quotes and awkward line-wrapping, and so on. Also the JsRender syntax is not that strange, especially if you are already familiar with any of the view engines in MVC.
For this simple example, the only bit of JsRender syntax that we used is a property reference.
{{>id}} refers to the id property of the JSON object that was passed in. Be careful though if you reference a property that does not actually exist, you will not get an error message and the rest of the template will most likely look right but be wrong. So be careful.
Looping
We can make our templates a little bit more complex with looping constructs.
|
1 2 3 4 5 6 7 8 9 10 11 12 13 14 15 16 17 |
<script id="rowTemplate"""" type="text/x-jsrender"> <tr id="gt;id}}"" > <td class="One"> <input type = "text" value = {{>One}}> </td> <td class="Two"> <select> {{for regions}} <option>{{>name}}</option> {{/for}} </select </td> <td class="Three"> {{>Three}} </td> </tr> </script> |
The “{{for” syntax defines a “for” loop. In this case it will loop through the items in the regions property which presumably will be an array.
Similarly, the {{/for}} syntax marks the end of the loop.
Within the body of the loop, {{>name}} refers to a property on the elements from the regions array.
For this new advanced template, we initialize our data a little differently, but everything else stays the same. We simply need to initialize a new property for the regions array:
|
1 2 3 4 5 6 7 8 9 10 11 12 13 14 |
function addRow() { count++; var data = { id: count, One: count, Two: "Row: " + count + ": Cell 2", Three: "Row: " + count + ": Cell 3", regions: [{ name: "North" }, { name: "South" }, { name: "East" }, { name: "West" } ] }; var newRow = $("#rowTemplate").render(data); $("#container").append(newRow); } |
Again, this data will probably come from the result of making an AJAX call to an action in your controller.
Conditional Logic
This gets to be a little bit more complicated because the comparison operators are not what you would expect. Our template becomes:
|
1 2 3 4 5 6 7 8 9 10 11 12 13 14 15 16 17 18 19 20 21 |
<script id="rowTemplate"""" type="text/x-jsrender"> <tr id="gt;id}}"" {{if lastMonthsVolume gt 100}} style = "background: green" {{/if}} </tr> <td class="One"> <input type = "text" value = {{>One}}> </td> <td class="Two"> <select> {{for regions}} <option>{{>name}}</option> {{/for}} </select </td> <td class="Three"> {{>Three}} </td> </tr> </script> |
The normal comparison operators cannot be used because they would be confused for html markup. So instead we have these options:
- eq = equals
- ne = not equals
- lt = less than
- le = less than or equal
- gt = greater than
- ge = greater than or equal
Being able to express conditional logic and looping logic gives us the basic building blocks that we would need.
Compiling Templates
As you can imagine, it may become difficult to maintain your template library if they are spread over each view that could use them. There is also the matter of downloading the various templates even if they are not going to be used or simply before they are needed.
Fortunately we have the option to compile the template from a string. This means that our AJAX call could return the template and the data needed to populate the template. Now things get to be very interesting.
We can easily take branding to a whole new level.
We could allow the user to determine what level of detail they are interested in.
We could update the look of an application without having to redeploy the whole site or even make the user to a full page refresh. Well, that last one might be a stretch, but this does open up some great possibilities.
In this example, we will make an AJAX call to the controller to get the template and the data needed to populate a Member Editor type control. We will assume that our templates are stored in a database that tracks different templates based on the user’s security access.
Our action may look like this:
|
1 2 3 4 5 6 7 8 9 |
[HttpPost] public JsonResult EditMember(string memberId) { var repository = new MemberRepository(); var member = repository.GetByName(memberId); var template = new TemplateRepository().GetMemberEditor(User); return Json(new {template, memer}); } |
Because we are returning JSON data, make sure that the action requires a POST.
Also make sure that the template is complete and valid HTML.
Now on the client side, our editMember function can potentially be very simple:
|
1 2 3 4 5 6 7 8 9 10 11 12 13 |
function editMember(memberId) { $.AJAX({ url: '<%=Url.Action("EditMember")%>', dataType: "json", type: "POST", data: { memberId: memberId }, success: function (result) { $.templates({editor: result.template }); $("#editor").empty(); $("#editor").html($.render.editor(result.member)); } }); } |
If you have a multi-tenant application, you may want to pass a tenant id to the controller or gather some screen metrics like size, resolution, etc. to help pull the right template.
There are lots of possibilities here.
Wait There’s Even More
This should give you a good overview of JSRender and pique your interest for more details. You should have enough information to create some useful templates and help bring your applications to the next level, but there is a good deal more available. You can create helpers, custom tags, sub templates, etc.
Conclusion
jQuery makes dynamic HTML much easier than ever. Being able to clone elements and manipulate the clone means that you don’t have to start from scratch when creating new content. Finally it is clearer where JQuery is going with templates now that we have a clear road map with jsRender.
No longer do you need to shy away from creating new client-side markup.
Load comments