
The Azure AD reference documentation delivers tons of examples describing scenarios in which this authorization service can be used. Those examples help to find the answer for the very first question a developer asks when starting to research Azure AD authentication: which kind of solution should I choose for my project? The use case examples provided there are really helpful if you find one of them matching your project requirements.
Unfortunately, Chrome extensions do not seem to be on a list of typical scenarios. The extensions are simple web applications built using HTML and JavaScript. Microsoft provides a ADAL.JS library that allows you to authorize web applications using the OAuth protocol. It simply redirects the user to the login page on Azure. After successful authorization the user is redirected back to the web application. That might seem to be a perfect solution for a Chrome extension. However, there is one technical issue that rules out this approach: Chrome extensions do not use the http/https protocol! They use the chrome-extension:// protocol instead. All attempts of setting up the ADAL.JS configuration using redirect page that doesn’t use http or https protocol result with an error like that shown in Figure 1.
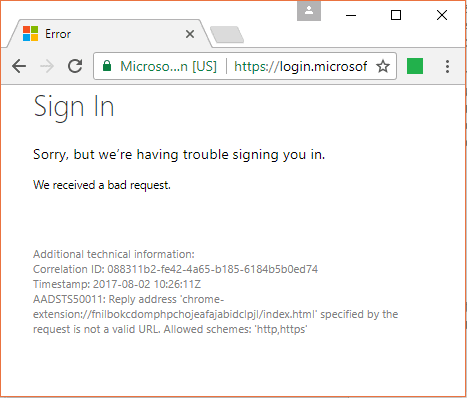
Figure 1: The login error
Find a Way Out
Let’s think about a way out. What if we delegated the authorization process to a web application hosted using standard the http protocol? Its role would be to obtain an authorization token from Azure AD and pass it to the Chrome extension. The diagram shown in Figure 2 presents the flow of a proposed solution. The code with a working solution covered in this article can be found on my GitHub.
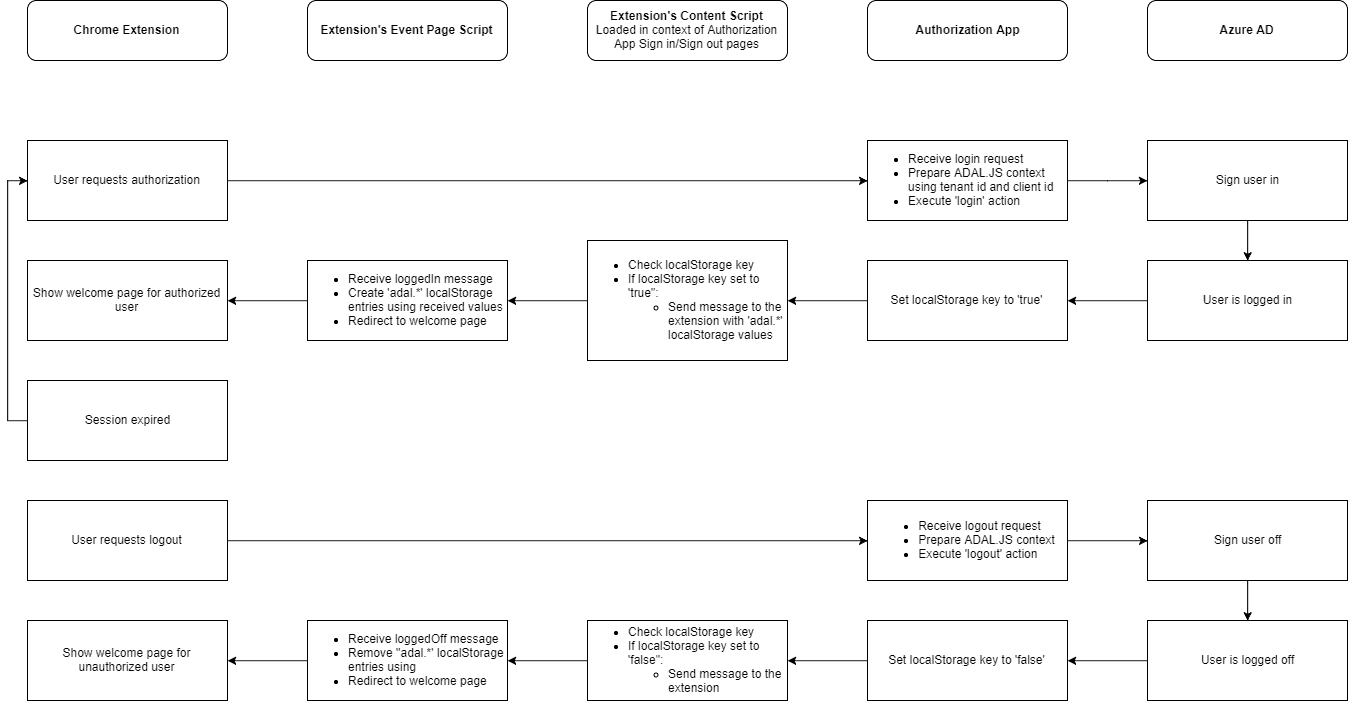
Figure 2: Proposed solution workflow
Getting Started
My previous article presented how to build Chrome extensions using TypeScript and Angular CLI. I will use the code developed in that article to demonstrate how to implement Azure AD authentication in this case. The goal is to restrict some content for authorized users only.
Before implementing the authorization solution, register a new application registration in Azure Active Directory module on the Azure portal. More details can be found in the Azure Active Directory documentation. While registering it, you need to provide some details. Here are the settings to use for the test application:
- Display name: ChromeTestApp
- Application type: Web app / API
- Home page URL: h
ttp://localhost:9100/home/signout - Logout URL:
http://localhost:9100/home/signout - Reply URLs (add new position):
http://localhost:9100/home/signin
After creating the app registration, copy Tenant ID and Application ID. Application ID can be found in the Essentials blade. Tenant ID is a directory name of your organization on Azure. It’s visible in All settings/Properties/App ID URI field as a part of the url generated by default for the registration, according to the following format:
https://organization-name.onmicrosoft.com/xxxxxxxx-xxxx-xxxx-xxxx-xxxxxxxxxxxx
The bolded part of the URL above is your Tenant ID and highlighted in Figure 3.

Figure 3: Setting up the ChromeTestApp properties
Building the Authorization Application
Before making changes in the extension code, you should take care of the middle of the flow – the authorization proxy app. This web application can be developed using any kind of programming language and framework. The only condition is that it should be capable of hosting web pages that can load JavaScript files. This article uses the ASP.NET Core framework.
Firstly, create a new ASP.NET Core web application. Name it AuthorizationApp as shown in Figure 4.
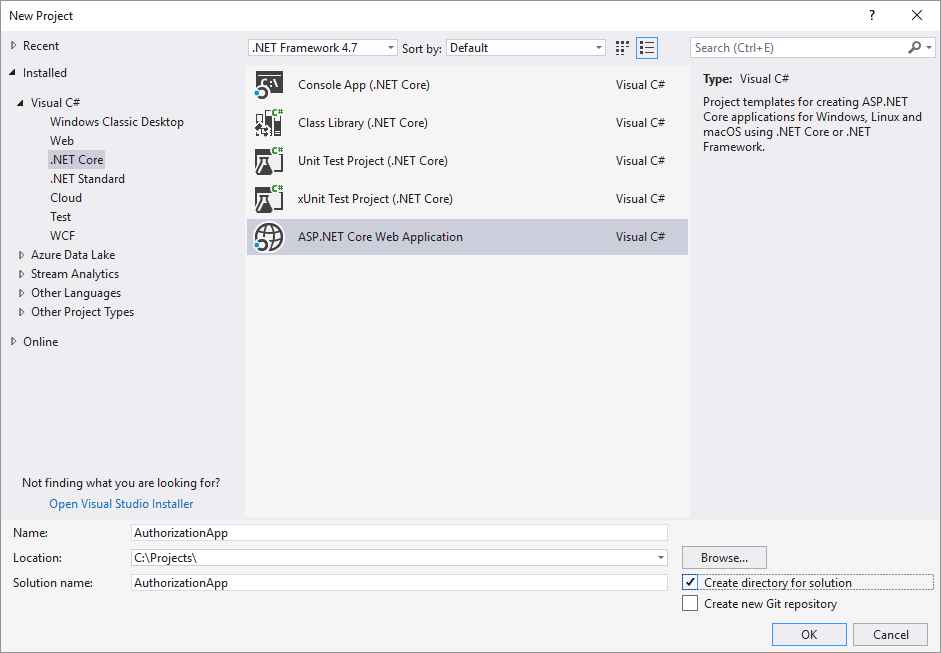
Figure 4: Create an ASP.NET Core Web-Application
Use the Empty template to create it shown in Figure 5.
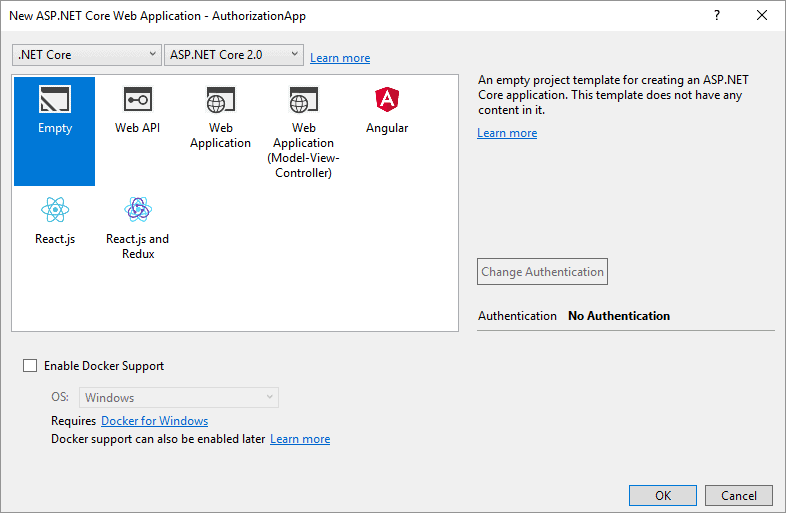
Figure 5: Use the Empty template
The application should host two pages – one which handles the login action, and the second for logout. Begin by creating the app configuration file (appsettings.json) by adding a new item of type ASP.NET Configuration File:
|
1 2 3 4 5 6 |
{ "AppSettings": { "TenantId": "organization-name.onmicrosoft.com", "ClientId": "00000000-0000-0000-0000-000000000000" } } |
You will also need the AppSettings model class (Models/AppSettings.cs) covering settings included in the configuration file:
|
1 2 3 4 5 6 7 8 |
namespace AuthorizationApp.Models { public class AppSettings { public string TenantId { get; set; } public string ClientId { get; set; } } } |
One of the cool new features in ASP.NET Core is the possibility to map a configuration file to a model class. Combined with another feature – built-in dependency injection container – you can make the AppSettings class injectable to any other class that will be resolved using DI. To use this feature, first install additional NuGet packages to the project:
- Microsoft.Extensions.Configuration
- Microsoft.Extensions.Configuration.Json
Now it’s time to enhance the Startup code (startup.cs):
|
1 2 3 4 5 6 7 8 9 10 11 12 13 14 15 16 17 18 19 20 21 22 23 24 25 26 27 28 29 30 31 32 33 34 35 |
using AuthorizationApp.Models; using Microsoft.AspNetCore.Builder; using Microsoft.AspNetCore.Hosting; using Microsoft.Extensions.Configuration; using Microsoft.Extensions.DependencyInjection; namespace AuthorizationApp { public class Startup { public Startup(IConfiguration configuration) { Configuration = configuration; } public IConfiguration Configuration { get; } public void ConfigureServices(IServiceCollection services) { services.Configure<AppSettings>(Configuration.GetSection("AppSettings")); services.AddMvc(); } public void Configure(IApplicationBuilder app, IHostingEnvironment env) { if (env.IsDevelopment()) { app.UseDeveloperExceptionPage(); } app.UseStaticFiles(); app.UseMvc(routes => { routes.MapRoute( name: "default", template: "{controller}/{action=Index}/{id?}"); }); } } } |
Authorization Controller
As you will need to provide some configuration entries for ADAL.JS, create an AuthorizationModel class (Models/AuthorizationModel.cs) that can be passed to the view of the pages:
|
1 2 3 4 5 6 7 8 9 |
namespace AuthorizationApp.Models { public class AuthorizationModel { public string TenantId { get; set; } public string ClientId { get; set; } public string ScriptBundleName { get; set; } } } |
Now you’re ready to implement the HomeController class (Controllers/HomeController.cs):
|
1 2 3 4 5 6 7 8 9 10 11 12 13 14 15 16 17 18 19 20 21 22 23 24 25 26 27 28 29 30 31 32 |
using AuthorizationApp.Models; using Microsoft.AspNetCore.Mvc; using Microsoft.Extensions.Options; namespace AuthorizationApp.Controllers { public class HomeController : Controller { private readonly AppSettings _appSettings; public HomeController(IOptions<AppSettings> appSettings) { _appSettings = appSettings.Value; } public ActionResult SignIn() { return GetView("signin.js"); } public ActionResult SignOut() { return GetView("signout.js"); } private ViewResult GetView(string scriptBundleName) { var model = new AuthorizationModel { ClientId = _appSettings.ClientId, TenantId = _appSettings.TenantId, ScriptBundleName = scriptBundleName }; return View("SignInOut", model); } } } |
New actions share the same view – SignInOut.cshtml. The reason for this is that both pages have a very similar objective – display no content, just initialize some configurations and include a single JavaScript file.
Implementing the View
Before you can implement the view file, make sure the following JavaScript files are included in wwwroot/js directory:
- jQuery library (https://jquery.com/download)
- ADAL.JS library (https://github.com/AzureAD/azure-activedirectory-library-for-js)
- New custom script files (empty):
- signin.js
- signout.js
The application will have only one view file, defined in the Views/Home directory (Views/Home/SignInOut.cshtml):
|
1 2 3 4 5 6 7 8 9 10 11 12 13 14 15 16 17 18 19 20 21 22 23 |
@model AuthorizationApp.Models.AuthorizationModel <!DOCTYPE html> <html> <head> <meta charset="utf-8" /> <meta name="viewport" content="width=device-width, initial-scale=1.0" /> <script> window.adalConfig = { instance: 'https://login.microsoftonline.com/', tenantId: '@Model.TenantId', clientId: '@Model.ClientId', postLogoutRedirectUri: window.location.origin + '/home/signout', cacheLocation: 'localStorage' }; </script> <script src="~/js/jquery.min.js"></script> <script src="~/js/adal.min.js"></script> <script src="~/js/@Model.ScriptBundleName"></script> <title>Authorization App</title> </head> <body> </body> </html> |
Use the ADAL.JS Library
You’re finally ready to use the ADAL.JS library. At first, you can develop the signin.js code (wwwroot/js/signin.js):
|
1 2 3 4 5 6 7 8 9 10 11 12 13 14 15 16 17 18 19 20 21 22 23 24 25 26 27 28 |
<a id="post-77521-30j0zll"></a><a id="post-77521-1fob9te"></a>(function () { var adalConfig = window.adalConfig; var authContext = new AuthenticationContext(adalConfig); var isCallback = authContext.isCallback(window.location.hash); authContext.handleWindowCallback(); if (isCallback && !authContext.getLoginError()) { window.location = authContext._getItem(authContext.CONSTANTS.STORAGE.LOGIN_REQUEST); } if (!authContext.getLoginError() && authContext.getCachedUser() != null) { localStorage.setItem('loggedIn', 'true'); } window.onhashchange = function () { loadView(stripHash(window.location.hash)); }; window.onload = function () { $(window).trigger("hashchange"); }; function loadView(view) { if (!authContext.getCachedUser()) { authContext.config.redirectUri = window.location.href; authContext.login(); return; } } function stripHash(view) { return view.substr(view.indexOf('#') + 1); } <a id="post-77521-_3znysh7"></a>}()); |
The Sign out script is even simpler (wwwroot/js/signout.js):
|
1 2 3 4 5 6 7 8 9 10 11 |
<a id="post-77521-2et92p0"></a><a id="post-77521-tyjcwt"></a>(function () { var adalConfig = window.adalConfig; var authContext = new AuthenticationContext(adalConfig); var user = authContext.getCachedUser(); if (user) { authContext.logOut(); } else { localStorage.setItem('loggedIn', 'false'); } }()); |
That’s it – the web application that will handle Azure AD authorization is ready. Before running it locally, please make sure its URL has a port number matching your Azure AD App Registration. In my case it is port 9100. You can configure it in Visual Studio in Project Properties as shown in Figure 6:
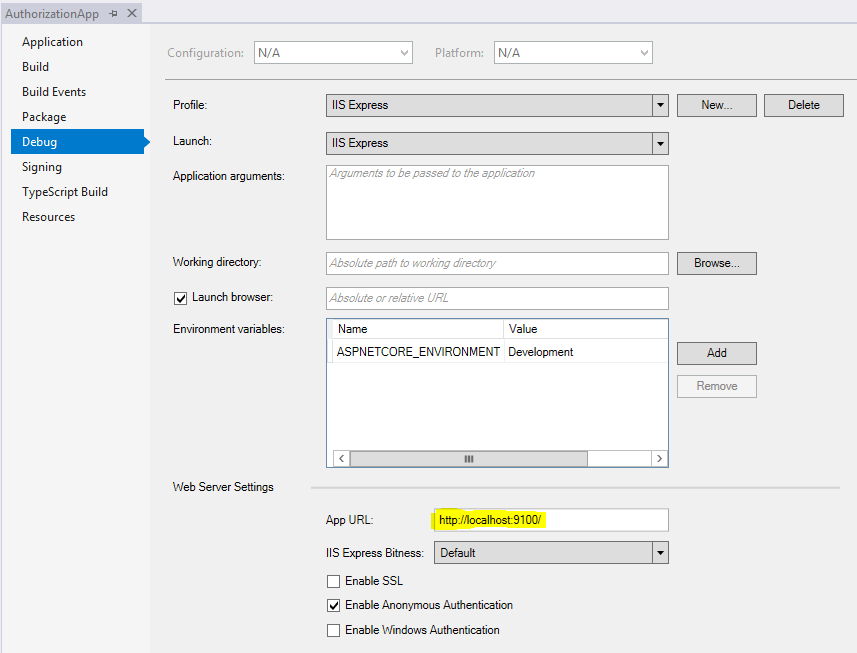
Figure 6: Configuring the App URL
The app can be hosted locally using IIS Express. For production use, it can be deployed in the cloud, e.g. as Azure App Service.
As you can see, the connection between the app and the extension is not implemented on the authorization app side. That’s the part that will be implemented on the extension side.
Enhancing the Extension: Content Script
As the proposed solution assumes that the extension implements the event page and content script, you need at first to make sure that the extension on has those elements.
Chrome extensions can include a content script that runs in the context of web page loaded in the browser tab. That’s the perfect place to implement logic that will communicate with the authorization web app, collect the authorization token, and use it to authorize the extension.
In this example, the ADAL.JS library uses browser local storage to keep authorization details, including the token. A content script running in the context of authorized web application has access to the authorization details, as it can browse the local storage of the authorization app. However, a content script doesn’t have access to the extension’s local storage. On the other hand, the event page script has access to it. You can use the messaging API to send messages from content scripts to event page scripts. You will need to send two such messages:
- After successful login action
- Message should include ADAL authorization data
- After successful logout action.
All new functionality will make use of ADAL.JS and Chrome extensions APIs – functionalities that are not known for TypeScript. However, you can install additional packages to fix that issue:
|
1 2 |
npm install –s adal-ts npm install –s @types/chrome |
You will also need a new configuration value stored in the environment collection. It’s necessary to include it in all instances of the environment class (src/environments/environment.ts):
|
1 2 3 4 |
export const environment = { production: false, authAppBaseUrl: 'http://localhost:9100' }; |
It must also be included here, for example (src/environments/environment.prod.ts):
|
1 2 3 4 |
export const environment = { production: true, authAppBaseUrl: 'http://localhost:9100' }; |
Some of the new code can be shared between content script and event page. First implement the Angular service that will be common for both (src/app/common/services/common-account.service.ts):
|
1 2 3 4 5 6 7 8 9 10 11 12 13 14 15 16 17 18 19 20 21 22 23 24 25 26 27 28 29 30 31 32 33 34 35 36 37 38 39 40 41 42 43 44 45 46 47 48 49 50 51 52 53 54 55 56 57 58 59 60 61 62 63 64 65 66 67 |
import { environment } from '../../../environments/environment'; import { Authentication, AuthenticationContext, AdalConfig, User } from 'adal-ts'; export class CommonAccountService { private baseUrl = environment.authAppBaseUrl; private loggedInKey = 'loggedIn'; public userExistsAndIsNotExpired(): boolean { const user = this.getAuthorizedUser(); if (!user) { return false; } const isTokenExpired = this.isAuthorizationTokenExpired(user.exp); return !isTokenExpired; } public isUserLoggedIn(): boolean { const loggedInValue = localStorage.getItem(this.loggedInKey); const loggedIn = loggedInValue === 'true'; return loggedIn; } public getUserName(): string { const user = this.getAuthorizedUser(); let result = ''; if (user) { result = user.name; } return result; } public redirectToLoginPage() { this.openUrlInCurrentTab(this.getLoginUrl()); } public redirectToLogoutPage() { this.openUrlInCurrentTab(this.getLogoutUrl()); } public getLoginUrl(): string { return this.getAuthorizationAppUrl('home/signin'); } public getLogoutUrl(): string { return this.getAuthorizationAppUrl('home/signout'); } public isAccountKey(key: string): boolean { return key.indexOf('adal.') >= 0 || key === this.loggedInKey; } getAuthorizedUser(): User { return this.getAuthenticationContext().getUser(); } getAuthorizationAppUrl(relativePath: string) { if (relativePath[0] !== '/') { relativePath = '/' + relativePath; } return this.baseUrl + relativePath; } openUrlInCurrentTab(targetUrl) { chrome.tabs.query({ active: true, currentWindow: true }, (tabs) => { chrome.tabs.update(tabs[0].id, { url: targetUrl }); }); } getAuthenticationContext(): AuthenticationContext { return Authentication.getContext(new AdalConfig('', '', '')); } isAuthorizationTokenExpired(expirationTimestamp: number): boolean { if (!expirationTimestamp) { return true; } const expirationDate = new Date(expirationTimestamp * 1000); const currentDate = new Date(); return currentDate > expirationDate; } } |
As the content script consists of other modules, you can implement an additional one in a separate file (content-script/account-messenger.ts):
|
1 2 3 4 5 6 7 8 9 10 11 12 13 14 15 16 17 18 19 20 21 22 23 24 25 26 27 28 29 30 31 32 33 34 35 36 37 38 39 40 41 42 43 44 45 46 47 48 49 50 51 |
import { CommonAccountService } from '../src/app/common/services/common-account.service'; export class AccountMessenger { private commonAccountService: CommonAccountService; constructor() { this.commonAccountService = new CommonAccountService(); this.initializeSigninListener(); this.initializeSignoutListener(); } initializeSigninListener() { const loginUrl = this.commonAccountService.getLoginUrl(); if (window.location.href.indexOf(loginUrl) < 0) { return; } const loggedIn = this.commonAccountService.isUserLoggedIn(); if (!loggedIn) { return; } const adalData = this.getAdalLocalStorageData(); const message = { 'command': 'signInAndRedirectToHomepage', 'adalData': adalData }; this.performEventPageRequest(message); } initializeSignoutListener() { const logoutUrl = this.commonAccountService.getLogoutUrl(); if (window.location.href.indexOf(logoutUrl) < 0) { return; } const loggedIn = this.commonAccountService.isUserLoggedIn(); if (loggedIn) { return; } const message = { 'command': 'signOutAndRedirectToHomepage' }; this.performEventPageRequest(message); } getAdalLocalStorageData() { const result = {}; for (const key in localStorage) { if (this.commonAccountService.isAccountKey(key)) { result[key] = localStorage[key]; } } return result; } performEventPageRequest(message) { chrome.runtime.sendMessage(message); } } |
In my previous article, a content script code was introduced. The implementation was based on the boot.ts script in the content-script folder responsible for launching some classes with content script logic (RuntimeListener and ConnectListener). Since you inherited this solution, you can enhance it now to launch also AccountMessenger logic (content-script/boot.ts):
|
1 2 3 4 5 6 |
<a id="post-77521-3dy6vkm"></a><a id="post-77521-1t3h5sf"></a>import { AccountMessenger } from './account-messenger'; import { ConnectListener } from './connect-listener'; import { RuntimeListener } from './runtime-listener'; const runtimeListener = new RuntimeListener(); const connectListener = new ConnectListener(); const accountMessenger = new AccountMessenger(); |
Finally, a provider of CommonAccountService needs to be registered in an Angular application as you’re about to inject it also into some components of the app. A reference to the service should be included in the AppModule class (src/app/app.module.ts):
|
1 2 3 4 5 6 7 8 9 10 11 12 13 14 15 16 17 18 19 20 21 22 23 |
<a id="post-77521-4d34og8"></a> import { BrowserModule } from '@angular/platform-browser'; import { NgModule } from '@angular/core'; import { AppComponent } from './app.component'; import { HomepageComponent } from './homepage/homepage.component'; import { EventPageComponent } from './event-page/event-page.component'; import { PopupComponent } from './popup/popup.component'; import { AppRoutingModule } from './app-routing.module'; import { CommonAccountService } from './common/services/common-account.service'; @NgModule({ declarations: [ AppComponent, HomepageComponent, EventPageComponent, PopupComponent ], imports: [ AppRoutingModule, BrowserModule ], providers: [CommonAccountService], bootstrap: [AppComponent] }) export class AppModule { } |
Enhancing the Extension: Event Page Script
The last missing part of the extension is the authorization messages receiver. It should be able to receive two command messages from the content script:
- signInAndRedirectToHomepage:
- On this action store ADAL configuration values in extension local storage.
- signOutAndRedirectToHomepage:
- On this action clear ADAL configuration values from extension local storage.
After each action, the user should be redirected to the homepage. Implement this logic in the EventPageComponent class (src/app/event-page/event-page.component.ts).
|
1 2 3 4 5 6 7 8 9 10 11 12 13 14 15 16 17 18 19 20 21 22 23 24 25 26 27 28 29 30 31 32 33 34 35 36 37 38 39 40 41 42 43 44 45 46 47 48 49 50 51 52 |
import { Component, OnInit } from '@angular/core'; import { CommonAccountService } from '../common/services/common-account.service'; @Component({ selector: 'app-event-page', templateUrl: './event-page.component.html', styleUrls: ['./event-page.component.css'] }) export class EventPageComponent implements OnInit { constructor(private accountService: CommonAccountService) { } ngOnInit() { this.addMessageListener(); } addMessageListener() { chrome.runtime.onMessage.addListener((request, sender, sendResponse) => { switch (request.command) { case 'signInAndRedirectToHomepage': this.signInAndRedirectToHomepage(request.adalData); break; case 'signOutAndRedirectToHomepage': this.signOutAndRedirectToHomepage(); break; default: return; } }); } signInAndRedirectToHomepage(adalData) { this.updateAdalData(adalData); this.redirectToHomepage(); } signOutAndRedirectToHomepage() { this.clearAdalData(); this.redirectToHomepage(); } redirectToHomepage() { chrome.tabs.query({ active: true, currentWindow: true }, (tabs) => { const tab = tabs[0]; const homepageUrl = chrome.extension.getURL('index.html#/homepage'); chrome.tabs.update(tab.id, { url: homepageUrl }); }); } updateAdalData(adalData) { for (const key in adalData) { const value = adalData[key]; localStorage.setItem(key, value); } } clearAdalData() { for (const key in localStorage) { if (this.accountService.isAccountKey(key)) { localStorage.removeItem(key); } } } } |
Note: the decorators of the EventPageComponent class were generated automatically by the Angular CLI generate component command. If your project wasn’t created with Angular CLI, you might notice a warning message during the build about questionable support of experimental decorators. To get rid of this warning, you should enable the experimentalDecorators option in the tsconfig.json file. If your project doesn’t have such a file, you should create it in angular app root folder with the following content (tsconfig.json):
|
1 2 3 4 5 6 |
{ "compilerOptions": { "experimentalDecorators": true, "allowJs": true } } |
Secured Content
It’s time to consume the authorization capability in the extension. Define a place, where the content needs to be visible only for an authorized user. Do this in the homepage component. At first, you will need the piece of html code that renders the login/logout buttons (src/app/homepage/homepage.component.html):
|
1 2 3 4 5 6 7 8 9 10 11 12 13 14 |
<h1>Homepage</h1> <div class="user-status"> <div class="welcome"> <p *ngIf="loggedIn">Welcome, <strong>{{</strong>userName<strong>}}</strong>!</p> <p *ngIf="!loggedIn">Please log in!</p> </div> <div class="buttons"> <button *ngIf="loggedIn" (click)="logout()">Log out</button> <button *ngIf="!loggedIn" (click)="login()">Log in</button> </div> </div> <div *ngIf="loggedIn" class="content-container"> <img src='assets/secret.png' /> </div> |
The last thing to do is to include the common.account.service module in homepage.component class and implement some logic there (src/app/homepage/homepage.component.ts):
|
1 2 3 4 5 6 7 8 9 10 11 12 13 14 15 16 17 18 19 20 21 22 23 24 |
import { CommonAccountService } from '../common/services/common-account.service'; import { Component, OnInit } from '@angular/core'; @Component({ selector: 'app-homepage', templateUrl: './homepage.component.html', styleUrls: ['./homepage.component.css'] }) export class HomepageComponent implements OnInit { userName: string; loggedIn: boolean; constructor(private accountService: CommonAccountService) { this.loggedIn = accountService.userExistsAndIsNotExpired(); if (this.loggedIn) { this.userName = accountService.getUserName(); } } ngOnInit() { } login() { this.accountService.redirectToLoginPage(); } logout() { this.accountService.redirectToLogoutPage(); } } |
Starting from now, the Chrome extension requires authorization of the user simply to show a content of content-container div element. You can enhance this logic to condition access to other interface areas, data-layer or whatever else is needed. After building the app using gulp command and loading it as a chrome extension, you can see the following view on extension homepage shown in Figure 7:
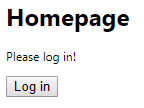
Figure 7: The login page
After logging in, you can see the content available only for authorized users (Figure 8):

Figure 8: Content shown to authorized users
Summary
A powerful Chrome Extensions API allowed us to deal with Azure AD limits regarding URLs that are accepted as reply URL for App Registration. By introducing a middle layer web application responsible for obtaining & sharing the authorization token the initial problem is solved. In addition to that, I also introduced the web API that might be used in future as back-end part of the extension.
Load comments