
Imagine you’ve spent much time, possibly years, into crafting your Unity app. The app then gets published, the launch is smooth, everything’s good. However, then some time passes, and you want to modify some small item in your app. Maybe it’s a game, and you want to change the base health of an enemy type, or it’s a business app, and you want to notify users of a handy new feature. One might expect the developer to open up their Unity project, whether at home or at a work PC, make the necessary tweaks, and push these changes to their app. However, suppose instead you’re out of town, away from your work PC, and the changes required need to happen as soon as possible. What do you do? One option available is Unity’s Remote Config, a feature that lets you make changes to an app from anywhere in the world so long as you have a web browser and can open your Unity Dashboard.
Unity’s Remote Config lets you change your app remotely and in real-time. It’s especially useful for fine-tuning your software attributes without needing to redeploy it with every change. You can also use Remote Config for live events by enabling holiday themed content or to unlock a previously created feature. Note that Remote Config is not meant to be used for creating entirely new content for your app, but rather modifying or unlocking what is already in the app. While actively developing the application, Remote Config can be used to iterate on the program without needing to modify the code itself. To demonstrate this feature, a simple project will be put together that allows you to change a bool, string, int, and even JSON data from within the Unity Dashboard. Changes made in the dashboard will then be reflected within the app itself.
Project Setup
This example assumes that Unity 2020 will be used for the project. However, the 2019 version will work just as well. Select the default 3D template, give your project a name, and set its location. Then click the Create button.
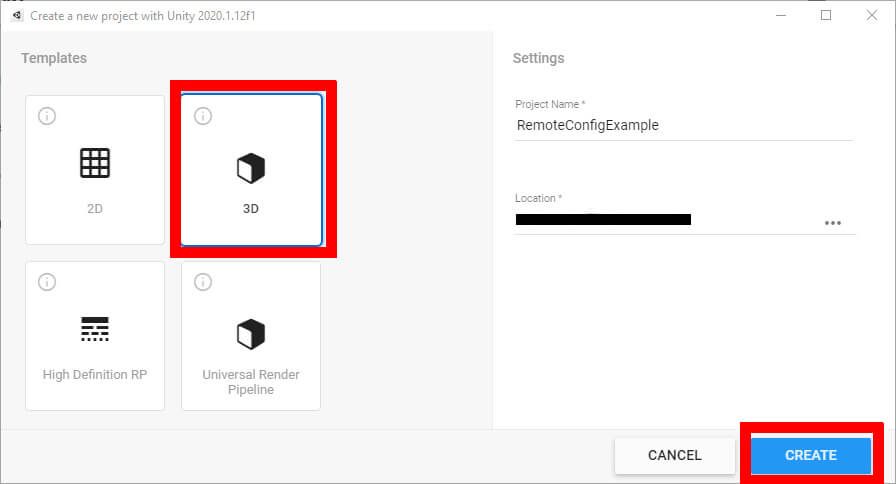 Figure 1: Creating a new project
To utilize Unity’s Remote Config, you must set up Unity services and acquire a project ID. To do this, navigate to the Edit top menu and select Project Settings. From there, select the Services option. Please note that you may need to create a Unity account and log into it at this point. You’ll then be asked to select an organization. Once you do, you may then click the Create project ID button. Unity will then automatically assign your project an ID.
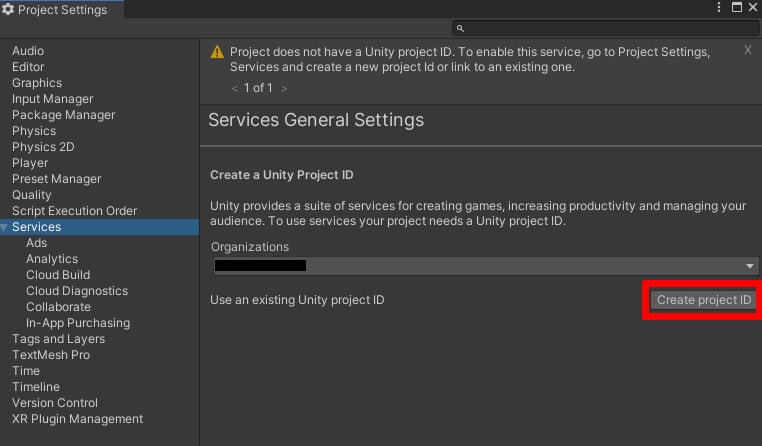
Figure 2: Setting up Unity Services
Next, you need to install the Remote Config package from Unity. Doing this requires navigating to the Package Manager, which is found in the top menu under Window->Package Manager. At first, the Package Manager will only show the packages currently installed in your project. To view all available packages, select the dropdown that currently shows Packages: In Project and choose Unity Registry.
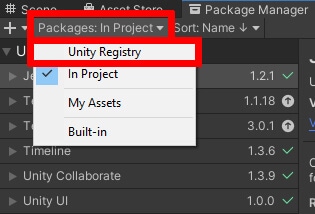
Figure 3: Accessing packages in the Unity Registry
Scroll down until you find Remote Config, then click the Install button to add Remote Config to your project.
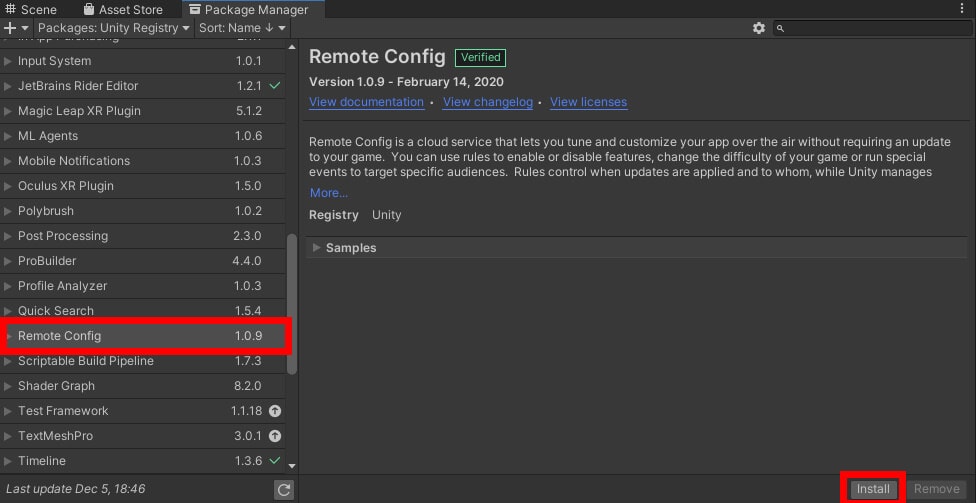 Figure 4: Installing the Remote Config package
To better see the effects of Remote Config, you’ll need a small handful of objects to change within your app. Start by creating a simple cube by going to the Hierarchy window and selecting the + button, then choosing 3D Object->Cube.
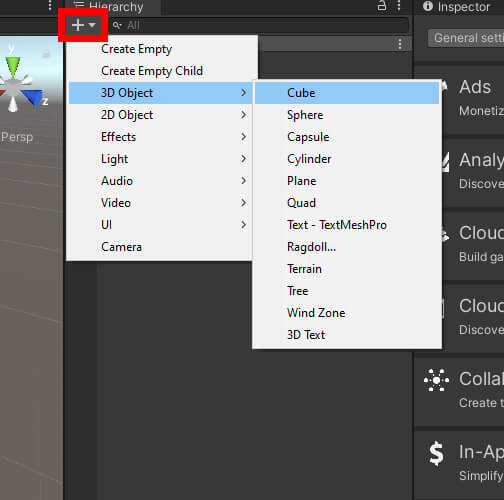
Figure 5: Creating a new object
By default, the object should be placed with location coordinates of 0, 0, 0 with no rotation and a scale of one. You can leave this object as is, but if you want or need to change it, go into the Inspector window and change the values seen in the Transform component. Right after that, using the same object creation menu, create a UI with text. Set its position to be 0, 150 and give it a width of 250. It also looks nice to give the text center alignment and some default text. Finally, give it a unique name to help identify it easier.
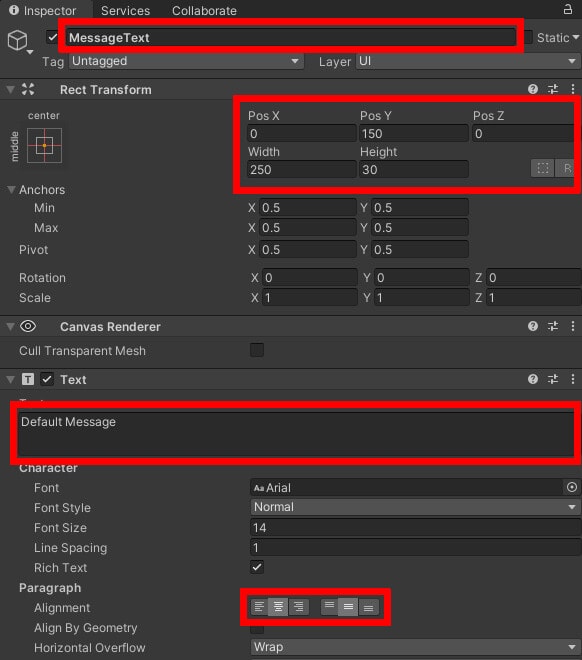
Figure 6: Giving object a name, setting position and size, creating default text, and alignment
Duplicate this text with Ctrl + D and move the copy a little lower down (this example changed the Y position to 100). This text will display a lucky number, which it will get from the Remote Config server. Change the object’s name and default text accordingly.
Finally, create the script needed to get the project running. Inside your Assets window, right-click and select Create->C# Script. The script in the example will be called GetConfig. With this, all the assets are in place, but Remote Config itself still needs a little more setup before you begin the coding process.
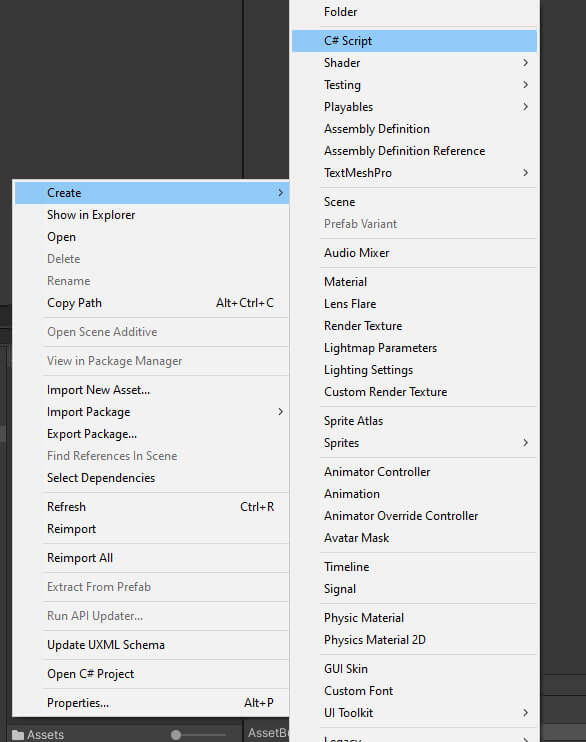
Figure 7: Creating a new C# script
Preparing Remote Config
From the top menu, select Window->Remote Config. Once you do so, you’ll be greeted with a window where you can create settings and push settings from Unity to the Remote Config server and vice versa. First, you’ll need some environments to work in. You should be able to pull in the two default environments currently sitting in the server. Doing this is as simple as clicking the Pull button in the top right. If these environments don’t appear, wait a few minutes for Unity to automatically create these in the server, then try pulling again. There’s also the option of creating your own environment if you are having trouble pulling the default environments. The Create button at the top of the window will allow you to do this. If you aren’t able to create an environment within the Remote Config window or can’t find the Create button, try updating to a preview version of Remote Config. Directions on how to do this are listed in the JSON portion of this article. . . As far as what environment to use, , it’s recommended to use or create the Development environment while actively developing the app.
Now is the time to create some settings that will be used in the project and can change from within your Unity Dashboard. Click the Add Settings button located at the bottom. A new setting is created with the option to give it a name and choose a type. This project will focus on editing a bool, string, and int value. After choosing a type, you’ll then be asked for a value. Give the setting a value of your choosing.
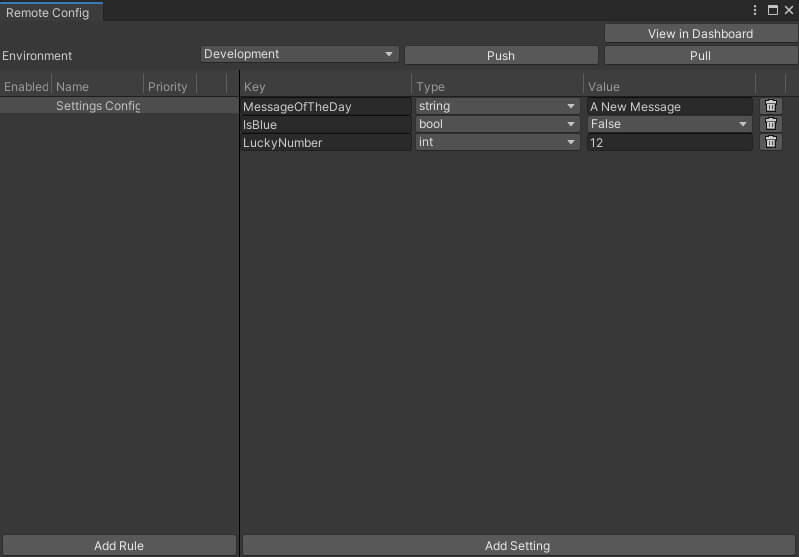
Figure 8: The Remote Config window with settings
In order to properly utilize Remote Config, you’ll need to push these settings out to the server. Click the Push button to achieve this. Once you’ve done so, you’ll have successfully stored these values in the Remote Config server to be used in your project. In the future, if you ever needed to get any new or updated settings made in the Unity Dashboard, you would click the Pull button. So, Push any settings you make in the editor, Pull any made in the dashboard.
Since this app wants to use settings in the Development environment within the Remote Config server, you’ll need to go to your project’s Build Settings in the File menu and check the box that says Development Build. This change can be made by first going to the top menu, choosing File, then Build Settings, then ticking Development Build. Now, whenever you run a .exe build of the app, it will get the settings seen in the Development environment. When releasing an app, you would want to uncheck Development Build and have your settings created and ready within the Release environment.
GetConfig Code
With everything set up, open the GetConfig script by double-clicking it in the Assets window. Once Visual Studio opens, the first thing to do is add using Unity.RemoteConfig and using UnityEngine.UI to the top of the script. Once that’s done, add the following to the class:
|
1 2 3 4 5 6 7 8 |
public struct userAttributes { } public struct appAttributes { } private bool isBlue; private string message; private int number; [SerializeField] private Renderer rend; [SerializeField] private Text messageText; [SerializeField] private Text numberText; |
For now, these two structs are not going to do anything. They will simply be passed into a method later to tell Unity to just use the default Remote Config settings. If you wanted to add custom attributes like a player name or skill level, this is where you would set that up. From there, your custom attributes can be used to only apply settings to users with certain attributes. However, for this project, the code will be kept simpler and focus on important aspects of Unity’s Remote Config.
Three private variables isBlue, message, and number will all be changed based on the values stored within your Remote Config settings. These values will be displayed using the cube object and the UI. All remaining variables are for changing properties of object components and the UI text created earlier. The SerializeField tag makes these otherwise private variables visible to the editor for editing.
The first thing to do is to let Unity know to call the SetValues function once Remote Config has finished retrieving data. SetValues will be created in a moment. After that, it then works on retrieving your currently stored configuration. Notice that the userAttributes and appAttributes types are passed into the FetchConfigs method, followed by creating new instances of those structs. All this is saying is that the project will use the default settings currently stored in Remote Config. This will all happen within the Awake function which replaces the Start function. Unity’s Awake function grants a little more safety when using Remote Config.
|
1 2 3 4 5 6 |
private void Awake() { ConfigManager.FetchCompleted += SetValues; ConfigManager.FetchConfigs<userAttributes, appAttributes> (new userAttributes(), new appAttributes()); } |
Next comes the Update function, which will have been created automatically when creating the script. Very little Remote Config work is being done here. This function will let you fetch configurations again whenever the left mouse button is clicked and give the app a way to close itself using the escape key. The code will be especially useful in demonstrating how you can make changes to your app from the Unity dashboard seamlessly while it is running.
|
1 2 3 4 5 6 7 8 |
private void Update() { if (Input.GetMouseButtonDown(0)) ConfigManager.FetchConfigs<userAttributes, appAttributes>( new userAttributes(), new appAttributes()); if (Input.GetKeyDown(KeyCode.Escape)) Application.Quit(); } |
Now is where the SetValues method comes in and is where the magic happens. Using Remote Config, you’ll change the values of isBlue, message, and number then use those values to change different parts of the app. The cube object will change color based on the value of isBlue, and the values of message and number will be shown in the app’s UI.
|
1 2 3 4 5 6 7 8 9 10 11 12 13 |
void SetValues(ConfigResponse response) { isBlue = ConfigManager.appConfig.GetBool("IsBlue"); message = ConfigManager.appConfig.GetString("MessageOfTheDay"); number = ConfigManager.appConfig.GetInt("LuckyNumber"); // apply values pulled from config if (isBlue) rend.material.color = new Color(0, 0, 1); else rend.material.color = new Color(1, 0, 0); messageText.text = message; numberText.text = "Lucky Number is: " + number.ToString(); } |
The last job to be done is to make sure SetValues won’t be called when the object is destroyed. Earlier in the Awake function the script tells Unity to call SetValues anytime Remote Config has finished gathering configurations. However, if the object using Remote Config’s data is destroyed, you wouldn’t want that function being called. So, as a precaution, OnDestroy is used to remove the callback function, assuring that SetValues is not called when it is not needed.
|
1 2 3 4 |
private void OnDestroy() { ConfigManager.FetchCompleted -= SetValues; } |
With all the code in place, save the script and return to the Unity editor to perform some finishing touches and run the project.
Testing the App
The first thing to do is attach the GetConfig script to the Cube object. Select the object in the Hierarchy window and then click and drag the script into the Inspector window.
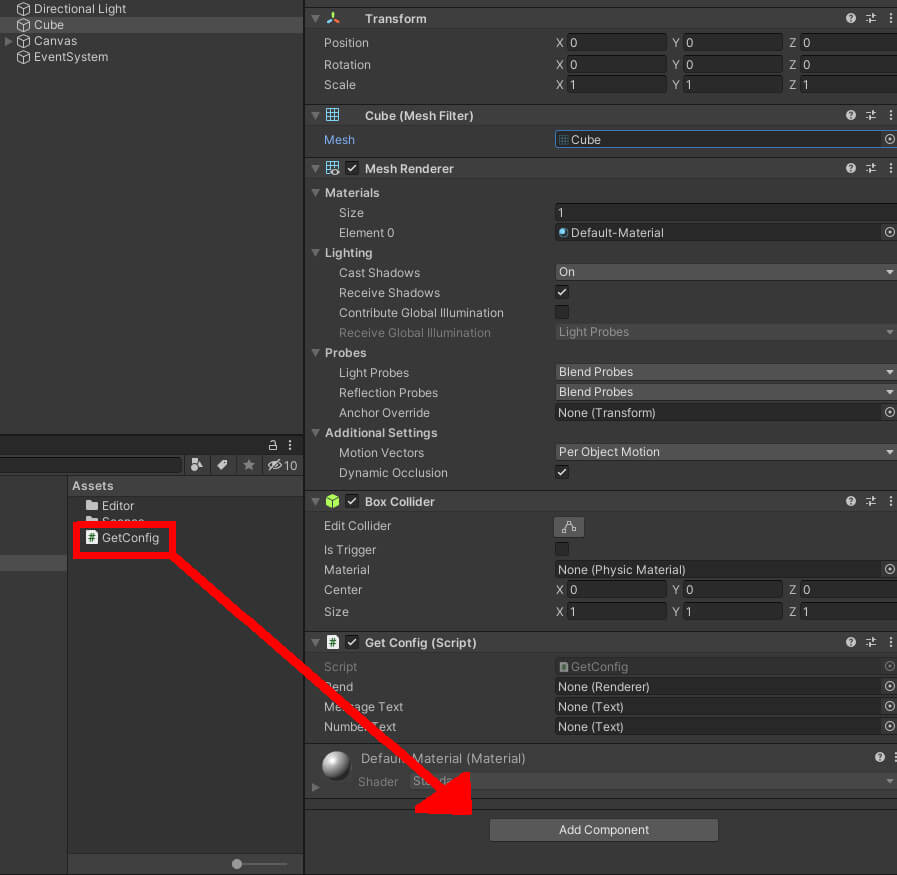 Figure 9: Adding the GetConfig script component
Now drag the object’s Mesh Renderer component into the Rend field, thereby allowing the program to change the cube’s color.
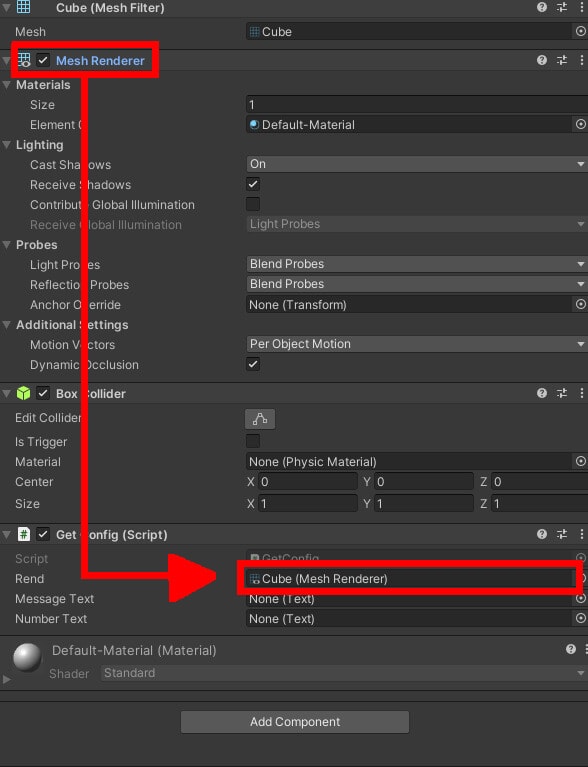
Figure 10: Setting Rend to be the object’s Mesh Renderer component
Finally, expand the Canvas object to find your two text objects. Drag them into the corresponding fields in the GetConfig component. Before selecting the two text objects, you may need to lock the inspector by clicking the padlock icon at the top.
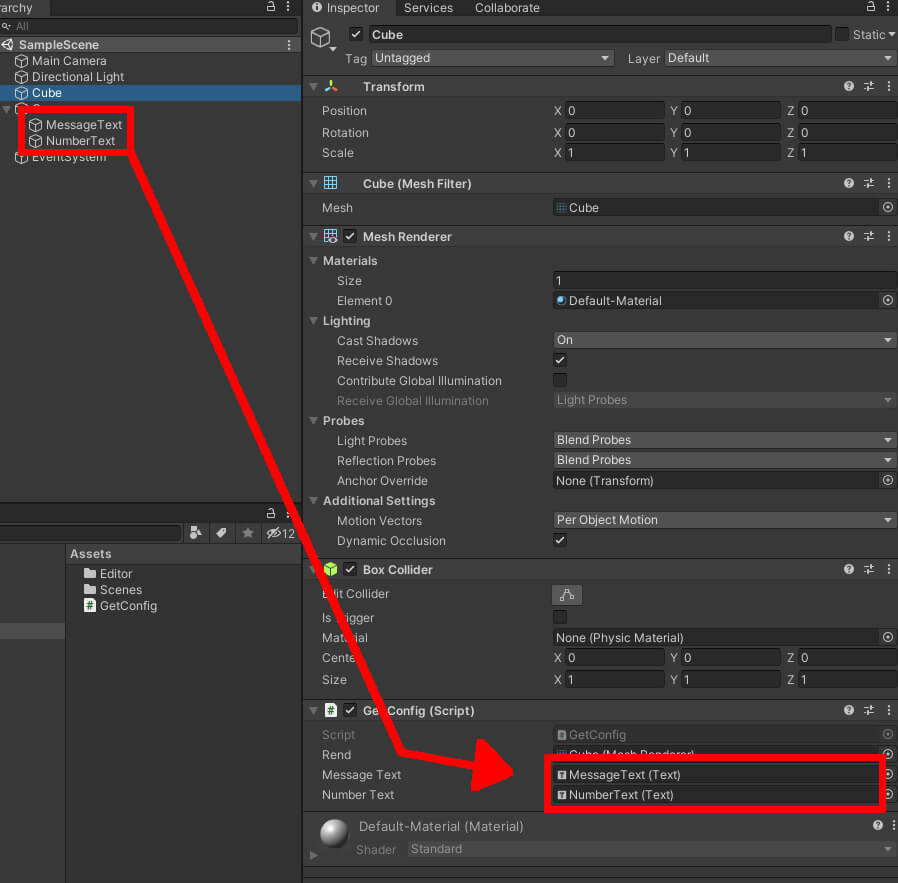 Figure 11: Setting the text fields
You’re all set! Run the program in the editor using the play button at the top and notice how the text and cube color changes to reflect what’s currently in Remote Config. If you’re having trouble seeing the changes, then here’s a few things you can try:
- Make sure you’re using the correct names of your settings in the GetConfig script.
- Make sure each text object is assigned to the correct field in the object’s GetConfig component.
- Close and reopen Unity.
- Push and/or pull your Remote Config settings in the Remote Config window.
- Change the default environment in the Unity dashboard and pull again. Read on for more information on using the dashboard for Remote Config.
- Create a brand new environment and set it as the default.
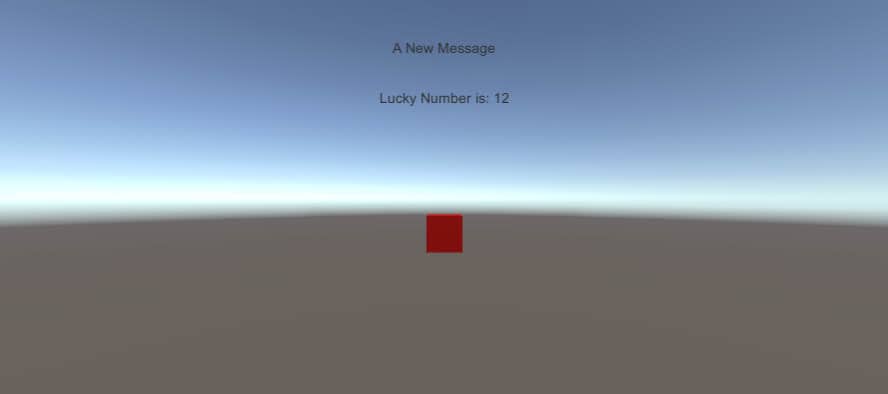 Figure 12: First run of the app
Now, let’s change these objects from the Unity dashboard. To open the dashboard, locate the Services window under Window -> General and click on the link to the dashboard. You will likely need to log in to your Unity account at this stage. Once logged in, you should be inside the dashboard for the project you have open. From there, open the menu (from the top left corner of the browser) and find Remote Config, located towards the bottom. From within Remote Config’s sub menu, choose Environments.
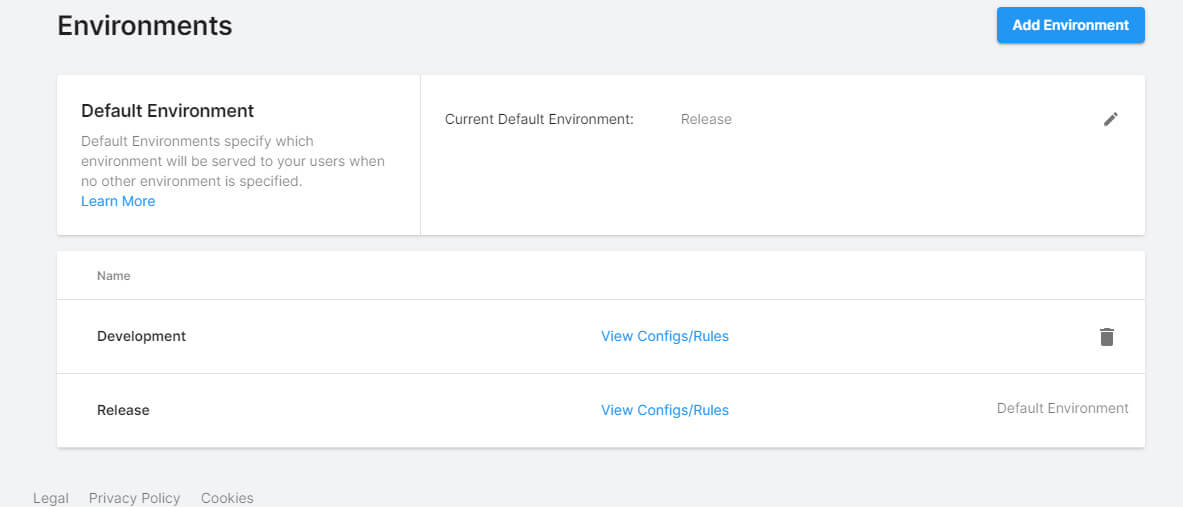 Figure 13: Remote Config screen, seen in browser
Here, you can change the default environment (make sure it’s set to Development), edit other environments, and create new ones. Click View Configs/Rules for the Development environment, then choose Default Config. Your settings will all appear, and you can change them as you wish, add new settings, and delete any you don’t want anymore. Try setting IsBlue to true and changing the LuckyNumber and MessageOfTheDay values.
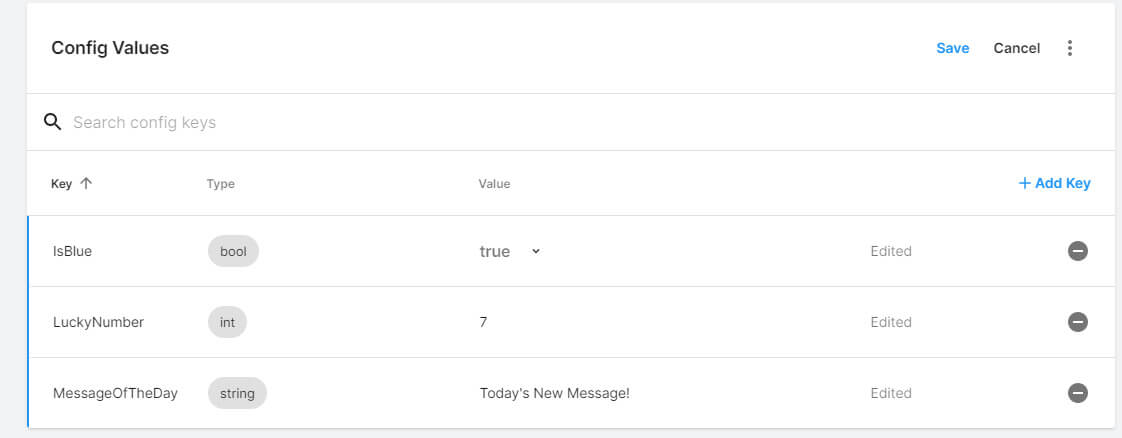 Figure 14: Editing settings
When you’re finished, click Save then run your app again. Your changes should be made apparent in the app.
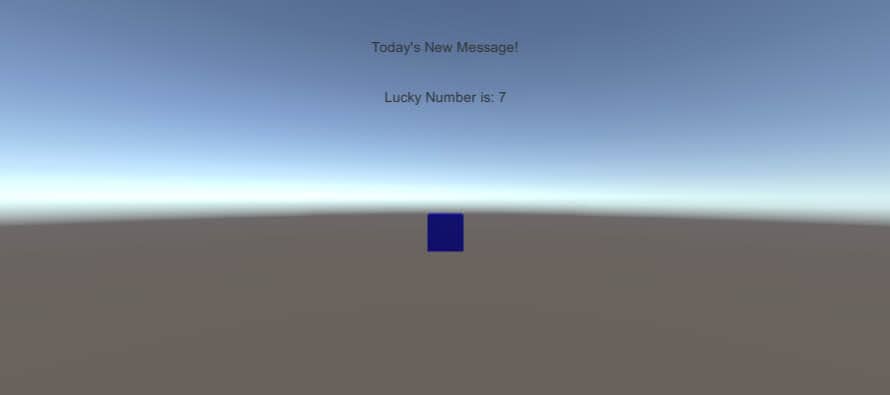 Figure 15: App reflects changes made in Remote Config environment
What’s more, you can see these changes occur in real-time too. With the app running, make another change in the dashboard, save it, then go back to the app and click anywhere on the screen. You should see the changes update after the mouse click. If you ever wanted to test this out on other people’s devices, you would need to build an exe using the Build Settings window, ensuring that Development Build is checked if the app is currently in development. If it’s not, leave it unchecked and make sure the appropriate Remote Config environment is set as the default one.
JSON Functionality
The project demonstrates the ability to modify variables without needing to open the Unity editor, and the variable types chosen are likely the most common ones you’ll use. For all intents and purposes, the project is complete. But when looking at the Unity Dashboard, you’ll notice that, along with floats and longs, another data type can be utilized. One of the more exciting options is the ability to utilize JSON within the app and changing that JSON as needed using Remote Config. However, as of this writing, it must be noted that Remote Config’s JSON functionality is still currently in active development and is not complete. That said, developers can still use JSON in their Remote Config projects if they install a preview version of the Remote Config package.
To start, return to the Package Manager window and find the Remote Config package. Click the arrow next to it to expand the version options available to you. Find version 2.0.1, then click the Update button.
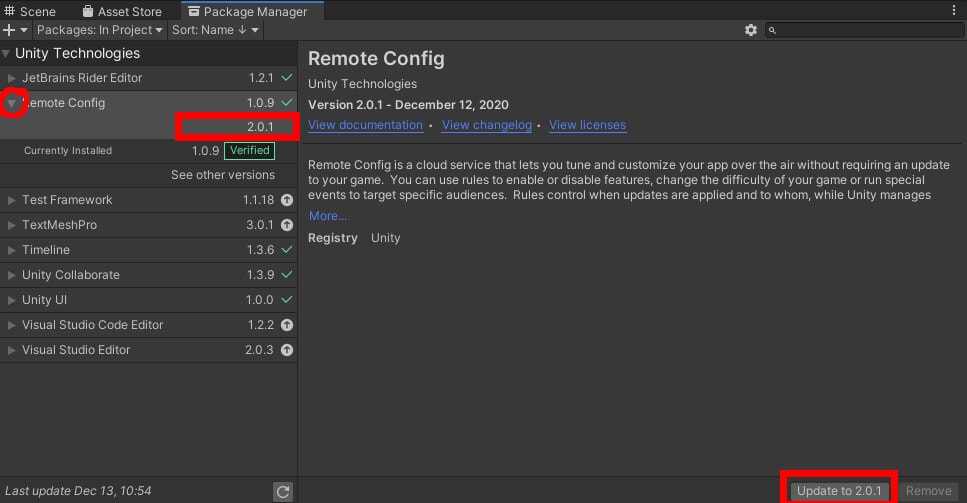 Figure 16: Updating Remote Config to preview version
Next, reopen the Remote Config window. You may need to pull your settings again if the window is empty. Once it’s filled, change the environment to Development and create a new setting, giving it a name and the JSON type.
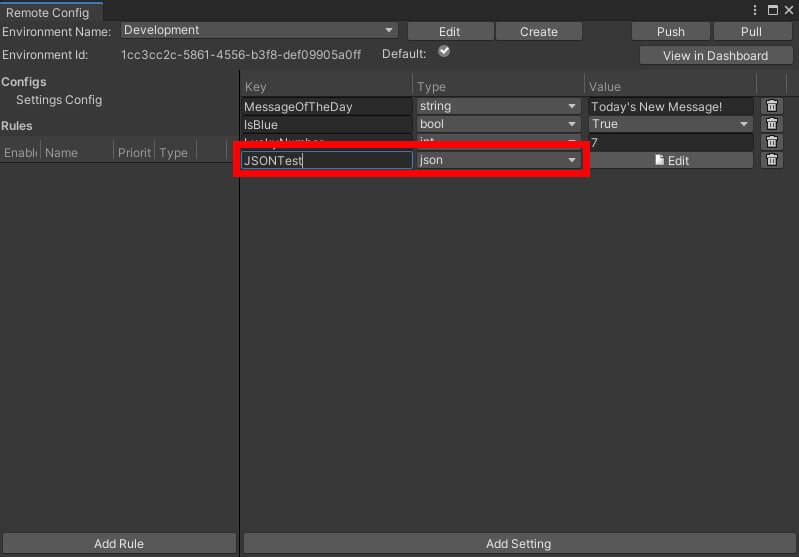
Figure 17: Creating a JSON setting
To change the JSON code, click on the edit button. A JSON editor will appear, allowing you to enter any of the JSON you wish. For this example, the following code will be used:
|
1 2 3 4 5 |
{ "rotate_X": 10, "rotate_Y": 35, "rotate_Z": 10 } |
Make sure to push this to the Remote Config server, then reopen the GetConfig script to utilize the newly created JSON.
Using JSON in Code
In order to use your newly created JSON, you’ll need to create a serializable class that can hold the data. The intent of the code is to modify the rotation of the cube object, which would be a property found within its Transform component. So, you’ll need to set up the class accordingly and get that component too. After that, a little code is added to SetValues and the JSON functionality is all set.
The serializable class is a good place to start. It can be placed anywhere so long as it’s outside the main class. As for the code, it consists of the following:
|
1 2 3 4 5 6 7 |
[System.Serializable] public class TransformInfo { public float rotate_X = 0f; public float rotate_Y = 0f; public float rotate_Z = 0f; } |
Two very important things to note about this. First, it’s integral that the class has the System.Serializable tag attached to it. Else, the JSON code won’t be able to write to the class at all. Second, make sure the names of the variables match what’s inside your JSON code, capitalization and all. This is generally true of programming in general, but it’s worth reiterating here to be safe.
Returning to the original GetConfig class, the project needs to be able to change the cube’s Transform component, and more specifically the rotation data. To allow this, create a new variable:
|
1 |
[SerializeField] private Transform tf; |
The final step has you adding to the SetValues method. Like the other settings in Remote Config, you need to instruct Unity on how to use the newly retrieved JSON.
|
1 2 3 4 5 |
TransformInfo tInfo = new TransformInfo(); var jsonString = ConfigManager.appConfig.GetJson("JSONTest"); JsonUtility.FromJsonOverwrite(jsonString, tInfo); tf.rotation = Quaternion.Euler(tInfo.rotate_X, tInfo.rotate_Y, tInfo.rotate_Z); |
First, a new TransformInfo object named tInfo will be created, followed by collecting the JSON code currently stored in the Remote Config server. Then we use the JsonUtility Unity class to, as the method name implies, rewrite the values of tInfo's variables according to what is in your JSON. After that, this object’s Transform component’s rotation is changed to whatever is now being held inside the tInfo object.
Be sure to save the script again, then return to the Unity editor to test the project.
Testing the JSON
Just before running the program, make sure the GetConfig component on the Cube object has the tf field filled. Similar to the Mesh Renderer component from earlier, all this takes is dragging the Transform component in the Inspector window into the field. Once that’s ready, run the project again. The cube should rotate itself according to what’s inside your JSON code. Be sure to go back to the dashboard, edit the rotation values, then left-click back in the Unity app to see an immediate change in the object’s rotation.
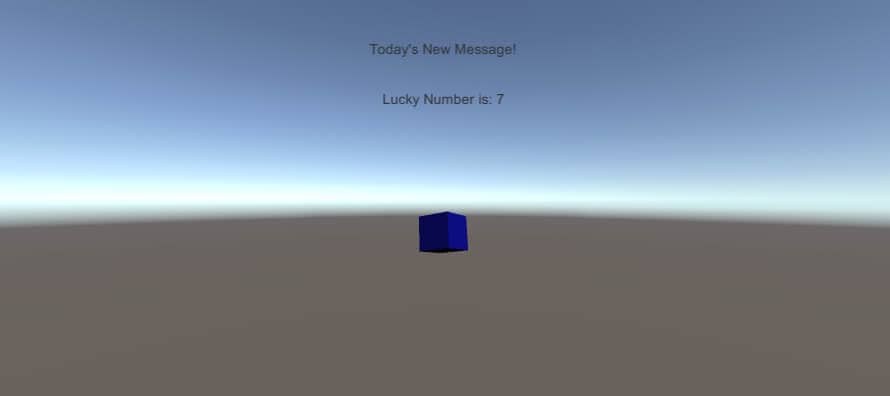 Figure 18: App utilizing JSON stored within Remote Config setting
Using Unity’s Remote Config
The ability to change your app from anywhere cannot be overstated. Even if you’re not the type who often travels, having this option to make quick and easy changes to your app brings the benefit of updating an app without having to go through the process of rebuilding it and sending out a traditional patch. Alongside making small, individual changes to an app, Remote Config also allows you to create rules, which are perfect for limited-time events. Set your dates and what settings will be affected, and your app will adjust itself per your Remote Config rule. For more information on Remote Config, check out Unity’s official documentation, found here.
If you liked this article, you might also like How to Create a Settings Menu in Unity – Simple Talk (red-gate.com)
This document contains proprietary information and is protected by copyright law.
Copyright © 2026 Red Gate Software Limited. All rights reserved
Load comments