
Suppose you’re making a role-playing video game and you need an easier way to assign statistics, properties, and much more to various items. While you could use Unity prefabs to do this and then change the values of each individual copy of the prefab, this is an inconvenient way to go about the task. For starters, this method uses up more of your memory, something you may need to conserve if you plan on making a large game. In addition, if you must make any changes to the in-game objects, it’s simply not as efficient to do so when there are several copies of prefabs lying around. This especially becomes an issue if you have a larger team to work with, so you’ll want to make things easier to change for other team members. Even if you’re not in a team, this method would just be harder on you as you work.
To make things easier in a situation like this, you have Scriptable Objects at your disposal. And what are Scriptable Objects? Simply put, they are data containers. The Unity developer creates a basic template for these containers, defining what information each object should contain. Then the Scriptable Objects are created from that template, which are then used by Unity game objects. In the above example, a single Scriptable Object can be used to define what the different properties of an item are. Then that Scriptable Object is referenced by all copies of the item. Before if you wanted to change an item’s stats, you’d have to change the values of every single copy of the item. Now with Scriptable Objects, you only need to change one object (the Scriptable Object) and all objects getting data from that Scriptable Object change at the same time.
It’s always helpful to see these things in action, create a new project. This project shows off Scriptable Objects and how they can help you. The project consists of three game objects meant to represent three characters. Each character inherits some values from a Scriptable Object. Those values are maximum health, attack, defense, speed, and a name and color for the character. A simple user interface displays these values so you can easily see the results of applying Scriptable Objects. Now that you have an end goal, it’s time to get creating.
Project Setup
Assuming you’ll be implementing these ideas in a new project, open up the Unity Hub application and create a new project as shown in Figure 1.

Figure 1: Creating a new project
In the next window, give the project any name of your choosing and decide on the file path. While you can perform this project in any template, this example uses the 3D project template as shown in Figure 2. It’s recommended you use this template if you wish to follow along.
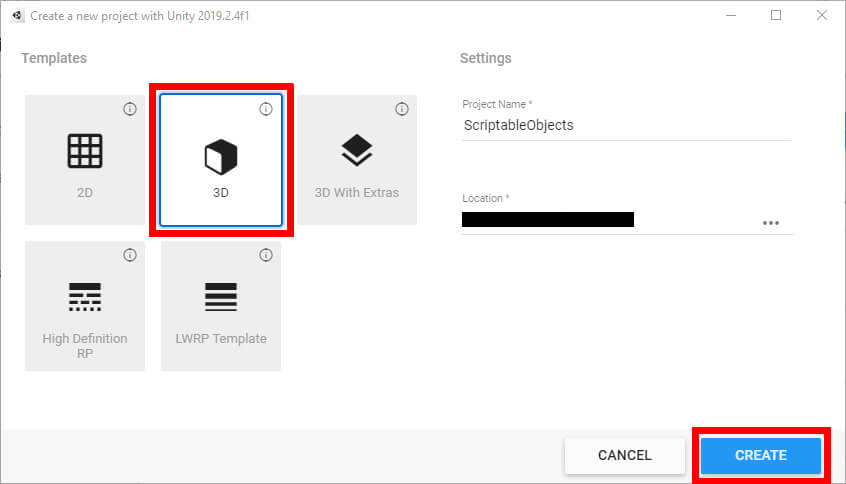
Figure 2: Setting the project name, type, and location
Once the project is created, you’ll want to get organized. In your Assets window, you’ll need to create three folders by right-clicking the window and navigating to Create -> Folder as shown in Figure 3 Name the folders Materials, Scriptable Objects, and Scripts.
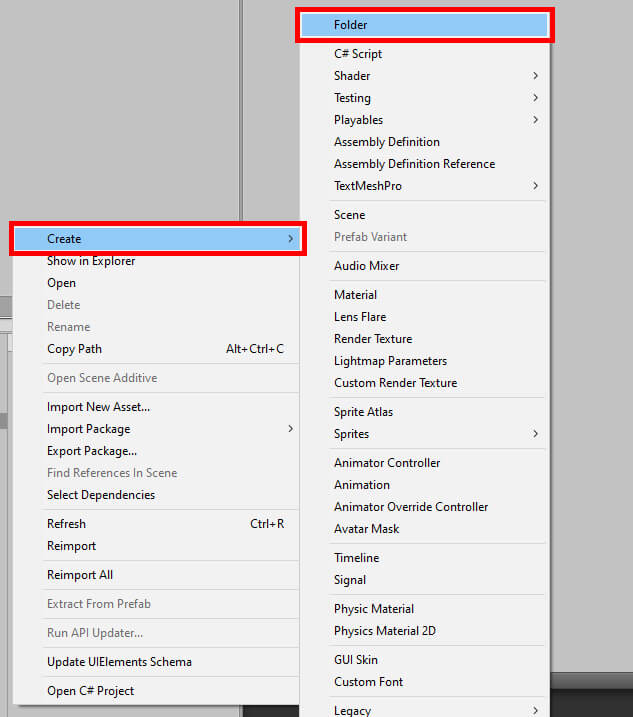
Figure 3: Creating a new folder
While you’re here, it’s a good idea to go ahead and get three materials made. These materials are used to change the colors of different objects following whatever material the Scriptable Object specifies. To create these materials, navigate to the Materials folder and right-click again, this time selecting Create -> Material. When naming the material, it’s recommended to give it a name that correlates with its color. For instance, this first material can be named Red. To set this color, you must select the newly created material and navigate to the Inspector window. In the Albedo field, there’s a color picker shown in Figure 4 you can click on to open the, well, color picker.
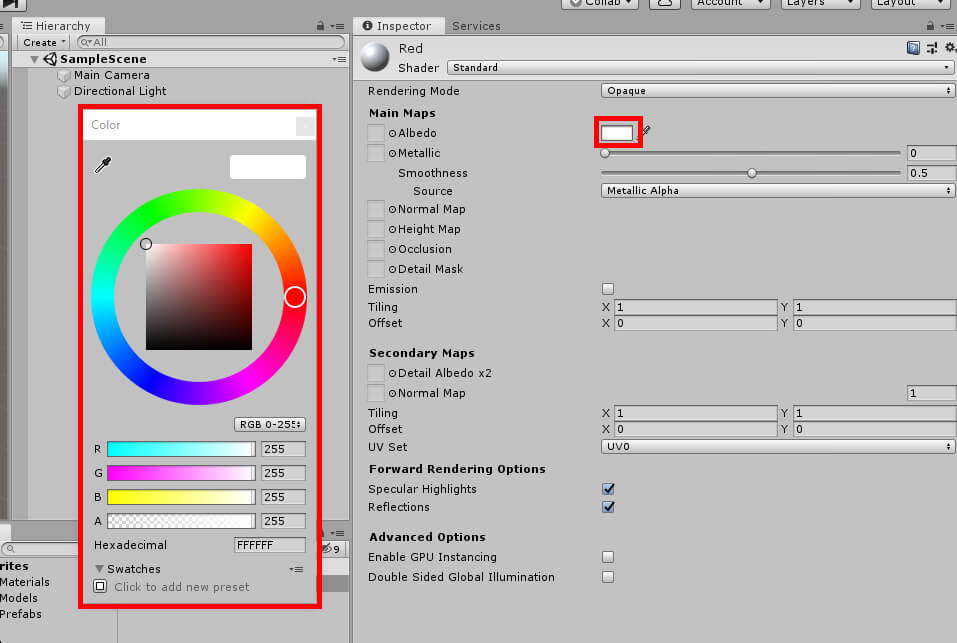
Figure 4: Opening the color picker
The color is changed either by moving the small circle in the color picker or by directly inputting the RGB values in the lower half of the color picker window. In the above example, the RGB values would be 255, 0, 0. After this, you should create two more materials and assign their colors. This example uses green and blue, but they can be any color of your choosing.
Now comes the time to create the actual scene this where this game takes place. It consists of two major parts – there’s the user interface which displays the statistics given to various scriptable objects and the three capsules representing characters. The “characters” are the easiest part, so you can start there. All you have to do is go to the Hierarchy window, click the Create button, and choose 3D Object -> Capsule shown in Figure 5. Do this three times or copy the first object, and you can also give them names if you wish. This example gives the capsules the names Char1, Char2, Char3.
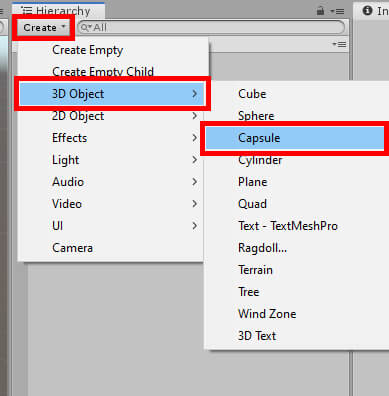
Figure 5: Creating a capsule object
You’ll need to change their positions, so they aren’t overlapping each other. To change the object’s position, you select one in the Hierarchy and navigate to the Transform component in the Inspector. Then change the x, y, and z positioning fields to move the objects where you want them.

Figure 6: Editing the object’s position
Table 1 shows the exact positions of all three capsules in this example.
Table 1: All objects and their positions in the world
|
Object |
X Position |
Y Position |
Z Position |
|
Char1 |
-4 |
0 |
-5 |
|
Char2 |
0.5 |
0 |
-4 |
|
Char3 |
4 |
0 |
-5 |
Of course, feel free to adjust any of these numbers if you wish. Next up is the user interface, which displays the values given to Scriptable Objects. To start, you’ll need to click the Hierarchy’s Create button but this time choose UI -> Canvas. Then, with the new Canvas object selected, click the Create button again and this time select Create Empty Child. Finally, once more you click the Create button and this time choose UI -> Text. Drag the newly created Text object onto the empty game object and duplicate Text four times using Ctrl + D so that there is a total of five Text objects under GameObject. Once finished, your Hierarchy should look like the one in Figure 7.
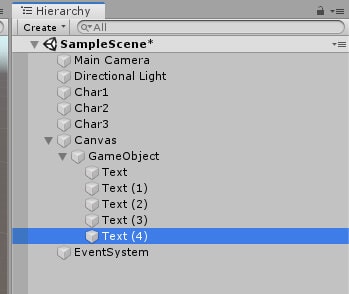
Figure 7: The current Hierarchy
Each Text object correlates to the name and stats that are given via Scriptable Object, those stats being maximum health, attack, defense, and speed. It’s helpful to change the Text object names to the value it represents. So, the first Text object can be called name_text, and the second can be called attack_text, and so on. In addition, you’ll need to change the default text to help provide a visual for how the user interface looks. This is done by navigating to the Text component in the Inspector and changing the Text value. And finally, adjust their positions so that they’re not all stacked on top of each other. To keep this easy, Table 2 shows all the different object names and what their respective values should be.
Table 2: All Text objects and their default text and positioning values
|
Text Object |
Default Text |
Pos Y Value |
|
name_text |
Name: ? |
100 |
|
attack_text |
Attack: ? |
75 |
|
defense_text |
Defense: ? |
50 |
|
speed_text |
Speed: ? |
25 |
|
maxHealth_text |
Maximum Health: ? |
0 |
Rename GameObject (under Canvas) to something a little more descriptive, such as Char1Description, then duplicate the parent object. Rename the two duplicates to Char2Description and Char3Description and position the three objects, so they are above the capsule objects. This example places Char1Description at an X position of -300, Char2Descrption at 0, and Char3Position at 250. All Y and Z position values are left at 0.
It was a bit of a long road, but the project setup is complete! Now comes the time to code and see just how Scriptable Objects are created as far as programming goes. In your Assets window, navigate to the Scripts folder and create two new scripts by right-clicking and navigating to Create -> C# Script. These scripts should be called CharStats and LoadStats. Once those are created, you’ll start in the CharStats script, so double click this script to open Visual Studio and get started with the coding process.
CharStats Script
In order to create a Scriptable Object, you’ll need to first add to the Create menu you’ve used to create materials and scripts. To do this, you’ll use the attribute CreateAssetMenu and specify the default filename and location within the menu. Also, you’ll need to change what class CharStats is inheriting from. By default, every C# class in a Unity project inherits from MonoBehaviour, but this script needs to inherit from ScriptableObject instead.
|
1 2 3 4 5 6 |
[CreateAssetMenu(fileName = "New Character", menuName = "Character Creation/Player Units")] public class CharStats : ScriptableObject { //...code } |
Notice when setting menuName that a slash character is used, indicating the use of submenus. If you wanted, you could remove the slash and just have the Player Units option present without needing to navigate further through the Create menu. In this case, the submenu was added primarily to show that you can organize your Scriptable Objects by whatever you wish. In this case, the menu is Create -> Character Creation -> Player Units. If you wanted to, in another Scriptable Object you can have the object be created from the same path but with a different create option, such as Item.
Being a Scriptable Object there is no need for the default Start and Update methods, so you can delete those. This object’s primary purpose is to hold data which is given to another object, but two custom methods are also created to demonstrate how Scriptable Objects can do more than just hold data. Speaking of data, the code for defining what data this object holds goes like this:
|
1 2 3 4 5 6 |
public string charName; public int attack; public int defense; public int speed; public int maxHealth; public Material newColor; |
As mentioned before, each scriptable object contains a name and some values for four different stats. It also holds information for what the character’s new color once the Scriptable Object is applied. The values for each are defined in the Unity editor, and of course, they’ll be different for every object created.
The two methods are kept simple. One simply prints a message to the debug console saying the character was loaded. This message is printed in the Start method of the LoadStats script.
|
1 2 3 4 |
public void PrintMessage() { Debug.Log("The " + charName + " character has been loaded."); } |
RandomizeStats, the second method, does exactly as the name suggests. It changes the values of the Scriptable Object to a random number between 1 and 20. Later on, you will program the project to update the user interface with the new values automatically. But that’s not even the most interesting part! Data in a Scriptable Object is persistent, meaning that they’ll remain the same for the session up until the game is closed. This is especially helpful if you’re making a game that consists of multiple scenes since ordinarily old objects are deleted, and new ones are reloaded as a new scene is opened. However, Scriptable Object data is untouched in the transition between scenes. In addition, the data remains the same while working in the Unity editor until the editor itself is closed. This means that changes made to the data within Scriptable Objects while running the game from the editor are present once you play the game from the editor again, provided no changes are made to the data itself.
|
1 2 3 4 5 6 7 |
public void RandomizeStats() { attack = Random.Range(1, 20); defense = Random.Range(1, 20); speed = Random.Range(1, 20); maxHealth = Random.Range(1, 20); } |
This is all there is to the CharStats script. It might seem rather simple, but the project is not complete. You’ve programmed the ability to make Scriptable Objects with its own methods and data, but your capsule characters don’t know anything about these objects. As far as they’re concerned, the Scriptable Objects don’t exist. To fix this, you’ll need to open the LoadStats script and code it so the objects can use a Scriptable Object’s data to update the user interface and change their color. The code should look similar to Figure 8.
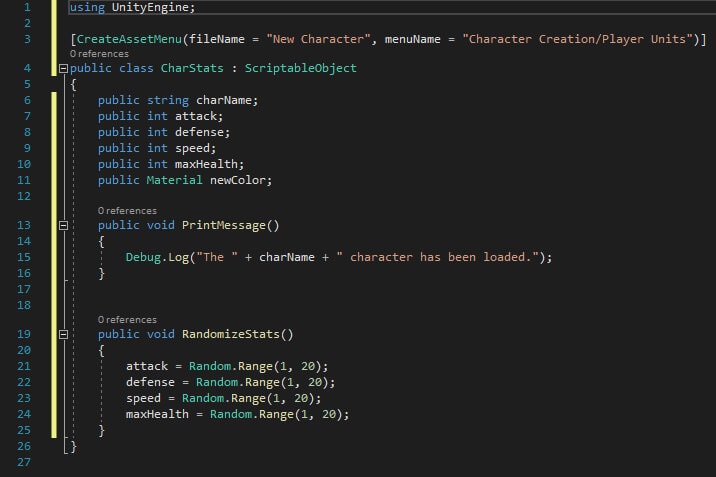
Figure 8: Complete CharStats script
LoadStats Script
Don’t worry about changing where the class this script inherits. The default MonoBehaviour is precisely what’s needed. Instead, include a new using statement at the top.
|
1 |
using UnityEngine.UI; |
Including this allows you to get the text from the user interface and update them to display the values found in the Scriptable Objects. Now, onto the class itself, starting with variables.
|
1 2 3 4 5 6 7 8 |
// scriptable object public CharStats charStat; public Text nameText; public Text attackText; public Text defenseText; public Text speedText; public Text maxHealthText; public MeshRenderer currentColor; |
As noted in the comment, the charStat variable is the Scriptable Object that is used. You can see here that getting these Scriptable Objects is no different from declaring any other variable. Later on in the script, you’ll be getting the variables and methods within the object and using them in this script. In fact, the PrintMessage method found in CharStats is used in LoadStats Start method right now.
|
1 2 3 4 5 |
void Start() { DisplayStats(); charStat.PrintMessage(); } |
Like with any other outside script, all you need to do is call charStat followed by PrintMessage to get the method found in that Scriptable Object. This can prove especially useful if you have objects that all have similar or identical behaviors. In this case, it can also be useful to the developer to, like in this example, print messages to the debug console. If something were to go wrong and you suspected the Scriptable Object was at fault, you could use the debug console messages to find the problem.
Right now, there’s an error saying DisplayStats does not exist. To fix this, navigate below the Update method and add this code.
|
1 2 3 4 5 6 7 8 9 |
void DisplayStats() { nameText.text = "Name: " + charStat.charName; attackText.text = "Attack: " + charStat.attack; defenseText.text = "Defense: " + charStat.defense; speedText.text = "Speed: " + charStat.speed; maxHealthText.text = "Max Health: " + charStat.maxHealth; currentColor.material = charStat.newColor; } |
Here is where the values stored in the Scriptable Object come out to play. All those text variables declared earlier? They’ll be given data to display, so those question marks you set in the editor now displays some value. Also, while it’s not really a stat, per se, the color of the character is changed here by calling currentColor.material and setting it to the material set in the Scriptable Object.
The second charStats method, RandomizeStats, has not yet seen use, so you should find a place for it. In the Update method, the program checks if the space bar has been pressed. If it has, then it calls RandomizeStats and gives the Scriptable Object some new values. Then DisplayStat is called again, and the new values are displayed.
|
1 2 3 4 5 6 7 8 |
void Update() { if (Input.GetKeyDown(KeyCode.Space)) { charStat.RandomizeStats(); DisplayStats(); } } |
This concludes the LoadStats script, thus ending the coding portion of this project. The code should look similar to Figure 9. All that’s left to do now is create a few Scriptable Objects, apply them to the capsule object using LoadStats, and try this new functionality out. Of course, be sure to save your work before returning to the Unity editor.
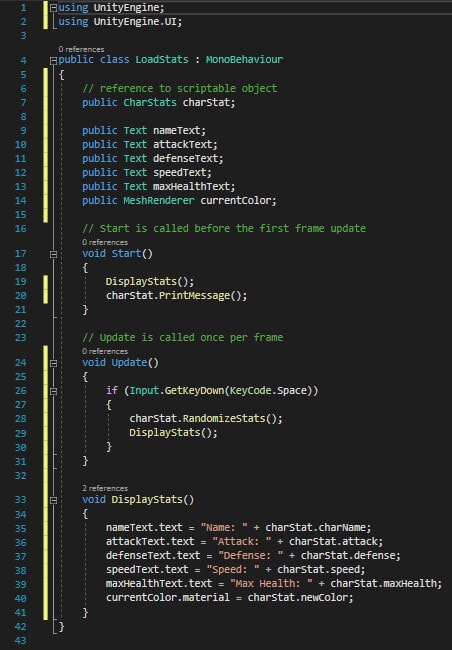
Figure 9: Complete LoadStats script
Completing the Project
To use Scriptable Objects, you must first create them. In the Assets window, under the Scriptable Objects folder, right-click and navigate to Create -> Character Creation -> Player Units as shown in Figure 10.
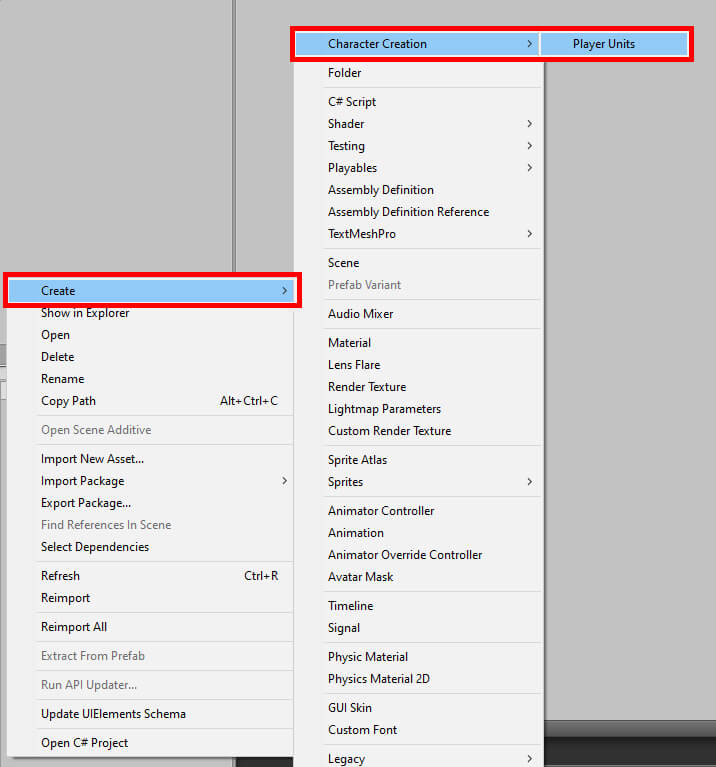
Figure 10: Creating a new Player Unit, a Scriptable Object
You can name the object whatever you wish. The example bases these objects off traditional role-playing game classes, so it’ll have a warrior, hunter, and mage. Select the new object, then navigate to the Inspector window and give values to the different fields. To fill in the New Color field, just navigate to your Materials folder and click and drag your desired material to the field as shown in Figure 11.
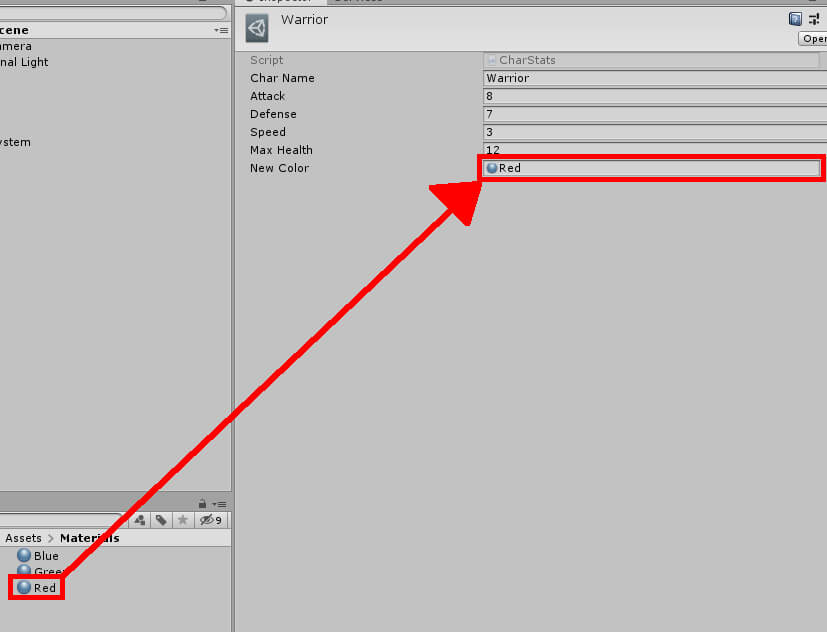
Figure 11: Setting the object’s New Color material
Create two more Scriptable Objects and do the same as before, giving them different values for the different fields. Once that’s done, move to the Hierarchy window and select one of the char objects. Then give them the LoadStats script as a component by navigating to the Scripts folder in the Assets window, finding LoadStats, and dragging it into the Inspector window as shown in Figure 12.
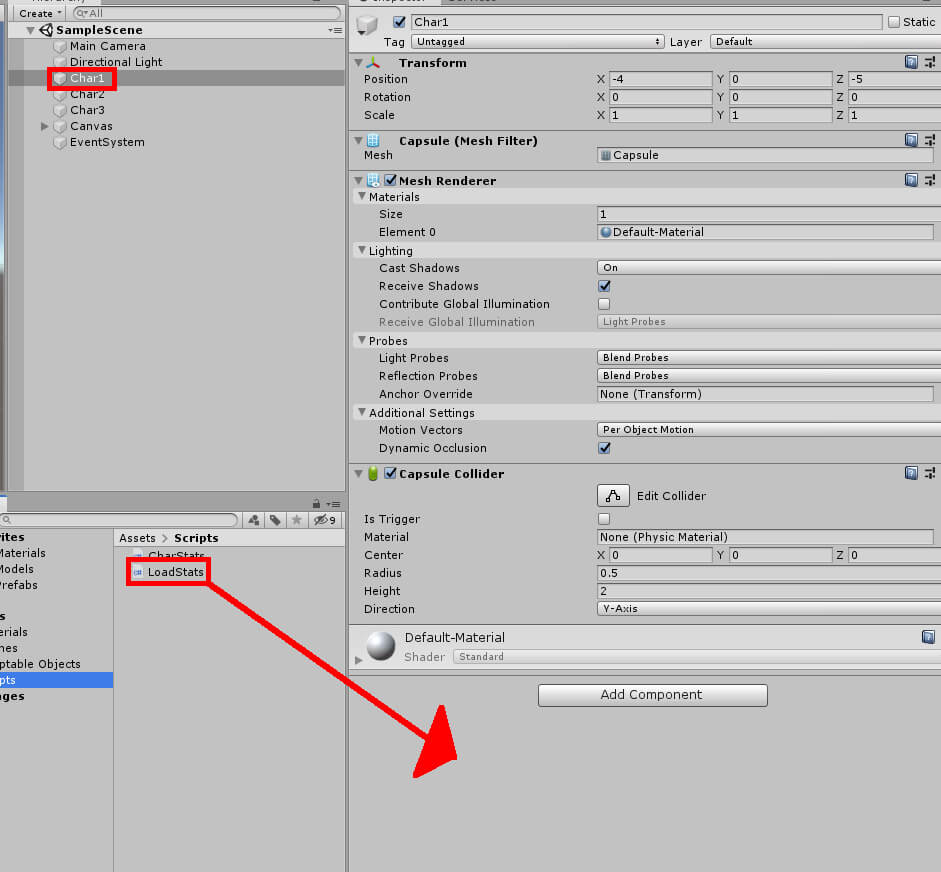
Figure 12: Attaching LoadStats script to an object
Next, you’ll need to fill the LoadStats fields. To begin, find a Scriptable Object you want to use on your first “character” and apply it to the Char Stat field as shown in Figure 13. Remember that Scriptable Objects are found in the Assets window under Scriptable Objects.
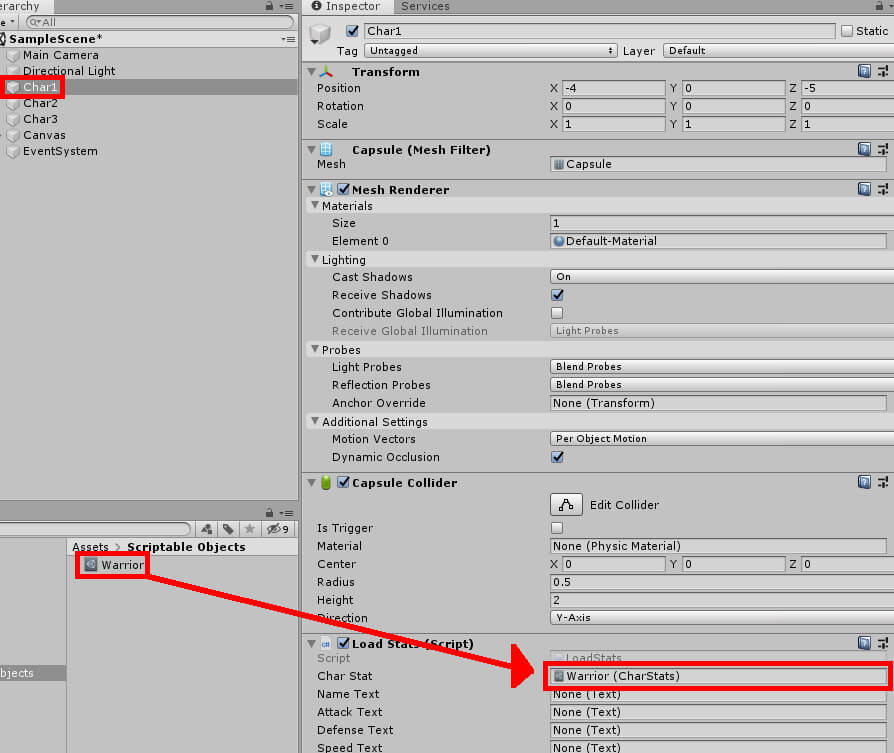
Figure 13: Setting where the Scriptable Object Char1 is to get data
Now fill in the text fields. In the Hierarchy, you’ll expand Canvas followed by expanding the character description object that correlates with the one you’re currently editing. For example, editing Char1 means you’ll want to expand Char1Description. Then take the text objects found under the parent object and apply them to the corresponding fields as shown in Figure 14.
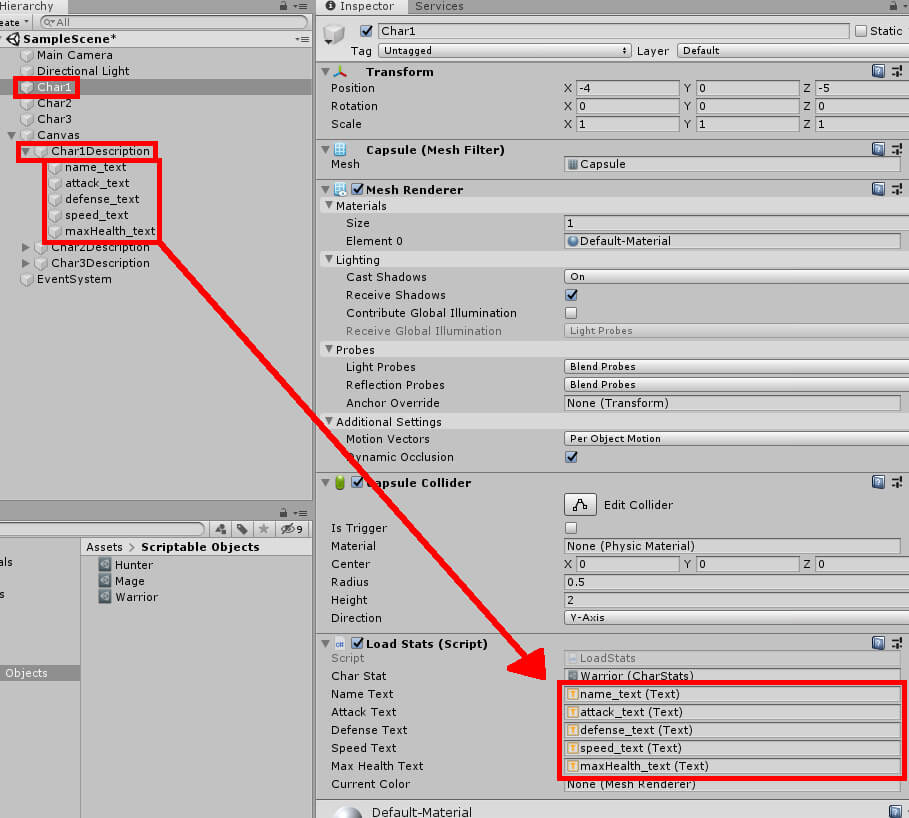
Figure 14: Setting all text fields
Once the text fields have been filled, you just need to get the object’s Mesh Renderer, so you have access to the material, thus permitting the color change. All you need to do is click and drag the Mesh Renderer component in the Inspector window and drag it into the Current Color field as shown if Figure 15.
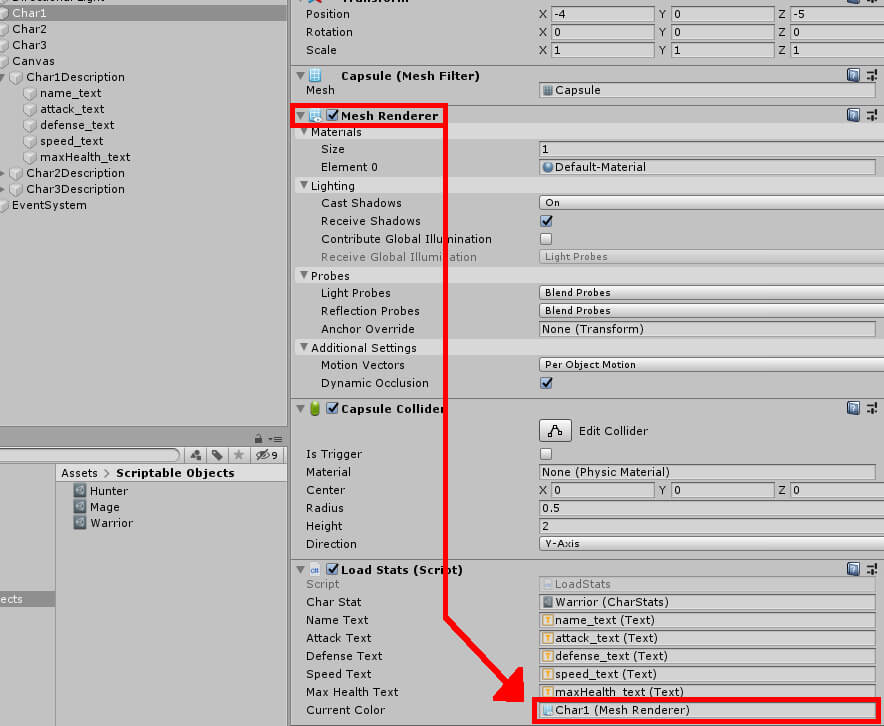
Figure 15: Setting the Current Color field
Repeat the previous few steps for the other two character objects, and you’ll have finished the project. When ready, click the play button at the top of the editor and observe as three near-identical objects have very different values attached to them. If for some reason something isn’t looking right, the first place to check would be your Scriptable Objects and assure yourself that the values and colors displayed are the ones you wanted. Remember to double-check the New Color field as well.
All these numbers and their colors are coming from Scriptable Objects, which themselves come from a single template. You could make even more Scriptable Objects as well and plug them into the Char Stat field in an object’s Load Stats component and have a very different character. While running the game (Figure 16), you should see a message in the debug console in the lower-left corner stating a character has been loaded. There are two other messages, but you can only see the one message without opening the full debug console, found at Window -> General -> Console. You can also press the space bar to get some completely new stats for your characters. If you stop the game then rerun it, you’ll notice the values you randomly generated persist, demonstrating the persistence of Scriptable Objects. They’ll return to their original values either by manually entering the values into the objects yourself or by closing and reopening the editor.

Figure 16: Scriptable Objects in action
Conclusion
Naturally, you can create multiple types of Scriptable Objects for many types of objects. This example demonstrated their use via character classes, but there’s also the aforementioned items example. It can even be used for much smaller objects, such as power-ups reminiscent of those found in arcade games. In using Scriptable Objects, you create a clean, easy system where you can change and load data with a few keystrokes and see the results almost instantly. Using Scriptable Objects also means fewer scripts to create, as you can use one template for multiple objects. Regardless of whether your project is big or small, or whether your team has many members or just yourself, Scriptable Objects can make everyone’s development a little easier.
This document contains proprietary information and is protected by copyright law.
Copyright © 2026 Red Gate Software Limited. All rights reserved
Load comments