
Executive Summary
Unity3D communicates with REST APIs using UnityWebRequest – the built-in HTTP client that works within Unity’s coroutine system. Unlike regular C# HttpClient calls (which block threads), UnityWebRequest is designed to integrate with Unity’s coroutine model: yield return request.SendWebRequest() suspends the coroutine until the response arrives without blocking the main thread. This article covers the two main patterns for calling REST APIs from Unity: simple UnityWebRequest with coroutines for GET and POST requests, and the considerations for choosing between coroutines (Unity-native, runs on main thread) and threads (true parallelism, requires marshal-back to Unity’s main thread for UI updates).
In the process of developing a game, it is often necessary to communicate with a server. Besides the most obvious reason – having a multiplayer game – there are certain cases when games need to get or send information to an external entity. In-game payments, global leaderboards or login systems are just a few examples.
While in the multiplayer scenario data is constantly exchanged between the server and the client, the other cases that I mentioned only require a simpler request/response pair: the client sends or requests some data to the server, and the server performs the required action, while also providing a response to the client. Nowadays, the most common way to solve this problem is to use a RESTful API.
What are RESTful APIs?
A RESTful API – or a RESTful web service – is an interface that can receive HTTP requests (GET, POST, PUT, DELETE) in order to manipulate data. A RESTful API is easy to scale, due to the loose coupling between the client and the server. Another advantage is the flexibility of the message, which can be sent in the form of XML, HTML, JSON or any other desired format.
This article does not cover the creation of such a web service but trying to do so would be a good exercise for learning how they work. This article explains how to create a RESTful API in .NET, but most programming languages are capable of doing this.
The purpose of this article
What I will do in this article is to present different ways of calling a RESTful API from Unity3D. If you are not familiar with Unity3D, you can read more about what it is and how to install it from this introductory article. The principles that I present should be applicable to any game engine that allows coding except maybe for the engines that implement their own language.
In order to make the things a little bit different, I chose to use a weather API for this tutorial. The code will check whether or not it is snowing in a particular city and will simulate the same in our game. The code uses the OpenWeatherMap API for this, since it is free and allows a decent number of requests. Create an account and you will be offered an API key which will be necessary when making the requests.
Setting up the project
To begin, create a new Unity3D project. Press the New button from the top-right and make sure the 3D checkbox is selected although you could easily replicate the tutorial in a 2D environment, since this example will not use any 3D-specific features.
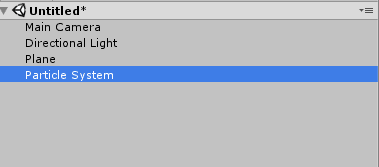
I created a plane on the scene just to have something simple to look at, but this is not mandatory. Of course, you could also create a more complex scene, depending on your needs.
The main thing that will be used in this tutorial is a particle system that will simulate snowing. Click the Create button from the left menu and choose Effects->Particle System. Leave the default particles, since they already look like ‘snowflakes’, but you can download one of the many packs that offers different particles from the Asset Store.
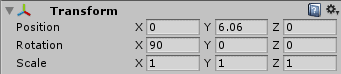
You will, however, slightly alter the properties of the particle system to make it look more like a snowing effect. Set the Y coordinate of the system to be located higher than the plane and also rotate it on the X axis, to have the particles ‘fall’. This is how the properties should look like (on the right side of the window):
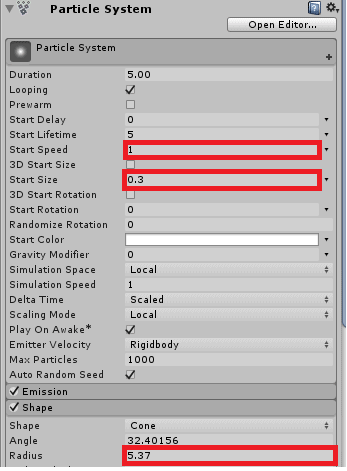
The next step is to decrease the speed of the particles and their size, while also increasing the Radius property of the Shape in order to cover the whole plane. You can play around with these options to achieve the desired outcome.
Now that the basic snowing effect is in place, you can move on to the more interesting part of the tutorial. One more thing to do is disabling the particle system to control whether it snows in the beginning or not. To do this, uncheck the box from the top-right.

The first step towards calling the API and getting useful information is to inspect the documentation. Any API that you decide to use should have a documentation page or file that explains what parameters you should supply and what is the expected result.
For the weather API that we are using, there are two parameters that should be sent: the ID of the city, which can be easily found by searching for that city on the website, and the API key that is received after creating an account. This is what a typical URI (Uniform Resource Identifier) would look like:
|
1 |
api.openweathermap.org/data/2.5/weather?id=2172797&APPID=88169749096b61e3b85398905927f53c |
A URI is a string that identifies a resource – most commonly, a URL (Uniform Resource Locator), also knows as a web address.
According to the documentation, this is what a typical response should look like:
|
1 2 3 4 5 6 7 8 9 10 11 |
{"coord":{"lon":139,"lat":35}, "sys":{"country":"JP","sunrise":1369769524,"sunset":1369821049}, "weather":[{"id":804,"main":"clouds","description":"overcast clouds","icon":"04n"}], "main":{"temp":289.5,"humidity":89,"pressure":1013,"temp_min":287.04,"temp_max":292.04}, "wind":{"speed":7.31,"deg":187.002}, "rain":{"3h":0}, "clouds":{"all":92}, "dt":1369824698, "id":1851632, "name":"Shuzenji", "cod":200} |
By default, the data offered by the API is in JSON format. Most APIs will probably do the same, since the format is light-weight and understandable by most programming languages. If you get an XML or HTML response, the only difference should be the code for parsing the response into an object, but we will get to that later.
By inspecting the response, we need to note what data we need to store for our purposes. The response contains a weather object, with a main field. This value contains one word that is used as the general description for the weather, so this is what we are mostly interested in.
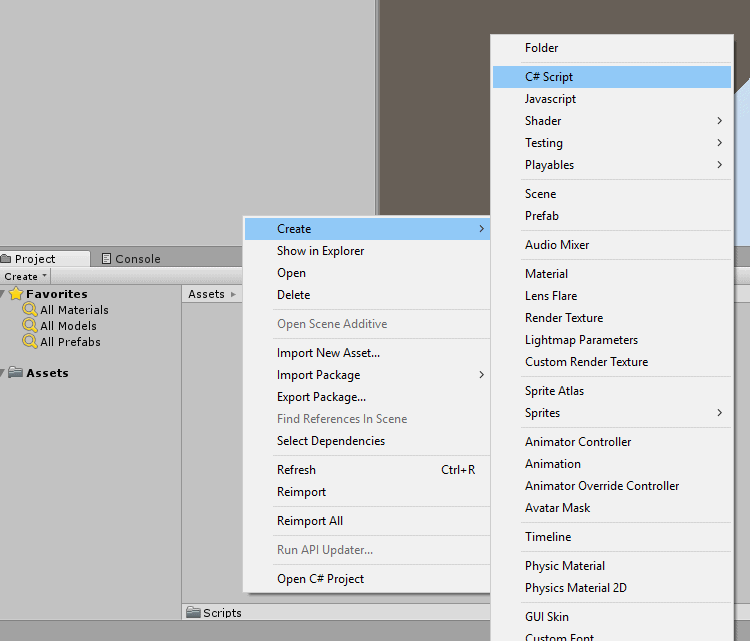
Now that we know what we need, it is time to go back to Unity and start coding. Right click in the file explorer (also known as Project tab or Assets window) from the bottom of the window and choose Create->C# script and name it WeatherController.
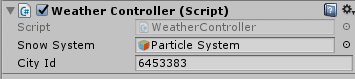
Create an Empty object using the Create menu button in the Hierarchy window and attach this script to it. This can be done either by clicking the Add Component button in the Inspector and searching for your script or by clicking and dragging the script from the file explorer into the Inspector.
Before implementing any functionality in the script, create the class that will hold the data that is received. Right-click on the solution explorer from the left side of Visual Studio or Mono Develop and add a new class to it. Name it WeatherInfo.
In this class, you will add an id field and a name field. Even though these are not important for our purposes, they might be useful for debugging. You will also create another class called Weather in the same file (you can also create it in another file) containing an id field and a main field. Then, you will create a list of Weather objects in the WeatherInfo class. Furthermore, you will decorate both classes with the Serializable attribute, since you will need to deserialize the JSON response into them. This is what the file looks like:
|
1 2 3 4 5 6 7 8 9 10 11 12 13 |
[Serializable] public class Weather { public int id; public string main; } [Serializable] public class WeatherInfo { public int id; public string name; public List<Weather> weather; } |
The list of Weather objects might seem weird, but if you go back to the JSON response example, you can see that the weather object is actually a list.
Back in the WeatherController class, create a public field that allows a CityId input, and a constant string that will represent the API key.
|
1 2 |
private const string API_KEY = "88169749096b61e3b85398905927f53c"; public string CityId; |
Before being concerned with any other behavior, you’ll create the method that will call the API. Name it GetWeather. It will return a WeatherInfo object. In this first example, use the HttpWebRequest class that is part of the .NET Framework. These namespaces are going to be used and the Assets namespace is used to include the WeatherInfo class:
|
1 2 3 4 5 6 7 8 9 10 11 12 13 |
using System.Net; using System; using System.IO; using Assets; private WeatherInfo GetWeather() { HttpWebRequest request = (HttpWebRequest)WebRequest.Create(String.Format("http://api.openweathermap.org/data/2.5/weather?id={0}&APPID={1}", CityId, API_KEY)); HttpWebResponse response = (HttpWebResponse)request.GetResponse(); StreamReader reader = new StreamReader(response.GetResponseStream()); string jsonResponse = reader.ReadToEnd(); WeatherInfo info = JsonUtility.FromJson<WeatherInfo>(jsonResponse); return info; } |
The method creates a HttpWebRequest object based on the API URI that needs to be called to get the data. The String.Format method is used to easily introduce the parameters in the URI. The response is read from the HttpWebResponse into a string containing the full JSON object and then deserialized into the WeatherInfo object. To do this, use the JsonUtility class that is part of Unity, since introducing dependencies into a Unity project can be a bit more difficult. One important thing to note is that, unlike other JSON libraries, this one is case-sensitive when it comes to field names. Make sure that all the field names from your classes are the same as the ones from the JSON response.
The next method to create is responsible for checking whether it is snowing or not in the city that was provided. You will also add another public field named SnowSystem and make sure that it’s linked from the Unity editor. To do this, select the empty game object that was created earlier and drag and drop the particle system object into the slot.
Here is the code:
|
1 2 3 4 5 6 7 8 9 10 11 |
public GameObject SnowSystem; public void CheckSnowStatus() { bool snowing = GetWeather().weather[0].main.Equals("Snow"); if (snowing) SnowSystem.SetActive(true); else SnowSystem.SetActive(false); } |
The CheckSnowStatus method verifies the value of the main field and performs an appropriate action on the particle system. This method will be called whenever we want to change the snowing effect. Since the weather API suggests not sending more than one request every ten minutes, you will create a counter for this. When the counter reaches zero, the code will call the API again and reset the value of the counter. This is what the script eventually looks like:
|
1 2 3 4 5 6 7 8 9 10 11 12 13 14 15 16 17 18 19 20 21 22 23 24 25 26 27 28 29 30 31 32 33 34 35 36 37 38 39 40 |
public class WeatherController : MonoBehaviour { private const string API_KEY = "88169749096b61e3b85398905927f53c"; private const float API_CHECK_MAXTIME = 10 * 60.0f; //10 minutes public GameObject SnowSystem; public string CityId; private float apiCheckCountdown = API_CHECK_MAXTIME; void Start() { CheckSnowStatus(); } void Update() { apiCheckCountdown -= Time.deltaTime; if (apiCheckCountdown <= 0) { CheckSnowStatus(); apiCheckCountdown = API_CHECK_MAXTIME; } } public void CheckSnowStatus() { bool snowing = GetWeather().weather[0].main.Equals("Snow"); if (snowing) SnowSystem.SetActive(true); else SnowSystem.SetActive(false); } private WeatherInfo GetWeather() { HttpWebRequest request = (HttpWebRequest)WebRequest.Create(String.Format("http://api.openweathermap.org/data/2.5/weather?id={0}&APPID={1}", CityId, API_KEY)); HttpWebResponse response = (HttpWebResponse)request.GetResponse(); StreamReader reader = new StreamReader(response.GetResponseStream()); string jsonResponse = reader.ReadToEnd(); WeatherInfo info = JsonUtility.FromJson<WeatherInfo>(jsonResponse); return info; } } |
The constant floating-point variable, API_CHECK_MAXTIME holds the value of ten minutes, and an apiCheckCountdown variable that starts with the same value and will be used for counting that period of time. The code also calls CheckSnowStatus in the Start method, so the effect is checked when the game starts. For counting down the time, the code subtracts the Time.deltaTime value, which represents the time it took to complete the last frame.
One problem with this solution is that it will significantly decrease the game speed by having to wait for the API response, which can sometimes take a few seconds. There are two solutions for this: using Unity’s coroutines or .NET’s async/await.
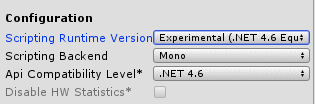
I will present the latter solution first, since it only takes a few changes in our existing code. To have this work in your project, go to the File->Build Settings->Player setting and change the Scripting Runtime Version to .NET 4.6.
Back to the WeatherController script, we need to get the response from the request asynchronously. This means that the application will not be blocked while the response from the API is awaited. The changes only need to happen in the CheckSnowStatus and GetWeather methods. This is what they look like:
|
1 2 3 4 5 6 7 8 9 10 11 12 13 14 15 16 17 |
public async void CheckSnowStatus() { bool snowing = (await GetWeather()).weather[0].main.Equals("Snow"); if (snowing) SnowSystem.SetActive(true); else SnowSystem.SetActive(false); } private async Task<WeatherInfo> GetWeather() { HttpWebRequest request = (HttpWebRequest)WebRequest.Create(String.Format("http://api.openweathermap.org/data/2.5/weather?id={0}&APPID={1}", CityId, API_KEY)); HttpWebResponse response = (HttpWebResponse)(await request.GetResponseAsync()); StreamReader reader = new StreamReader(response.GetResponseStream()); string jsonResponse = reader.ReadToEnd(); WeatherInfo info = JsonUtility.FromJson<WeatherInfo>(jsonResponse); return info; } |
To be able to use the async functionality, the following namespace will be used:
|
1 |
using System.Threading.Tasks; |
The most important change is that the request.GetResponse() was changed to request.GetResponseAsync(). Consequently, GetWeather method must be marked as async, since it performs an awaited operation, and made to return a Task<WeatherInfo> object instead of a WeatherInfo object. It is also the case for the CheckSnowStatus method, which now needs to wait for GetWeather. If you are not familiar with asynchronous programming and would like to learn more, this article can be a good start.
Using Coroutines
An alternative to this is to use Unity’s coroutines. In the current case, it might be the most viable option. The difference between coroutines and asynchronous programming is that coroutines run for multiple frames, while ‘awaited’ methods are running in another thread. If you plan to send a web request for something like payment processing, when you wouldn’t have the actual game running, asynchronous programming could work fine. For our purposes, when we call the API while many other things could happen, we should use coroutines.
Starting with the GetWeather method, there are a few changes that need to be made. To use coroutines, we will use Unity’s UnityWebRequest class, instead of .NET’s HttpWebRequest. The code will wait for the response to be received, and then will convert it from JSON to an actual object the same way it did in the previous example.
The main problem with coroutines is that they cannot return an actual value, since their return type must be IEnumerator. There are a few ways to work around this. The one used in this example has a lambda as a parameter for the GetWeather method and calls it after the response is processed.
This is the modified method:
|
1 2 3 4 5 6 7 8 9 10 11 12 13 |
IEnumerator GetWeather(Action<WeatherInfo> onSuccess) { using (UnityWebRequest req = UnityWebRequest.Get(String.Format("http://api.openweathermap.org/data/2.5/weather?id={0}&APPID={1}", CityId, API_KEY))) { yield return req.Send(); while (!req.isDone) yield return null; byte[] result = req.downloadHandler.data; string weatherJSON = System.Text.Encoding.Default.GetString(result); WeatherInfo info = JsonUtility.FromJson<WeatherInfo>(weatherJSON); onSuccess(info); } } |
One important aspect is using the yield keyword, which is the point where the method will be resumed from the next frame. After sending the request, a while loop makes sure that the response arrived before continuing with any other action. After converting the result, it calls the onSuccess lambda which will further process the data.
The method supplied as the parameter for GetWeather is CheckSnowStatus. To make it suitable for this, add a parameter of the type WeatherInfo to it. This object is used to check the snow status.
|
1 2 3 4 5 6 7 8 |
public void CheckSnowStatus(WeatherInfo weatherObj) { bool snowing = weatherObj.weather[0].main.Equals("Snow"); if (snowing) SnowSystem.SetActive(true); else SnowSystem.SetActive(false); } |
As the last part, we need to start the coroutine. This will happen from the Start and Update methods:
|
1 2 3 4 5 6 7 8 9 10 11 12 13 |
void Start() { StartCoroutine(GetWeather(CheckSnowStatus)); } void Update() { apiCheckCountdown -= Time.deltaTime; if (apiCheckCountdown <= 0) { apiCheckCountdown = API_CHECK_MAXTIME; StartCoroutine(GetWeather(CheckSnowStatus)); } } |
This is the result of all the work that we have done once you run the game:

Conclusion
Calling a RESTful API in the context of a game might raise different problems than in other types of applications. It is important to choose the right method, depending on what you are trying to achieve, since games could be impacted more drastically by things such as memory leaks or blocked threads. A good way to test for such issues is to use the Unity Profiler, which can be opened from Window-> Profiler; this tool offers insight into how much resources are used by each part of your game.
Read also:
OAuth 2.0 authentication for securing the REST API endpoints your Unity app calls
FAQs: Calling RESTful APIs in Unity3D
1. How do I call a REST API in Unity3D?
Use UnityWebRequest in a coroutine. Example: IEnumerator GetData() { using var request = UnityWebRequest.Get(“https://api.example.com/data”); yield return request.SendWebRequest(); if (request.result == UnityWebRequest.Result.Success) { Debug.Log(request.downloadHandler.text); } else { Debug.LogError(request.error); } } Start the coroutine with StartCoroutine(GetData()). For POST requests with JSON, use UnityWebRequest.Post(url, jsonString) with a DownloadHandlerBuffer and UploadHandlerRaw with Content-Type set to application/json.
2. What is the difference between coroutines and threads for Unity API calls?
Coroutines run on Unity’s main thread and integrate naturally with the game loop – yield return pauses execution until the next frame or operation completes. They cannot truly run in parallel but avoid blocking the frame update. Threads run in parallel on separate CPU threads but cannot directly access Unity’s API (GameObject, Transform, UI) from a background thread – you must marshal results back to the main thread using a dispatcher pattern or Task.Run with ConfigureAwait(false) and then invoke Unity APIs back on the main thread. For simple API calls, coroutines are simpler; for CPU-heavy operations alongside API calls, threads are more appropriate.
3. How do I POST JSON data to a REST API from Unity3D?
Build your JSON string (manually or with JsonUtility.ToJson(yourObject)). Create a UnityWebRequest: var request = new UnityWebRequest(url, “POST”); byte[] bodyRaw = Encoding.UTF8.GetBytes(jsonString); request.uploadHandler = new UploadHandlerRaw(bodyRaw); request.downloadHandler = new DownloadHandlerBuffer(); request.SetRequestHeader(“Content-Type”, “application/json”); yield return request.SendWebRequest(); This sends the JSON body and waits for the response. Unity’s built-in JsonUtility handles simple object serialisation; for complex JSON (nested objects, arrays), consider Newtonsoft.Json via the Unity Package Manager.
4. How do I handle authentication headers in Unity UnityWebRequest?
Set headers before sending: request.SetRequestHeader(“Authorization”, “Bearer ” + accessToken); or for Basic auth: request.SetRequestHeader(“Authorization”, “Basic ” + Convert.ToBase64String(Encoding.ASCII.GetBytes(username + “:” + password))). Store credentials in a ScriptableObject or PlayerPrefs – never hardcode credentials in source files. For OAuth flows, store the access token obtained from an initial login request and include it in subsequent API calls.
This document contains proprietary information and is protected by copyright law.
Copyright © 2026 Red Gate Software Limited. All rights reserved
Load comments