
Using Nested Sets with the Treeview
If you’re like me, one day Joe Celko exposed you to Michael J. Kamfonas’ Nested Sets model for trees in SQL on the Usenet, and it changed your life. So you have an easy way of expressing hierarchical data in SQL, with ordered sibling nodes, no less.
A decade or so later, we find ourselves trying to integrate our database design patterns with the .NET controls. Data-binding handles a lot of the functional requirements for you, but you have to do it pretty much the way that Microsoft expects you to, which you’ll understand if you try to set the DataSource on a FormView control. We have to give up middle layer logic and tie our user interface directly to the database objects, which is not generally a good idea, but not always worth avoiding.
The .NET control for hierarchical data is the TreeView, and the TreeView requires an IHierarchicalDataSource object. However, if you try to do this through the GUI, you’ll see there is no way that is provided to add a connection to a SQL Server database.
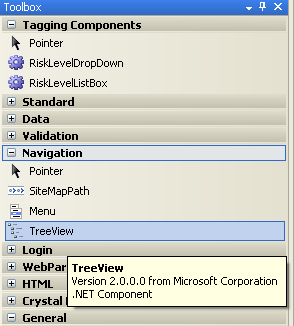
Figure 1 TreeView control in Toolbox under ‘Navigation’
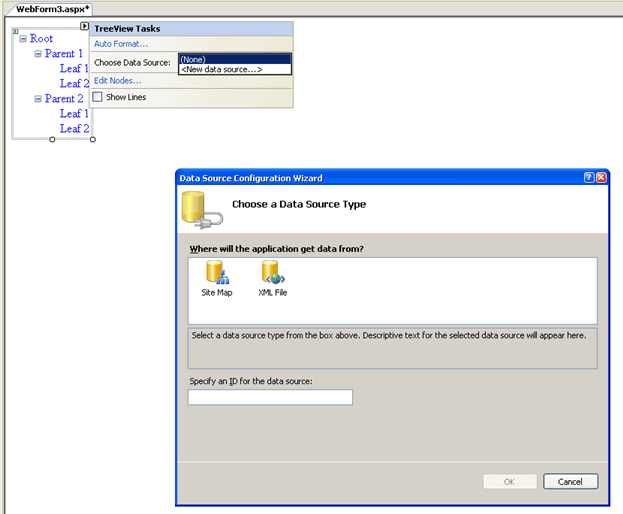
Figure 2: Options for a TreeView data source
It seems nested sets aren’t so pervasive that .NET provides a UI component set. The point of this article, though, is to fill that gap. So, let’s back up a little.
Populating a Treeview with Nested sets
The Database bit.
In the nested set model, every node has two integer values which (after Celko) I call lft and rgt . rgt is always greater than lft , but only one greater for leaf nodes. If one node’s lft is less than another node’s lft , and the first node’s rgt is greater than the next node’s rgt , the first node is an ancestor of the second node. There is a lot more to nested sets, and many wonderful reasons to use them. However, this article is about showing them in a .NET TreeView, so I’ll refer you to Celko’s “SQL for Smarties” or “Trees and Hierarchies in SQL For Smarties” for a discussion. Now, we’ll just make one, with data enough to populate a TreeView.
|
1 2 3 4 5 6 7 8 9 10 11 12 13 14 15 16 17 18 19 20 21 22 23 24 25 26 27 28 29 30 31 32 33 34 35 36 37 38 39 40 41 42 43 44 45 46 47 48 49 50 51 52 53 54 55 56 57 58 59 60 61 62 63 64 65 66 67 68 69 70 71 72 73 74 75 76 77 78 79 80 81 82 83 84 85 86 87 88 89 90 91 92 93 94 95 96 97 98 99 100 101 102 103 104 105 106 107 108 109 110 111 112 113 114 115 116 117 118 119 120 121 122 123 124 125 126 127 128 129 130 131 132 133 134 135 136 137 138 139 140 141 142 143 144 145 146 147 148 149 150 151 152 153 154 155 156 157 158 159 160 161 162 163 164 165 166 167 168 169 170 171 172 173 174 175 176 177 178 179 180 181 |
USE SQLTreeNode GO -- drop the schemabound function IF OBJEcT_ID('GetTreeNodeParentPath', 'FN') IS NOT NULL DROP FUNCTION GetTreeNodeParentPath GO -- create a table to store node data. IF OBJECT_ID('TreeNode', 'U') IS NOT NULL DROP TABLE TreeNode IF OBJECT_ID('Node', 'U') IS NOT NULL DROP TABLE Node GO CREATE TABLE Node( NodeID INT IDENTITY(0,1) CONSTRAINT PK_NODE PRIMARY KEY Clustered, TEXT NVARCHAR(255) NOT NULL CONSTRAINT NOSLASH 0 = CHARINDEX('/', Text), TOOLTIP NVARCHAR(MAX), IMAGEURL NVARCHAR(4000), Checked BIT DEFAULT 0 ) GO /** create a table to place nodes in the hierarchy. * note that the node data are stored separately from the node position to * allow a node to appear in the tree multiple times */ GO CREATE TABLE TreeNode( lft INT UNIQUE, -- we would cluster on lft if we were using a single table rgt INT UNIQUE, CONSTRAINT PK_TreeNode PRIMARY KEY NONCLUSTERED(lft , rgt ), NODEID INT CONSTRAINT TreeNodeNode FOREIGN KEY (NODEID) REFERENCES NODE(NODEID) ) GO -- We're going to want that merge join CREATE CLUSTERED INDEX IX_TreeNode ON TreeNode(NodeID) GO /** This procedure lets us check for bad nodes. It's for development and schema * Maintenance */ IF OBJEcT_ID('CheckTreeNodeTable', 'P') IS NOT NULL DROP PROCEDURE CheckTreeNodeTable GO CREATE PROCEDURE CheckTreeNodeTable AS BEGIN IF EXISTS(SELECT * FROM TreeNode tvd1 INNER JOIN TreeNode tvd2 ON tvd1.lft = tvd2.rgt ) RAISERROR('lft and rgt together are not unique', 16, 1) IF 1 <> (SELECT 2 * COUNT(*) - MAX(rgt ) + MIN(lft ) FROM TreeNode) RAISERROR('Gaps exist in lft and rgt values', 16, 1) IF EXISTS(SELECT * FROM TreeNode, TreeNode tvd2 WHERE (TreeNode.lft < tvd2.lft AND TreeNode.lft > tvd2.rgt ) AND (TreeNode.rgt > tvd2.lft AND TreeNode.rgt < tvd2.rgt )) RAISERROR('Incorrectly nested nodes are defined', 16, 1) END GO /** Add a root node */ INSERT INTO Node([TEXT], TOOLTIP, IMAGEURL, Checked) VALUES (N'Root', N'This is the node from which all other nodes descend', N'http://example.com/myicon.png', 0 ) INSERT INTO TreeNode (lft , rgt , NodeID) VALUES (0, 1, @@IDENTITY) GO SET ANSI_NULLS ON GO /** Return's the path to the node's parent * @lft the value for the node's left edge */ CREATE FUNCTION GetTreeNodeParentPath(@lft INT) RETURNS nvarchar(max) with schemabinding AS BEGIN DEcLARE @RETVAL nvarchar(max), @rgt INT SelEcT @rgt = rgt FROM dbo.TreeNode WHERE lft = @lft -- return the node's parent's slash-delimited path SELEcT @RETVAL = -- Initialize @Retval with an empty string COALESCE(@RETVAL + '/', SPACE(0)) + Text FROM dbo.TreeNode INNER JOIN dbo.Node ON dbo.TreeNode.NodeID = dbo.Node.NodeID -- get all ancestor nodes WHERE lft < @lft AND rgt > @rgt -- get lower level nodes earlier ORDEr BY lft ASC RETURN @RETVAL END GO IF OBJECT_ID('GetDescendingNodes', 'P') IS NOT NULL DROP PROCEDURE GetDescendingNodes GO /** return all the nodes descending from the node with the specified path * We leave lft and rgt in the database, and deal with path enumeration out * in the world. We undo that here. * @Path slash-delimited path enumeration of ancestors of the node and the node * itself. Only this node and its descendants will be returned. If @Path is * null, return the entire tree. */ CREATE PROCEDURE GetDescendingNodes(@PATH NVARCHAR(max) = NULL) AS BEGIN DECLARE @rgt INT, @lft INT /* For very large hierarchies, calculating the path for each node will * become time-consuming and you may wish to rewrite the query finding a * node by its path in the following way * 1. Take the token before the first 'slash' and leave a remainder * 2. Find the nth-level node with that text descending from the passed * node [a node's level is * (count(*) where lft < node.lft and rgt > node.rgt )] * 3. If the remainder has text, recurse with the found node and the * remainder * 4. If the remainder is empty, return the node * 5. Return all nodes with lft and rgt between that nodes lft and rgt as * below */ /* Common Table Expressions get a bad rap as only enabling people who * insist on using adjacency lists with CONNECT BY. But, we can cut our * calls to GetTreeNodeParentPath in half using them here. */ ;WITH TreeNodes(lft , rgt , ParentPath, TEXT, ToolTip, ImageURL, Checked) AS (SELECT lft , rgt , dbo.GetTreeNodeParentPath(lft ), TEXT, ToolTip, ImageURL, Checked FROM TreeNode INNER JOIN Node ON TreeNode.NodeID = Node.NodeID ) -- Return the node and its descendants SELECT tns.ParentPath, COALESCE(tns.ParentPath + '/', SPACE(0)) + tns.TEXT AS PATH, tns.TEXT, tns.Tooltip, tns.ImageURL, tns.Checked FROM TreeNodes tns INNER JOIN TreeNodes anc -- get the specified node and all descendants ON tns.lft >= anc.lft AND tns.rgt <= anc.rgt -- compare the nodes path with the argument AND COALESCE(Anc.ParentPath + '/', SPACE(0)) + Anc.[TEXT] = COALESCE(@PATH, -- get the root node if the argument is not specified (SELECT COALESCE(ParentPath + '/', SPACE(0)) + Text FROM TreeNodes WHERE lft IN -- the root node has the lowest lft value (SELECT MIN(lft ) FROM TreeNodes))) -- ordering by lft ensures nodes will precede their children ORDER BY tns.lft ASC END GO /** Add some nodes, just so there's something to see in the display * using Free Icons from * http://www.iconarchive.com/category/business/people-icons-by-aha-soft.html * Clearly, you'll need CreateNode, ReviewNode, UpdateNode and DeleteNode * procedures, but those can wait until an article on the FormView ;) */ DECLARE @ROOTID INT SELECT @ROOTID = NodeID FROM TreeNode WHERE lft = 0 UPDATE TreeNode SET rgt = 19 WHERE nodeid = @ROOTID UPDATE Node SET TEXT = 'People', ImageURL = 'http://icons.iconarchive.com/icons/aha-soft/people/people-icon.jpg' , ToolTip = 'We''re all people, after all' INSERT INTO node (TEXT, ImageURL, Tooltip) VALUES( 'Boss', 'http://icons.iconarchive.com/icons/aha-soft/people/boss-icon.jpg', 'Your boss is a person') INSERT INTO TreeNode (lft , rgt , NODEID) VALUES (1, 8, @@IDENTITY) INSERT INTO node (TEXT, ImageURL, Tooltip) VALUES('Engineer', 'http://icons.iconarchive.com/icons/aha-soft/people/engineer-icon.jpg', 'Your boss could be an engineer') INSERT INTO TreeNode (lft , rgt , NODEID) VALUES (2, 5, @@IDENTITY) INSERT INTO node (TEXT, ImageURL, Tooltip) VALUES('Footballer', 'http://icons.iconarchive.com/icons/aha-soft/people/footballer-icon.jpg', 'Engineers play a lot of soccer; I think they like the hexagons') INSERT INTO TreeNode (lft , rgt , NODEID) VALUES (3, 4, @@IDENTITY) INSERT INTO node (TEXT, ImageURL, Tooltip) VALUES('Army Officer', 'http://icons.iconarchive.com/icons/aha-soft/people/army-officer-icon.jpg', 'Your boss could be an Army officer') INSERT INTO TreeNode (lft , rgt , NODEID) VALUES (6, 7, @@IDENTITY) INSERT INTO node (TEXT, ImageURL, Tooltip) VALUES('Users', 'http://icons.iconarchive.com/icons/aha-soft/people/users-icon.jpg', 'Users are people') INSERT INTO TreeNode (lft , rgt , NODEID) VALUES (9, 18, @@IDENTITY) INSERT INTO node (TEXT, ImageURL, Tooltip) VALUES('User Group', 'http://icons.iconarchive.com/icons/aha-soft/people/user-group-icon.jpg', 'Users can form groups') INSERT INTO TreeNode (lft , rgt , NODEID) VALUES (10, 11, @@IDENTITY) INSERT INTO node (TEXT, ImageURL, Tooltip) VALUES('User', 'http://icons.iconarchive.com/icons/aha-soft/people/user-icon.jpg', 'Users can be individuated') INSERT INTO TreeNode (lft , rgt , NODEID) VALUES (12, 17, @@IDENTITY) INSERT INTO node (TEXT, ImageURL, Tooltip) VALUES('User Info', 'http://icons.iconarchive.com/icons/aha-soft/people/user-info-icon.jpg', 'Users have information') INSERT INTO TreeNode (lft , rgt , NODEID) VALUES (13, 14, @@IDENTITY) INSERT INTO node (TEXT, ImageURL, Tooltip, Checked) VALUES('Check User', 'http://icons.iconarchive.com/icons/aha-soft/people/check-user-icon.jpg', 'Users can be checked!', 1) INSERT INTO TreeNode (lft , rgt , NODEID) VALUES (15, 16, @@IDENTITY) |
That code contains a few different sections
- Making the data tables. We make one table to contain the data and another to locate it in the tree. This can be one table for simple implementations. Note that for a production implementation, you might want security, auditing and historical state functions, which are not included here
- This section starts with the GetParentPath function. It provides the ‘select’ functionality for the TreeView control, for which we’ll shortly get to providing a client.
- The third section adds some data, leaning on some free icons I found on the web. Any practical implementation is going to provide Create/Review/Update/Delete features, but since the TreeView doesn’t provide a way to use them, they’re out of scope here.
The Middle Bit
So, now, all that’s left to do is write some helper functions for the IHierarchicalDataSource , the IHierarchicalDataSource itself, and tie it to a TreeView. Really, we’ve defined the table, so the heavy lifting is done. I don’t know what those application developers go on about.
What’s in an IHierarchicalDataSource ? The documentation says ” The interface defines a single method, GetHierarchicalView, which retrieves a strongly typed HierarchicalDataSourceView object.” Our HierarchicalDataSourceView implementation, in turn, must override HierarchicalDataSourceView.Select and return a collection implementing IHierarchicalEnumerable. So, let’s define our IHierarchicalEnumerable.
|
1 2 3 4 5 6 7 8 9 10 11 12 13 14 15 16 17 18 19 20 21 22 23 24 25 26 27 28 29 30 31 32 33 34 35 36 37 38 39 40 41 42 43 44 45 46 47 48 49 50 51 52 53 54 55 56 57 58 59 60 61 62 63 64 65 66 67 68 69 70 71 72 73 74 75 76 77 78 79 80 81 82 83 84 85 86 87 88 89 90 91 92 93 94 95 96 97 98 99 100 101 102 103 104 105 106 107 108 109 110 111 112 113 114 115 116 117 118 119 120 121 122 123 124 125 126 127 128 129 130 131 132 133 134 135 136 137 138 139 140 141 142 143 144 145 146 147 148 149 150 151 152 153 |
using System.Web.UI; using System.Collections; namespace SQLTreeView { /** A collection of IHierarchyData objects -- nothing specific to * SQLTreeNodeHierarchyData objects happens in this class. */ public class HierarchicalEnumerable : ArrayList, IHierarchicalEnumerable { /** Casts as IHierarchyData * returns null if that was not possible * @enumeratedItem object to cast as IHierarchyData */ public IHierarchyData GetHierarchyData(object enumeratedItem) { // not clear why this is an instance method return enumeratedItem as IHierarchyData; } } } We now need a class to implement the IHierarchyData object. using System.Web.UI; using System.Data.SqlTypes; using System.Text.RegularExpressions; namespace SQLTreeView { /** Class to transfer nested set data to the TreeView */ public class SQLTreeNodeData : IHierarchyData { protected static string _select = "GetDescendingNodes"; protected bool _hasChildren = false; protected bool _checked = false; protected string _toolTip = ""; protected string _text = ""; protected string _path = ""; protected string _imageURL = ""; protected HierarchicalEnumerable _children = new HierarchicalEnumerable(); protected SQLTreeNodeData _parent = null; protected Regex _lasttoken = new Regex("([^/]*)$"); /** create a tree node with various display settings set * @path the text for each ancestor node in order from root to this, * delmited by slashed * @text Caption for the node * @tooltip pop-up mouseover text * @imageURL locator for icon to display * @checkd whether the node is checked. 'checked' is a C# keyword. */ public SQLTreeNodeData(string path, string text, string tooltip, string imageURL, bool checkd) { if (_lasttoken.Matches(path)[0].ToString() != text) throw new System.Exception(text + " is not the terminating token in " + path); this.Path = path; this.Text = text; this.ToolTip = tooltip; this.ImageURL = imageURL; // checked is misspelled because it is a keyword this.Checked = checkd; } /** Return the path for ToString requests */ public override string ToString() { return this.Path; } /** The stored procedure to call to collect the TreeNodes */ public static string Select { get { return _select; } set { _select = value; } } // report if a children collection with non-zero count exists public bool HasChildren { get { if (null == _children || 0 == _children.Count) { return false; } return true; } } /** the slash-delimited text of the node and its ancestors */ public string Path{ get { return _path; } set { _path = value; }} /** Text for the treeview node */ public string Text { get { return _text; } set { _text = value; } } /** ToolTip to contextualize the node for the user */ public string ToolTip{get { return _toolTip; }set { _toolTip = value; } } /** Uniform resource identifier for a picture to display on the TreeView */ public string ImageURL {get {return _imageURL; }set {_imageURL = value;} } /** Whether to display the treenode as checked */ public bool Checked {get {return _checked; } set {_checked = value; } } /** Accessor and Modifier for the collection of children */ public HierarchicalEnumerable Children { get { return _children; } set { _children = value; } } /** specify which node contains this node */ public SQLTreeNodeData Parent { get { return _parent; } set { _parent = value; } } /** interface method to access Children property */ public IHierarchicalEnumerable GetChildren() { return this.Children; } /** interface method to access Parent property */ public IHierarchyData GetParent() { return this.Parent; } /** interface property to return this very object */ public object Item { get { return ((IHierarchyData)this); } } /** interface propery to wrap this.getType().Name * If the TreeViewBinding.DataMember property is specified and * specified a matching value, this element may get displayed */ public string Type{ get{ return this.GetType().Name; }} } } |
I added the name of the select stored procedure to the object as a static property. The public fields consumed by the .NET infrastructure, including those mapped to column names, are all properties, because you otherwise risk “Could not find a property named…” errors.
We’re now ready to code a HierarchicalDataSourceView.
|
1 2 3 4 5 6 7 8 9 10 11 12 13 14 15 16 17 18 19 20 21 22 23 24 25 26 27 28 29 30 31 32 33 34 35 36 37 38 39 40 41 42 43 44 45 46 47 48 49 50 51 52 53 54 55 56 57 58 59 60 61 62 63 64 65 66 67 68 69 70 71 72 73 74 75 76 77 78 79 80 81 82 83 84 85 86 87 88 89 90 91 92 93 94 95 96 97 98 99 100 101 102 103 104 105 |
using System.Configuration; using System.Data.SqlClient; using System.Data; using System.Collections; using System.Web.UI; using System; namespace SQLTreeView { // The SQLTreeNodeView class encapsulates the // capabilities of the SQLTreeNodeDataSource data source control. public class SQLTreeNodeView : HierarchicalDataSourceView { public string RootNodePath; protected HierarchicalEnumerable _lastreturned = null; /** create a view of the node with the * specified path and its descendants */ public SQLTreeNodeView(string rootNodePath) { // Store the root node path RootNodePath = rootNodePath; } /** create a view of the entire tree */ public SQLTreeNodeView() : this(null) { } /**Return the list of nodes descending from the slash-delimited path * Changing or generalizing the delimiter is * left as an exercise to the reader */ public override IHierarchicalEnumerable Select() { HierarchicalEnumerable retval = new HierarchicalEnumerable(); // load some TreeNodeData objects from the database and return them DataSet treeNodeDataSet = new DataSet(SQLTreeNodeData.Select); try { /* pull a connection string from an * configuration/connectionStrings/add element in Web.config*/ SqlConnection connect = new SqlConnection(ConfigurationManager .ConnectionStrings["Connectionstring"].ConnectionString); connect.Open(); SqlCommand command = connect.CreateCommand(); // populate the treeview with descendants of Tag command.CommandText = SQLTreeNodeData.Select; command.CommandType = CommandType.StoredProcedure; SqlCommandBuilder.DeriveParameters(command); /* DataBinding passes an empty string instead of null to * HierarchicalDataSourceView.GetHierarchicalView. Correct that * here.*/ command.Parameters["@Path"].Value = this.RootNodePath == "" ? null : this.RootNodePath; Hashtable parentage = new Hashtable(); SqlDataReader reader = command.ExecuteReader(CommandBehavior.Default); while (reader.Read()) { // capture the record SQLTreeNodeData thd = new SQLTreeNodeData( (string)reader["Path"], (string)reader["Text"], (string)reader["ToolTip"], (string)reader["ImageURL"], (bool)reader["Checked"]); // store the record in your hashtable string path = reader["Path"].ToString(); parentage.Add(path, thd); /* the stored procedure guarantees that parents will be * returned before children */ string parentpath = reader["ParentPath"].ToString(); // add the parent and child to each node thd.Parent = (SQLTreeView.SQLTreeNodeData)parentage[parentpath]; if (thd.Parent != null) // handle the root ((ArrayList)thd.Parent.Children).Add(thd); // return the root node if (0 == retval.Count) retval.Add(thd); } reader.Close(); reader.Dispose(); command.Dispose(); connect.Close(); } // Write SQLExceptions to standard out catch (SqlException se) { Console.Write(se.StackTrace); foreach (SqlError ser in se.Errors) Console.Write(ser.Message); } catch (NullReferenceException nre) { /* return an empty data set if the connectionstringname property isn't present */ } // update the local field _lastreturned = retval; // Return the HierarchicalEnumerable with 0 or 1 members return retval; } /** Report the last data to be constructed and returned */ public HierarchicalEnumerable LastReturned { get { return _lastreturned; } } } } |
The Select method builds the hierarchy and loads the root node into the return value. It also loads every other node into that node’s parent’s Children collection, which we defined as part of the SQLTreeNodeData implementation of IHierachyData. That Select method is the most coding that gets done; most of this implementation is just getting the objects in the right places.
Unlike with identifiers like the NodeID, there’s no philosophical objection to exposing lft and rgt to the data consumer. They’re meaningful numbers describing the node position in any context. We certainly could have retrieved the data as lft , rgt , Text, et cetera, instead of building the path enumeration in the database, but the logic for matching parents to children in C# would have been somewhat hairier. Any node can get its immediate children from the TreeNode table with
|
1 2 3 |
SELECT * FROM TREENODE WHERE lft > @lft AND rgt < @rgt AND @LEVEL + 1 = (SELECT COUNT(*) FROM TreeNode anc WHERE anc.lft < TREENODE.lft AND anc.rgt > TREENODE.rgt ) |
where @lft is the node’s lft value and @rgt is the node’s rgt value, and @LEVEL is the number of the node’s ancestors, or
|
1 |
SELECT COUNT(*) FROM TreeNode anc WHERE anc.lft < @lft AND anc.rgt > @rgt |
but you can see that that’s starting to become a large number of database round-trips. This is why we’re getting all the nodes at once.
Or, nearly. There’s a hidden feature in the code as written that lets you start your tree from any node. Wiring that in to the front-end code is left as an exercise to the reader.
With a principle of reducing impact on data resources in mind, you might prefer to load the data into a detached data set and close the connection before doing anything else at all. However, in this case, all that’s being done is the building of a number of ArrayList objects — there’s little faster. Building the hierarchy of SQLTreeNodeData objects as you navigate the open cursor is not even necessarily more demanding that the construction of an offline DataSet would be.
Our only remaining component to provide a data source for a TreeView is the DataSource itself. So…
|
1 2 3 4 5 6 7 8 9 10 11 12 13 14 15 16 17 18 19 20 21 22 23 24 25 26 27 28 29 30 31 32 33 34 35 36 37 38 39 40 |
using System.Web.UI; namespace SQLTreeView { /**Data Source for the SQLTreeNodeView */ public class SQLTreeNodeDataSource : HierarchicalDataSourceControl { private SQLTreeNodeView _view = null; /** Returns a SQLTreeNodeView object providing access to * Select functionality for the SQLTreeNode objects descending from the * given path * @rootnodepath the path from which returned nodes descend; if set to * null, all nodes are returned */ protected override HierarchicalDataSourceView GetHierarchicalView(string rootnodepath) { if (null == _view) { _view = new SQLTreeNodeView(rootnodepath); } else if (_view.RootNodePath != rootnodepath) { _view.RootNodePath = rootnodepath; } return _view; } /** Overriding HierarchicalDataSourceControl.CreateControlCollection * allows the TreeView to attach to the DataSouce in the aspx page, * which simplifies data binding immensely */ protected override ControlCollection CreateControlCollection() { return new ControlCollection(this); } /** Return the last data set to be constructed */ public HierarchicalEnumerable LastReturned { get { return _view == null ? null : _view.LastReturned; } } } } |
We now have a HierarchicalDataSourceControl object that can be used declaratively, so let’s take advantage of that.
The Front End Bit
With a registered and included SQLTreeNodeDataSource control, my aspx page now looks like
|
1 2 3 4 5 6 7 8 9 10 11 12 13 14 15 16 17 18 19 |
<%@ Page Language="C#" AutoEventWireup="true" CodeBehind="SQLTreeNodeDemonstration.aspx.cs" Inherits="SQLTreeView.SQLTreeNodeDemonstration" %> <%@ Register Assembly="SQLTreeView" Namespace="SQLTreeView" TagPrefix="stv" %> <!DOCTYPE html PUBLIC "-//W3C//DTD XHTML 1.0 Transitional//EN" "http://www.w3.org/TR/xhtml1/DTD/xhtml1-transitional.dtd"> <html xmlns="http://www.w3.org/1999/xhtml" > <head runat="server"> <title>SQLTreeNodeDataSource Demonstration</title> </head> <body> <form id="frm" runat="server"> <stv:SQLTreeNodeDataSource runat="server" id="tds" /> <div> <asp:TreeView ID="tvw" runat="server" DataSourceID="tds"/> </div> </form> </body> </html> |
All that’s left, really, is to bind the SQLTreeNodeData fields to TreeNode properties, which we do through a property page on the TreeView called DataBindings.
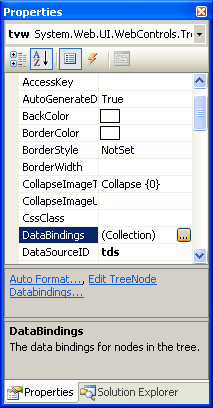
Figure 3… Property Page for the TreeView Control
Click on the ellipses in the Property Page for the TreeView to launch the TreeViewDataBindingsEditor.
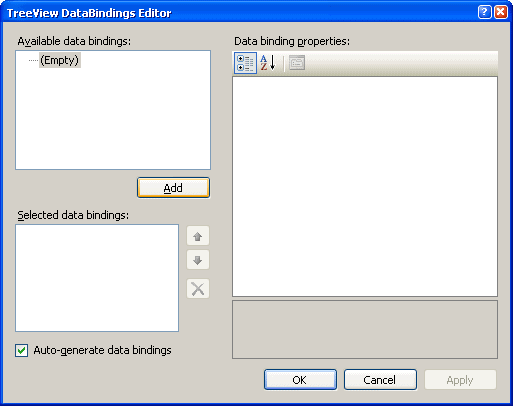
Figure 4…TreeViewDataBindings Editor
Click the ‘Add’ button to create a TreeViewDataBindings object.
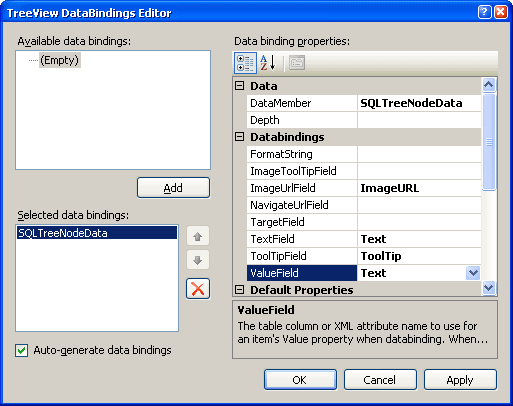
Figure 5… TreeViewBindings Editor with bindings defined
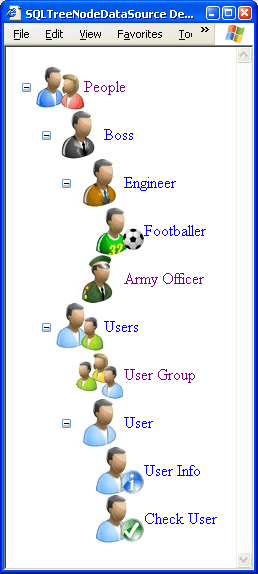
Figure 6… ASPX page showing TreeView
with HierarchicalDataSourceControl
Populate the fields of the new TreeViewDataBindings. The DataMember field should be the return value of the ‘Type’ property of the SQLTreeNodeData objects. This can be useful as a filter, but as I’ve implemented it each object just returns the class name, so this field could just as well be left blank. The ImageUrlField, TextField and ValueField have the obvious mappings, and the ValueField is set to text so as to enable the Find method for nodes. This is also why it was so important that we use a declarative data source with DataSourceID instead of programmatically setting the DataSource property of the TreeView — Find does not work otherwise, and we are going to need it to. Not to foreshadow.
You now have a working TreeView based on hierarchical data stored as nested sets in the database.
We should take a moment to savor this before addressing that nagging feeling that we’ve defined a column and returned it in our stored procedure without displaying it on the page.
Adding Checkboxes
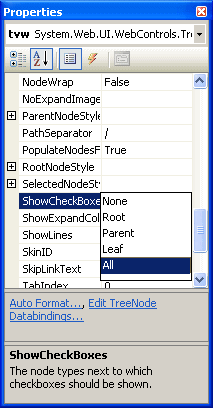
Figure 7: ShowCheckBoxes property of
the TreeView control
There comes a time in every .NET implementation — or at least every one I have done to date — where patiently sorting out how to connect all the plumbing to meet your specified requirements suddenly blows up into a red-eyed tragicomedy. One day you’re tending sheep for Laban, then suddenly you’re taking blows to your hip socket in a tent at Peniel.
And so it is with checkboxes. You can show them easily enough by setting ‘ShowCheckBoxes’ to Leaf, All or whatever you please.
The difficulties — or ‘opportunities for excellence’ — start to come when you try to do things like handle OnCheck events, or even set them to checked. I will show you how to do the latter here. The former is still beyond my reach.
OnDataBound
.NET data-bound controls provide ‘OnDataBinding’ and ‘OnDataBound’ events, to modify states before or after a control updates itself with retrieved data respectively. We can implement any event handler by clicking through the event part of the property page.
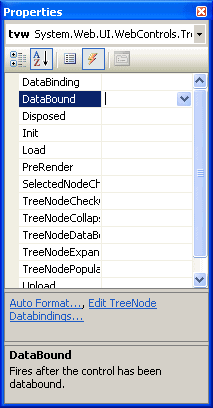
Figure 8… Event handlers for the TreeView control
Triple click in the method name field for the DataBound event handler, and Visual Studio 2005 will create the handler and give it focus in the code editor.
|
1 2 3 4 5 6 7 8 9 10 11 12 13 14 15 16 17 18 19 20 21 22 23 24 25 26 27 28 29 30 31 32 |
using System; using System.Web.UI; namespace SQLTreeView { public partial class SQLTreeNodeDemonstration : System.Web.UI.Page { protected void tvw_DataBound(object sender, EventArgs e) { // get the last constructed data set from the data source HierarchicalEnumerable he = tds.LastReturned; foreach (SQLTreeNodeData tnd in he) { CheckBoxes(tnd); } } /** For each passed node and its descendants, check the corresponding * box if the Checked property is true */ protected void CheckBoxes(SQLTreeNodeData tnd) { // if Checked is True, find the corresponding TreeNode and check it /* Note that FindNode is expensive enough that * tvw.FindNode(tnd.Path).Checked = tnd.Checked * would be rather slower */ if (tnd.Checked) tvw.FindNode(tnd.Path).Checked = true; foreach (IHierarchyData ihd in tnd.GetChildren()) { CheckBoxes((SQLTreeNodeData)ihd); } } } } |
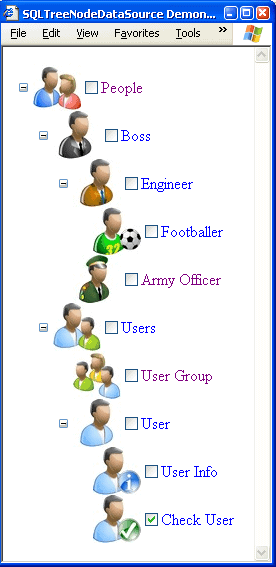
Figure 9… Displayed TreeView with checked state
from data
This justifies our LastReturned read-only HierarchicalEnumerable-valued property procedures for the SQLTreeNodeView and SQLTreeNodeDataSource objects. If we hadn’t get a copy of those objects when creating them for the TreeView’s consumption, we would have to return to the database to get the data again. Our other option would be to store the ‘Checked’ value in some otherwise irrelevant property, perhaps binding it with TargetField, but we have to realize that the days of storing obscure XML snippets in the tag property of controls are gone.
In any case, we have now succeeded in our task as set.
Thanks for reading, and I hope you enjoy your many .NET TreeView controls populated from nested sets!
Load comments