
Overview:
In this article, I’ll be demonstrating a method of automating the task of building and deploying SSIS projects via a PowerShell script. By deployment, I mean the process of setting up new software or making changes to existing software. The deployment pipeline usually involves several phases, including installation, configuration, running and testing.
Manual Deployment for SSIS:
SQL Server Integration Services only supports manual deployment using the SSDT designer. The “Integration services Deployment wizard’ is an add-on utility tool with Visual Studio to deploy the packages to a target server. Although this tool can also be executed from the command line, you need to have Visual Studio to use this wizard tool, which limits this approach.
It may seem reasonable to deploy SSIS applications manually, and certainly this may be true for simple applications that aren’t being actively developed. A team or an individual is responsible for the deployment end to end, and so becomes the subject matter expert on this topic over a period of time. However as the application becomes more complex, the deployment process becomes more tedious to maintain, and too intricate to become repeatable without introducing errors.
Deployment Automation:
Where you must deploy frequently and accurately, with reduced risk of human error and less reliance on individual expertise, then SSSIS deployments should be automated.
Advantages of Deployment Automation:
1) Align with Agile and DevOps principles of deploying as frequently as appropriate
To support Agile methodology, we should be able to deploy a fresh build to the test server after every sprint. It is relatively straightforward to deploy more frequently with the help of deployment automation.
2) Straightforward deployment to any target server
The details of the target server can be stored / passed as a parameter to the deployment automation process. The software can be deployed to the new target server with the help of simple configuration changes.
3) No manual mistakes
Once the deployment process has been defined correctly, then no manual intervention is needed. This increases the availability of the test server. In addition, the deployment can be done very frequently without impacting the development productivity.
4) Wider knowledge base about deployment methods
Once the deployment has been automated, the step-by-step details are available in a system or script, normally kept in source control. This eliminates the need for a subject matter expert to deploy the changes, as anyone in the team can support the deployment by running the script.
Deployment Automation for SSIS:
Unfortunately Visual Studio doesn’t support automation for SSIS deployment. Also there are no tools available in the market to achieve this. To deploy SSIS automatically, we need an alternative scripted approach to build and deploy the SSIS packages. In this article, we will learn to build and deploy using a PowerShell script.
This approach consists of three stages. In the first stage we will create a DLL to support the build process. The DLL will be used in the second stage to build the SSIS project using MSBuild.. Once the build has completed, this will create an ISPAC file for each SSIS project. In the third stage we will deploy the ISPAC file to the target server using PowerShell script.
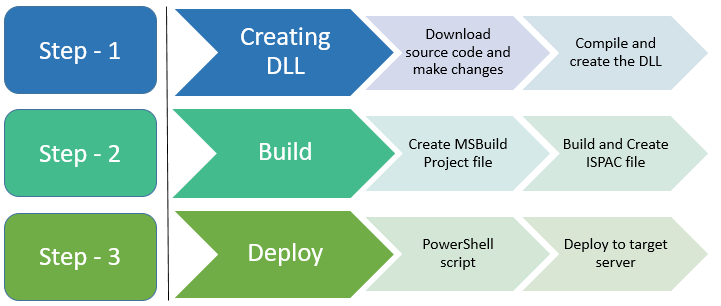
Step 1: Creating a DLL to support Build:
Before automating the build, let’s understand the mechanics behind the scene during the build process. Let’s understand the build process using the manual deployment.
In Visual Studio / SSDT designer, the process of building a SSIS project creates the ISPAC file in the bin\Development folder. The ISPAC file is a zip file which will contain the following files.
- All the packages available in the project
- Project parameters for the project
- Manifest file
- Content Type file
In the proposed solution, we will be building the SSIS package using MSBuild. By default, the MSBuild will not support building SSIS projects. We need to create a DLL to extend the capability of MSBuild to build the SSIS projects. Let’s first understand the basics of MSBuild and then I will explain the step by step procedure to create an assembly for MSBuild.
MSBuild overview:
MSBuild is a tool that is widely used in the industry to build windows applications. It uses an XML schema in the project file that specifies the execution of the MSBuild process.
Visual Studio hosts MSBuild to build managed projects. This is how the build and deployment process within Visual Studio works seamlessly. As we are focusing on ‘XCopy’ deployment, we want to build the SSIS projects using the MSBuild directly. Hence there is no need of Visual Studio on the build server.
Extending the capability of MSBuild for SSIS:
We need a microsoft.sqlserver.integrationservices.Build.dll (dynamic link library) file to build the SSIS project file using MSBuild. This is a one-off activity because once this has been created you can reuse the DLL for subsequent deployments. I’ll now describe how to download the source code and compile it to create the DLL.
Creating microsoft.sqlserver.integrationservices.Build.dll
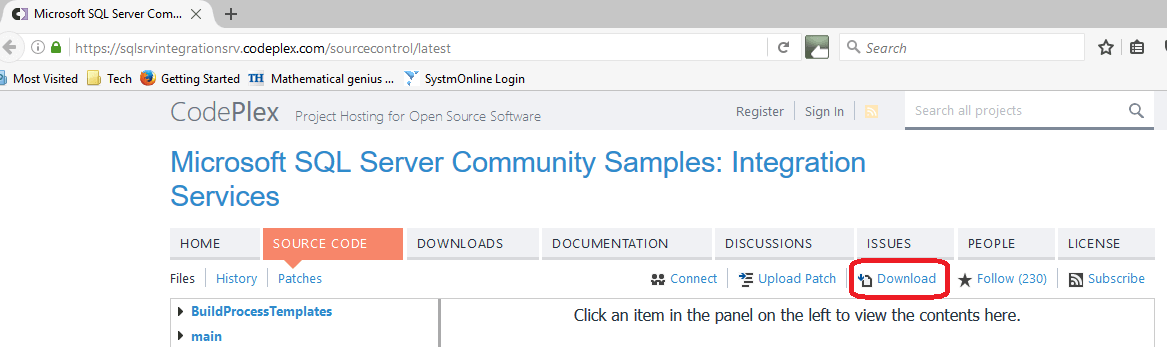
As a part of the community initiative, a member has created a CodePlex project which is hosted here (https://sqlsrvintegrationsrv.codeplex.com/sourcecontrol/latest). As we are each likely to use adifferent version of SQL Server and Visual Studio, it is highly recommended that you download the source code and build the DLL.
You can download the source code by clicking the “Download” button on the page. This has been highlighted in the picture below.
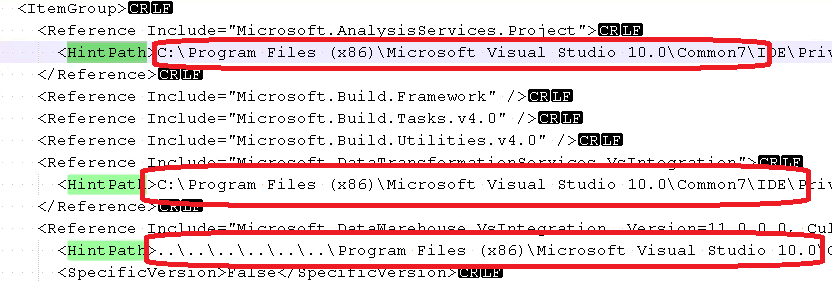
Once you have downloaded the source code from the above location you will need to adjust the properties that must be based on your local settings. Unfortunately, as it comes, the project will not compile, due to missing references and hardcoded paths.
Let’s extract the downloaded zip file into a folder and Open the \main\ssismsBuild\Project\microsoft.sqlserver.integrationservices.Build.csproj file in Visual studio. The screenshot below represents the project in Visual Studio. The invalid references and the files will be highlighted in yellow warning as per the image below.
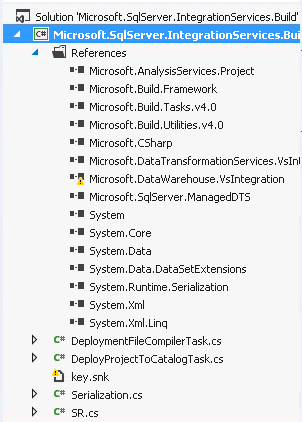
This is because the sample project has been created with hard-coded references. These references have to be updated as appropriate for installation on your machine, but this is easy to do.
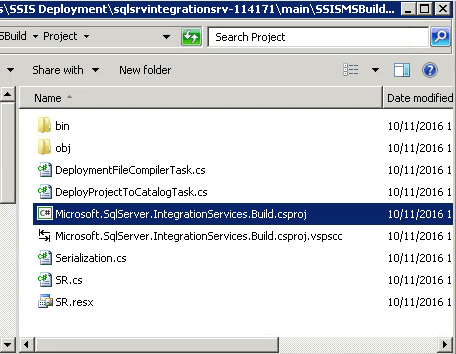
Find the Microsoft.SqlServer.IntegrationServices.Build.csproj file in the folder location you’ve unzipped to.
The project file can be edited in two ways. The first option is to use the Visual Studio to edit the project file. You have to unload the project first to edit the project file. You may select the project and choose the menu “Unload Project”. Once the project has been unloaded, now the project file can be edited using the menu item.
The second option is to use a text editor to open the project file and edit. I have chosen the note pad editor to edit the project file.
In the project file, we are going to update the highlighted section.
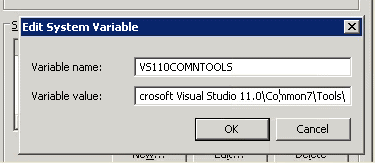
When we install SQL Server 2012, the Development SDK for Visual Studio will be installed in the Visual Studio shell. The system variable “VS110COMNTOOLS” contains the location of the Visual Studio installation folder. This screenshot shows the value of the system variable.
Replace the highlighted section with the system variable value. 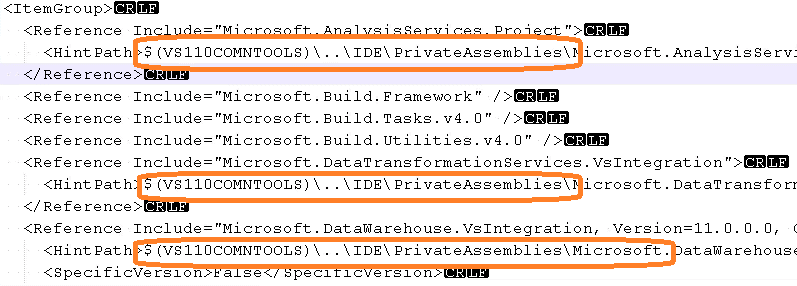
Once you have updated these, then save and close the project file. Now open the project file using Visual Studio and you will now notice that there are no warnings in the references section. As per the image below, now we have resolved all the invalid references.
But still we do see the warning for the key file. The assembly needs to be signed with a new file. So we can delete the existing key file.
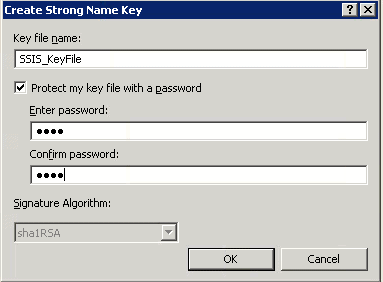
Now, select the project properties on Visual Studio. The screenshot below shows the project property for the SSIS project. Select the ‘Signing’ tab to sign the assembly. Now on the ‘Choose a strong name key file’ drop-down box, select the ‘New’ item. 
This will list another dialog box to collect the name of the file and the password. In following screenshot, ‘Key file name’ has been specified as ‘SSIS_KeyFile’.
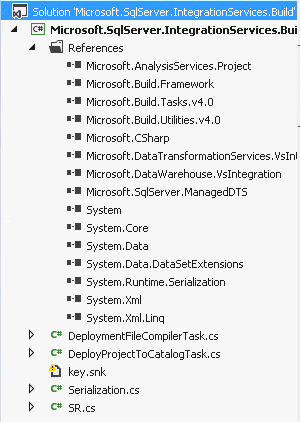
Once the assembly has been signed using this approach, the project is ready to build. The solution can be built using the ‘Build Solution’ from the ‘Build’ menu. After the completion of the build, you can expect to see the message “Build Succeeded” in the status bar.
Now the assembly (dll) is available in the location \main\SSISMSBuild\Project\bin\Debug\Microsoft.SqlServer.IntegrationServices.Build.dll.
This dll should be copied to the folder “C:\Program Files (x86)\Microsoft Visual Studio 10.0\Common7\IDE\PrivateAssemblies”
Now we have created the DLL and this can be used to extend the capability of the MSBuild. I recommend that you to check-in the source code into your source control repository so that it can be used for future purposes.
Step 2: Building the SSIS project:
Now we need to create an MSBuild project file. The MSBuild.exe will then make use of this MSBuild project file. This project file will link the MSBuild and the Integrationservices.dll to build and create an ISPAC file.
To do this, we create a new file ‘MSBuild_Script_For_SSIS.proj’ and copy into it the contents below.
|
1 2 3 4 5 6 7 8 9 10 11 12 13 14 15 16 17 |
<?xml version="1.0" encoding="Windows-1252"?> <Project xmlns="http://schemas.microsoft.com/developer/msbuild/2003" DefaultTargets="SSISBuild"> <!--Requires a property called $(SSISProj) to be defined when this script is called--> <UsingTask TaskName="DeploymentFileCompilerTask" AssemblyFile="C:\Program Files (x86)\Microsoft Visual Studio 10.0\Common7\IDE\PrivateAssemblies\Microsoft.SqlServer.IntegrationServices.Build.dll" /> <Target Name="SSISBuild" Condition="'$(SSISProj)' != ''"> <PropertyGroup> <SSISProjPath>..\$(SSISProj)\$(SSISProj).dtproj</SSISProjPath> </PropertyGroup> <Message Text="Building SSIS project: $(SSISProjPath) using the configuration: $(CONFIGURATION)........" /> <DeploymentFileCompilerTask InputProject="$(SSISProjPath)" Configuration="$(CONFIGURATION)" ProtectionLevel="DontSaveSensitive"> </DeploymentFileCompilerTask> </Target> </Project> |
Create a sample SSIS package:
I have created a sample “Staging.dtsx” package in the project “Sample SSIS_Project”. This package has a single “SQL Execute Task” to execute a SQL statement “Select GetDate()”. Now we can build this SSIS project using MSBuild and create an ISPAC file.

Build project using MSBuild
The developer command prompt for Visual Studio sets the environment variables that enable us to use .NET framework tools such MSBuild straight away. Hence I will be using the Developer command prompt for this purpose.
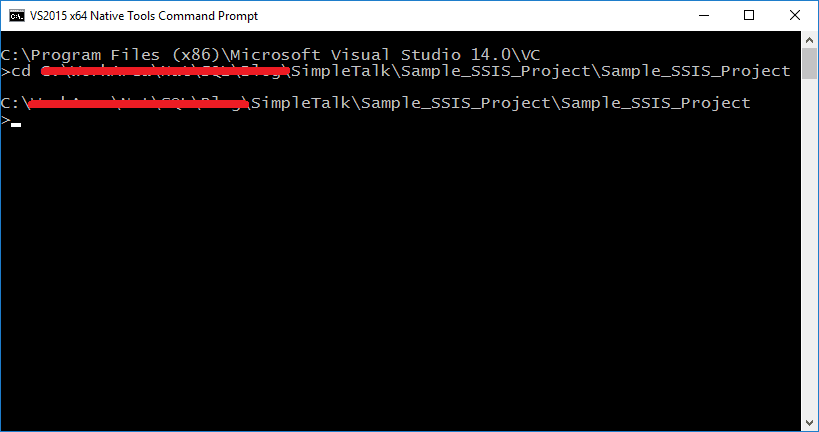
Open Visual studio command prompt, as per the picture below.
![]()
Once opened, change the directory to the location of the SSIS project folder, as show below in the image.
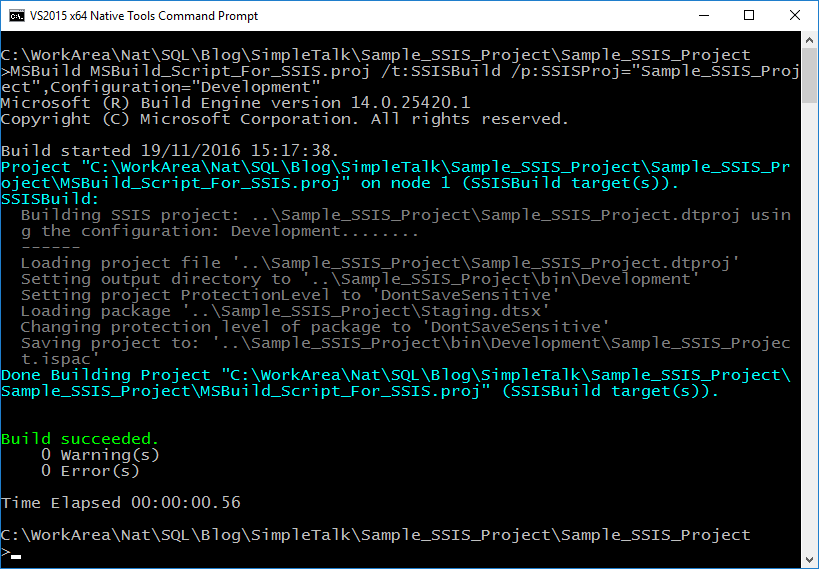
Now type the below mentioned script in the command prompt. This script will invoke MSBuild and pass a few arguments.
|
1 |
MSBuild MSBuild_Script_For_SSIS.proj /t:SSISBuild /p:SSISProj=”Sample_SSIS_Project”,Configuration=”Development” |
Details of the supplied parameters for the MSBuild script
- MSBuild_Script_For_SSIS.proj –MSBuild project file
- SSISBuild – Name of the target in the MSBuild project file
- SSISProj – Name of the SSIS project
- Configuration – Name of the configuration used in the SSIS project

This will successfully build the SSIS project. The resulting ISPAC file will be generated after the successful build.
The ISPAC file can be seen in the bin\development folder.
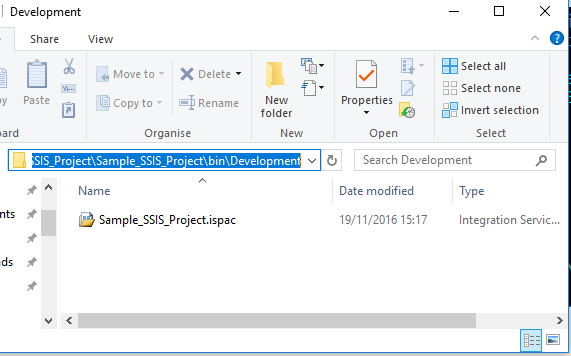
Now we have completed the “Build” for a SSIS project and the ISPAC file is ready to be deployed to the target server.
Step 3: Deploy ISPAC file to SSIS server:
I will be using the PowerShell script to deploy the ISPAC file to the server. The ISPAC file contains the SSIS project, Packages, Parameters and the manifest file. We must pass two arguments to the deployment utility: the Target Server and the SSIS folder name in the Catalog.
We’ll take deployment process step by step. I will use three PowerShell script examples to help illustrate the whole process.
In the first example, we will be able to access the server using PowerShell script. This script will help you to access the SSIS server from the PowerShell script.
Accessing the SQL Server Integration Services Server:
The below mentioned PowerShell Script will help us to access the SQL Server Integration service.
Pre-requisite:
I recommend that you should check whether these windows services are running on the target server before executing the PowerShell script
- SQL Server Service
- SQL Server Integration Services 11.0 (for SQL Server 2012)
With the help of PowerShell, we can access the methods and properties of SSIS catalog. The namespace “microsoft.sqlserver.management.integrationservices” contains the classes and interfaces that implement the functionality towards the administration of the Integration services. To enable us to refer the methods inside PowerShell script, we need to load the assembly first. This can be achieved by executing this code.
|
1 2 |
# Load the IntegrationServices Assembly [System.Reflection.Assembly]::LoadWithPartialName("Microsoft.SqlServer.Management.IntegrationServices") | Out-Null; |
This first script will help to test the connection with SQL Server Integration Services. If you encounter any issues while executing this script, you should check whether both services are running properly by accessing the server via SSMS.
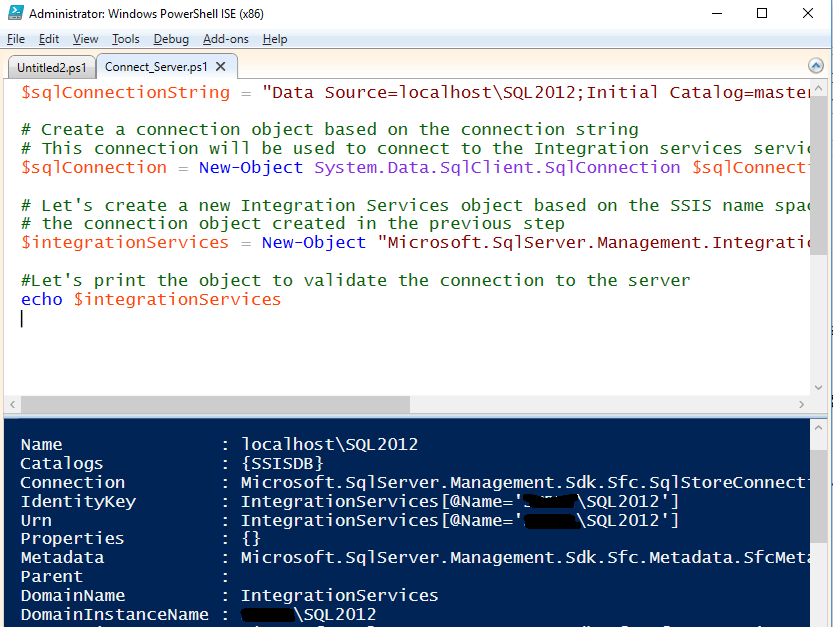
Script to test the connection:
|
1 2 3 4 5 6 7 8 9 10 11 12 13 14 15 |
$sqlConnectionString = "Data Source=localhost\SQL2012;Initial Catalog=master;Integrated Security=SSPI;" # Load the IntegrationServices Assembly [System.Reflection.Assembly]::LoadWithPartialName("Microsoft.SqlServer.Management.IntegrationServices") | Out-Null; # Create a connection object based on the connection string # This connection will be used to connect to the Integration services service $sqlConnection = New-Object System.Data.SqlClient.SqlConnection $sqlConnectionString # Let's create a new Integration Services object based on the SSIS name space and # the connection object created in the previous step $integrationServices = New-Object "Microsoft.SqlServer.Management.IntegrationServices.IntegrationServices" $sqlConnection #Let's print the object to validate the connection to the server echo $integrationServices |
The below mentioned picture highlights the output of the script. The PowerShell script will access SQL Server Integration Services and will print the details such as the name of the catalog and server name .
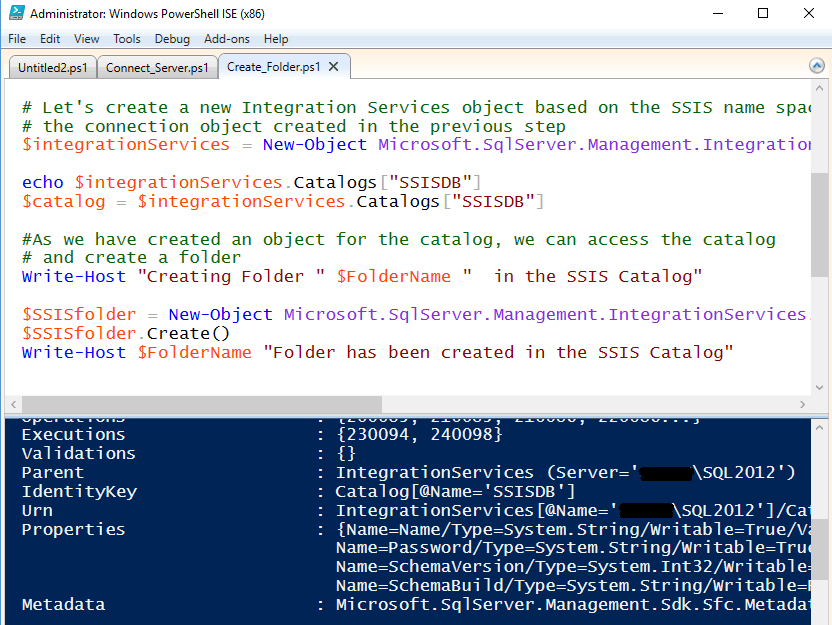
Creating a folder in SSIS Catalog
As a next step, let’s access the SSIS Catalog and create a folder so that we can deploy the SSIS project to this folder.
Here is the script to access the SSIS catalog and to create a folder. I have declared three variables in the script to store the connection details, Folder Name and the Folder description.
These details can be amended as per your server details.
|
1 2 3 4 5 6 7 8 9 10 11 12 13 14 15 16 17 18 19 20 21 22 23 24 25 |
$sqlConnectionString = "Data Source=localhost\SQL2012;Initial Catalog=master;Integrated Security=SSPI;" $FolderName = "SSIS Deploy Demo" $FolderDescription = "SSIS Deploy Demo" # Load the IntegrationServices Assembly [System.Reflection.Assembly]::LoadWithPartialName("Microsoft.SqlServer.Management.IntegrationServices") | Out-Null; # Create a connection object based on the connection string # This connection will be used to connect to the Integration services service $sqlConnection = New-Object System.Data.SqlClient.SqlConnection $sqlConnectionString # Let's create a new Integration Services object based on the SSIS name space and # the connection object created in the previous step $integrationServices = New-Object Microsoft.SqlServer.Management.IntegrationServices.IntegrationServices $sqlConnection echo $integrationServices.Catalogs["SSISDB"] $catalog = $integrationServices.Catalogs["SSISDB"] #As we have created an object for the catalog, we can access the catalog # and create a folder Write-Host "Creating Folder " $FolderName " in the SSIS Catalog" $SSISfolder = New-Object Microsoft.SqlServer.Management.IntegrationServices.CatalogFolder ($catalog, $FolderName, $FolderDescription) $SSISfolder.Create() Write-Host $FolderName "Folder has been created in the SSIS Catalog" |
The output of the PowerShell script can be seen below.
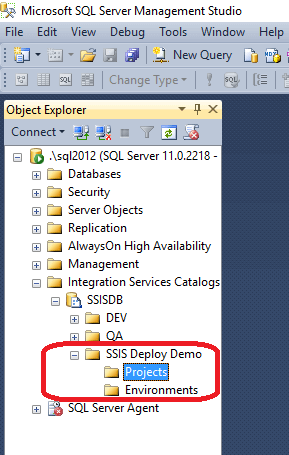
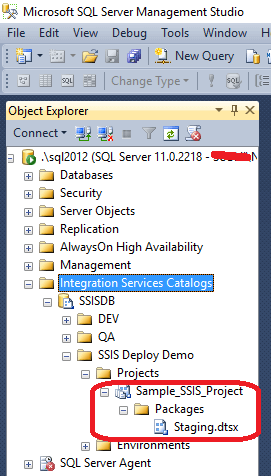
We can now check that the new folder “SSIS Deploy Demo” has been created under the SSIS catalog by opening SQL Server Management Studio and connecting to SQL Server. Once connected, we expand the section “Integration Services Catalogs” -> “SSISDB” to make sure that the project folder is there
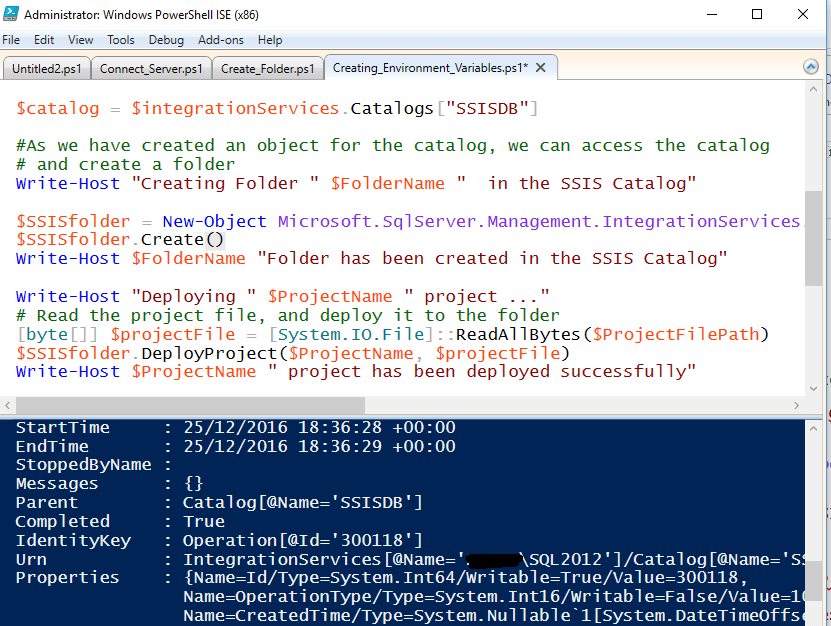
Deploying SSIS Project:
Once the folder has been created, we can make use of the folder object to deploy the project. This can be done by accessing the DeployProject function in the folder. This function accepts two parameters, the Project Name and the Location of the ISPAC file.
This script will connect to the server and create a folder. Finally the supplied ISPAC file will be deployed to the target SSIS Catalog.
Script:
|
1 2 3 4 5 6 7 8 9 10 11 12 13 14 15 16 17 18 19 20 21 22 23 24 25 26 27 28 29 30 31 32 33 34 35 36 |
$ProjectFilePath = "C:\WorkArea\Nat\SQL\Blog\SimpleTalk\Sample_SSIS_Project\Sample_SSIS_Project\bin\Development\Sample_SSIS_Project.ispac" $ProjectName = "Sample_SSIS_Project" $EnvironmentName = "CustomerA" $sqlConnectionString = "Data Source=localhost\SQL2012;Initial Catalog=master;Integrated Security=SSPI;" $FolderName = "SSIS Deploy Demo" $FolderDescription = "SSIS Deploy Demo" # Load the IntegrationServices Assembly [System.Reflection.Assembly]::LoadWithPartialName("Microsoft.SqlServer.Management.IntegrationServices") | Out-Null; # Create a connection object based on the connection string # This connection will be used to connect to the Integration services service $sqlConnection = New-Object System.Data.SqlClient.SqlConnection $sqlConnectionString # Let's create a new Integration Services object based on the SSIS name space and # the connection object created in the previous step $integrationServices = New-Object Microsoft.SqlServer.Management.IntegrationServices.IntegrationServices $sqlConnection echo $integrationServices.Catalogs["SSISDB"] $catalog = $integrationServices.Catalogs["SSISDB"] #As we have created an object for the catalog, we can access the catalog # and create a folder Write-Host "Creating Folder " $FolderName " in the SSIS Catalog" $SSISfolder = New-Object Microsoft.SqlServer.Management.IntegrationServices.CatalogFolder ($catalog, $FolderName, $FolderDescription) $SSISfolder.Create() Write-Host $FolderName "Folder has been created in the SSIS Catalog" Write-Host "Deploying " $ProjectName " project ..." # Read the project file, and deploy it to the folder [byte[]] $projectFile = [System.IO.File]::ReadAllBytes($ProjectFilePath) $SSISfolder.DeployProject($ProjectName, $projectFile) Write-Host $ProjectName " project has been deployed successfully" |
Deploy SSIS Project Output:
Here is the output of this PS script we’ve just run.
And we can use SSMS to check that the deployed project and the package are there.
Scope for Improvement:
This PowerShell script will help us to deploy a single SSIS project with multiple packages. However an ETL solution may contain numerous SSIS projects with many more packages. PowerShell has various cmdlets to interact with folder and files, so we can use the PowerShell script cmdlets to loop thru the available SSIS projects in a folder. Now each SSIS project name can be passed to the PowerShell script to deploy into the target server. Using this approach, we can deploy multiple SSIS projects using a single PowerShell script.
You can extend this functionality further by maintaining various server connection details in an XML file. This XML file can be read in the PowerShell script and the SSIS project can be deployed to a suitable target server (Dev, Test, UAT, etc).
Summary:
The script we’ve described here will help you to build and deploy an SSIS project using common tools that are available to a developer. This deployment can be done through the command line, so this end-to-end process can easily be integrated with any Continuous Integration tools. I recommend you to try out this approach on a Sandbox machine in the development area. Once you have this working as you’d expect, you can then extend this to other servers.
Reference:
Deployment Automation:
https://www.red-gate.com/blog/database-lifecycle-management/5-big-benefits-automated-deployment
Manual Deployment using SSDT
https://www.simple-talk.com/sql/ssis/ssis-2012-projects-setup-project-creation-and-deployment/
SSIS Deployment Reference from Matt Masson
http://www.mattmasson.com/2012/06/publish-to-ssis-catalog-using-powershell/
Load comments