
SSIS (SQL Server Integration Services) projects are deployed as .ispac files (zipped SSIS project packages) to the SSISDB catalog in a SQL Server instance. Visual Studio’s deployment wizard handles a single project interactively, while automated deployment of multiple projects requires PowerShell.
This article walks through PowerShell automation, covering the following:
- How to load the IntegrationServices assembly (Microsoft.SqlServer.Management.IntegrationServices);
- How to connect to the SSISDB catalog;
- How to iterate .ispac files in a folder or project list;
- How to deploy each via the Catalog.DeployProject method;
- How to configure environments, environment references, and project parameters programmatically.
Common use cases include CI/CD pipeline deployment steps, migration between environments (Dev → Test → Prod), and bulk deployment in DBA automation.
PowerShell-based deployment supports the full SSISDB configuration surface – folders, environments, environment variables, project-parameter overrides, and server-level properties – giving you programmatic control equivalent to what Visual Studio’s deployment wizard provides. Integrates cleanly with Azure DevOps, AppVeyor, GitHub Actions, and Jenkins pipelines.
Overview
This article describes a way of using PowerShell to deploy multiple SSIS projects as part of a database or data warehouse deployment. It contains code snippets to illustrate some of the details, and so you can amend it for similar requirements if necessary.
System Integration Test
This set of scripts were developed in order to automate the process of setting up a test cell to verify the build via a System integration test. It was done to ensure that all the dependencies between several SSIS projects for the Data Warehouse systems were all accounted for.
Before each test run, the entire Data Warehouse system was provisioned afresh within the SIT test environment.
Solution Overview
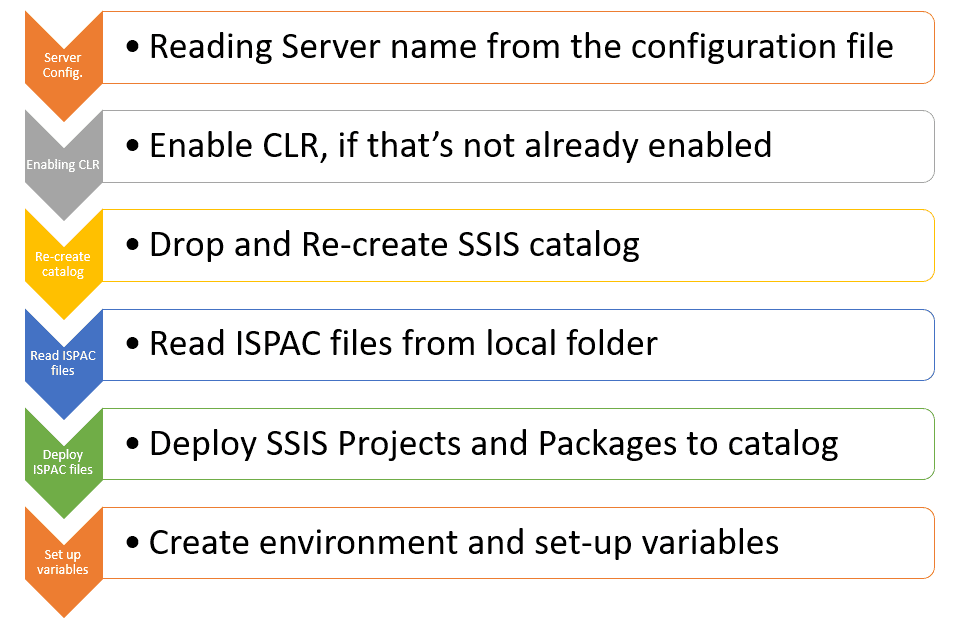
In this solution, I will explain how to develop a PowerShell script to deploy multiple SSIS projects / packages. You can use the script straight away to deploy the SSIS artefacts in a test environment. I recommend that you to read all the steps detailed in the article before you do so, and understand the consequence. If required, you may modify the script based on usage. This script has six steps to complete.
What is expected from the script ?
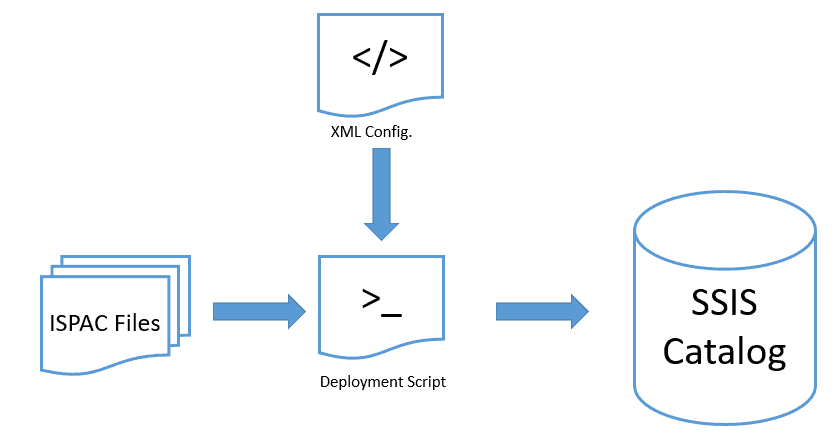
The deployment script will read the Server configuration details (XML) and then deploy the Integration Services Project Deployment (ISPAC) files to the target SSIS server. The server configuration file is an XML file which contains server names for several test environments. This script can be used to deploy the ISPAC files to other test environments such as System Unit Test, System Integration test and Regression Test environments.
Solution in Detail
The screenshot below represents the steps involved at very high level.
Assumptions
We’ll assume that the reader is already aware of the SSIS build automation which is detailed here, and that the reader has got fair understanding of PowerShell.
Step 1: Reading Server Details from a Configuration file
It is always a good idea to maintain the server details in a separate configuration file (an XML). This configuration file can keep the details that are specific to each environment. A sample XML configuration file has been created for demonstration purpose.
|
1 2 3 4 5 |
<Environments> <Environment Name="SIT" ServerInstance="Localhost\SQL2012" SourceFileLocation="\\Server\Data\Files"></Environment> <Environment Name="TST" ServerInstance="Localhost\TST2012" SourceFileLocation="\\TSTServer\Data\Files"></Environment> <Environment Name="RST" ServerInstance="Localhost\RST2012" SourceFileLocation="\\RSTServer\Data\Files"></Environment> </Environments> |
The file maintains the details for SIT, System test and regression test environments. For each environment, we are maintaining such details as the Environment name, Server Instance Name and Source File Location.
There are various advantages to maintaining the details in a separate file. The configuration file can be easily updated if there are any changes to the name of the server or any environment specific values. Also there is no need to change the code to update the environment-specific values.
This PowerShell script will read an XML configuration file and, based on the given target environment, will print the values.
|
1 2 3 4 5 6 7 8 9 10 11 12 |
$ConfigPath = "E: \Scripts\ServerConfig.xml"; $TargetEnvironment = "SIT" [xml]$file = Get-Content $ConfigPath $Environments = $file.SelectNodes("/Environments/Environment") Foreach ($Environment in $Environments) { If ($Environment.Name -eq $TargetEnvironment) { Write-Host $Environment.Name Write-Host $Environment.ServerInstance Write-Host $Environment.SourceFileLocation } |
Step 2: Enabling CLR in the server
You must enable the CLR on the SQL Server before you create the catalog on the SSIS server. The following section of the PowerShell script will do this.
|
1 2 3 4 5 6 7 8 9 |
$SQLServer = New-Object Microsoft.SQLServer.Management.SMO.Server .\SQL2012 $configuration = $SQLServer.Configuration $CLRValue = $SQLServer.Configuration.IsSqlClrEnabled Write-Host $CLRValue.ConfigValue If ($CLRValue.ConfigValue -eq 0) { Write-Host "Enabling CLR....." $CLRValue.ConfigValue = 1 $configuration.Alter() |
Step 3: Creating SSIS Catalog in SQL Server
As we are setting up a System Integration Test environment, we should first drop the existing SSIS catalog so as to ensure that the existing projects, packages and environment details are deleted completely.
However if we are planning to reuse the same script for other environments, we might want to comment out the relevant sections. This will help to keep the existing Catalog and deploy the SSIS projects.
This script has three variables that are used to store the values of the password for SQL Server and the SSIS Catalog. The SSIS catalog stores sensitive information such as the package password in the SSIS Catalog. Therefore we must protect the Catalog with a password.
This script will first check whether the CLR is enabled in the server. If not, then the PowerShell script will enable the CLR: Then it will connect to the SQL server. Once the connection has been established, the script will check for the presence of Catalogues in the server.
If the catalog is not available in the first place, then the script will continue to create a catalog on the target server, using the password supplied.
If the catalog is available, then it will raise a warning and it will drop the entire catalog. This means that all the available SSIS projects, packages and environments will be completely removed. You must decide whether this is appropriate in your environment. Once the catalog has been dropped, then it will recreate the Catalog.
Script to create SSIS catalog
|
1 2 3 4 5 6 7 8 9 10 11 12 13 14 15 16 17 18 19 20 21 22 23 24 25 26 27 28 29 30 31 32 33 34 35 36 37 38 39 40 41 42 |
$SQLServerInstance = "localhost\SQL2012" $SSISCatalogPassword = "PW0Rd4sSsIsCAt10g" $SQLServerConnectionString = "Data Source=$SQLServerInstance;Initial Catalog=master;Integrated Security=SSPI;" # Pre-Requisite - Enable CLR before creating catalog #Connect to SQL server and enable CLR, if this is not already enabled Write-Host "Enabling CLR on the SQL Server ...." $SQLServer = New-Object Microsoft.SQLServer.Management.SMO.Server $SQLServerInstance $configuration = $SQLServer.Configuration $CLRValue = $SQLServer.Configuration.IsSqlClrEnabled Write-Host $CLRValue.ConfigValue If ($CLRValue.ConfigValue -eq 0) { Write-Host "Enabling CLR on the server $SQLServerInstance" $CLRValue.ConfigValue = 1 $configuration.Alter() Write-Host "CLR enabled on the server $SQLServerInstance successfully" } # Loading IntegrationServices Assembly ......... [System.Reflection.Assembly]::LoadWithPartialName("Microsoft.SqlServer.Management.IntegrationServices") | Out-Null; # Store the value of IntegrationServices Assembly name in a string # This will avoid to re type the same string again and again $SSISNamespace = "Microsoft.SqlServer.Management.IntegrationServices" Write-Host "Trying to connect SQL Server...." # Create SQL Server connection based on the connection string $SQLServerConnection = New-Object System.Data.SqlClient.SqlConnection $SQLServerConnectionString Write-Host "SQL Server connection has been enabled successfully" # Create Integration Services object based on the SQL Server connection Write-Host "Trying to create a object for Integration Service...." $IntegrationServices = New-Object $SSISNamespace".IntegrationServices" $SQLServerConnection Write-Host "Integration service object has been created successfully" Write-Host "Dropping existing SSIS Catalog on the server $SQLServerInstance" # Drop the existing catalog if it exists if ($IntegrationServices.Catalogs.Count -gt 0) { Write-Host "Warning !, all the SSIS projects and Packages will be dropped...." $IntegrationServices.Catalogs["SSISDB"].Drop() Write-Host "Existing SSIS Catalog has been dropped successfully ." } Write-Host "Creating SSIS Catalog on the server $SQLServerInstance" $SSISCatalog = New-Object $SSISNamespace".Catalog" ($IntegrationServices, "SSISDB", $SSISCatalogPassword) $SSISCatalog.Create() Write-Host "SSIS Catalog has been created successfully on the server $SQLServerInstance" |
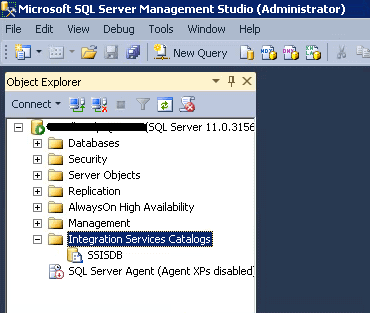
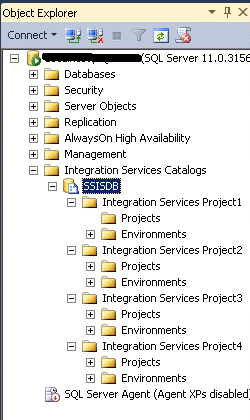
The screenshot below below confirms that the SSIS catalog has been created successfully.
Step 4: Reading ISPAC files from folder
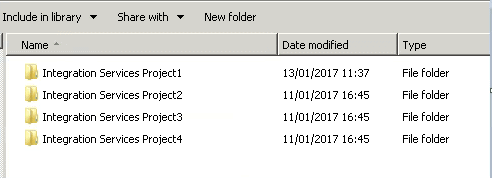
The scripts is written with the assumption that the Data Warehouse solution has many SSIS projects and these are stored in many folders. The screenshot below shows several SSIS projects, each in its own folder.
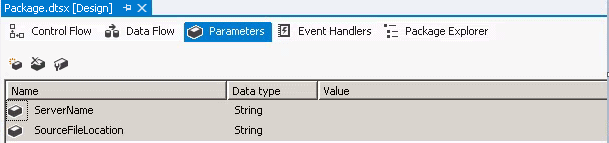
In addition, each SSIS package has two package parameters called ServerName and SourceFileLocation.
Listing SSIS Project files
Now we need to find the name and location of the ISPAC file in the folder. This PowerShell script will loop through the given folder and will list out the name of the ISPAC file and its full path. In later stage this code snippet will be integrated into the main code.
Script to print the project files in a given folder
|
1 2 3 4 5 6 7 8 9 10 11 12 13 14 |
$SSISFolder = "C:\WorkArea\ SSIS" # Look for SSIS ISPAC file (with extension .ISPAC) and return the # name of the SSIS ISPAC file and the directory full path $SSISISPACFiles = Get-ChildItem $SSISFolder -Recurse -Filter "*.ispac" Foreach ($SSISISPACFile in $SSISISPACFiles) { #Name of the SSIS ISPAC file , will be used to create SSIS folder $SSISFolerName = $SSISISPACFile.BaseName; #The name of the directory will be used to locate the ISPAC file $SSISISPACFile.FullName; Write-Host $SSISISPACFile.BaseName; #Name of the ISPAC file Write-Host $SSISISPACFile.FullName; # ISPAC file full path } |
Creating SSIS Projects in the Catalog
In this step, we will be integrating the code from the previous step. The PowerShell script will help us to drop the existing catalog and create a new catalog. Then the script will search for the SSIS project files in the given folder. Once found, the name of the SSIS project file will be used to create a folder in the SSIS Catalog. As each and every project need to be deployed to a separate folder this setup will help.
In addition, the full location of the folder will also be stored in a separate variable. This folder location will be used to derive the full path for the ISPAC file in the next step.
Script to read ISPAC files and to create a folders in the SSIS catalog
|
1 2 3 4 5 6 7 8 9 10 11 12 13 14 15 16 17 18 19 20 21 22 23 24 25 26 27 28 29 30 31 32 33 34 35 36 37 38 39 40 41 42 43 44 45 46 47 48 49 50 51 52 53 54 55 56 57 |
$SQLServerInstance = "localhost\SQL2012" $SSISCatalogPassword = "PW0Rd4sSsIsCAt10g" $SQLServerConnectionString = "Data Source=$SQLServerInstance;Initial Catalog=master;Integrated Security=SSPI;" # Pre-Requisite - Enable CLR before creating catalog #Connect to SQL server and enable CLR, if this is not already enabled Write-Host "Enabling CLR on the SQL Server ...." $SQLServer = New-Object Microsoft.SQLServer.Management.SMO.Server $SQLServerInstance $configuration = $SQLServer.Configuration $CLRValue = $SQLServer.Configuration.IsSqlClrEnabled Write-Host $CLRValue.ConfigValue If ($CLRValue.ConfigValue -eq 0) { Write-Host "Enabling CLR on the server $SQLServerInstance" $CLRValue.ConfigValue = 1 $configuration.Alter() Write-Host "CLR enabled on the server $SQLServerInstance successfully" } # Loading IntegrationServices Assembly ......... [System.Reflection.Assembly]::LoadWithPartialName("Microsoft.SqlServer.Management.IntegrationServices") | Out-Null; # Store the value of IntegrationServices Assembly name in a string # This will avoid to re type the same string again and again $SSISNamespace = "Microsoft.SqlServer.Management.IntegrationServices" Write-Host "Trying to connect SQL Server...." # Create SQL Server connection based on the connection string $SQLServerConnection = New-Object System.Data.SqlClient.SqlConnection $SQLServerConnectionString Write-Host "SQL Server connection has been enabled successfully" # Create Integration Services object based on the SQL Server connection Write-Host "Trying to create a object for Integration Service...." $IntegrationServices = New-Object $SSISNamespace".IntegrationServices" $SQLServerConnection Write-Host "Integration service object has been created successfully" Write-Host "Dropping existing SSIS Catalog on the server $SQLServerInstance" # Drop the existing catalog if it exists if ($IntegrationServices.Catalogs.Count -gt 0) { Write-Host "Warning !, all the SSIS projects and Packages will be dropped...." $IntegrationServices.Catalogs["SSISDB"].Drop() Write-Host "Existing SSIS Catalog has been dropped successfully ." } Write-Host "Creating SSIS Catalog on the server $SQLServerInstance" $SSISCatalog = New-Object $SSISNamespace".Catalog" ($IntegrationServices, "SSISDB", $SSISCatalogPassword) $SSISCatalog.Create() Write-Host "SSIS Catalog has been created successfully on the server $SQLServerInstance" $SSISFolder = "C:\WorkArea\ SSIS" # Look for SSIS ISPAC file (with extension .ISPAC) and return the # name of the SSIS ISPAC file and the directory full path $SSISISPACFiles = Get-ChildItem $SSISFolder -Recurse -Filter "*.ispac" Foreach ($SSISISPACFile in $SSISISPACFiles) { #Name of the SSIS ISPAC file , will be used to create SSIS folder $SSISFolerName = $SSISISPACFile.BaseName; #The name of the directory will be used to locate the ISPAC file $SSISDirectory = $SSISISPACFile.FullName; Write-Host "Creating the directory $SSISFolerName in the SSIS Catalog........" $SSISFolderInCatalog = New-Object $SSISNamespace".CatalogFolder" ($SSISCatalog, $SSISFolerName, $SSISFolerName) $SSISFolderInCatalog.Create() Write-Host "The directory $SSISFolerName has been successfully created in the SSIS Catalog........" } |
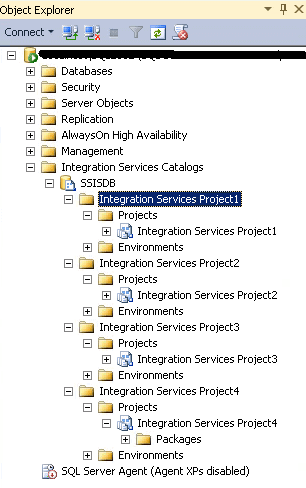
The screenshot below confirms that folder has been created for each SSIS project.
Step 5: Deploy ISPAC files to SSIS catalog
This step integrates all the steps mentioned above (Step 1, Step 2 & Step3)
In this step the script will read the available ISPAC file for each SSIS project. The ISPAC file will be read into a Byte array variable and then the file will be deployed into the SSIS Catalog.
Script to deploy ISPAC files to the SSIS catalog
|
1 2 3 4 5 6 7 8 9 10 11 12 13 14 15 16 17 18 19 20 21 22 23 24 25 26 27 28 29 30 31 32 33 34 35 36 37 38 39 40 41 42 43 44 45 46 47 48 49 50 51 52 53 54 55 56 57 58 59 60 61 62 63 64 65 66 |
$SQLServerInstance = "localhost\SQL2012" $SSISCatalogPassword = "PW0Rd4sSsIsCAt10g" $SQLServerConnectionString = "Data Source=$SQLServerInstance;Initial Catalog=master;Integrated Security=SSPI;" # Pre-Requisite - Enable CLR before creating catalog #Connect to SQL server and enable CLR, if this is not already enabled Write-Host "Enabling CLR on the SQL Server ...." $SQLServer = New-Object Microsoft.SQLServer.Management.SMO.Server $SQLServerInstance $configuration = $SQLServer.Configuration $CLRValue = $SQLServer.Configuration.IsSqlClrEnabled Write-Host $CLRValue.ConfigValue If ($CLRValue.ConfigValue -eq 0) { Write-Host "Enabling CLR on the server $SQLServerInstance" $CLRValue.ConfigValue = 1 $configuration.Alter() Write-Host "CLR enabled on the server $SQLServerInstance successfully" } # Loading IntegrationServices Assembly ......... [System.Reflection.Assembly]::LoadWithPartialName("Microsoft.SqlServer.Management.IntegrationServices") | Out-Null; # Store the value of IntegrationServices Assembly name in a string # This will avoid to re type the same string again and again $SSISNamespace = "Microsoft.SqlServer.Management.IntegrationServices" Write-Host "Trying to connect SQL Server...." # Create SQL Server connection based on the connection string $SQLServerConnection = New-Object System.Data.SqlClient.SqlConnection $SQLServerConnectionString Write-Host "SQL Server connection has been enabled successfully" # Create Integration Services object based on the SQL Server connection Write-Host "Trying to create a object for Integration Service...." $IntegrationServices = New-Object $SSISNamespace".IntegrationServices" $SQLServerConnection Write-Host "Integration service object has been created successfully" Write-Host "Dropping existing SSIS Catalog on the server $SQLServerInstance" # Drop the existing catalog if it exists if ($IntegrationServices.Catalogs.Count -gt 0) { Write-Host "Warning !, all the SSIS projects and Packages will be dropped...." $IntegrationServices.Catalogs["SSISDB"].Drop() Write-Host "Existing SSIS Catalog has been dropped successfully ." } Write-Host "Creating SSIS Catalog on the server $SQLServerInstance" $SSISCatalog = New-Object $SSISNamespace".Catalog" ($IntegrationServices, "SSISDB", $SSISCatalogPassword) $SSISCatalog.Create() Write-Host "SSIS Catalog has been created successfully on the server $SQLServerInstance" $SSISFolder = "C:\WorkArea\SSIS" # Look for SSIS ISPAC file (with extension .ISPAC) and return the # name of the SSIS ISPAC file and the directory full path $SSISISPACFiles = Get-ChildItem $SSISFolder -Recurse -Filter "*.ispac" Foreach ($SSISISPACFile in $SSISISPACFiles) { #Name of the SSIS ISPAC file , will be used to create SSIS folder $SSISFolerName = $SSISISPACFile.BaseName; #The name of the directory will be used to locate the ISPAC file $SSISDirectory = $SSISISPACFile.FullName; Write-Host "Creating the directory $SSISFolerName in the SSIS Catalog........" $SSISFolderInCatalog = New-Object $SSISNamespace".CatalogFolder" ($SSISCatalog, $SSISFolerName, $SSISFolerName) $SSISFolderInCatalog.Create() Write-Host "The directory $SSISFolerName has been successfully created in the SSIS Catalog........" #Build the ISPAC file path from the SSIS directory path $ISPACFilePath = $SSISISPACFile.FullName Write-Host "Deploying " $SSISFolerName " project ..." # the ISPAC file will be read into a variable for deployment [byte[]]$ISPACFile = [System.IO.File]::ReadAllBytes($ISPACFilePath) $SSISFolderInCatalog.DeployProject($SSISFolerName, $ISPACFile) Write-Host $SSISFolerName " project has been deployed successfully" } |
The screenshot below confirms that all the SSIS projects have been deployed successfully.
Step 6: Setting up Environment for SSIS catalog
Creating an Environment for the SSIS Project
This step will help us to create an environment for each SSIS Project and will assign the environment to the project. This consists of three parts. In the first part, we will be creating an environment for the SSIS project. In the second part, a set of Environment variables will be added to the Environment. In the last part, the SSIS project variable will be referenced to the Environment variable.
An environment object can be created with the help of the EnvironmentInfo in the SSIS Integration assembly by passing the Folder name, Environment name and description.
Adding variables to the environment
Once an environment has been created, then variables can be added to it. A variable can be added by accessing the Variables.Add method by passing the arguments we’ll mention soon.
The Add methods accept variable name, datatype, default value, sensitivity and description as parameters.
Referencing the environment variables to SSIS Project
The last step will create an environment with variables. Now in this step, we will see a procedure to add the environment to the SSIS project.
First the SSIS project has to be referenced to a variable using the Projects method in the catalog, by passing the SSIS project name. Now the environment can be linked by accessing the References.Add method and by passing the EnvironmentName.
Setting up package parameters using environment name
Now we can make use of the environment variables to link with the package parameters.
The SSIS package has to be referenced to a local variable. Now the parameters method on the SSIS package can be used to link the Package parameter to the environment variable.
Script to create SSIS environment and setting up variables
|
1 2 3 4 5 6 7 8 9 10 11 12 13 14 15 16 17 18 19 20 21 22 23 24 25 26 27 28 29 30 31 32 33 34 35 36 37 38 39 40 41 42 43 44 45 46 47 48 49 50 51 52 53 54 55 56 57 58 59 60 61 62 63 64 65 66 67 68 69 70 71 72 73 74 75 76 77 78 79 80 81 82 83 84 85 86 87 88 89 90 91 92 93 94 95 |
$SQLServerInstance = "localhost\SQL2012" $SSISCatalogPassword = "PW0Rd4sSsIsCAt10g" $SQLServerConnectionString = "Data Source=$SQLServerInstance;Initial Catalog=master;Integrated Security=SSPI;" $EnvironmentName = "SIT" # Pre-Requisite - Enable CLR before creating catalog #Connect to SQL server and enable CLR, if this is not already enabled Write-Host "Enabling CLR on the SQL Server ...." $SQLServer = New-Object Microsoft.SQLServer.Management.SMO.Server $SQLServerInstance $configuration = $SQLServer.Configuration $CLRValue = $SQLServer.Configuration.IsSqlClrEnabled Write-Host $CLRValue.ConfigValue If ($CLRValue.ConfigValue -eq 0) { Write-Host "Enabling CLR on the server $SQLServerInstance" $CLRValue.ConfigValue = 1 $configuration.Alter() Write-Host "CLR enabled on the server $SQLServerInstance successfully" } # Loading IntegrationServices Assembly ......... [System.Reflection.Assembly]::LoadWithPartialName("Microsoft.SqlServer.Management.IntegrationServices") | Out-Null; # Store the value of IntegrationServices Assembly name in a string # This will avoid to re type the same string again and again $SSISNamespace = "Microsoft.SqlServer.Management.IntegrationServices" Write-Host "Trying to connect SQL Server...." # Create SQL Server connection based on the connection string $SQLServerConnection = New-Object System.Data.SqlClient.SqlConnection $SQLServerConnectionString Write-Host "SQL Server connection has been enabled successfully" # Create Integration Services object based on the SQL Server connection Write-Host "Trying to create a object for Integration Service...." $IntegrationServices = New-Object $SSISNamespace".IntegrationServices" $SQLServerConnection Write-Host "Integration service object has been created successfully" Write-Host "Dropping existing SSIS Catalog on the server $SQLServerInstance" # Drop the existing catalog if it exists if ($IntegrationServices.Catalogs.Count -gt 0) { Write-Host "Warning !, all the SSIS projects and Packages will be dropped...." $IntegrationServices.Catalogs["SSISDB"].Drop() Write-Host "Existing SSIS Catalog has been dropped successfully ." } Write-Host "Creating SSIS Catalog on the server $SQLServerInstance" $SSISCatalog = New-Object $SSISNamespace".Catalog" ($IntegrationServices, "SSISDB", $SSISCatalogPassword) $SSISCatalog.Create() Write-Host "SSIS Catalog has been created successfully on the server $SQLServerInstance" $SSISFolder = "C:\WorkArea\SSIS" # Look for SSIS ISPAC file (with extension .ISPAC) and return the # name of the SSIS ISPAC file and the directory full path $SSISISPACFiles = Get-ChildItem $SSISFolder -Recurse -Filter "*.ispac" Foreach ($SSISISPACFile in $SSISISPACFiles) { #Name of the SSIS ISPAC file , will be used to create SSIS folder $SSISFolerName = $SSISISPACFile.BaseName; #The name of the directory will be used to locate the ISPAC file $SSISDirectory = $SSISISPACFile.FullName; Write-Host "Creating the directory $SSISFolerName in the SSIS Catalog........" $SSISFolderInCatalog = New-Object $SSISNamespace".CatalogFolder" ($SSISCatalog, $SSISFolerName, $SSISFolerName) $SSISFolderInCatalog.Create() Write-Host "The directory $SSISFolerName has been successfully created in the SSIS Catalog........" #Build the ISPAC file path from the SSIS directory path $ISPACFilePath = $SSISISPACFile.FullName Write-Host "Deploying " $SSISFolerName " project ..." # the ISPAC file will be read into a variable for deployment [byte[]]$ISPACFile = [System.IO.File]::ReadAllBytes($ISPACFilePath) $SSISFolderInCatalog.DeployProject($SSISFolerName, $ISPACFile) Write-Host $SSISFolerName " project has been deployed successfully" Write-Host "Setting up a environment for the project $SSISFolerName" $environment = New-Object $SSISNamespace".EnvironmentInfo" ($SSISFolderInCatalog, $EnvironmentName, "Description") $environment.Create() Write-Host "Environment $EnvironmentName for the project $SSISFolerName has been created successfully" #Let's add variables to the environment #Usage example $environment.Variables.Add(variable name, type, default value, sensitivity, description) Write-Host "Add variables for the environment $EnvironmentName " $environment.Variables.Add("ServerName", [System.TypeCode]::String, "Localhost\SQL2012", "False", "Server Name") $environment.Variables.Add("SourceFileLocation", [System.TypeCode]::String, "\\Server\Folder\SourceFiles", "False", "Source File Location") $environment.Alter() $ServerName = $environment.Variables["ServerName"]; $SourceFileLocation = $environment.Variables["SourceFileLocation"]; Write-Host "Variables have been added for the environment $EnvironmentName " Write-Host "Refer the environment in the deployed SSIS Project" $SSISProject = $SSISFolderInCatalog.Projects[$SSISFolerName] $SSISProject.References.Add($EnvironmentName, $SSISFolderInCatalog.Name) $SSISProject.Alter() $SSISPackage = $SSISProject.Packages["Package.dtsx"] $SSISPackage.Parameters["ServerName"].Set([Microsoft.SqlServer.Management.IntegrationServices.ParameterInfo+ParameterValueType]::Referenced, $ServerName.Name) $SSISPackage.Parameters["SourceFileLocation"].Set([Microsoft.SqlServer.Management.IntegrationServices.ParameterInfo+ParameterValueType]::Referenced, $SourceFileLocation.Name) $SSISPackage.Alter() } |
From the screenshot below, you’ll see that the SSIS projects have been deployed with the SSIS packages and the “SIT” environment has been created for each project.
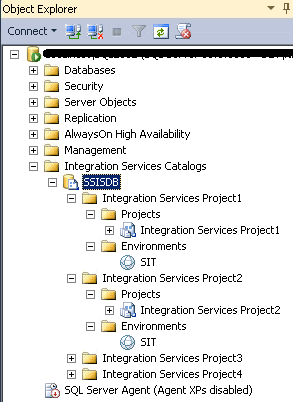
This screenshot confirms that the environment “SIT” has been created with two variables.
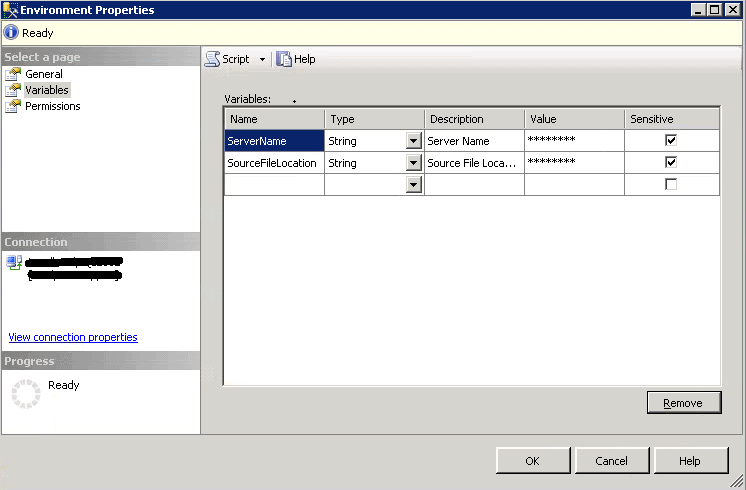
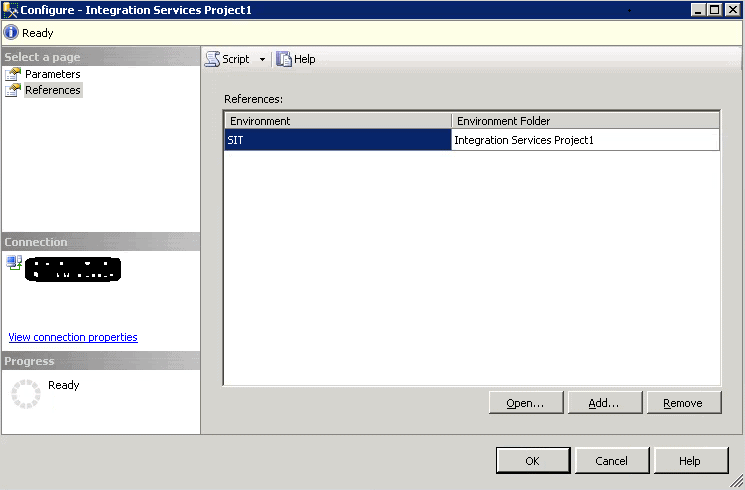
In addition the “SIT” environment has been referenced in the SSIS project.
Enhancements to PowerShell script
The values of the key information such as the Server name and the data file location has been hardcoded in the deployment script. Now the deployment script will read the config. XML for key values. Based on the Target test Environment value (SIT, TST or RST), it will lookup the key values in the XML config file. The key values will be stored in few variables that can be used while creating a SSIS environment in the script.
Script to integrate XML config file with the PowerShell script
|
1 2 3 4 5 6 7 8 9 10 11 12 13 14 15 16 17 18 19 20 21 22 23 24 25 26 27 28 29 30 31 32 33 34 35 36 37 38 39 40 41 42 43 44 45 46 47 48 49 50 51 52 53 54 55 56 57 58 59 60 61 62 63 64 65 66 67 68 69 70 71 72 73 74 75 76 77 78 79 80 81 82 83 84 85 86 87 88 89 90 91 92 93 94 95 96 97 98 99 100 101 102 103 104 105 106 107 108 |
$TargetEnvironment = "SIT" $ConfigPath = "C:\WorkArea\Scripts\ServerConfig.xml"; $SSISCatalogPassword = "PW0Rd4sSsIsCAt10g" #Read the XML config file [xml]$file = Get-Content $ConfigPath $Environments = $file.SelectNodes("/Environments/Environment") Foreach ($Environment in $Environments) { If ($Environment.Name -eq $TargetEnvironment) { $TargetEnvironmentName = $Environment.Name $TargetServerName = $Environment.ServerInstance $TargetSourceFileLocation = $Environment.SourceFileLocation } } $SQLServerConnectionString = "Data Source=$TargetServerName;Initial Catalog=master;Integrated Security=SSPI;" # Pre-Requisite - Enable CLR before creating catalog #Connect to SQL server and enable CLR, if this is not already enabled Write-Host "Enabling CLR on the SQL Server ...." $SQLServer = New-Object Microsoft.SQLServer.Management.SMO.Server $SQLServerInstance $configuration = $SQLServer.Configuration $CLRValue = $SQLServer.Configuration.IsSqlClrEnabled Write-Host $CLRValue.ConfigValue If ($CLRValue.ConfigValue -eq 0) { Write-Host "Enabling CLR on the server $SQLServerInstance" $CLRValue.ConfigValue = 1 $configuration.Alter() Write-Host "CLR enabled on the server $SQLServerInstance successfully" } # Loading IntegrationServices Assembly ......... [System.Reflection.Assembly]::LoadWithPartialName("Microsoft.SqlServer.Management.IntegrationServices") | Out-Null; # Store the value of IntegrationServices Assembly name in a string # This will avoid to re type the same string again and again $SSISNamespace = "Microsoft.SqlServer.Management.IntegrationServices" Write-Host "Trying to connect SQL Server...." # Create SQL Server connection based on the connection string $SQLServerConnection = New-Object System.Data.SqlClient.SqlConnection $SQLServerConnectionString Write-Host "SQL Server connection has been enabled successfully" # Create Integration Services object based on the SQL Server connection Write-Host "Trying to create a object for Integration Service...." $IntegrationServices = New-Object $SSISNamespace".IntegrationServices" $SQLServerConnection Write-Host "Integration service object has been created successfully" Write-Host "Dropping existing SSIS Catalog on the server $SQLServerInstance" # Drop the existing catalog if it exists if ($IntegrationServices.Catalogs.Count -gt 0) { Write-Host "Warning !, all the SSIS projects and Packages will be dropped...." $IntegrationServices.Catalogs["SSISDB"].Drop() Write-Host "Existing SSIS Catalog has been dropped successfully ." } Write-Host "Creating SSIS Catalog on the server $SQLServerInstance" $SSISCatalog = New-Object $SSISNamespace".Catalog" ($IntegrationServices, "SSISDB", $SSISCatalogPassword) $SSISCatalog.Create() Write-Host "SSIS Catalog has been created successfully on the server $SQLServerInstance" $SSISFolder = "C:\WorkArea\SSIS" # Look for SSIS ISPAC file (with extension .ISPAC) and return the # name of the SSIS ISPAC file and the directory full path $SSISISPACFiles = Get-ChildItem $SSISFolder -Recurse -Filter "*.ispac" Foreach ($SSISISPACFile in $SSISISPACFiles) { #Name of the SSIS ISPAC file , will be used to create SSIS folder $SSISFolerName = $SSISISPACFile.BaseName; #The name of the directory will be used to locate the ISPAC file $SSISDirectory = $SSISISPACFile.FullName; Write-Host "Creating the directory $SSISFolerName in the SSIS Catalog........" $SSISFolderInCatalog = New-Object $SSISNamespace".CatalogFolder" ($SSISCatalog, $SSISFolerName, $SSISFolerName) $SSISFolderInCatalog.Create() Write-Host "The directory $SSISFolerName has been successfully created in the SSIS Catalog........" #Build the ISPAC file path from the SSIS directory path $ISPACFilePath = $SSISISPACFile.FullName Write-Host "Deploying " $SSISFolerName " project ..." # the ISPAC file will be read into a variable for deployment [byte[]]$ISPACFile = [System.IO.File]::ReadAllBytes($ISPACFilePath) $SSISFolderInCatalog.DeployProject($SSISFolerName, $ISPACFile) Write-Host $SSISFolerName " project has been deployed successfully" Write-Host "Setting up a environment for the project $SSISFolerName" $environment = New-Object $SSISNamespace".EnvironmentInfo" ($SSISFolderInCatalog, $TargetEnvironment, "Description") $environment.Create() Write-Host "Environment $TargetEnvironment for the project $SSISFolerName has been created successfully" #Let's add variables to the environment #Usage example $environment.Variables.Add(variable name, type, default value, sensitivity, description) Write-Host "Add variables for the environment $TargetEnvironment " $environment.Variables.Add("ServerName", [System.TypeCode]::String, $TargetServerName, "False", "Server Name") $environment.Variables.Add("SourceFileLocation", [System.TypeCode]::String, $TargetSourceFileLocation, "False", "Source File Location") $environment.Alter() $ServerName = $environment.Variables["ServerName"]; $SourceFileLocation = $environment.Variables["SourceFileLocation"]; Write-Host "Variables have been added for the environment $TargetEnvironment " Write-Host "Refer the environment in the deployed SSIS Project" $SSISProject = $SSISFolderInCatalog.Projects[$SSISFolerName] $SSISProject.References.Add($TargetEnvironment, $SSISFolderInCatalog.Name) $SSISProject.Alter() $SSISPackage = $SSISProject.Packages["Package.dtsx"] $SSISPackage.Parameters["ServerName"].Set([Microsoft.SqlServer.Management.IntegrationServices.ParameterInfo+ParameterValueType]::Referenced, $ServerName.Name) $SSISPackage.Parameters["SourceFileLocation"].Set([Microsoft.SqlServer.Management.IntegrationServices.ParameterInfo+ParameterValueType]::Referenced, $SourceFileLocation.Name) $SSISPackage.Alter() } |
Command line execution and passing parameters
Usually the release manager, or whoever holds responsibility for the release, always prefers to deploy SSIS projects from the command line. Because the deployment script has been prepared in PowerShell, it is possible to execute the script from the command line.
In the previous script, we have hard-coded a number of variables, to make things simpler, but for the final version of the script, we can make the change to accept parameters for these values.
Script to run PowerShell script from command line with parameters
|
1 2 3 4 5 6 7 8 9 10 11 12 13 14 15 16 17 18 19 20 21 22 23 24 25 26 27 28 29 30 31 32 33 34 35 36 37 38 39 40 41 42 43 44 45 46 47 48 49 50 51 52 53 54 55 56 57 58 59 60 61 62 63 64 65 66 67 68 69 70 71 72 73 74 75 76 77 78 79 80 81 82 83 84 85 86 87 88 89 90 91 92 93 94 95 96 97 98 99 100 101 102 103 104 105 106 107 108 109 110 111 112 113 114 115 116 117 |
# Call the PowerShell script and pass the arguments #.\7_Deployment_Script_With_Arguments.ps1 "SIT" "C:\WorkArea\Scripts\ServerConfig.xml" "PW0Rd4sSsIsCAt10g" "C:\WorkArea\SSIS" #.\7_Deployment_Script_With_Arguments.ps1 -TargetEnvironment "SIT" -ConfigPath "C:\WorkArea\ Scripts\ServerConfig.xml" -SSISCatalogPassword "PW0Rd4sSsIsCAt10g" -SSISFolder "C:\WorkArea\SSIS" [CmdletBinding()] param ( [Parameter(Mandatory = $true)] [string]$TargetEnvironment = $null, [string]$ConfigPath = $null, [string]$SSISCatalogPassword = $null, [string]$SSISFolder = $null ) #$SSISFolder = "C:\WorkArea\SSIS" #Read the XML config file [xml]$file = Get-Content $ConfigPath $Environments = $file.SelectNodes("/Environments/Environment") Foreach ($Environment in $Environments) { If ($Environment.Name -eq $TargetEnvironment) { $TargetEnvironmentName = $Environment.Name $TargetServerName = $Environment.ServerInstance $TargetSourceFileLocation = $Environment.SourceFileLocation } } $SQLServerConnectionString = "Data Source=$TargetServerName;Initial Catalog=master;Integrated Security=SSPI;" # Pre-Requisite - Enable CLR before creating catalog #Connect to SQL server and enable CLR, if this is not already enabled Write-Host "Enabling CLR on the SQL Server ...." $SQLServer = New-Object Microsoft.SQLServer.Management.SMO.Server $SQLServerInstance $configuration = $SQLServer.Configuration $CLRValue = $SQLServer.Configuration.IsSqlClrEnabled Write-Host $CLRValue.ConfigValue If ($CLRValue.ConfigValue -eq 0) { Write-Host "Enabling CLR on the server $SQLServerInstance" $CLRValue.ConfigValue = 1 $configuration.Alter() Write-Host "CLR enabled on the server $SQLServerInstance successfully" } # Loading IntegrationServices Assembly ......... [System.Reflection.Assembly]::LoadWithPartialName("Microsoft.SqlServer.Management.IntegrationServices") | Out-Null; # Store the value of IntegrationServices Assembly name in a string # This will avoid to re type the same string again and again $SSISNamespace = "Microsoft.SqlServer.Management.IntegrationServices" Write-Host "Trying to connect SQL Server...." # Create SQL Server connection based on the connection string $SQLServerConnection = New-Object System.Data.SqlClient.SqlConnection $SQLServerConnectionString Write-Host "SQL Server connection has been enabled successfully" # Create Integration Services object based on the SQL Server connection Write-Host "Trying to create a object for Integration Service...." $IntegrationServices = New-Object $SSISNamespace".IntegrationServices" $SQLServerConnection Write-Host "Integration service object has been created successfully" Write-Host "Dropping existing SSIS Catalog on the server $SQLServerInstance" # Drop the existing catalog if it exists if ($IntegrationServices.Catalogs.Count -gt 0) { Write-Host "Warning !, all the SSIS projects and Packages will be dropped...." $IntegrationServices.Catalogs["SSISDB"].Drop() Write-Host "Existing SSIS Catalog has been dropped successfully ." } Write-Host "Creating SSIS Catalog on the server $SQLServerInstance" $SSISCatalog = New-Object $SSISNamespace".Catalog" ($IntegrationServices, "SSISDB", $SSISCatalogPassword) $SSISCatalog.Create() Write-Host "SSIS Catalog has been created successfully on the server $SQLServerInstance" # Look for SSIS ISPAC file (with extension .ISPAC) and return the # name of the SSIS ISPAC file and the directory full path $SSISISPACFiles = Get-ChildItem $SSISFolder -Recurse -Filter "*.ispac" Foreach ($SSISISPACFile in $SSISISPACFiles) { #Name of the SSIS ISPAC file , will be used to create SSIS folder $SSISFolerName = $SSISISPACFile.BaseName; #The name of the directory will be used to locate the ISPAC file $SSISDirectory = $SSISISPACFile.FullName; Write-Host "Creating the directory $SSISFolerName in the SSIS Catalog........" $SSISFolderInCatalog = New-Object $SSISNamespace".CatalogFolder" ($SSISCatalog, $SSISFolerName, $SSISFolerName) $SSISFolderInCatalog.Create() Write-Host "The directory $SSISFolerName has been successfully created in the SSIS Catalog........" #Build the ISPAC file path from the SSIS directory path $ISPACFilePath = $SSISISPACFile.FullName Write-Host "Deploying " $SSISFolerName " project ..." # the ISPAC file will be read into a variable for deployment [byte[]]$ISPACFile = [System.IO.File]::ReadAllBytes($ISPACFilePath) $SSISFolderInCatalog.DeployProject($SSISFolerName, $ISPACFile) Write-Host $SSISFolerName " project has been deployed successfully" Write-Host "Setting up a environment for the project $SSISFolerName" $environment = New-Object $SSISNamespace".EnvironmentInfo" ($SSISFolderInCatalog, $TargetEnvironment, "Description") $environment.Create() Write-Host "Environment $TargetEnvironment for the project $SSISFolerName has been created successfully" #Let's add variables to the environment #Usage example $environment.Variables.Add(variable name, type, default value, sensitivity, description) Write-Host "Add variables for the environment $TargetEnvironment " $environment.Variables.Add("ServerName", [System.TypeCode]::String, $TargetServerName, "False", "Server Name") $environment.Variables.Add("SourceFileLocation", [System.TypeCode]::String, $TargetSourceFileLocation, "False", "Source File Location") $environment.Alter() $ServerName = $environment.Variables["ServerName"]; $SourceFileLocation = $environment.Variables["SourceFileLocation"]; Write-Host "Variables have been added for the environment $TargetEnvironment " Write-Host "Refer the environment in the deployed SSIS Project" $SSISProject = $SSISFolderInCatalog.Projects[$SSISFolerName] $SSISProject.References.Add($TargetEnvironment, $SSISFolderInCatalog.Name) $SSISProject.Alter() $SSISPackage = $SSISProject.Packages["Package.dtsx"] $SSISPackage.Parameters["ServerName"].Set([Microsoft.SqlServer.Management.IntegrationServices.ParameterInfo+ParameterValueType]::Referenced, $ServerName.Name) $SSISPackage.Parameters["SourceFileLocation"].Set([Microsoft.SqlServer.Management.IntegrationServices.ParameterInfo+ParameterValueType]::Referenced, $SourceFileLocation.Name) $SSISPackage.Alter() } |
This script accepts parameters for TargetEnvironment, ConfigPath, SSISCatalogPassword and SSIS folder location. The PowerShell script can be executed in two ways with parameters.
By Position
In the first method, the parameter values can be provided with a space in between each parameter. Based on their position, the corresponding parameter values will be set and the script will be executed.
|
1 |
.\7_Deployment_Script_With_Arguments.ps1 "SIT" "C:\WorkArea\Scripts\ServerConfig.xml" "PW0Rd4sSsIsCAt10g" "C:\WorkArea\SSIS" |
By Parameters
In this method, we can specify the parameter name and the value together. This is the recommended method as it is easy enough to understand the parameter and values.
|
1 |
.\7_Deployment_Script_With_Arguments.ps1 -TargetEnvironment "SIT" -ConfigPath "C:\WorkArea\ Scripts\ServerConfig.xml" -SSISCatalogPassword "PW0Rd4sSsIsCAt10g" -SSISFolder "C:\WorkArea\SSIS" |
Logging PowerShell script output:
The supplied script will display the deployment progress in the console. This is very helpful, if you are planning to integrate the script with the CI tools. As the CI tools usually maintain their own log , the PowerShell script output information will be available on the CI log for analysis and investigation.
However if you are planning to use the script for unattended deployment then the script can be enhanced with additional logging. The same script has been modified to incorporate a logging to capture the details in a text file.
A function “Write-Log” has been added to the script to accept a string and write the details to a logfile. This function will be called during the deployment and the progress information will be supplied as a parameter.
This is the updated script
|
1 2 3 4 5 6 7 8 9 10 11 12 13 14 15 16 17 18 19 20 21 22 23 24 25 26 27 28 29 30 31 32 33 34 35 36 37 38 39 40 41 42 43 44 45 46 47 48 49 50 51 52 53 54 55 56 57 58 59 60 61 62 63 64 65 66 67 68 69 70 71 72 73 74 75 76 77 78 79 80 81 82 83 84 85 86 87 88 89 90 91 92 93 94 95 96 97 98 99 100 101 102 103 104 105 106 107 108 109 110 111 112 113 114 115 116 117 118 119 120 121 122 123 124 125 126 127 128 129 130 131 132 133 134 135 136 137 |
# Call the PowerShell script and pass the arguments #.\8_Deployment_Script_With_Logging.ps1 "SIT" "C:\WorkArea\Scripts\ServerConfig.xml" "PW0Rd4sSsIsCAt10g" "C:\WorkArea\SSIS" #.\8_Deployment_Script_With_Logging.ps1 -TargetEnvironment "SIT" -ConfigPath "C:\WorkArea\ Scripts\ServerConfig.xml" -SSISCatalogPassword "PW0Rd4sSsIsCAt10g" -SSISFolder "C:\WorkArea \SSIS" [CmdletBinding()] param ( [Parameter(Mandatory = $true)] [string]$TargetEnvironment = $null, [string]$ConfigPath = $null, [string]$SSISCatalogPassword = $null, [string]$SSISFolder = $null ) $DeploymentLogfile = ".\SSIS_DeploymentLogfile.log" Function Write-Log { Param ( [string]$logOutput ) Add-content $DeploymentLogfile -value $logOutput } #Read the XML config file [xml]$file = Get-Content $ConfigPath $Environments = $file.SelectNodes("/Environments/Environment") Foreach ($Environment in $Environments) { If ($Environment.Name -eq $TargetEnvironment) { $TargetEnvironmentName = $Environment.Name $TargetServerName = $Environment.ServerInstance $TargetSourceFileLocation = $Environment.SourceFileLocation } } $SQLServerConnectionString = "Data Source=$TargetServerName;Initial Catalog=master;Integrated Security=SSPI;" # Pre-Requisite - Enable CLR before creating catalog #Connect to SQL server and enable CLR, if this is not already enabled Write-Log "Enabling CLR on the SQL Server ...." $SQLServer = New-Object Microsoft.SQLServer.Management.SMO.Server $SQLServerInstance $configuration = $SQLServer.Configuration $CLRValue = $SQLServer.Configuration.IsSqlClrEnabled Write-Log $CLRValue.ConfigValue If ($CLRValue.ConfigValue -eq 0) { Write-Log "Enabling CLR on the server $SQLServerInstance" $CLRValue.ConfigValue = 1 $configuration.Alter() Write-Log "CLR enabled on the server $SQLServerInstance successfully" } # Loading IntegrationServices Assembly ......... [System.Reflection.Assembly]::LoadWithPartialName("Microsoft.SqlServer.Management.IntegrationServices") | Out-Null; # Store the value of IntegrationServices Assembly name in a string # This will avoid to re type the same string again and again $SSISNamespace = "Microsoft.SqlServer.Management.IntegrationServices" Write-Log "Trying to connect SQL Server...." # Create SQL Server connection based on the connection string $SQLServerConnection = New-Object System.Data.SqlClient.SqlConnection $SQLServerConnectionString Write-Log "SQL Server connection has been enabled successfully" # Create Integration Services object based on the SQL Server connection Write-Log "Trying to create a object for Integration Service...." $IntegrationServices = New-Object $SSISNamespace".IntegrationServices" $SQLServerConnection Write-Log "Integration service object has been created successfully" Write-Log "Dropping existing SSIS Catalog on the server $SQLServerInstance" # Drop the existing catalog if it exists if ($IntegrationServices.Catalogs.Count -gt 0) { Write-Log "Warning !, all the SSIS projects and Packages will be dropped...." $IntegrationServices.Catalogs["SSISDB"].Drop() Write-Log "Existing SSIS Catalog has been dropped successfully ." } Write-Log "Creating SSIS Catalog on the server $SQLServerInstance" $SSISCatalog = New-Object $SSISNamespace".Catalog" ($IntegrationServices, "SSISDB", $SSISCatalogPassword) $SSISCatalog.Create() Write-Log "SSIS Catalog has been created successfully on the server $SQLServerInstance" # Look for SSIS ISPAC file (with extension .ISPAC) and return the # name of the SSIS ISPAC file and the directory full path $SSISISPACFiles = Get-ChildItem $SSISFolder -Recurse -Filter "*.ispac" Foreach ($SSISISPACFile in $SSISISPACFiles) { #Name of the SSIS ISPAC file , will be used to create SSIS folder $SSISFolerName = $SSISISPACFile.BaseName; #The name of the directory will be used to locate the ISPAC file $SSISDirectory = $SSISISPACFile.FullName; Write-Log "Creating the directory $SSISFolerName in the SSIS Catalog........" $SSISFolderInCatalog = New-Object $SSISNamespace".CatalogFolder" ($SSISCatalog, $SSISFolerName, $SSISFolerName) $SSISFolderInCatalog.Create() Write-Log "The directory $SSISFolerName has been successfully created in the SSIS Catalog........" #Build the ISPAC file path from the SSIS directory path $ISPACFilePath = $SSISISPACFile.FullName Write-Log "Deploying " $SSISFolerName " project ..." # the ISPAC file will be read into a variable for deployment [byte[]]$ISPACFile = [System.IO.File]::ReadAllBytes($ISPACFilePath) $SSISFolderInCatalog.DeployProject($SSISFolerName, $ISPACFile) Write-Log $SSISFolerName " project has been deployed successfully" Write-Log "Setting up a environment for the project $SSISFolerName" $environment = New-Object $SSISNamespace".EnvironmentInfo" ($SSISFolderInCatalog, $TargetEnvironment, "Description") $environment.Create() Write-Log "Environment $TargetEnvironment for the project $SSISFolerName has been created successfully" #Let's add variables to the environment #Usage example $environment.Variables.Add(variable name, type, default value, sensitivity, description) Write-Log "Add variables for the environment $TargetEnvironment " $environment.Variables.Add("ServerName", [System.TypeCode]::String, $TargetServerName, "False", "Server Name") $environment.Variables.Add("SourceFileLocation", [System.TypeCode]::String, $TargetSourceFileLocation, "False", "Source File Location") $environment.Alter() $ServerName = $environment.Variables["ServerName"]; $SourceFileLocation = $environment.Variables["SourceFileLocation"]; Write-Log "Variables have been added for the environment $TargetEnvironment " Write-Log "Refer the environment in the deployed SSIS Project" $SSISProject = $SSISFolderInCatalog.Projects[$SSISFolerName] $SSISProject.References.Add($TargetEnvironment, $SSISFolderInCatalog.Name) $SSISProject.Alter() $SSISPackage = $SSISProject.Packages["Package.dtsx"] $SSISPackage.Parameters["ServerName"].Set([Microsoft.SqlServer.Management.IntegrationServices.ParameterInfo+ParameterValueType]::Referenced, $ServerName.Name) $SSISPackage.Parameters["SourceFileLocation"].Set([Microsoft.SqlServer.Management.IntegrationServices.ParameterInfo+ParameterValueType]::Referenced, $SourceFileLocation.Name) $SSISPackage.Alter() } |
Points to remember
This script is intended to provision a Data Warehouse for System Integrated testing (SIT). For this we usually drop any existing SSIS Projects and deploy all the SSIS projects with packages and environments. If the requirement is similar then this script can be used straight away to meet these requirements.
However, if you don’t want to drop existing SSIS projects, you may comment/remove the code to drop the existing catalog.
In addition you can check whether the specific SSIS project is available and delete the project if exists.
You should always delete the existing SSIS projects for a clean deployment. This will help us to investigate and debug deployment-related issues more easily.
Summary
You should check this script in a sandbox environment. This will help you to understand the script in detail, and you can modify the script to make it work better in your real test environment.
If you use a Continuous Integration tool within your organisation, you can easily integrate this script to add it to an automated deployment. In addition, if you have an automated test framework for SSIS projects, then you can deploy and run the test framework to validate the deployment.
Reference
SSIS Deployment Reference from Matt Masson ( http://www.mattmasson.com/2012/06/publish-to-ssis-catalog-using-powershell/)
Simple Talk is brought to you by Redgate Software
This document contains proprietary information and is protected by copyright law.
Copyright © 2026 Red Gate Software Limited. All rights reserved
Load comments