
This article explains how to implement the Hyper-V Networking and VLAN Tagging. The article applies to Hyper-V running Windows Server 2008 and Windows Server 2012 otherwise stated specifically.
Most of the article talks about Hyper-V Networking without elaborating on the basics of Networking. Instead, the article focuses more on the Hyper-V Networking, Networking Virtual Switch Types and Guest Operating Systems supported by Hyper-V running on Windows Server 2008/R2 and Windows Server 2012.
This articale will discuss:
- Virtual Networking Overview
- Hyper-V Virtual Network Switch Overview
- Microsoft Hyper-V Virtual Network Switch Types
- Microsoft Hyper-V Virtual Network Maximum configuration
- Supported Guest Operating Systems
- What happens when you create a Virtual Network Switch?
Terms Used Throughout This Article:
Before tackling Hyper-V Networking, there are a few basic terms that I ought to define in case you aren’t familiar with them.
- Parent Partition
- A Windows Server 2008 running Hyper-V Role is called the Parent Partition or Root Partition. The Operating System (Windows Server 2008) running on the Root is the “Management Operating System”. Parent Partition is responsible to create Child Partition and also controls the communications between all the Virtual Machines.
- Child Partition
- A Virtual Machine running on Hyper-V Server is called the Child Partition. The Parent Partition creates the Child Partition.
- Virtual Switch or
Virtual Network
Switch - A Virtual Switch is a software component of Virtualization Software. Virtual Machines are connected to Virtual Switch in order to allow communications between Virtual Machines. A Virtual Switch, just like Physical Switch, does more than communications.
- VLAN
- A VLAN is a Virtual LAN. A VLAN is a method of creating independent logical networks. VLAN is a broadcast domain created by the physical or virtual switches.
- VLAN ID
- A unique number called the VLAN ID identifies the each VLAN. Each VLAN is separated by assigning unique VLAN ID.
- VLAN Trunk
and
Access Modes - There are two modes a particular port on a Virtual or Physical Switch can operate in; Access Mode and Trunk Mode. Access Mode is used for end devices that will not require access to multiple VLANs. Trunk Mode is used for passing multiple VLANs to other network devices that need to have communication to multiple VLANs on one occasion.
- Integration
Services
Component - A Hyper-V component used to enhance the performance of Virtual Machines running on Hyper-V. The Integration Services component is similar to the VM Additions of Virtual PC but it’s more than that in the functionality.
- VMBUS
- VMBUS is a logical inter-partition communication channel. VMBUS allows Virtual Machines to access hardware resources faster. VMBUS is available only when you install the Integration Service Components on the Virtual Machines running on Hyper-V
Virtual Networking Overview
Virtual Networking is designed to meet the requirement to move from a physical to virtual environment which reduces the overall costs of hosting the system.
Both Physical and Virtual Network Switches perform routing. There are two types of routing performed by the switches; IP and MAC Routing. IP Routing is performed by the Layer 3 Switches and MAC Routing at Layer 2 Switches. Microsoft Hyper-V and VMWare both implement Virtual Network Switches which operate at Layer 2.
Microsoft Hyper-V Virtual Networking has been designed as part of its Virtualization Software; Hyper-V. The way that the underlying components of Microsoft Hyper-V Networking behave is completely different from those of VMWare. This series of the article does not compare Virtual Networking in Hyper-V and VMWare. Instead it focuses only on Microsoft Hyper-V Virtual Networking technology.
In the Virtual World, we rely on the vendor of the virtualization software to maintain the quality and performance of Virtual Networking code since it is crucial for improving the overall algorithms of a Virtual component. Microsoft Hyper-V has been designed to improve Virtual Networking by introducing new Networking Technologies such as VMBUS and VSP/VSC design. This is explained in more detail later in this series of articles.
The Hyper-V Virtual Network Switch
The implementation of the Virtual Network Switch in Hyper-V operates at Layer 2. The switch maintains a table called the MAC Table. This MAC Table contains entries consisting of the MAC Address and the name of the Virtual Machine connected. The Hyper-V Virtual Network Switch has a learning algorithm in which it learns the MAC address of a Virtual Machine. This MAC Address, once learned, is stored in the MAC Table of the switch. An unlimited number of Virtual Machines can be connected to a Virtual Network Switch.
In previous versions of Hyper-V, only one parent virtual NIC was supported, however in Windows Server 2012 Hyper-V, multiple NICs are supported. In addition, you can share the physical NIC that is bound to the Hyper-V Switch with the management operating system. The Virtual Networking switch running on Windows Server 2012 can be managed via Windows PowerShell commands.
Microsoft Hyper-V Virtual Network Switch Types
Microsoft Hyper-V implements three types of Virtual Switches or Networking Types as shown in figure 1.1.
There are no changes in Hyper-V Virtual Networking Switch Types in Windows Server 2012. There are a few enhancements done for the Hyper-V Virtual Network Switches but these are beyond the scope of this article.
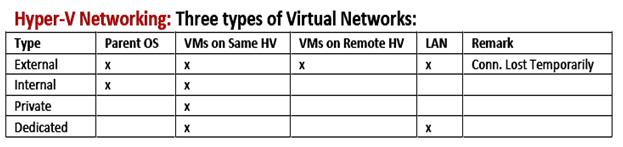
FIGURE 1.1 – Hyper-V Virtual Network Types
As you can see in Figure 1.1, there are four types of Virtual Switches in Hyper-V based on their network function. You can see that there is one more type called Dedicated. This is neither visible nor available in Hyper-V Virtual Network Manager. You see only three types. We will discuss the Dedicated type later in this article series.
Before I get into more details, I ought to explain that, in a default Hyper-V implementation:
- There are no virtual Network Switches created.
- Virtual Machines created on Hyper-V Networking are not associated with any of the Virtual Network Switch types shown in Figure 1.1.
- There are no Network Adaptors configured in Virtual Machines (depending on the guest Operating Systems).
The default Hyper-V Implementation looks like as shown below in Figure 1.2:
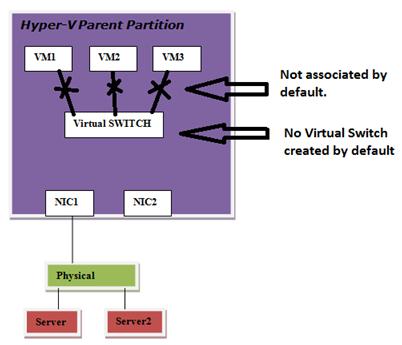
FIGURE 1.2 – Hyper-V Default Implementation and Network Configuration
As you can see in Figure 1.2, there are three VMs created on the Hyper-V Server; VM1, VM2 and VM3. By default, these VMs are not associated with the Virtual Network Switch and cannot have any communication with each other. If any of the VMs running on Hyper-V (VM1, VM2 and VM3) need communicate with Server1 on the physical LAN then they can’t do so until Virtual Network Switch is created. It is not created by default.
You create Virtual Switches using the Virtual Network Manager found in the Action Pane on the right-hand side of the Hyper-V Manager.
As shown in figure 1.1, the “External” Virtual Network Switch allows you to communicate with Parent Partition of Hyper-V, Virtual Machines running on same Hyper-V Server, Virtual Machines running on Remote Hyper-V Server, and physical servers on the LAN. The External Network Switch requires that you have at least one Physical NIC (e.g. not associated with any other Virtual Network Switch). You can have one External Virtual Network Switch per Physical NIC.
One thing you’ll notice is the remark column for “External” Virtual Network Switch. It says “Conn. Lost Temporarily”, which means that the connection is lost temporarily if you create an External Virtual Network Switch. Why so? It is because the External Virtual Network Switch is mapped to a physical NIC on the Hyper-V Server. This is basically a binding of Virtual Network Services to a Physical NIC.
The “Internal” Virtual Network Switch allows you to communicate between the Parent Partition of Hyper-V and the Virtual Machines running on the same Hyper-V Server. You cannot communicate with any other VMs which are associated with a different Virtual Network Switch or physical servers. You can create or use an Internal Virtual Network Switch even if the Physical NIC is not available, because communication happens internally or on the same Hyper-V Server.
The “Private” Virtual Network Switch allows you to have communication only between the Virtual Machines running on the same Hyper-V Server. Communications are only allowed only between the Virtual Machines which are connected to that Internal Virtual Network Switch.
Hyper-V Virtual Networking Maximum Configuration
| Support For | MAXIMUM | Remark |
| Virtual NICs Per Virtual Machine | 12 NICs | 4 Legacy and 8 VMBus NICs |
| VLAN | Unlimited | |
| Virtual Machines Per VLAN | Unlimited | |
| External Network Virtual Switch Per Hyper-V Server | 1 Per Physical NIC | |
| Internal Network Virtual Switch Per Hyper-V Server | Unlimited | |
| Private Network Virtual Switch Per Hyper-V Server | Unlimited | |
| Virtual Machines Per Virtual Network Switch | Unlimited | |
| Wireless | No support for wireless | |
| VLAN ID Tagging | External, Internal | |
| VLAN ID Tagging On Virtual Machines | One per Virtual MAchine |
FIGURE 1.3 – Virtual Network Types and Maximum Configuration
As you can see in figure 1.3, the Hyper-V Virtual Machine can support two types of Networking Cards; Legacy and VMBus NICs. The support for Legacy Network Card is included for Guest Operating Systems which are not supported by Hyper-V. There can be up to four Legacy Network Adaptors. You install a Legacy Network Adapter from the property of Virtual Machine and then selecting “Add New Hardware”. Legacy Network Adapters use Device Emulation architecture to communicate with the Parent Partition and to access Network resources. The article linked to in the URL lists all the Guest Operating Systems which are supported on Hyper-V:
List of Guest operating systems that are supported on a Hyper-V virtual machine running on Windows Server 2008 and R2.
Guest Operating Systems supported by Hyper-V running on Windows Server 2012:
Supported Server Operating Systems:
| Windows Server 2012 | Integration Services included. |
| Windows Server 2008 R2 with Service Pack 1 (SP 1) | Integration Services installation is required. |
| Windows Server 2008 R2 | Integration Services installation is required. |
| Windows Server 2008 with Service Pack 2 (SP 2) | Integration Services installation is required. |
| Windows Server 2008 | Integration Services installation is required. |
| Windows Server 2003 SP2 and R2 | Integration Services installation is required. |
| CentOS 6.0 – 6.2 | Linux Integration Services installation is required. |
| Red Hat Enterprise Linux 6.0 -6.2 | Linux Integration Services installation is required. |
| SUSE Linux Enterprise Server 11 SP2 | Integration Services included. |
Supported Guest Operating Systems:
| Windows 8 | Integration Services included. |
| Windows 7 with Service Pack 1 (SP 1) | Integration Services installation is required. |
| Windows 7 | Integration Services installation is required. |
| Windows Vista with Service Pack 2 (SP2) | Integration Services installation is required. |
| Windows XP SP3 and SP2 | Integration Services installation is required. |
VMBus Network Card Adapters are available only when you install the Integration Services Component. The Integration Services component of Hyper-V leverages the VMBus architecture for the best networking performance. There can be a maximum of 8 VMBus Network Cards.
A Virtual Machine running on Hyper-V can support a maximum of 12 Network Cards (4 Legacy and 8 VMBUS NICs).
VLAN Support is also included in Virtual Machines. A Virtual Machine running on Hyper-V can be configured with a VLAN ID. You can create an unlimited number of VLANs in Hyper-V, and there is no limit either to the number of Virtual Machines per VLAN.
As shown in Figure 1.3, you can have one External Virtual Network Switch per Physical NIC on Hyper-V Server. This type of Network Virtual Network Switch allows Virtual Machines communicate with LAN Servers also. The External Virtual Network Switch is mapped to the Physical NIC in order to allow communication with Physical Devices.
There is no limitation for the Internal or Private Network Virtual Switch. The reason is that Internal and Private operate internally and the communication is restricted to the Virtual Machines running on the Hyper-V. So you can create unlimited number of Private and Internal Virtual Network Switches.
You can have any number of Virtual Machines connected to a Virtual Network Switch. This can be an External, Private or Internal Network Virtual Switch.
In figure 1.3, you also notice the support for VLAN IDs on Virtual Switches. VLAN IDs can be specified on each Virtual Network Virtual Switch except for the Private Network Virtual Switch. These VLAN IDs can be used to create VLANs.
Similarly, VLAN ID support is also available for Virtual Machines. You can have one VLAN ID per Virtual Machine.
Note: There is no support for Direct Wireless for Virtual Machines running on Hyper-V. Instead you need to create a bridge between Wireless NIC and a Virtual Machine NIC.
What happens when you create a Virtual Network Switch?
You can create a Virtual Network Switch by selecting “Virtual Network Manager” that is located on the right pane of the Hyper-V Manager and then select the Network Virtual Switch Type you want to create. You need to select “Virtual Network Manager” to create any Virtual Network Switch Type. However, the creation of an External Virtual Network Switch is different from either Private or Internal Network Switches.
When you create an External Virtual Network Switch, you need to select a Physical NIC to which the Virtual Switch will be mapped. This process requires you to modify the Physical NIC components.
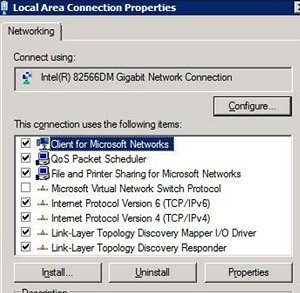
Before creating an External Network Virtual Switch, the network connection folder has only one network connection. The property of the Physical Network Connection looks like as shown below: (I assume you have only one Physical NIC attached to the Hyper-V Server).
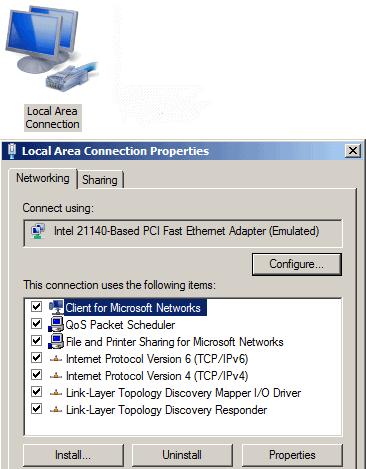
FIGURE 1.4 – Property of Physical NIC
When you create the External Network Virtual Switch using Virtual Network Manager, Hyper-V Components or VMMS.EXE, the process makes the following changes:
- It unbinds the following services, protocols, clients from the Physical NIC:
- Client for Microsoft Networks
- File and Print Sharing for Microsoft Networks
- TCP/IP Protocol IPv4
- TCP/IP Protocol IPv6
- Any other Service, client or protocol
- It binds the “Microsoft Virtual Network Switch Protocol”
- It creates a new network connection in the Network Connections folder with the name you had specified when creating the External Virtual Network Switch. Let’s say the name while creating the Virtual Switch you gave is “EXT NET Switch”.
- It binds the following Services, protocols, clients to the External Virtual Network Switch (EXT NET Switch):
- Client for Microsoft Networks
- File and Print Sharing for Microsoft Networks
- TCP/IP Protocol IPv4
- TCP/IP Protocol IPv6
- It unbinds the following protocol from the External Virtual Network Switch; EXT NET Switch:
- “Microsoft Virtual Network Switch Protocol”
When you open the Network Connections folder you will see two Network Connections created; one Local Area Connection for physical NIC and other one is “EXT NET Switch” for External Virtual Network Switch as shown in figure 1.5:
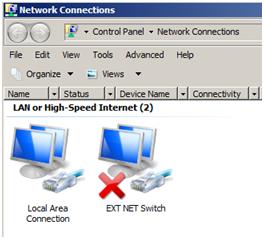
FIGURE 1.5 – Network Connections with External Virtual Network Switch
The bindings will also be changed. When you look at the property of the Physical NIC and the virtual Network Switch it will look like Figure 1.6
Property of EXT NET Virtual Switch

Property of Local Area Connection
FIGURE 1.6 – Property of Virtual Network Switch and Physical Connection
In step 3, the Virtual Network Manager unloads and loads the Network Driver for the Physical NIC from the memory. That’s the reason that the network connection is lost temporarily when you create an External Virtual Network Switch. Any device that is connected to Hyper-V Server has to retry to reconnect. As an example; if you had connected to a Virtual Machine from a remote computer using VMConnect.exe, the connection is lost and you need to reconnect using VMConnect.exe.
A warning is shown to the user about a temporary loss of network connection when you create the External Virtual Network Switch.
The creation of Private and Internal Network Virtual Switches is same as is shown above. However, you don’t have to have the physical NIC to create these switches.
Conclusion
In this article we saw how Hyper-V Networking is different and the networking types introduced in the RTM version of Hyper-V. There are three networking types available; External, Internal and Private. We also saw the default configuration of Hyper-V Networking in which no network communication is possible unless a Virtual Network Switch is created. The Hyper-V Virtual Network Switches can be used to connect any number of Virtual Machines. We also saw Guest Operating Systems supported for Hyper-V running on Windows Server 2008/R2 and Windows Server 2012.
In the next article in the series, we will primarily focus on the following topics:
- Hyper-V Networking Best Practices
- Hyper-V Networking Examples (including VLAN Configuration)
- Hyper-V Networking and VLAN Tagging System Traffic
This document contains proprietary information and is protected by copyright law.
Copyright © 2026 Red Gate Software Limited. All rights reserved
Load comments