
Containerization has removed boundaries that limit developers from working on one application using different systems. Thus, boosting developer collaboration and speeding the application deployment process. Containerization involves bundling and packaging applications into containers that have all the necessary dependencies and tools for compiling an application on any operating system.
Containers enable the coexistence of legacy and modern applications. Instead of removing core components of older systems, containerization allows these systems to seamlessly communicate and function alongside modern applications. By integrating legacy applications into containerization architecture, organizations can leverage their existing systems while benefiting from the flexibility and scalability of containerized environments.
In this article, you will learn what containerization is and how to containerize an application. In addition, you will learn the benefits and use cases of containerization.
Prerequisites
If you want to work through the tutorial, you will need Docker Desktop. You can learn how to install Docker Desktop from the Docker documentation hub. You will also need GIT set up. You can see how to install that here on Git’s website (Install Git.)
What Is Containerization?
Containerization is the process of bundling applications together with their dependencies and libraries into lightweight, portable, deployable software packages. They are designed to run within a container runtime platform without direct host machine access; thus, boosting security.
Containers encapsulate applications by utilizing shared resources from the host operating system while providing a secure and isolated environment. This prevents issues in one container from impacting others. Commonly containerized applications include web servers, databases, and microservices.
The holy grail of containerization is the container image, which includes all the necessary dependencies to run an application and is used to build a container when executed. Think of a container image as the “template” used to create running instances or containers. The layered architecture of containerization is as follows:
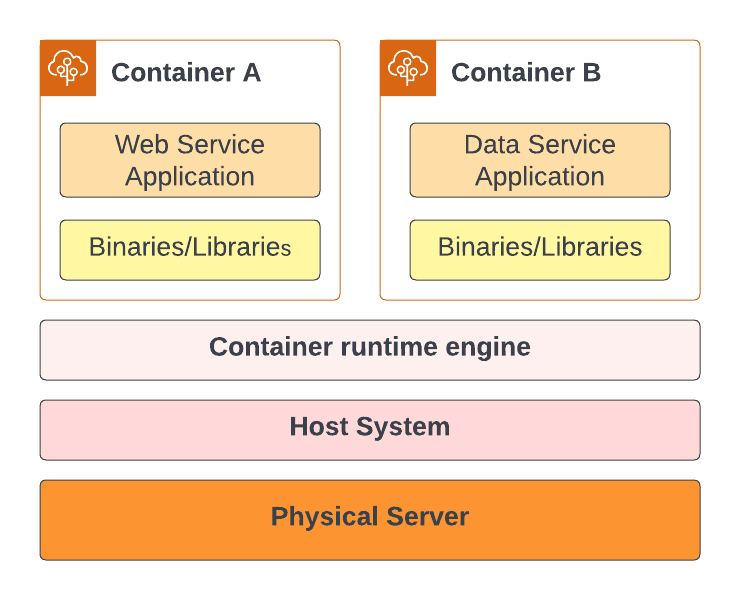
- Physical Server: This layer provides the underlying infrastructure that powers the operating system.
- Host system: This layer abstracts the hardware layer and provides fundamental mechanisms required to run containers. For example, file systems, networking, and process management mechanisms.
- Container runtime engine: This layer abstracts resources and operating systems to enable containerization.
- Containers (In the diagram, Container A and Container B, but could be many more): Containers run on top of the container runtime engine like Docker. Inside the container, there are binaries and applications.
Containerization Use Cases
Let’s look at 3 important use cases for containerization across various applications.
Microservice Architecture
The microservice architecture breaks down big applications into small, easy-to-deploy independent parts that handle a limited set of functionality. The goal is to make it easier to maintain and troubleshoot services when downtime occurs. Microservices isolate services to ensure that a service facing downtime does not affect other services.
Containers are an important part of putting the microservices design into action. They let developers split a big app into smaller, accessible pieces, each of which is contained in its own container.
Containerization is good for microservices because it lets services run in different containers, keeping them separate. This helps make sure that other services won’t be affected if one goes down for most reasons other than the shared platform fails. Also, this separation makes it easy to fix and re-deploy certain services without affecting the whole program. Microservices’ modular design makes management and changes easier, which cuts costs and makes the application more stable.
Continuous Integration and Continuous Deployment (CI/CD)
CI/CD is used to allow software teams to build, test, and deploy software rapidly in an automated manner. Containers are often an important part of making CI/CD work. Containers make sure that environments stay the same throughout the software development lifecycle by enclosing apps and the libraries they need.
This then makes it possible for apps to be automatically built, tested, and deployed, which leads to fast iteration and continuous delivery of software updates. Containers can be expanded and moved around, which makes CI/CD processes run more smoothly and efficiently.
Infrastructure Security
By separating software systems and components, containerization tends to make infrastructure more secure. Containers were made to keep things safe by isolating them, which reduces the attack area and stops security holes from spreading through the infrastructure. When you run apps in containers, security risks are contained within each container, which protects the system as a whole.
How to Containerize an Application
In this section, we will learn how to containerize a simple React app; however, this tutorial won’t cover any React concepts. Go ahead and clone the React app from GitHub using the following command:
|
1 |
git clone https://github.com/xTrilton/my-app.git |
After cloning the application, change the directory to the my-app directory. Do not change to another directory when executing the following command.
|
1 |
$ cd my-app |
The first step to containerizing your application is writing a Dockerfile. A Dockerfile specifies dependencies that will be used to create the container. Now create an empty file called Dockerfile and add the following contents.
|
1 2 3 4 5 6 7 8 9 10 |
FROM node:19-alpine3.16 WORKDIR /app ENV PATH="./node_modules/.bin:$PATH" COPY . . # install npm dependencies RUN npm install RUN npm run build # # start an application CMD ["npm", "run", "start"] |
The following explains the contents of the Dockerfile:
FROM node:19-alpine3.1:This specifies the base image to use for the container. Here, it’s using a version of the official Node.js image (node), specifically version 19, which is based on Alpine Linux 3.16.WORKDIR /app: This sets the working directory inside the container to/app. All subsequent commands will be run from this directory.ENV PATH="./node_modules/.bin:$PATH": Sets an environment variable in the container. It modifies thePATHenvironment variable to include the./node_modules/.bindirectory. This is useful for running executables from Node.js packages installed in thenode_modulesdirectory without specifying their full path.COPY . .: This command copies all files and directories from the current directory on your local machine (the first.) to the current directory in the container (the second .), which would be /app as set by theWORKDIRcommand.RUN npm install: Runsnpm installin the container, which installs the Node.js project’s dependencies as defined in thepackage.jsonfile. These dependencies are installed in the container’s/appdirectory.RUN npm run build: This line executes the build process for the application. It’s common in Node.js projects to have a script defined inpackage.jsonunder the scripts section namedbuild. This is typically used for compiling or preparing the application for production.CMD ["npm", "run", "start"]:TheCMDcommand specifies what command to run when the container starts. In this case, it runsnpmrunstart. Like build, start is usually a script defined in thepackage.jsonfile and is used to start the application. For a React application, this would start the React development server.
After creating a Dockerfile, build the image using the following command:
|
1 |
docker build -t my-app . |
Now, Docker will start downloading all necessary layers and files needed to build the image specified in the Dockerfile. The period . tells docker to find the Dockerfile in the current directory. The -t flag tags and names the container you are building.
After successfully building the image, use docker run command to start the container.
|
1 |
docker run -dp 127.0.0.1:3000:3000 my-app |
The -d flag detaches the container and runs in the background while -p parameter publishes the container by creating a port mapping between the host: 127.0.0.1 and container.
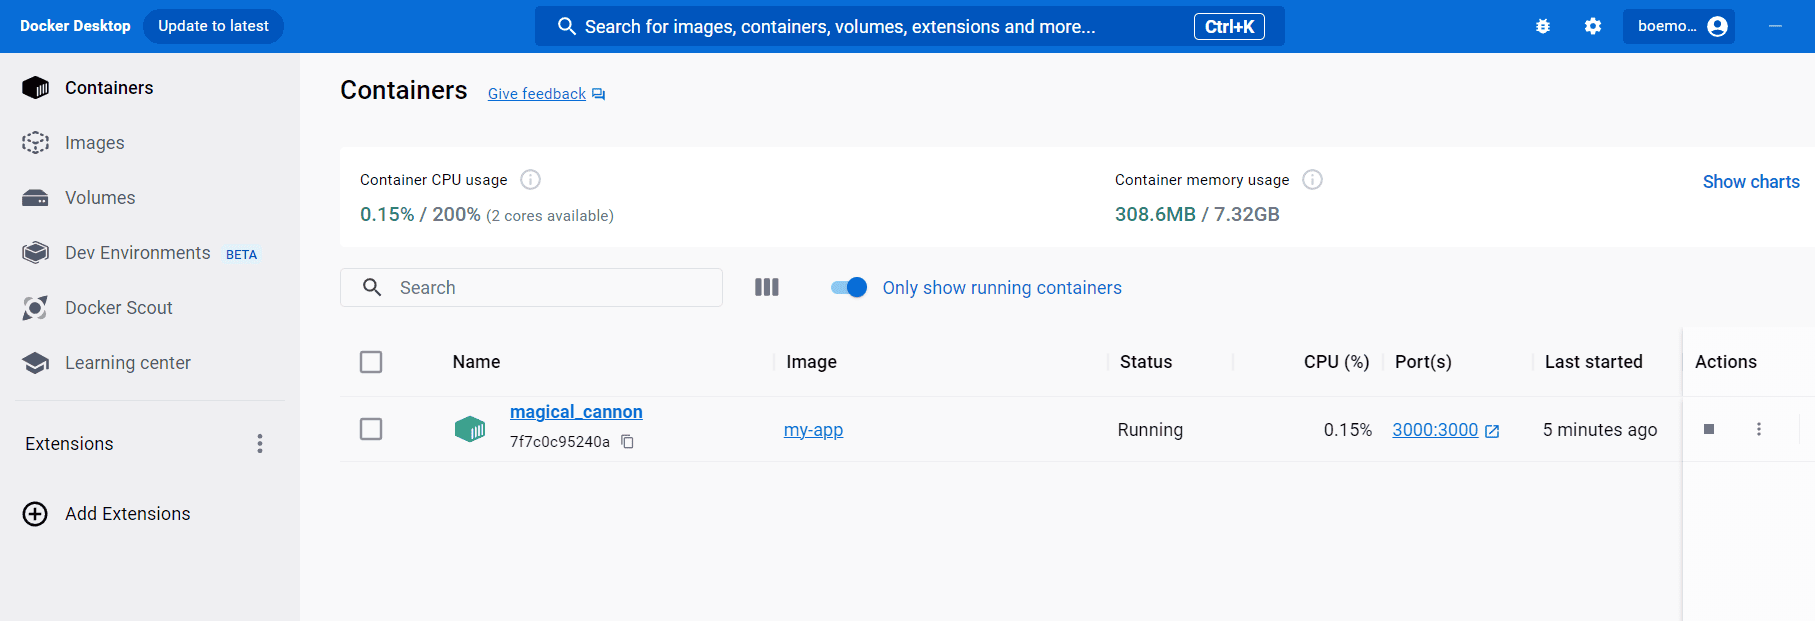
Next, check if your container is running. You can do this by executing the $ docker ps command; or you can check on the Docker Desktop dashboard.
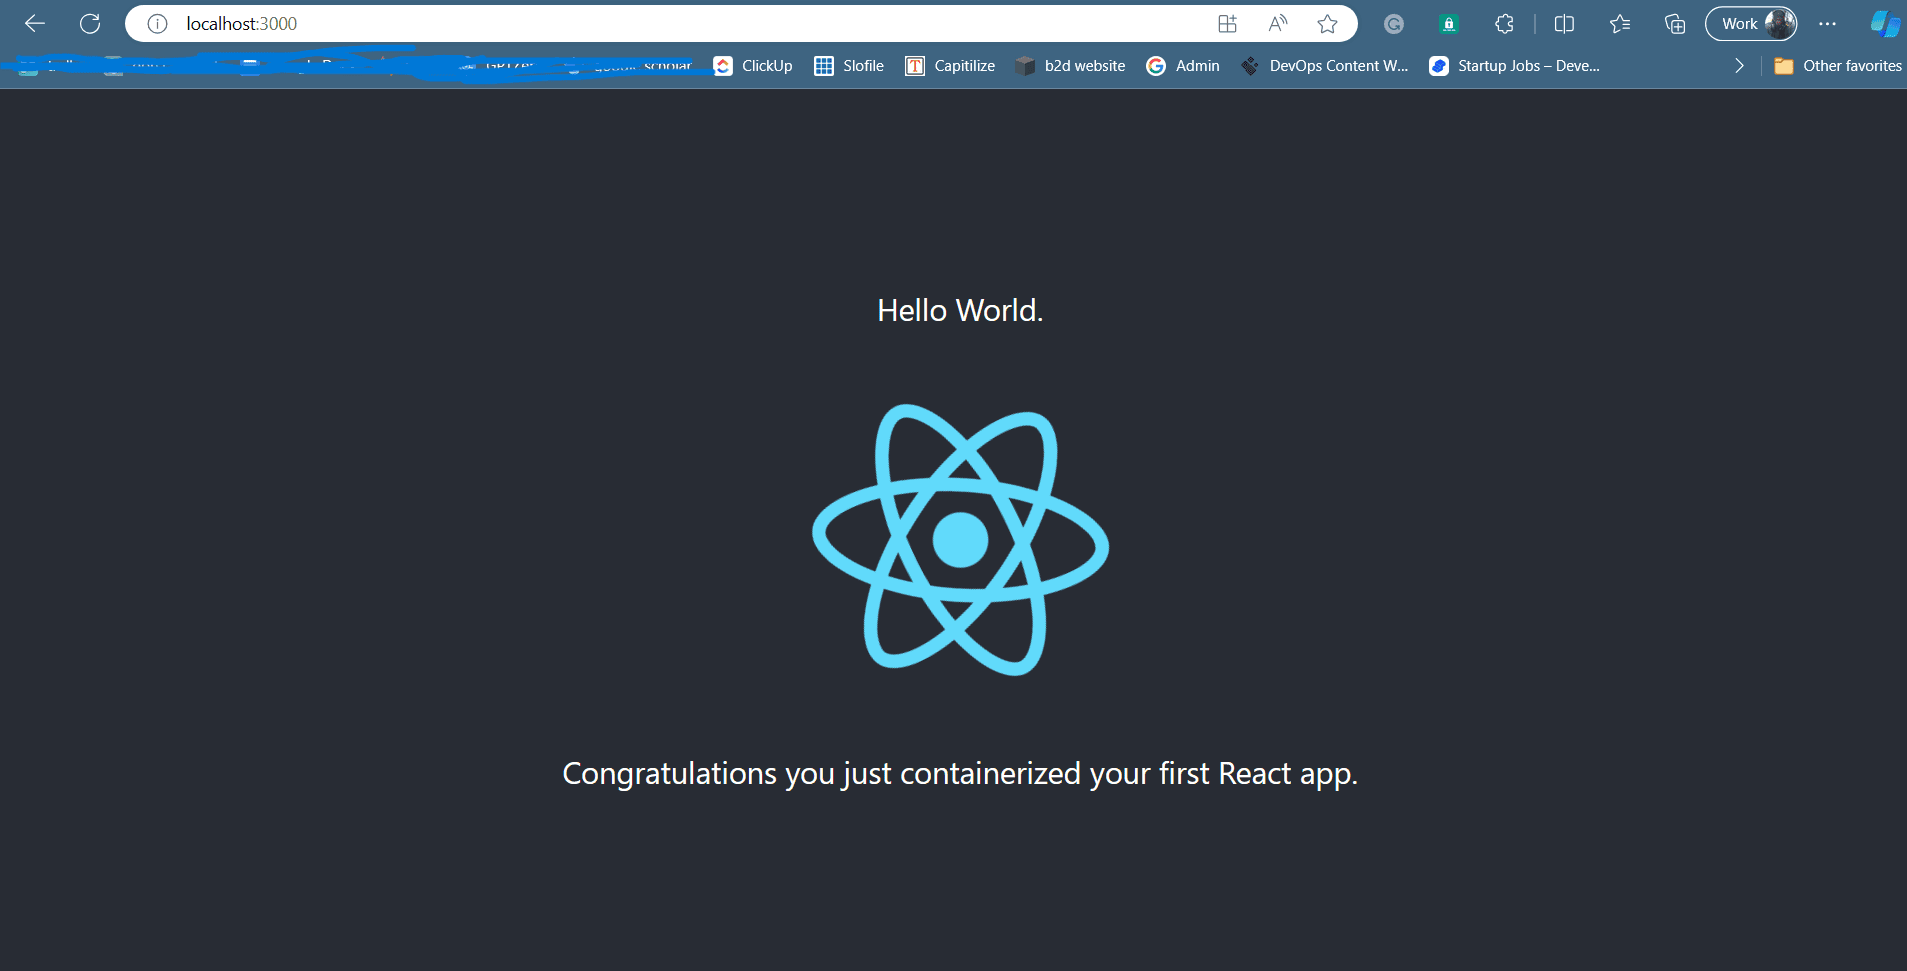
If your container is running, open your web browser and input the localhost: http://localhost:3000/. You will see your React app running on the web.
Benefits of Containerizing Your Workloads
There are many good things about containerization that make it a good way to run your workloads. These are the main reasons why you should containerize your work:
- Teamwork and collaboration: Since containers can run on any operating system without hiding the hardware, they make it easier for teams to work together. With container images that are tailored to their needs, developers who work on different operating systems and settings can still do their jobs together without any problems.
- Quick and effective: Because they only carry the necessary parts, containers can start up faster than virtual machines. This means that deployment times will be shorter, which means that you can get apps and services to people faster.
- Cost-effective: Container runtimes don’t need any special hardware to run. The also use resources more efficiently than virtual machines, and you can set resource limits to limit how many resources a container can use. This can help keeps you from spending more than necessary.
- Improved scalability: Containerization makes your system more flexible. Adding similar containers as demand rises is an easy way to make multiple application instances. Platforms for managing containers, such as Kubernetes, can automate the scaling process based on data like how many users are using the service. Kubernetes gives the containers more resources when there is a lot of traffic. There are fewer resources when there is less traffic.
- Enhanced risk management: Containerization lets you deploy different parts of a program separately in their own containers, which improves risk management. Better risk management means that if one part of the program is hacked, it won’t affect other parts that are running in different containers.
Conclusion
Containerization has become a vital part of software engineering. The advantages of containerizing applications, such as improved productivity, faster deployment, and enhanced security, make it a valuable practice for organizations. While the initial process of containerization may seem daunting, following the steps outlined above can help alleviate complexity.
By embracing containerization, organizations can unlock greater flexibility, scalability, and efficiency in software development and deployment processes. With careful planning, adaptation, and continuous improvement, containerization can enable businesses to stay ahead and deliver the highest quality applications to customers.
This document contains proprietary information and is protected by copyright law.
Copyright © 2026 Red Gate Software Limited. All rights reserved


Load comments