
When it comes to high-availability in Hyper-V Server 2012, two options are available:
- Quick migration – this option was already available in Windows Server 2008 and is built on top of Windows failover-clustering. Basically it is a failover cluster where the Virtual Machines are configured as cluster resources. In the case of a failover, the Virtual Machines are stopped, they failover to the other cluster node and are started again. This always comes with some downtime;
- Live migration – Live migration was introduced in Windows Server 2008 R2 and is also built on top of Windows failover-clustering. In this case, a failover cluster is built and, again, the Virtual Machines are cluster resources as well. But in a failover, the VMs do not stop but keep running during the failover. The entire running machine is brought to the other cluster node without any downtime.
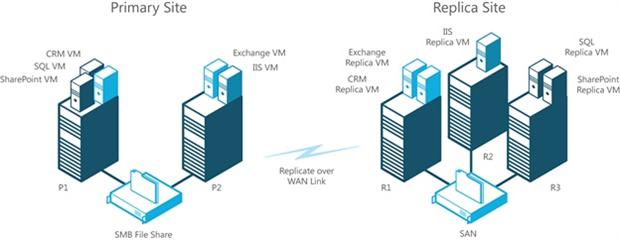
Both options are intended to improve availability for Hyper-V but there still is no rapid Disaster Recovery with either of them. To make good this omission, Windows Server 2012 brings a rapid Disaster Recovery solution by means of Hyper-V Replica. A Hyper-V Replica installation consists of a primary site where all Hyper-V hosts and the respective Virtual Machines are running. Besides the primary site there’s also a replica site. Hyper-V hosts are also located in this replica site but they contain replicas of virtual machines that are running in the primary site. Every five minutes, the primary site sends information regarding these last five minutes to the replica site where this information is replayed into the Hyper-V Replica.
When disaster strikes in the primary site, the virtual machines are still available in the replica site. Part of the disaster recovery process is taken up with firing up these virtual machines. Since the replication is an asynchronous mechanism, you will always face some data loss, though it should be very minimal.
It is a manual disaster recovery process so there’s always intervention from the sysadmin. This is in contrast to an automated high-availability solution such as the live migration that I discussed earlier, which has no downtime, unless an unscheduled outage occurs.
Hyper-V Replica is targeted by Microsoft towards the SMB market which traditionally cannot afford a solid disaster recovery solution. It is now possible to easily build a disaster recovery solution by using two Windows Server 2012 Hyper-V hosts without spending too much money. The replication is asynchronous and does not send too many data across the WAN link so it should run fine on any broadband connection you typically see in the SMB market.
It is not really a disaster recovery solution for a high-end enterprise. These will need a fast and reliable solution that performs well and is capable of replicating large amounts of data to other datacenters. In these environments you typically see large SAN infrastructures that replicate their data to other locations.
This article is aimed at helping you understand what “Hyper-V Replica” is, and how you can benefit from it before you implement it in your production environment. I’ll try to describe all the benefits that Hyper-V Replica provides, and the minimum configuration that is required to enable this technology.
There are various tips and notes highlighted in the each section/configuration page which help you understand the concepts illustrated.
For Hyper-V Replica, we will discuss the following topics in detail in the this part of this article series:
- Overview of Hyper-V Replica and benefits
- Hyper-V Replica Components
- Installing and Configuring Hyper-V Replica
Note: This article discusses only Hyper-V Replica and not the applications running within Virtual Machines that are replicated. Not all applications support Hyper-V Replica. For example, SQL Server 2012 does support it but Exchange Server does not support Hyper-V Replica at any time. Please check with the appropriate application to check whether it supports Hyper-V Replica.
One might ask if Hyper-V Replica can be combined with the Windows Azure infrastructure and thus have a replica ‘in the cloud’. Unfortunately this is not the case. Hyper-V Replica on the actual hypervisor is not available for end-users in Windows Azure.
Terms used throughout the article:
| Primary Server | A Windows Server 2012 server running with Hyper-V Role enabled is called a Primary Server which hosts Virtual Machines participating in the replication. The Primary Servers run on primary or production site. |
| Replica Server | A Windows Server 2012 server running with Hyper-V Role enabled is called a Replica Server which accepts replication from Hyper-V Primary Servers. The Replica Servers run on replica or disaster recovery site. |
| Primary Site | A site on which Primary Servers are located. |
| Replica Site | A site on which Replica Servers are located. |
| Primary Virtual Machine | A Virtual Machine that is enabled for replication and is running on Primary Server. |
| Replica Virtual Machine | A copy of Primary Virtual Machine that is running on a Replica Server in a Replica Site. |
| Hyper-V Replica API | Application Programming Interface (API) available with Hyper-V Replica. Vendors can use APIs provided with Hyper-V Replica to build a customized disaster recovery environment. |
| VSS Snapshots | A process associated with Volume Shadow Copy Service to take point-in-time snapshots of volumes on the Operating System. |
| Replication Engine | A component of Hyper-V Replica which is responsible for replicating the replicas to Replica Server. |
| Network Module | A component of Hyper-V Replica which improves the network traffic over slow WAN links. |
| Change Tracking | A component of Hyper-V Replica responsible for tracking changes to the Primary Virtual Machines. |
| Standard Replicas | A ‘point-in-time’ copy of the Virtual Machine VHD file which is generated by the Primary Server and available to use with Replica Server at disaster recovery site when recovering a Virtual Machine. |
| Test Failover | A mechanism implemented by Hyper-V Replica to perform tests on Replica Virtual Machine. |
| Planned Failover | Planned Failover is initiated from Primary site to Replica site in case of any planned events or maintenance of Primary Site. |
| Failover | Failover, sometimes called unplanned failover, is initiated on Replica Virtual Machine. |
| Reverse Replication | A process in which the virtualized workload is reverse-replicated from Replica to Primary Server. |
| Cancel Failover | A process in which the virtual machine’s state is returned to what it was before a failover was started. |
About Hyper-V Replica
“Hyper-V Replica” is a technology introduced in Windows Server 2012 which does not require “Windows Failover Cluster” to be configured on Hyper-V servers.
There are a number of benefits that come from using “Hyper-V Replica” in the production environment as a disaster recovery technology. “Hyper-V Replica” can not only be operated in a non-clustered environment but also provides a sub-set of components; called “Hyper-V Replica Broker”, which can be used to enable high-availability for Hyper-V “Primary Servers”. In this article, I will not touch upon the “Hyper-V Replica Broker” component but will focus on more on how “Hyper-V Replica” is beneficial and how to implement it.
Hyper-V Replica provides the following benefits:
- With some downtime, virtualized workloads can be failed over to the “Replica Server” in case something goes wrong with the “Primary Server”.
- There is no need to have identical hardware for “Primary and Replica Servers” as it is the case with the “Windows Failover Clustering” feature.
- “Hyper-V Replica” can operate in “Workgroup Security Model” and “Domain Security Model” modes. So Active Directory domain membership is not required for “Primary and Replica Servers”.
- “Hyper-V Replica” provides options for restoring virtual machines at the “Replica Site” to a ‘point-in-time’ backup copy.
- “Hyper-V Replica” provides Application Programming Interfaces (APIs). With the help of APIs, software vendors can customize the options and build an enterprise disaster recovery solution.
- As opposed to “Quick and Live Migration” high-availability technologies of Hyper-V, the active directory membership is not required for “Primary and Replica Servers” and both the servers can be part of the different active directory domain, if required.
- Hyper-V Replica is closely integrated with the Volume Shadow Copy Service which allows administrators to create multiple “point in time backup” copies.
- Since replicated data travels over the network, Hyper-V Replica provides encryption and data compression when replicating virtual machine data to the “Replica Site”.
Hyper-V Replica Components
Before I start explaining how to implement Hyper-V Replica, it’s time to understand the main Hyper-V Replica components.
| Tip: | It is worth poking around the component architecture of a technology before you deep dive into installations and configuring other options of it. |
There are at least four components involved when configuring Hyper-V Replica.
- Primary Server: A server running Microsoft Hyper-V version 3.0 (Windows Server 2012) with “Hyper-V Replica” enabled. This Server will participate in the replication with “Replica Server” configured at the other end. The virtual machines running on the “Primary Server” are configured to participate in the replication process. There is no need to configure any other component for Hyper-V Replica on the Primary Server. The Primary Server always runs in the production site or Primary Site. Primary Server monitors the changes on the Virtual Machines’ VHD files with the help of modules implemented in the “Replication Engine”.
- Replica Server: A server running on Windows Server 2012 with Hyper-V role enabled in a disaster recovery site which accepts the replication packets from the “Primary Server”. Replica Servers always run in disaster recovery site or “Replica Site” in Hyper-V terminology.
- Primary Virtual Machine: A virtual machine configured on the ‘Primary Server” which participates in the replication. By default, no virtual machines are configured to replicate. You must enable replication for at least one virtual machine running on the “Primary Server” before “Hyper-V Replica” feature is in action. The Primary Virtual Machine is available to users and will be running all the time unless something goes wrong with it.
- Replica Virtual Machine: A virtual machine which is a copy of the “Primary Virtual Machine” and is hosted on the “Replica Server”. “Replica Virtual Machine” has the backup copies attached to it which are used during the failover process discussed in this article. The Replica Virtual Machine will always remain OFF and be ready to come online if something issues happen to the Primary Virtual Machine.
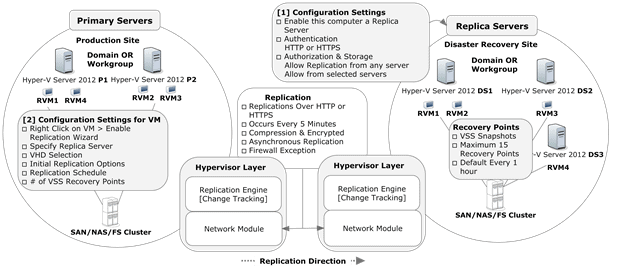
Figure 1.0 – Hyper-V Replica and its components in Workgroup or Domain Security Model
As shown in Figure 1.0, the Primary Servers (P1 and P2) are running on the production site and the Primary Virtual Machines (RVM1, RVM2, RVM3, and RVM4) are hosted on P1 and P2.
Replica Servers (DS1 and DS2) are running in the disaster recovery site and the “Replica Virtual Machines” (RVM1, RVM2, RVM3, and RVM4) are hosted on the DS1 and DS2 Replica Servers.
| Tip: | Windows Server Hyper-V 3.0, a standalone and free version released with Hyper-V Role enabled, can also be used to participate in the Hyper-V Replication. |
There can be more than one “Replica Server” running in the disaster recovery site accepting replication packets from multiple Primary Servers running in the production site as shown in the figure 1.0 above. Depending on your customer’s requirement, you can also host Replica Servers in production site and Primary Servers in disaster recovery site.
Note: One virtual machine can be configured with one “Replica Server”. The same virtual machine cannot be used by any other “Replica Servers”.
To facilitate Hyper-V Replica in Windows Server 2012 additional software was added to the Hypervisor:
- Replication Engine
- Network Module
Note: There are other components implemented in “Hyper-V Replica” component but the above two components play an important role.
As shown in figure 1.0, the hypervisor contains a replication engine; this is the same on the primary server and the replica server. On the primary server the replication engine tracks all the write operations of the Virtual Machines on this server. These changes are replicated to the replica server. The replica server in turn has (of course) the same modules but does not track any changes on the Virtual Machines, unless a failover has occurred and the replica server has become the primary server, but this is not normal .
As shown in the figure 1.0 above, the Virtual Machines running on the Primary Server are configured in a file server cluster. The Hyper-V Replica is designed in such a way that it works irrespective of where the virtual machine VHD files resides. The Virtual Machine VHD files can be hosted on a NAS LUN, DAS or an SMB share on a file server or on a CSV (Clustered Shared Volume). There is no need to implement a cluster just for storing the Virtual Machine VHD files but it is recommended to store the Virtual Machines VHD files on a failover cluster to avoid any single point of failure for storage devices.
The Primary Server and Replica Server can authenticate using either HTTP (Kerberos) or HTTPs (Certificate) as indicated in the figure 1.0 above. A firewall exception is mandatory for Hyper-V Replica. Please note that the firewall exception rules for port 80 for HTTP and 443 for HTTPS are already created in the Windows Firewall. The firewall rules just need to be enabled.
A firewall exception is mandatory for Hyper-V Replica Primary and Hyper-V Replica Servers.
By default, replication from Hyper-V Primary Server to Hyper-V Replica Server occurs every 5 minutes and this interval cannot be changed. The packets that travel from Primary to Replica Server are compressed if you have enabled compression for the virtual machine. The encryption is available, or packets get encrypted, only if you have selected “Certificate-Based HTTPS” as the authentication mechanism between Primary and Replica Servers.
| Tip: | You can enable/disable compression per Virtual Machine when configuring a Virtual Machine for Hyper-V Replication. |
It is important to understand that Hyper-V Replica does not provide replication for specific Virtual Machine components. Hyper-V Replica enables the complete Virtual Machine for replication. Since Hyper-V Replication happens at VHD level (or file level), you can uncheck VHD files which you do not want to replicate when you are enabling the Virtual Machine for replication.
Hyper-V Replica provides two types of replica copies; “Standard Replica copy” and “Application-Consistent replica copy”. These replica copies are called “recovery points” which are explained in the later part of this article.
Hyper-V Replica uses Volume Shadow Copy Service (VSS) to take point-in-time snapshots (Application-Consistent recovery point) of the applications running inside the Virtual Machine and/or Virtual Machine (Standard Replica Recovery Point). A maximum of 15 recovery points can be created, and the default interval for creating these copies is every hour.
If the limit is reached (16th copy), Primary Server merges the oldest snapshot to the base replica VHD.
Replica Backup copies are explained more in detail in a later part of the article.
Primary Servers and Replica Servers can operate in different domains in the same Active Directory Forest as long as they are able to communicate and authenticate.
| Tip: | Active Directory implements two-way transitive trust relationships between the domains of the same Active Director Forest. So by default every other object in the domain is trusted by the other domains. Hyper-V Replica utilizes the trust-relationship to authenticate Primary and Replica Servers in different domains. |
Installing and Configuring Hyper-V Replica
You must have sufficient storage on both the Primary and Replica servers to host the files used by virtualized workloads. There must be network connectivity between the locations that are hosting the Primary and Replica servers. Properly-configured firewall rules that permit the replication between the Primary and Replica sites are the minimum requirements before you can configure and implement the Hyper-V Replica feature.
Before I start to explain how to configure Hyper-V Replica, I ought to explain that Hyper-V Replica works with two security models:
- Workgroup Security Model
- Domain Security Model
In “Workgroup Security Model”, you configure Hyper-V Replica in a Workgroup environment but this model requires a certificate based authentication model which is outside the scope of this article. In this article we’re going to use the domain security model, based on the regular Active Directory domain. As a high level process, four steps are performed to implement Hyper-V Replica. We’ll assume that you have already installed two or more Windows Server 2012 servers and enabled those Hyper-V Roles on them which are going to participate in the replication. Please also make sure to join these servers to the domain if you have not done so already.
- Step 1 – Enabling Hyper-V Replica in the disaster recovery site
- Step 2 – Enabling Virtual Machines for replication.
- Step 3 – Enabling the Firewall Rules
- Step 4 – Finalizing the configuration
Step 1 – Enabling Hyper-V Replica in the disaster recovery site
There are three configuration options available when you click on the Hyper-V Settings > “Replication Configuration” setting in the Left Pane as shown in the figure 1.1 below:
- Enable this computer as a Replica Server
- Authentication and Ports
- Authorization and Storage
Enable this computer as a Replica Server
To enable the Hyper-V Replica, check “Enable this computer as a Replica Server” on the Hyper-V Server Settings page as shown in the figure 1.1 below:

Figure 1.1 – Hyper-V Replica Settings Page
Note:By default, the Hyper-V Replica is not enabled with the first install.
| Tip: | This is the only configuration setting provided in Hyper-V Manager UI to enable Hyper-V Replica on the Replica Server other than configuring a Primary Virtual Machine to participate in the replication which you will perform on Primary Server. |
Authentication and Ports configuration
Hyper-V Replica and Primary Servers will authenticate over one of two protocols; either “Kerberos HTTP” or “Certificate-based Authentication using HTTPS”. You can select the authentication mechanism using the “Authentication and Ports” form on this settings page.
| Tip: | HTTP port 80 and HTTPS port 443 are, by default, enabled in the firewall exception on the Replica Server. If you change the port number here, you must be sure to modify the existing Hyper-V Replica firewall rule and then enable the firewall exception so the Replica Server can receive the packets from Primary Server. |
Note: You can use Certificate-based Authentication (Using HTTPs) if you need the data to be sent over the network be encrypted. The data will not be encrypted if you select Kerberos Authentication (HTTP).
Authorization and Storage configuration
For authorization, you have a choice:
- “Allow Replication from any authenticated Server” option allows this Hyper-V Replica Server to accept virtual machine replication packets from any Primary Server which has successfully authenticated using one of the authentication mechanisms discussed above.
- “Allow Replication from the specified Servers” option allows this Hyper-V Replica Server to accept virtual machine replication packets only from the servers which are part of the list you have configured.
Both options; “Allow Replication from any authenticated Server” and “Allow Replication from the Specified Servers” allow you to specify the storage location for the replicated Virtual Machines. This Is useful for configuring different storage locations for Virtual Machines being replicated from different Hyper-V Primary Server. You can also create the Trust Groups so that Replica Servers accept replication packets only from the trusted servers.
Click “Ok” or “Apply” to configure this server as a Hyper-V Replica Server.
Please note:
- By default, no authentication type is selected and if you try to “Apply” the configuration or try to configure this server as a Hyper-V Replica Server, the following error message is shown.
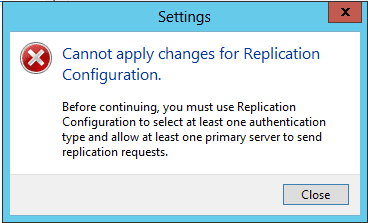
Figure 1.2 – Configuration Page Error Message for Authentication
- Similarly, you must enable the “Firewall Exception Rule” for Hyper-V Replica to operate successfully. The message for enabling the firewall rule is shown when you hit the “Apply” button on the “Enable Replication Configuration” Page as shown in the figure 1.3 below.
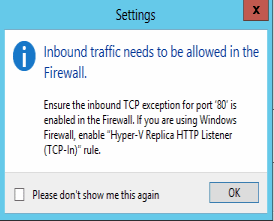
Figure 1.3 – Firewall Rule Enabling Message
Step 2 – Enabling Virtual Machines forreplication
Once the Hyper-V Replica server is configured to receive replication, it is time to configure a Primary Virtual Machine for replication on Primary Server.
Note: By default, no Virtual Machines are configured to participate in the replication. You must configure at least one Virtual Machine on the Primary Server.
To configure a Virtual Machine to participate in the Hyper-V Replica, right-click on the Virtual Machine and then select the “Enable Replication” option as shown in the figure 1.4 below:
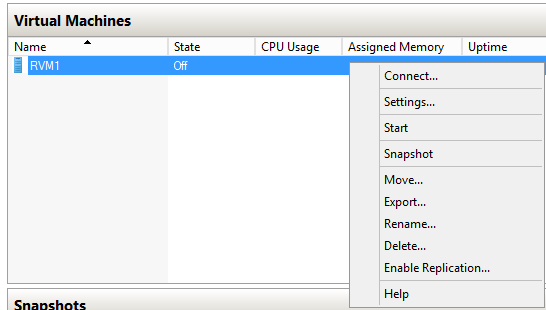
Figure 1.4 – Enable Replication on Right Click Context Menu
Note: The “Enable Replication” is a new option that has been added to the Right-Click context menu of the Virtual Machines on Hyper-V role running on Windows Server 2012.
Clicking on “Enable Replication” option brings the configuration wizard as shown in the figure 1.5 below:
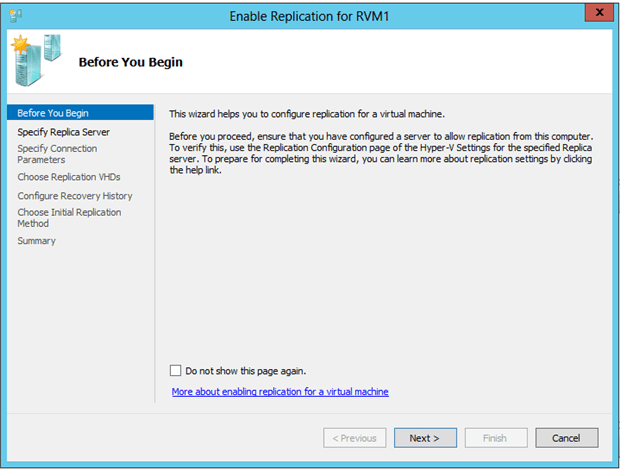
Figure 1.5 – Configuration Page for Virtual Machine Replication
In “Enable Replication for RVM1” page, you can configure the following options:
- Specify Replica Server
- Specify Connection Parameters
- Choose Replication VHDs
- Configure Recovery History
- Choose Initial Replication Method
Specify Replica Server
In “Specify Replica Server” configuration page, you are asked to enter the “Hyper-V Replica Server” name to which this Virtual Machine will be replicated as shown in the figure 1.6 below:
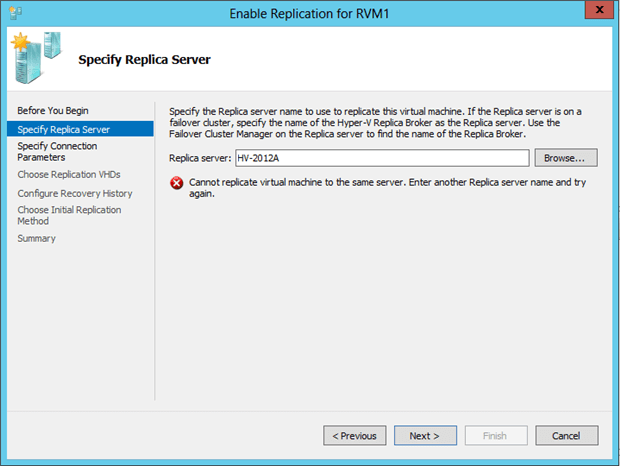
Figure 1.6 – Specify Replica Server Configuration Page
Note: You are not allowed to specify the Hyper-V server name on which the Virtual Machine is being currently configured for the replication and this is what you see in the figure 1.6 above. An error message will be displayed to let you know that the Virtual Machine cannot be replicated to the same server.
If the Replica Server is not configured to receive replication, or if the Replica Server is configured but not allowed to replicate Virtual Machines from this Primary Server, then you will see the error message indicating that Hyper-V Replica must be enabled for this server, or this Primary Server must be added in the “Allow Replication from the specified servers” list before you can configure the Primary Virtual Machine for replication on the Primary Server.
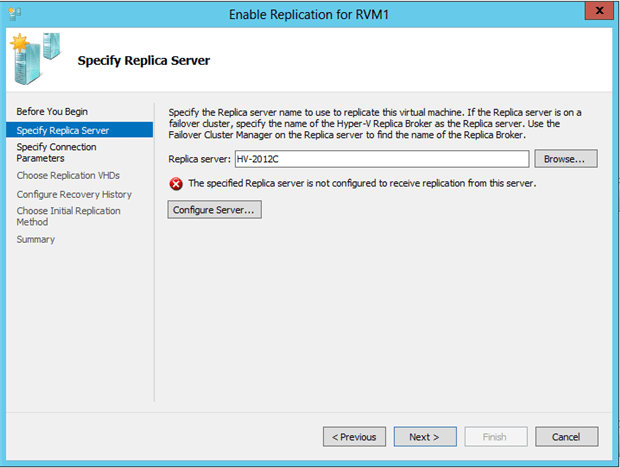
Figure 1.7 – Specify Replica Server Configuration Page
| Tip: | The wizard allows you to configure the destination server as Replica Server using the “Configure Server” button as shown in the above figure 1.7. |
Click “Next” button on the configuration page to see the “Specify Connection Parameters” configuration page.
Specify Connection Parameters
In the “Specify Connection Parameters” configuration page, the Replica Server setting, which you configured in Step 1, are displayed as shown in the figure 1.8 below.
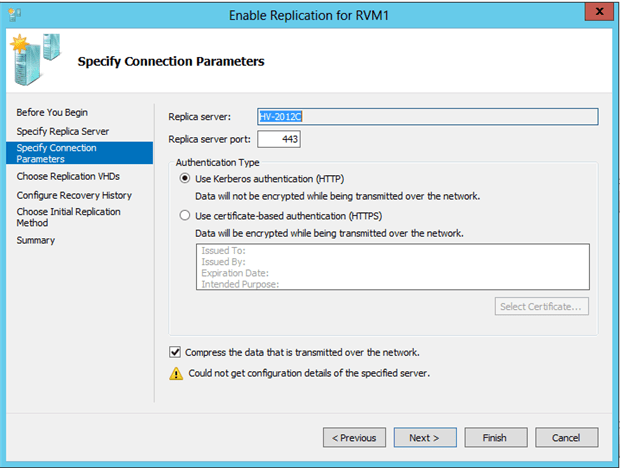
Figure 1.8 – Specify Connection Parameters Configuration Page
If the wizard is not able to get the configuration details for the Replica server successfully then you will see “Could not get configuration details of the specified server” as shown in the above figure 1.8. It could be because:
- The destination server is not configured as a Replica Server
- The destination server is not a member of the domain.
- The destination server is not registered in the DNS Server.
| Tip: | Replica Server must be registered in the DNS server before it can participate in the replication. This is one of the requirements for the Replica Server. |
If the wizard is able to successfully get the configuration details then you will see the Replica Server name as FQDN in the “Replica Server” text box as shown in the below figure 1.9:
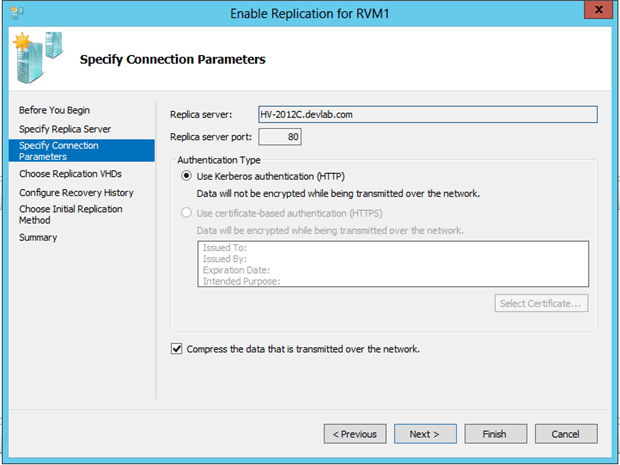
Figure 1.9 – Specify Connection Parameters Configuration Page and Replica Server Name showing as FQDN
The configuration details gathered (when you clicked “Next”) from the previous page for Replica Server are shown on the “Specify Connection Parameters” page, but you cannot modify any parameters from this configuration page. This is just for your information that the destination server is configured as a Hyper-V Replica Server and is configured with these parameters.
The only option you can change here is the “Compress the data that is transmitted over the network” for the Primary Virtual Machine. This option is a ‘per Primary Virtual Machine’ setting. You can enable or disable compression at this stage for the Primary Virtual Machine.
| Tip: | The data from Primary Server to Replica Server will be transmitted over the network without compressing them first. It is recommended to enable the compression for the Primary Virtual Machine data. The replication traffic will use more bandwidth than necessary if you do not enable the compression for the Primary Virtual Machine. |
Hit the “Next” button to see the “Choose Replication VHDs” configuration page.
Choose Replication VHDs
The “Choose Replication VHDs” configuration page provides a list of VHD files which are associated with Primary Virtual Machine. You can uncheck the VHD files you do not want to replicate to the Replica Server as shown in the Figure 1.10 below.
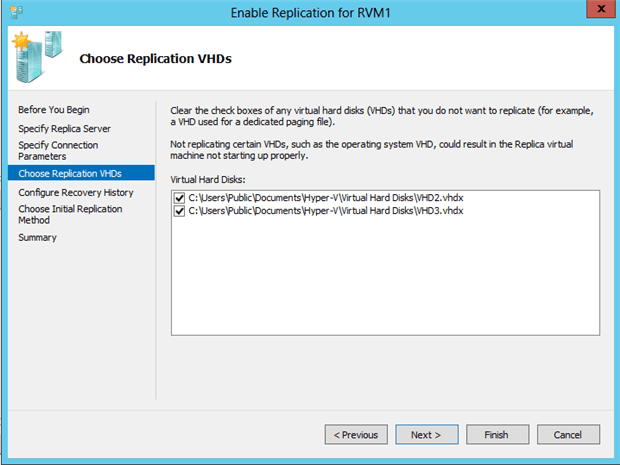
Figure 1.10 – Choose Replication VHDs Configuration page – Check/Uncheck VHD files
At this stage, you’ll need to have identified the VHD files which are going to participate in the replication. The Virtual Machine configuration file (XML) will be replicated to the Replica Server in any case but if you select VHD files unnecessarily, it will put extra overhead on the Replication Engine on the Primary Server and more network bandwidth will be used for a VHD file which need not be replicated. The wizard cannot work out which VHD file belongs to the Operating System and which one belongs to the data. You might have noticed that “Choose Replication VHDs” configuration page talks about excluding the “Paging file”. Well, you can configure a second VHD on the IDE controller and move the paging file to that location and then do not select the paging file VHD during “Choose Replication VHDs” configuration page.
All VHD files including paging VHD file must be replicated once. Once the initial replication is completed, break and re-enable the replication but this time, do not select the paging VHD file. This way, the paging file VHD will not be replicated to the Replica Server which saves a lot of bandwidth.
Initial replication options are explained in the later part of this article.
You will need to be wary of a couple of points:
- Moving the paging file to a VHD file attached to a SCSI Controller is not supported. This is because the SCSI Controller is a synthetic device and available only when Integration Service Components are initialized. The Integration Service components initialization happens after the operating system has loaded successfully!
- Moving the Paging file to a separate drive will disable the ability to create memory dumps if a Blue Screen Of Death (BSOD) occurs due to a driver or DLL failure!
| Tip: | It is not necessary to select all VHD files of the Primary Virtual Machine for replication but you must not forget to include the VHD files which are important ones. For example, you must select the VHD file on which the operating system is installed or any other VHD file which you think is important and must be replicated to the Replica Server. |
Once you’re done selecting/deselecting VHD files, click “Next” button to see the next configuration page.
Configure Recovery History
The “Configure Recovery History” configuration page allows you to configure the recovery points for the Primary Virtual Machine. In case something goes wrong at the Primary Server/site, you can use recovery points to restore the Virtual Machine to a ‘point-in-time’ snapshot.
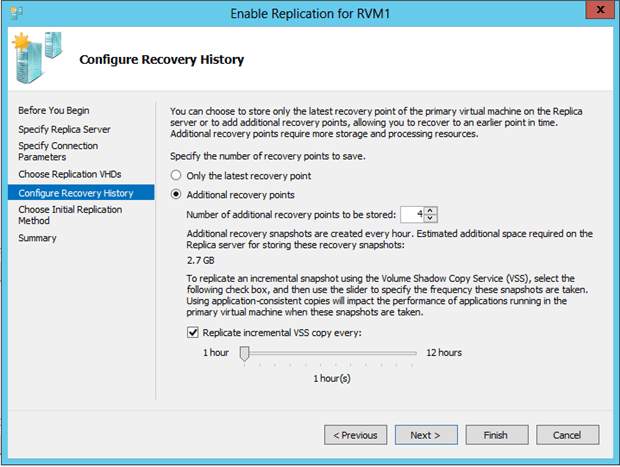
Figure 1.11 – Configure Recovery History Page
The Recovery History is an important part of the configuration. There are two options available for you to choose for specifying the Recovery History; “Only the latest Recovery Point” and “Additional Recovery Points” as shown in the figure 1.11 above. Recovery history is designed for Primary Virtual Machines participating in the Hyper-V Replica environment. It allows data to be restored to an earlier ‘point-in-time’ backup copy at Replica Virtual Machine running at Replica Site.
Note: Recovery History is not available for standard Virtual machines or the Virtual Machines which do not participate in the Hyper-V Replica.
There are two types of backup copies provided by Hyper-V Replica for Virtual Machines:
- Standard Replica Backup copy
- Application-Consistent Backup copy
The “Standard Replica Backup Copy” can be further divided into two types:
- Latest Recovery Backup Copy
- Point-In-Time Backup Copy“.
The “Latest Recovery Backup Copy” is a backup copy that is created by the Primary Server for Primary Virtual Machine and only one backup copy is created and managed. This backup copy is created whenever any changes occur to the base VHD file of virtual machine. The changes are merged into the base VHD and are replicated every 5 minutes. The Primary Server maintains “single” log/ Standard Replica backup copy in which it keeps the changes to be replicated till replication interval occurs. Selecting “Only the latest recovery point” in the wizard enables you to have this type of backup copy as shown in the figure 1.11 above.
The “Point-In-Time Backup Copy” allows a Primary Server to keep multiple backup copies for a Primary Virtual Machine. The “Point-In-Time Backup Copy” is created every hour by the VSS component and a maximum of fifteen backup copies can be created as highlighted in the wizard shown in figure 1.11 above. The one-hour interval for creating these backup copies cannot be changed. Selecting “Additional recovery points” in the wizard enables you to have this type of backup copy. Selecting “Additional recovery points” enables other options under this category which is to specify the additional recovery points in the “Number of additional recovery points to be stored” text box.
Both “Latest Recovery Backup Copy” and “Point-In-Time Backup Copy” are sent to Replica Server. Enabling “Additional Recovery points” will put more overhead on the “Primary Server” and requires more system resources for processing and enough storage to store the “Point-In-Time Backup Copy“.
| Tip: | “Additional recovery points” will appear as “Standard Replicas” when you use any of the failover types discussed in the next part of this article. “Additional Recovery Points” are sometimes called “Crash-Consistent” backup copies. |
The “Replicate incremental VSS copy every” option (as shown in the figure 1.11 above) is different from “Only the latest recovery point” and “Additional Recovery points“. This is sometimes referred as “Application-Consistent” backup copy. An “Application-Consistent” backup copy is created by the Hyper-V VSS Writer for the applications which are running in the Primary Virtual Machine. The Hyper-V VSS Writer communicates with Hyper-V VSS Requestor Service in Primary Virtual Machine, running as part of the Hyper-V Integration Service Components, to create an “Application-Consistent” backup copy.
| Tip: | “Hyper-V VSS Requestor Service must be running in the Primary Virtual Machine before “Application-Consistent” backup copies can be created. The service must also be running in the Replica Virtual Machine before the “Application-Consistent” backup copies can be applied. |
By default, interval for creating Application-consistent backup copies is every 1 hour but you can change the interval by moving the slider to the hour of your choice at a maximum of 12 hours as shown in the figure 1.11 above.
| Tip: | Hyper-V Replication happens every 5 minutes but the “Application-Consistent Backup Copy” is created every 1 hour. That means the applications running inside the Primary Virtual Machine have a good backup copy only after 1 hour! |
| Tip: | Creation of backup copies (discussed above) for Primary Virtual Machine takes place at Primary Server. Replica Server is just notified of a new copy. Replica Server then keeps these copies as the historical data for recovery purpose if you have selected “Additional Recovery Points” option in figure 1.11 above. |
Because it has an impact on the performance of Hyper-V Server if you enable the “Replicate incremental VSS copy every” option, you must enable this option only if you think that an application running inside the Virtual Machine will require this functionality. For example, for any application hosted in Primary Virtual Machine which has its own VSS Writer to recover its data then you must enable it.
Coming back to the configuration page; the configuration page also shows the space required for storing the default (4 copies) recovery points for the Primary Virtual Machine which is 2.7 GB. This is shown in the above figure 1.11. If you divide this figure by four, you will get size for storing one recovery point. It completely depends on the size of the Primary Virtual Machine.
The backup copies, as discussed above, are created by the Volume Shadow Copy Service.
If you need to restore a Primary Virtual Machine or bring the Primary Virtual Machine online at the Replica Server in case if something goes wrong on the Primary Server, then there will be following recovery points provided for your selection:
| • Latest Recovery Point | – This one is always available and is the last replication packet sent by the Primary Server to Replica Server |
| • Standard Replica_<TimeStamp> | – Up to 15 copies |
| • Application-Consistent_<TimeStamp> | – Up to 15 copies |
Choose Initial Replication Method
In this final configuration page, select the options as to how you would like this Virtual Machine to be shipped over to Replica Server. There are three options available on “Choose Initial Replication Method” configuration page as shown in the Figure 1.12 below:
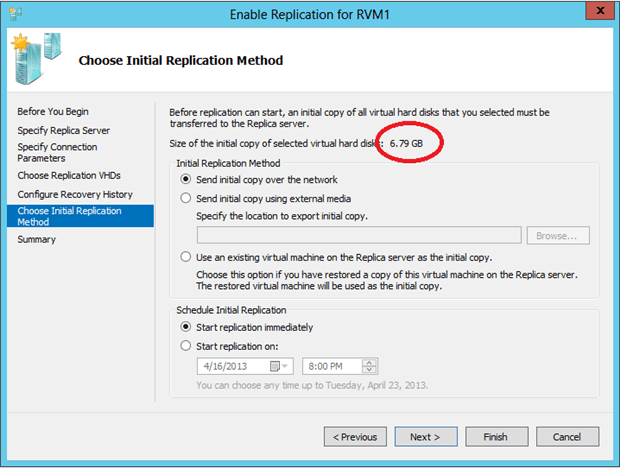
Figure 1.12 – Choose Initial Replication Method Configuration Page
The “Send Initial copy over the network” option is selected by default. This option allows you to copy the Primary Virtual Machine configuration file (XML) and VHD files which you selected during the “Choose Replication VHDs” configuration page to the Replica Server “over the network”.
Note: It is recommended to thoroughly understand these options before you use them or else it might impact the network if the Virtual Machine VHD files are larger and are replicated over a slow WAN link.
The “Send initial copy using external media” option can be used if you have already exported the Virtual Machine and you want the initial replication to happen using exported files.
The Option “Use an existing Virtual Machine on the Replica Server as the initial copy” is helpful if the Primary Virtual Machine is already configured on the Replica Server as a Replica Virtual Machine.
For larger Virtual Machines, it is best to select the option “Use an existing Virtual Machine on the Replica Server as the initial copy” option in a production environment. You can use the Hyper-V Export feature to export the Primary Virtual Machine and import it at the Replica Server as a Replica Virtual Machine. To do this, the Virtual Machine on the Replica Server must be configured with the same parameters as the source before you can use “Use an existing Virtual Machine on the Replica Server as the initial copy” option.
The configuration page also shows the Primary Virtual Machine size, as shown in the red circle in figure 1.12 above, which will be replicated.
The Primary Virtual Machine can be configured to replicate immediately to the Replica Server or at a predefined interval as mentioned in the configuration page in figure 1.12 above.
Once you have configured all the required options for the Primary Virtual Machine, click on “Next” and “Finish” buttons.
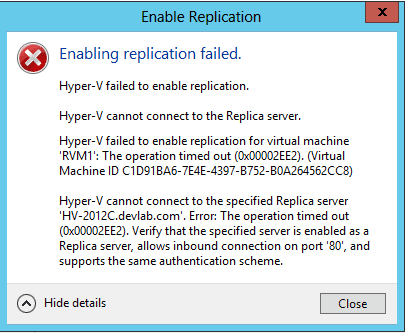
On clicking “Finish” button, the wizard checks to see if the firewall rules are enabled or not. An error message will be shown if the firewall rules for Replica Server traffic are not enabled as shown in the below screenshot:
On clicking “Finish” button, if you have selected “Start Replication Immediately“, the “Replication Engine” will start replicating the Primary Virtual Machine to Replica Server immediately and the status of the replication in progress will be shown in the Hyper-V Manager UI as shown in the figure 1.13 below.

Figure 1.13 – Replication Status for a Virtual Machine which is currently being replicated
The Primary Virtual Machine will still be running while the “Replication Engine” is replicating the contents (VHD files and configuration files) to the Replica Server. This is again a snapshot created by the Volume Shadow Copy Service which is sent over to the Replica Server in disaster recovery site.
If you have scheduled the replication for the Replica Virtual Machine or selected the “Start replication on” option in the configuration page, then the “Status” column will show “Start Replication – Scheduled” as shown in the figure 1.14 below.

Figure 1.14 – Replication Status for a Virtual Machine which is scheduled to replicate
Note: You can only set up one Replica Virtual Machine to one Replica Server. In other words, one Replica Virtual Machine can be configured to use only one Replica Server.
For any scheduled replication, you can always start the replication immediately by selecting “Start Initial Replication” action from the Right Click context menu of the Virtual Machine on the Primary Server or “Import Initial Replica” on the Replica Server as shown in the figure 1.15 below.
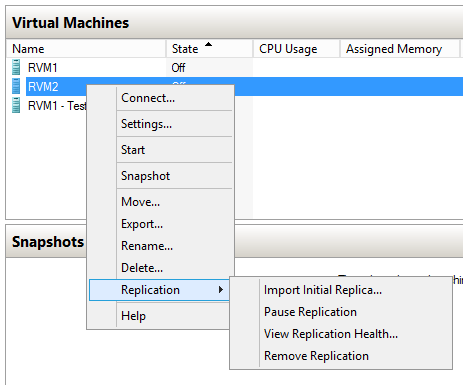
Figure 1.15 – “Import Initial Replica” action on Right Click Context Menu of Virtual Machine on Replica Server
You will see the screen shown in Figure 1.16 below if you use the “Start Initial Replication” action on Primary Server.
If you click Ok, the Replica Virtual Machine will begin to be replicated to the Replica Server.
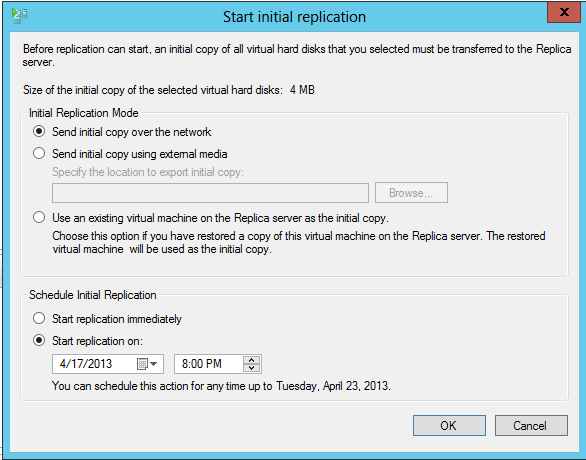
Figure 1.16 – “Start Initial Replication” action on Right Click Context Menu of Virtual Machine at Primary Server
Once the Virtual Machine has been replicated initially to the Replica Server, Hyper-V will start creating Standard Replicas and Application-Consistent replicas for the Replica Virtual Machine on the Replica Server as shown in the figure 1.17 below.
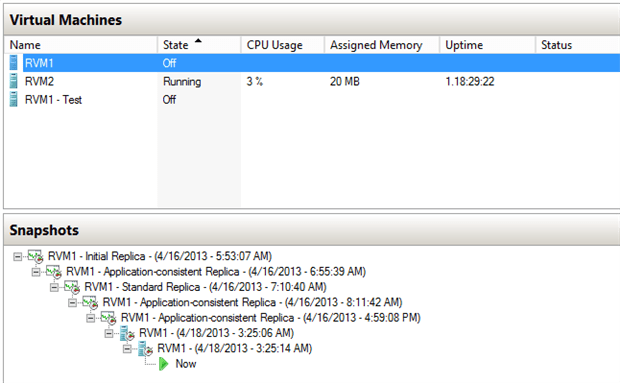
Figure 1.17 – Standard Replicas and Application-Consistent replicas for a Virtual Machine on Replica Server
The Replica Virtual Machine on the Replica Server remains OFF. You will get an error message if you try to start the Replica Virtual Machine on the Replica Server as shown in the below screenshot:
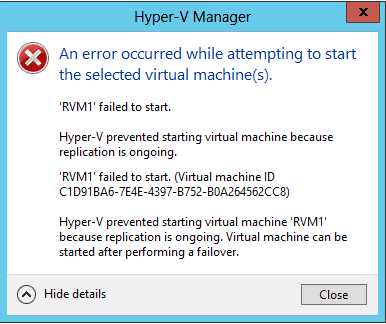
Figure 1.18 – Error message when starting up a Virtual Machine on Replica Server
This behavior is by design. Any Virtual Machine which is participating in the Hyper-V Replica must not be turned on using normal procedures. The Virtual Machine on Replica Server must be turned on using the Failover options which I’m going to explain in a couple of minutes.
Step 3 – Enabling Firewall Rules
To permit replication between the primary and Replica servers, it is necessary to configure Windows Firewall. Hyper-V Role, when you enable it initially on the Windows Server 2012, creates firewall exception rules with default ports (HTTP 80 and HTTPS 443 to allow any incoming virtual machine replication traffic.
The firewall rules for Hyper-V Replica are already created. You need to enable them from the Windows Firewall > Advanced Settings page. The firewall rules are:
- Hyper-V Replica HTTP Listener (TCP-In)
- Hyper-V Replica HTTPS Listener (TCP-In)
To enable the firewall rules, select both the firewall rules and then choose “Enable Rule” action from the Right Click context menu.

| Tip: | Hyper-V Replica firewall rules can also be enabled by executing a PowerShell command: Enable-Netfirewallrule -displayname “Hyper-V Replica HTTPS Listener (TCP-In)” |
Step 4 – Finalizing configuration
Step 4 is optional but it is s good practice to check following items to make sure that the newly implemented and configured Hyper-V Replica environment is healthy:
- Hyper-V identifies the Virtual Machines on both the Primary and Replica Servers by the GUID of Virtual Machine. So you can rename the Primary Virtual Machine and Replica Virtual Machine so that it is easy for you to identify the virtual machine type running on both the servers. For example, I would rename Primary Virtual Machine to “Production VM” and Replica Virtual Machine to “DR VM”.
- Make sure to check that the Primary Virtual Machine is always running or ON and Replica Virtual Machine running on the Replica Server is OFF.
- Perform replication health check for Primary Virtual Machine to ensure that replication is happening.
- Perform a “Test Failover” on the Replica Virtual Machine to ensure it comes online in case of any disaster at Primary Server. “Test Failover” is explained in detail in the latter part of this article.
- Please make sure that the Hyper-V VSS Requestor Service is running on both Primary and Replica Virtual Machines; otherwise Application-Consistent backup copies will “not” be created.
- The EnableWriteOrderPreservationAcrossDisks option must be set for Virtual Machine hosting applications that save data across VHD files. The option determines whether all Virtual Machine VHD files are replicated to the Replica Server to the same point in time.
Conclusion
In this article, we saw the benefits of Hyper-V Replica for organizations that need business continuity without paying for storage devices such as SAN and DAS. There could be some slight downtime and data loss for the Virtual Machines participating in the Hyper-V Replica but that is can be tolerated as long as it provides the backup copies at the disaster recovery site. We also learned how Hyper-V Replica creates backup copies for the Virtual Machine: This helps to minimize the time taken for an organization to recover the virtualized workloads at the Replica Site. Without backup copies, it would take considerable amount of time to restore a virtual machine from backup.
We have also learned how Hyper-V Replica is easy to configure and implement in the production environment.
In the final part of this article series, we are going to primarily focus on the following topics:
- Hyper-V Replica Health-check
- Hyper-V Replica Failover Types
This document contains proprietary information and is protected by copyright law.
Copyright © 2026 Red Gate Software Limited. All rights reserved
Load comments