
Sharing Web Parts across multiple pages
Most Web Parts implementations allow users to create a single portal page where they can personalize the look, feel, functionality, and experience of their “My Home” page in an application. But what if you want to take Web Parts a step further and allow users to define a personalized interface that applies to a series of pages in an application? Wouldn’t it be useful if your users could place helpful tools and components on the periphery of your application and have those available on each page they visit instead of just on their “My Home” page? Absolutely! The question is how do you do it?
At first glance, it may seem that Master Pages are the solution to the issue, but you will quickly run into a stumbling block: personalization settings for Web Parts are stored on a page-by-page basis. Even if you define all of the Web Part logic in a single Master Page, the Web Parts personalization settings for the pages that use the Master Page are stored separately from one another, preventing you from applying a single set of Web Parts to every page on the site. This is illustrated in Figure 01.
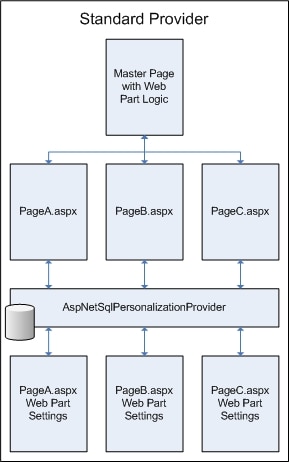
Figure 01 – The standard personalization provider stores settings on a page-by-page basis
Figure 1 demonstrates that changes and updates made on PageA.aspx will not appear when you visit PageB.aspx because each page has its own personalization settings. Our objective is to get changes on PageA.aspx to appear on PageB.aspx, PageC.aspx, and on whatever other pages we so desire. One way to go about doing this is to set up a mechanism that copies changes from one page to another as they occur – in other words, to synchronize settings between the pages. I am far too lazy for such an approach because it sounds like a lot of hard work and testing. Fortunately, there is an easier way. We are going to create a personalization provider that stores information from multiple pages into a single data store, as shown in Figure 02.
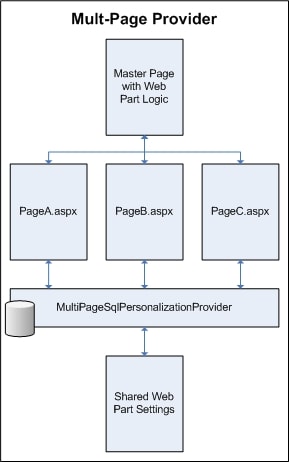
Figure 02 – The MultiPageSqlPersonalizationProvider stores settings over multiple pages
Thus, when you make change to PageA.aspx, it will be reflected on PageB.aspx because both pages store and retrieve their Web Parts data from the same data store. To do this you need to know a bit about the internals of the personalization mechanism that stores Web Part settings.
A quick refresher on providers
Before we get too deep into the personalization provider in ASP.NET 2.0, it’s worth reviewing some of the fundamentals of providers in general. A provider is an abstraction mechanism that allows ASP.NET to request data without having to worry about how or where that data is stored. A provider is made up of two parts: a provider definition and a provider implementation.
The provider definition is normally an abstract class (though it can be an interface) that defines a set of methods and properties ASP.NET may call to retrieve data. The provider definition itself does not, however, contain any data-retrieval logic. It merely defines a “contract” that stipulates that a call to one of the provider methods will return data, regardless of the location from which it is coming. For any given provider (personalization, membership, and so on) there is only one definition.
A provider implementation iinherits from the provider definition and implements the data-retrieval logic for a particular data store. As such, there can be any number of provider implementations for a given provider definition. This allows you to create provider implementations for any number of data storage scenarios: SQL Server, Oracle, MySQL, Access, FoxPro, an XML File, a CSV file, or even an Excel file (it’s possible, but terribly slow for a web app, so please don’t actually do it unless you’re just showing off). You can then configure ASP.NET to use a particular provider implementation for whichever data store you want ASP.NET to use to store your data. Figure 03 depicts a provider definition and its various provider implementations.
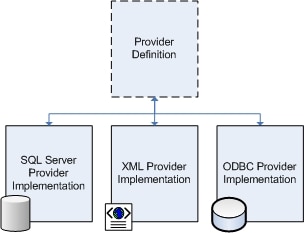
Figure 03 – Provider Definition and Provider Implementations
The Web Parts provider definition: PersonalisationProvider
ASP.NET uses the PersonalizationProvider abstract class as the provider definition for Web Parts settings. Table 1 contains a brief listing of the abstract methods the class exposes to define how ASP.NET saves and retrieves the appropriate settings for the Web Parts on a particular page.
|
Method |
Returns |
Parameters |
Description |
|
FindState |
PersonalizationState |
PersonalizationScope scope, PersonalizationStateQuery query, int pageIndex, int pageSize, out int totalRecords |
Returns a collection of PersonalizationStateInfo objects based on the query and scope parameters. This allows ASP.NET to retrieve personalization settings for a given page. |
|
GetCountOfState |
int |
PersonalizationScope scope, PersonalizationStateQuery query |
Returns the number of items in the data store for the given query and scope. |
|
LoadPersonalizationBlobs |
void |
WebPartManager webPartManager, string path, string userName, ref byte[] sharedDataBlob, ref byte[] userDataBlob |
Loads raw data from the data source and converts it into a PersonalizationStateInfo object. This, in essence, converts the data from a data-source specific format into a non-data-source specific format. |
|
ResetState |
int |
PersonalizationScope scope, string[] paths, string[] usernames |
Resets all personalization data based on the given parameters |
|
ResetUserState |
int |
string path, DateTime userInactiveSinceDate |
Resets all Web Part personalization data based on the given parameters |
|
SavePersonalizationBlob |
void |
WebPartManager webPartManager, string path, string userName, byte[] dataBlob |
Saves personalization data |
Table 1 – Abstract Methods in the PersonalizationProvider Abstract Class
Please note the bolded parameters in Table 1 because they will be of importance later on in the article.
The Web Parts provider implementation: SqlPersonalizationProvider
Naturally, a provider definition by itself is not of much use unless there is a provider implementation to accompany it. Fortunately, ASP.NET 2.0 ships with a provider for SQL Server called the SqlPersonalizationProvider class, which resides in the System.Web.UI.WebControls.WebParts namespace. This class contains a SQL Server-specific implementation of the abstract methods from the PersonalizationProvider class. As you can imagine, this means that the class contains a lot of code to connect to a SQL Server database, to query the database for pertinent records, and to read the data returned by SQL Server.
Truth be told, we are not really all that concerned about the SqlPersonalizationProvider class specifically. It’s just that the technique I am going to show you for storing multiple pages to a single data stores requires that we begin with a fully functional PersonalizationProvider implementation. In this article I’ll be using the PersonalizationProvider for SQL Server. If you happen to be using Oracle, MySQL, or some other provider, then you can still use this technique against that provider implementation.
Storing multiple pages to a single data store
We know that the default SqlPersonalizationProvider stores Web Parts settings on a page-by-page basis. It therefore stands to reason that each page needs a unique identifier so that the personalization provider can store and retrieve settings for the page. And what is the easiest way to uniquely identify a page? By the page path! If you look back at the bolded parameters in Table 1 you will notice there are a number of parameters named path. When the provider is saving or retrieving information for PageA.aspx, it passes as the path parameter value a string value containing “PageA.aspx” (and if PageA.aspx is in a directory called Pages, then it would pass “MyDirectory/PageA.aspx” as the parameter value). Fortunately, this path value is simply a unique key, so it does not have to be a valid path in the web application. Thus, if you want to store settings for use on multiple pages, make sure they all use the same unique key.
The easiest way to do this is to inherit from an existing provider implementation and override all of the methods that require a page path. Inside the overridden method, you just call down to the base-class method to do the actual work, but you pass your own shared key into the method instead of the page path. Thus, any page that uses your provider will share Web Parts settings with any other page that uses your provider, and you don’t have to worry about the nasty implementation details of the provider.
Creating the MultiPageSqlPersonalizationProvider class
Code listing 1 provides the complete definition for the MultiPageSqlPersonalizationProivder class. You will see that it is a very simple class because it simply calls down to the base class when it needs to do any real work. Also take note of any bold areas because they show the important portions of the code, and will be discussed in more detail after the code listing:
|
1 |
using System; using System.Web.UI.WebControls.WebParts; namespace Providers { public class MultiPageSqlPersonalizationProvider : SqlPersonalizationProvider { private string _groupName = "PageGroup"; public string GroupName { get { return _groupName; } set { _groupName = value; } } public override PersonalizationStateInfoCollection FindState (PersonalizationScope scope,PersonalizationStateQuery query, int pageIndex, int pageSize, out int totalRecords) { if (query.PathToMatch != String.Empty) { query.PathToMatch = GroupName; } return base.FindState(scope, query, pageIndex, pageSize, out totalRecords); } public override int GetCountOfState(PersonalizationScope scope, PersonalizationStateQuery query) { if (query.PathToMatch != String.Empty) { query.PathToMatch = GroupName; } return base.GetCountOfState(scope, query); } protected override void LoadPersonalizationBlobs(WebPartManager webPartManager,string path, string userName, ref byte[] sharedDataBlob, ref byte[] userDataBlob) { base.LoadPersonalizationBlobs(webPartManager, GroupName, userName, ref sharedDataBlob, ref userDataBlob); } protected override void ResetPersonalizationBlob(WebPartManager webPartManager,string path, string userName) { base.ResetPersonalizationBlob(webPartManager, GroupName, userName); } public override int ResetState(PersonalizationScope scope, string[] paths,string[] usernames) { return base.ResetState(scope, new string[] { GroupName }, usernames); } public override int ResetUserState(string path, DateTime userInactiveSinceDate) { return base.ResetUserState(GroupName, userInactiveSinceDate); } protected override void SavePersonalizationBlob(WebPartManager webPartManager,string path, string userName, byte[] dataBlob) { base.SavePersonalizationBlob(webPartManager, GroupName, userName, dataBlob); } public override void Initialize(string name, System.Collections.Specialized.NameValueCollection configSettings) { GroupName = configSettings["groupName"]; if (string.IsNullOrEmpty(GroupName)) GroupName = "PageGroup"; configSettings.Remove("groupName"); base.Initialize(name, configSettings); } } //class } //namespace |
Let’s begin with the GroupName property that appears at the beginning of the class. Remember that we need a unique identifier to use as the key for any pages we want to share Web Parts settings, and GroupName stores the value of that key. It is a simple string property that uses the _groupName field to store its value. You will see in a moment how we set the GroupName value when initializing the provider and when configuring the provider in web.config.
Throughout the class you will notice the GroupName property used in place of the path parameter, which effectively overwrites the path value with our own unique key. You will see the GroupName property used in three different ways. The most common way is as it appears in the LoadPersonalizationBlobs, ResetPersonalizationBlob, ResetUserState, and SavePersonalizationBlob methods – it simply takes the place of the path property.
The second way appears in both the FindState and GetCountOfState methods. In those methods you will NOT see a path parameter, but you will see a parameter named query, which is a PersonalizationStateQuery object. One of the properties of this object is the PathToMatch property. If the PathToMatch value is not an empty string, you want to overwrite the value with the value in GroupName.
And you can see the third way if you look at the ResetState method, where the GroupName value is passed into the constructor of a new string array. This ensures that the base method only operates on the single GroupName value instead of a series of actual paths.
At the very end of the class is the overridden Initialize method, aptly named since ASP.NET calls the method when initializing the provider. The configSettings parameter on the Initialize method is a NameValueCollection object containing a series of settings and their values from the web.config (we’ll get to the Web.config momentarily). To set the GroupName property value, you simply assign the property the value contained in configSettings[“groupName”]. If the “groupName” attribute is NOT set in the web.config, then the call to configSettings[“groupName”] returns null. On the next line, if the value of the GroupName is null or empty, the method gives the GroupName property a default value of “PageGroup” to ensure there is a unique key for the saving and retrieval of Web Parts settings. It then removes the “groupName” attribute name and value from the configSettings parameter. Why, you ask? When you call the Initialize method in the base class, it runs a syntax check on the setting names in the configSettings NameValueCollection. If the “groupName” attribute name is in the collection, the call to the Initialize method in the base class throws an exception because the base class does not expect a “groupName” attribute setting from the web.config. Once you remove it, however, there is no problem. And you have a Web Part PersonalizationProvider that allows you to share Web Parts Settings between pages.
Configuring your new provider in the web.config
Now that you have a new Web Part provider class, you have to setup your application to use it. This is accomplished in the <configuration> -> <system.web> -><webParts> -> <personalization> -> <providers> section of the web.config. The following code listing illustrates how to configure a MultiPageSqlPersonlizationProvider named MyMultiPageProvider:
|
1 |
<configuration> ... <system.web> ... <webParts> <personalization defaultProvider="AspNetSqlPersonalizationProvider"> <providers> <add connectionStringName="LocalSqlServer" groupName="MyGroupKey" id="MyMultiPageProvider"" type="Providers.MultiPageSqlPersonalizationProvider" /> </providers> </personalization> </webParts> </system.web> </configuration> |
Let’s focus first on the <add> element shown above. There are four attributes in the <add> element, each of which is briefly detailed in Table 2.
|
Attribute Name |
Description |
|
connectionStringName |
Name of the connection string in the <connectionStrings> section that this provider should use to connect to a SQL Server database. |
|
groupName |
Unique key under which all Web Parts settings will be stored. This value is placed in the GroupName property when the MultiPageSqlPersonalizationProvider is initialized |
|
name |
Unique name that identifies the provider configuration settings. You use this name when telling the Web Part Manager which provider configuration to use, or when configuring a default provider configuration in the Web.config |
|
type |
Type name of the Web Part Personalization Provider implementation class |
Table 2 – Add Element Attributes
In the above example, the provider configuration is named MyMultiPageProvider. You will see shortly where to use this name to tell ASP.NET to use this provider configuration. The connectionStringName is set to use the “LocalSqlServer” connection string, which is a built-in connection string in ASP.NET 2.0 that points to the ASPNETDB.mdf file in the APP_DATA folder of your web application. If the ASPNETDB.mdf file does not exist, the SqlPersonlizationProvider automatically creates it and initializes any tables it needs (remember, we are using the SqlPersonalizationProvider as a base class so we inherit its ability to automatically create a database for itself). The “groupName” attribute is set to “MyGroupKey”, so any pages that use this provider configuration will have their path information overwritten with this value. And lastly, the type is set to “Providers.MultiPageSqlPersonalizationProvider” because the MultiPageSqlPersonalizationProvider class resides in the Provider’s namespace. If you are using an external assembly, you may have to qualify the type name with the assembly (e.g. “[AssemblyName,] TypeName”).
Also notice the defaultProvider attribute in the <personalization> element of the web.config. This tells ASP.NET which provider configuration to use as a default if a provider configuration is not explicitly specified in the Web Part Manager. In the example above, it is set to AspNetSqlPersonalizationProvider. This is the default built-in provider configuration for ASP.NET that uses the ASPNETDB.mdf file in the APP_DATA directory of your web application to store Web Parts settings. If you only want to use the MyMultiPageProvider by default in your application, then you can set it as the default provider:
|
1 |
<configuration> ... <system.web> ... <webParts> <personalization defaultProvider="MyMultiPageProvider"> <providers> <add connectionStringName="LocalSqlServer" groupName="MyGroupKey" id="strong">MyMultiPageProvider" type="Providers.MultiPageSqlPersonalizationProvider" /> </providers> </personalization> </webParts> </system.web> </configuration> |
If you specify the MyMultiPageProvider as the default provider configuration, then you do not have to explicitly specify it as the provider configuration in the Web Part Manager. But in case you want to leave the default as AspNetSqlPersonalizationProvider, I’ll cover how to setup the Web Part Manager next.
Configuring the Web Parts manager to use a specific provider configuration
Every page that contains Web Parts must have one (and only one) WebPartManager control to manage the storage, retrieval, and interaction of Web Parts. When you first place a WebPartManager on a page or a Master Page, the control definition looks similar to this:
|
1 |
<asp:WebPartManager runat="server" id="wpManager"" /> |
Since there the control is not being explicitly told which provider configuration to use, it uses the default configuration specified in the web.config.
If you want to use a specific provider configuration, then you have to tell the control which provider configuration to use. You do this by passing in the unique name of the provider configuration to the control, as follows:
|
1 |
<asp:WebPartManager runat="server" id="wpManager""> <Personalization ProviderName="MyMultiPageProvider" /></asp:WebPartManager> |
Now that you can configure the WebPartsManager to use the MultiPageSqlPersonalizationProvider, you can embed your Web Parts logic into a Master Page and easily share Web Parts over multiple pages.
Using the demo application
Open up the demo application (available using the code download link at the top of the page) in Visual Studio and run the application. You are presented with a login screen. Login using one of the user names and passwords listed on the page, or click on the Login link next to the user name to automatically log in. Once you log in, you will see two options presented as links. The first link says “Standard Provider Pages” and demonstrates the “normal” Web Parts functionality. Click on the link and you will be taken into the StandardWeb folder. This folder has three pages, named PageA.aspx, PageB.aspx, and PageC.aspx. Follow the directions on the page and add a few Web Parts to the page. When you are finished, go to PageB.aspx. Notice that your Web Parts disappear. Use the back button to return to the page with the two links.
The second link says “Multi-Page Provider Pages” and demonstrates the functionality of the MultiPageSqlPersonalizationProvider we have been discussing. Click on the link and you will be taken into the MultiPageWeb folder. This folder also has three page named PageA.aspx, PageB.aspx, and PageC.aspx. Follow the directions on the page and add a few Web Parts to the page. When you are finished, go to PageB.aspx. Notice that your Web Parts remain. Changes you make from any of these pages will appear on the other pages.
Here is a quick run down of the important files in the application and what they contain:
|
File Name |
Description |
|
MultiPageWebParts.sln |
Visual Studio 2005 Solution File |
|
Web.config |
Configuration settings for the Web Parts Personalization Provider |
|
Default.aspx |
Login screen |
|
StandardProvider.master |
Master Page with Web Parts controls and logic that uses the default AspNetSqlPersonalizationProvider to store Web Parts settings |
|
MultiPageProvider.master |
Master Page with Web Parts controls and logic that uses the MultiPageSqlPersonalizationProvider to store Web Parts Setting. |
|
StandardWeb\PageA.aspx StandardWeb\PageB.aspx StandardWeb\PageC.aspx |
Pages that use the StandardProvider.master and demonstrate the default Web Parts functionality |
|
MultiPageWeb\PageA.aspx MultiPageWeb\PageB.aspx MultiPageWeb\PageC.aspx |
Pages that use the MultiPageProvider.master and demonstrate how to share Web Parts settings between pages. |
|
WebParts\ |
Folder containing extremely simple Web Parts and the Web Parts catalog for use in the demo application. |
Table 3 – Demo Application Files and Descriptions
Conclusion
Now you have a simple, yet powerful, solution for SQL Server that allows users to setup Web Parts that span multiple pages inside your application. Also remember that the technique works for other PersonalizationProvider implementations as well, so if you ever need to work Oracle, MySQL, or another database, you can setup the same mechanism fairly quickly. Good luck!
This document contains proprietary information and is protected by copyright law.
Copyright © 2026 Red Gate Software Limited. All rights reserved
Load comments