
What is augmented reality (AR)? AR is a technology that places information such as images and text into the physical world we see. Typically, this is done through a camera that acts as the application’s “eye” and lets it see the world. This is not to be confused with virtual reality (VR), where an application creates a digital environment of its own that the user can interact with using special hardware. From there, the app can project objects into the world for the user to interact with or do something if it finds a specified real-world object. Though AR may sound like science fiction, it is a technology that has existed in some form since the 1990s. Most people probably think of popular mobile games when this technology is brought up, but it has application in archaeology, education, marketing, and more.
There is much that can be done with AR, so this project aims to provide an introduction to AR development by sampling the functionality available to a developer in an app made with Unity and Vuforia, a software development kit (SDK) for AR. The app will perform three tasks: first, it will recognize certain objects and images in the real world and spawn a game object upon finding the real-world item. You’ll be able to interact with this object by tapping on it, and the app will recognize when your device is near the spawned object. Finally, a simple graphical user interface (GUI) will be made to demonstrate how the typical Unity features a developer uses works just as well in an AR application.
A starting Unity project is provided to help you jump right into AR development. In addition, a completed version is available to compare to your own as well as experiment with freely.
Template Overview
The codeless template provides all the assets that are used in this example, including the image file for the playing card used. You can, of course, use your own image target if you wish, but keep in mind that some of your scale and width values will likely differ from what’s shown here. All that remains to be set up in this project is the AR configuration and the scripts. Within the Assets window are several other folders, each containing the types of assets specified. Feel free to browse them if you wish, but they will not be looked at in any detail during the tutorial. It bears mentioning that the textures were provided by CC0 textures, which can be seen here.
Within the scene, are some buttons and text along with a chest. The chest is the object that will appear whenever the app locates a real-world queen of hearts playing card. It’s incredibly small, and that’s because the image target object that will be created later is also quite small. This is to reflect the real-world size of the card. If you were to leave the chest’s scale at the default value of one, it would appear incredibly large in the app once the playing card was found. With this adjustment, it will appear as though it is roughly the same size as the card.
Vuforia Setup
As mentioned above, Vuforia is an SDK for creating AR applications on mobile devices. It allows the application to detect real-world objects. The developer creates a database of “image targets” that will be fed into the Unity app. These image targets are, as you may have guessed, 2D images of what to look for in the real world.
To begin, you’ll first need a developer account on the Vuforia developer portal. You can register the account here. After you’ve created the account and confirmed it, you’ll find yourself at the License Manager screen in the portal. In the top left portion of the screen, there are two buttons, one for gaining a development key and one for purchasing a deployment key. The deployment key is what is needed if you ever decide to publish an AR app with Vuforia, so it can be ignored. Instead, click the Get Development Key button shown in Figure 1.
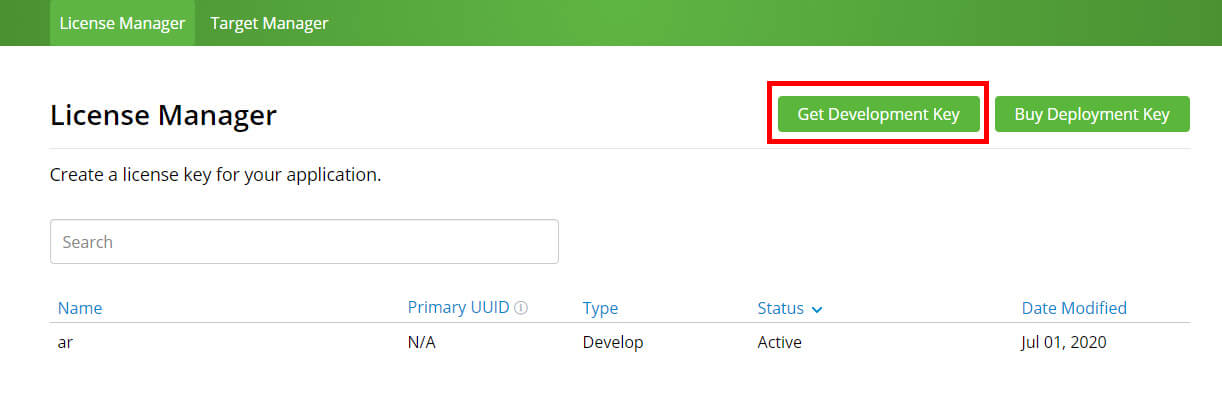 Figure 1: Getting a development key
In the next screen, you’ll assign a name to the license, then simply check the terms and conditions box, followed by clicking the Confirm button near the bottom shown in Figure 2.
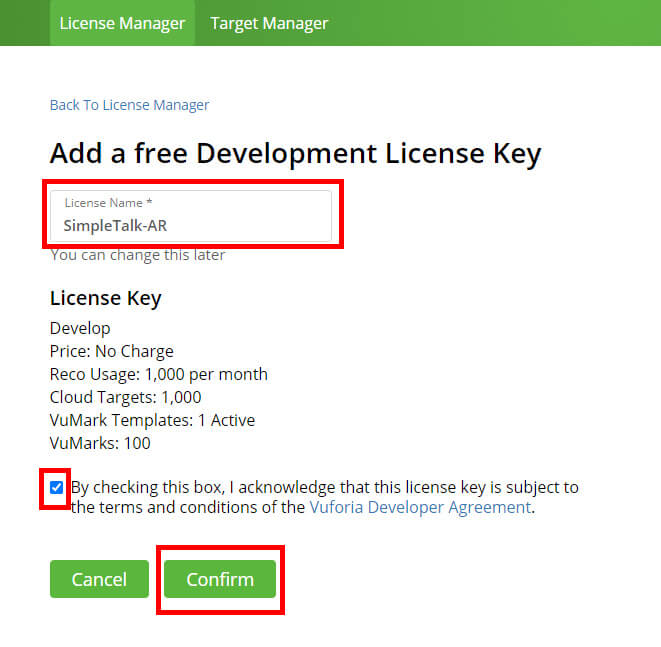
Figure 2: Creating a new license
You’ll return to the License Manager, this time with your newly created app license displayed. Clicking the name of the license will get you the license key, but before doing so, you’ll need at least one image target to use in your app. In the top left, there is a Target Manager tab. Click it, then select the Add Database button in the top right shown in Figure 3.
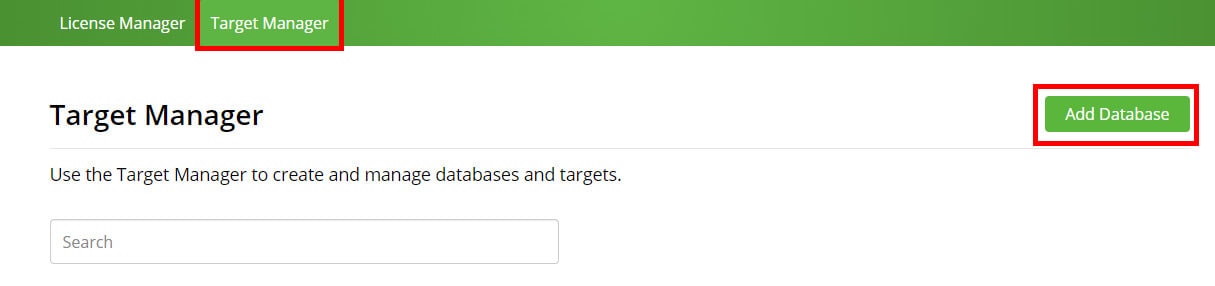 Figure 3: Creating a new target database
In the dialog that appears, give the database a name of your choosing, followed by the type of database. For this app, select Device, the default choice shown in Figure 4.
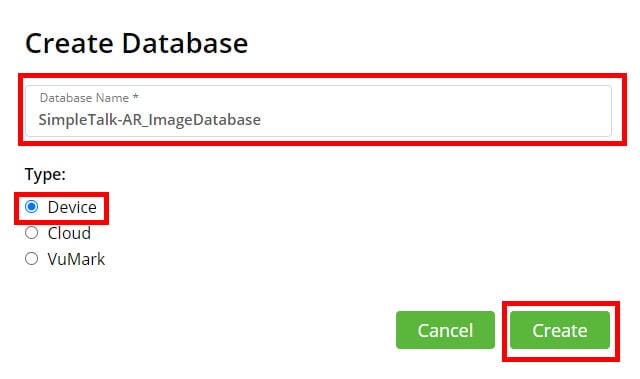
Figure 4: Database creation
Now all the database needs is an image. The image you use can be anything you wish. It’s only important that the image used is clear enough that Vuforia understands what object to look out for from the image. This example uses a playing card as the real-world item to look out for. The card image used can be found within the project files downloaded from the template. In Unity, there will be a folder named Card image in the Assets window that will contain the picture of the card. Right-click the card file and select Show in Explorer to locate the card in the file explorer. To upload this image, click on the name of the newly created database, click the Add Target button above the target list as shown in Figure 5.
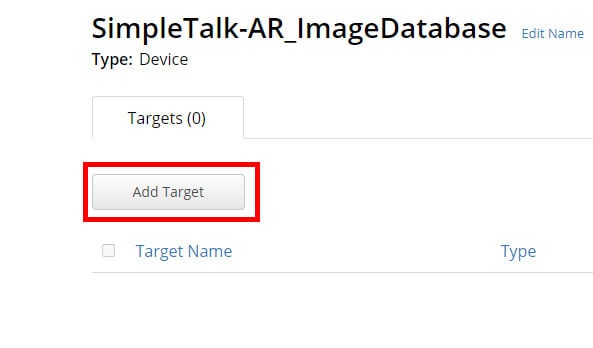
Figure 5: Adding a target to the database
A new dialog appears, asking for a type, file, width, and name. The target type specifies what sort of real-world object to look for. For instance, if you wanted your object to appear on a glass, you may wish to select the cylinder type. By default, the type is a single image, which is what this app will use. Select the image file you’re using, and then specify the width. The width is used to let the app know roughly how large to expect the target to be. It asks for the width in “scene units” which can change depending on the development software you’re using. Unity’s scene units are typically one meter per unit, so you’ll need to specify the width in meters of your target. In this example, a typical playing card is about six centimeters wide so specify 0.06 for the width in Vuforia. The name can be whatever you wish. The screen should look similar to Figure 6.
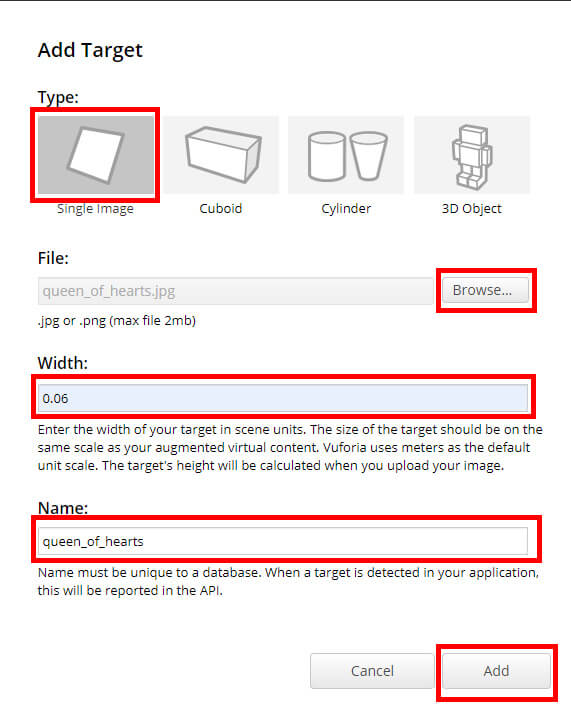
Figure 6: Specifying the type, image, width, and name
You’ll return to the Target Manager, but this time your new image will appear in the database. It will say that the status is processing, but it usually takes just a brief moment for it to become active. You may need to refresh your browser before it shows that the image target is active. You’ll also see a star rating which tells you how good of an image target is. If you were to click on the name of the target, you’d be taken to a screen showing the image and some other information. Clicking the Show Features text below the image shows you where Vuforia has identified distinguishing features of the image.
In order to properly use this database in Unity, you’ll need to go back to the Target Manager and click the Download Database (All) button. In the dialog that appears, select the Unity Editor development platform and then click Download as shown in Figure 7.
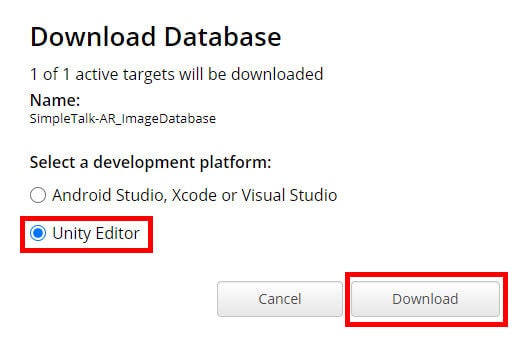
Figure 7: Downloading the database
After a moment, you’ll download a Unity package file. Save it to wherever you like, but don’t open it yet. You’ll first need to prepare the Unity project for AR development.
Unity Project Setup
In order to develop an AR app, you must enable the Vuforia engine within Unity. To do this, click the Edit option in the top menu and select Project Settings. From there, make sure you’re in the Player settings, then scroll to the bottom until you find XR Settings. Once found, check the box next to Vuforia Augmented Reality Supported shown in Figure 8. Unity will import some assets, and then you’ll have access to AR functionality in the app.
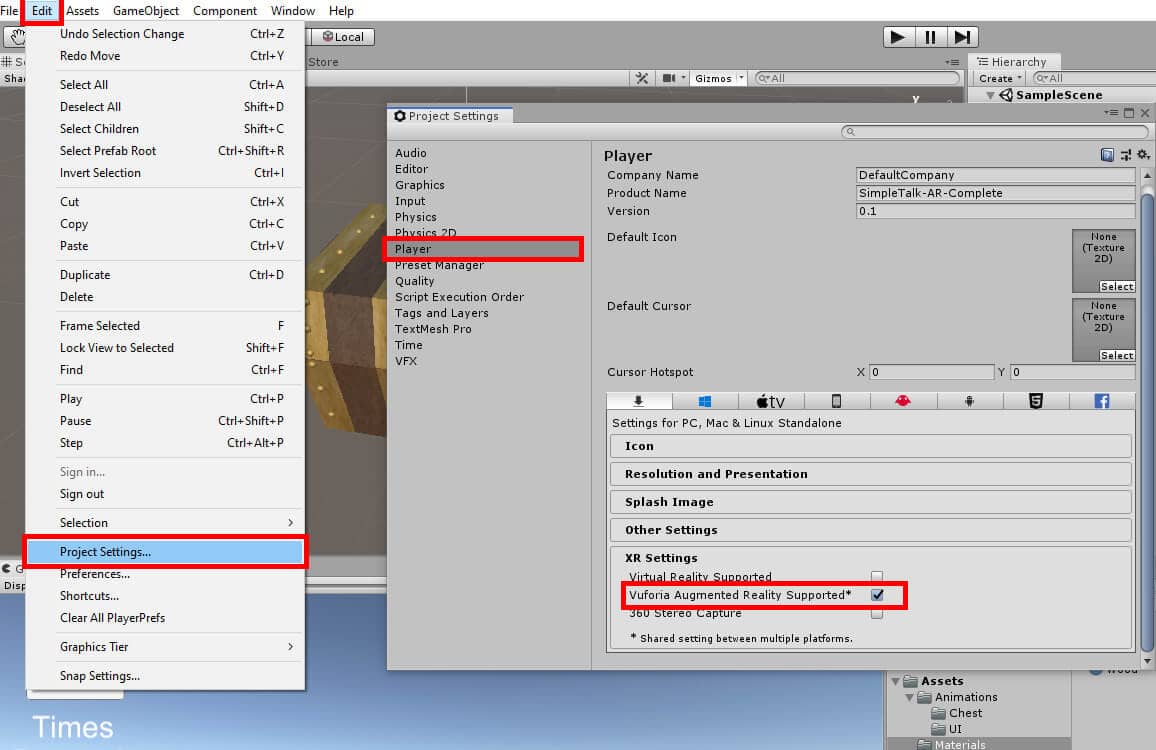 Figure 8: Enabling Vuforia
Now that Vuforia is being used, you need to apply the app key you were given on the developer portal and change the configuration. You can do this by creating an AR camera and clicking a button in the Inspector. To create the camera, first delete the Main Camera object. Then click the Create button in the Hierarchy window, then choose Vuforia Engine->AR Camera shown in Figure 9. After accepting a software license, the AR camera will be created. It’s possible that the camera might appear on top of the chest model or in another location normally considered undesirable. You may move it if you wish, but it’s not required since the location of the objects in the engine won’t affect where they appear in the built app. Now, what’s the difference between the two cameras? An AR camera is what’s used when the developer wants the device’s built-in camera to both view the real world as well as essentially turn the real world into the game world. Meanwhile, the default camera displays what’s currently in the “Unity world” if you will.

Figure 9: Creating an AR camera
With the ARCamera object selected, find a button in the Inspector that says Open Vuforia Engine Configuration. Copy your app key from the Vuforia portal (accessed by clicking the name of your app in License Manager), then paste it into the App Key field in Unity. Then, scroll down until you find an option that says Track Device Pose. Check that box, and the Vuforia engine configuration will be finished.
Earlier you had told Vuforia what images to look out for in the real world. Now you need to pass that same information into Unity. When finishing the Vuforia setup, you downloaded a database, which came as a Unity package file. Open that file now by clicking Assets -> Import Package -> Custom Package. Then navigate to the file you downloaded to import the database into Unity. Make sure that everything seen in the import window is checked.
Once that’s been completed, create another object. This time the object is an image target, created by clicking Image under the Vuforia Engine sub-menu in the Create menu. Because you imported the Vuforia database just before this step, the ImageTarget should use your database and have the correct scale by default. If it doesn’t, then you can click on the object in the Hierarchy and then look at the Inspector window and search for a field named Database. From there, you can change the database being used as shown in Figure 10.
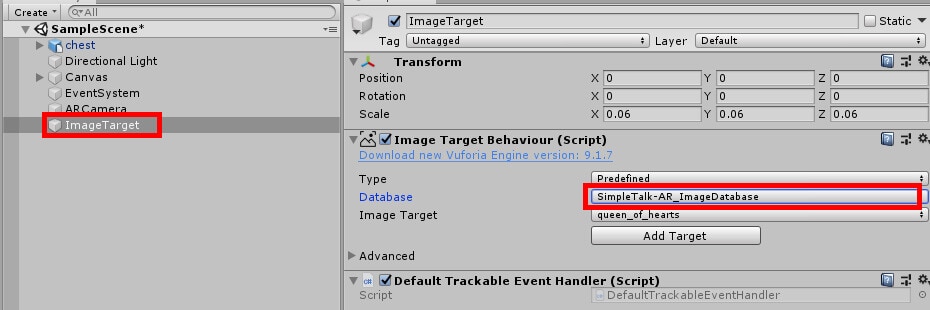 Figure 10: Confirming your database is being used
Unity now knows what object to look for, but it’s not aware of what will be shown when the playing card is found. This is easily fixed by dragging the chest object onto the ImageTarget to make it a child of the target as shown in Figure 11. The template is already set up so that the chest will fit on the image correctly, but if it doesn’t then just change the scale of the chest until it’s about the size of the card itself.
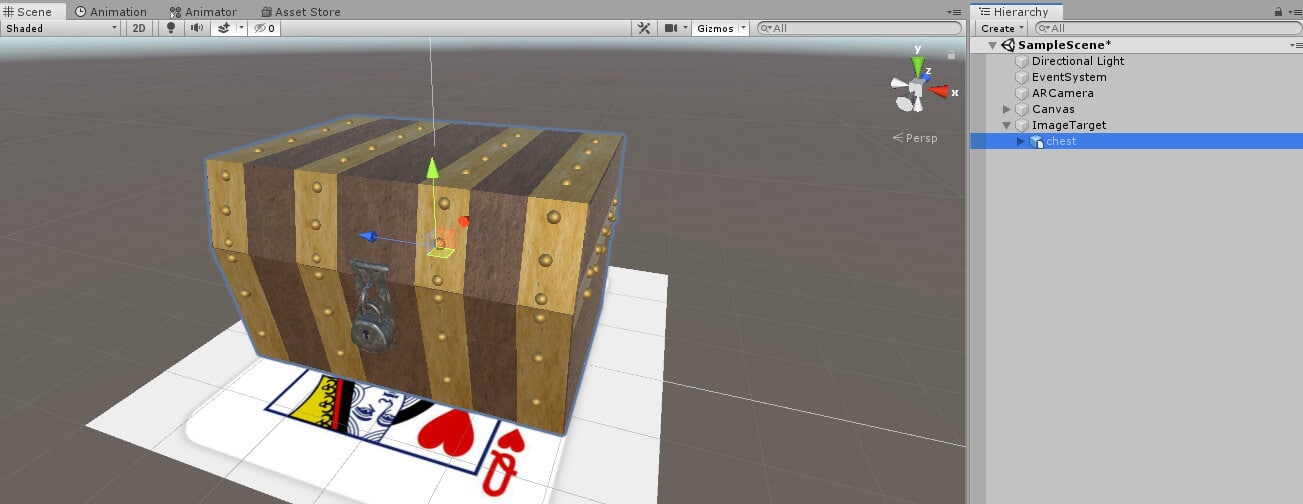 Figure 11: The chest should appear similar in size to the playing card.
All that remains is to set up collisions for the chest and camera. The chest collision should already be set up, so you need only select the ARCamera object, click Add Component in the Inspector and add a Box Collider (Figure 12)and Rigidbody. Box Collider, as the name implies, is the collision box for an object, while a Rigidbody us the physics component of an object. At least one of the colliding objects must have a Rigidbody for collision detection to work properly in Unity, and that’s why one is being included in the camera object.
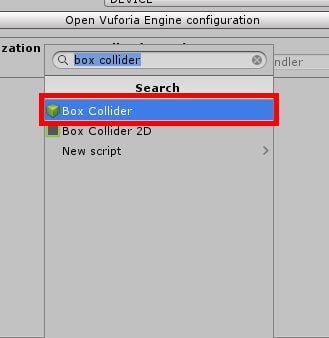
Figure 12: Adding a box collider
Be sure to check the Is Trigger checkbox in the Box Collider and uncheck the Use Gravity box in the Rigidbody. You should also change the size of the collider in order to control how close or far the user can be for collisions to be detected. This example sets the size to 0.3 but adjust if you want the text to activate from further away or closer as shown in Figure 13.
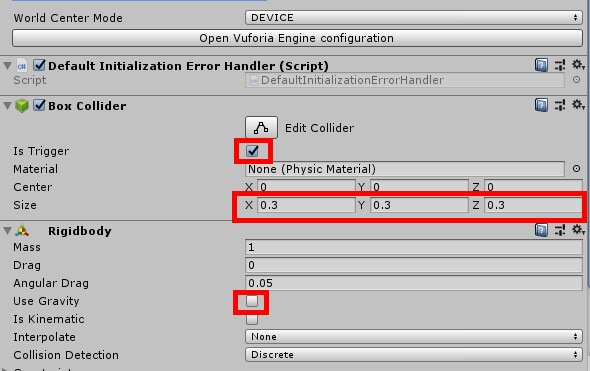
Figure 13: Setting collider to trigger, changing size, and disabling Use Gravity on ARCamera
If you wanted to, you could run this program now and find that it can already detect the card and spawn a chest on top of it. This is pretty cool, but it’d be even better if you could interact with the object in some way. Plus, there are still those buttons that currently do nothing. Three scripts resolve this issue. PlayerInput performs actions when the user taps on the chest, ChestCollision handles collision between the user and the chest, and GUIFunctions contains the functionality for the buttons. Double click PlayerInput to open it in Visual Studio.
PlayerInput
To begin, you’ll need using Vuforia at the top to use features like TrackableBehaviours. In addition, the script must also inherit from ItrackableEventHandler. Class declaration should then look like the following:
|
1 |
public class PlayerInput : MonoBehaviour, ITrackableEventHandler |
Next comes the variable declarations. You’ll first need a variable of type TrackableBehaviour which will be used to know when an image target has been detected or is currently being tracked. Two more variables will be filled in the Unity editor and will hold on to animator and gameobject information.
|
1 2 3 |
private TrackableBehaviour mTrackableBehaviour; public GameObject objectFoundText; public Animator chestAnim; |
In order to properly use mTrackableBehaviour, you need to get the TrackableBehaviour from the gameobject this script is attached to (in this case, the ImageTarget object) and then register the trackable event handler to this variable. This is all done within the Start function.
|
1 2 3 4 5 6 |
void Start() { mTrackableBehaviour = GetComponent<TrackableBehaviour>(); if (mTrackableBehaviour) mTrackableBehaviour.RegisterTrackableEventHandler(this); } |
Before putting the trackable behaviour to use, it’s a good idea to fill in the Update function. This function looks out for input from the user. In the code, it watches out for a mouse input, which may sound strange for a mobile app. But fear not, as tapping the mobile device’s screen is considered a mouse input by Unity so that you can use both interchangeably. Once the user taps the screen, a raycast will be sent out. Raycasts are invisible lines that are quickly drawn between two points and determines if there’s an object intersecting the line. You don’t have to distinguish the real world from the chest that will be created when the queen of hearts is found since raycasts only look for Unity game objects. In this case, so long as you tap on the chest, an animation trigger will be set that will grow or shrink the cube depending on its current state.
|
1 2 3 4 5 6 7 8 9 |
Void Update() { if (Input.GetMouseButtonDown(0)) { Ray ray = Camera.main.ScreenPointToRay(Input.mousePosition); if (Physics.Raycast(ray, out RaycastHit hit)) chestAnim.SetTrigger("Tapped"); } } |
To finish off this script, you’ll need to put mTrackableBehaviour to use. A new function called OnTrackableStateChanged looks for any of the three statuses of the image target – whether it’s been detected, is currently being tracked, or is being “extended tracked” which means that the target is no longer in the view of the camera but is still maintaining the augmentation of the real world. As long as any of the conditions are met, some text appears on the screen announcing that the object has been found. This example only uses the current status of the target detection but has functionality available for the previous status as well.
|
1 2 3 4 5 6 7 8 9 10 11 |
public void OnTrackableStateChanged( TrackableBehaviour.Status previousStatus, TrackableBehaviour.Status newStatus) { if (newStatus == TrackableBehaviour.Status.DETECTED || newStatus == TrackableBehaviour.Status.TRACKED || newStatus == TrackableBehaviour.Status.EXTENDED_TRACKED) objectFoundText.SetActive(true); else objectFoundText.SetActive(false); } |
After that, this script is done. One of the major functions of the app is complete, that being the tapping of the game object to interact with it. There’s also some helpful code that enables a text object whenever the image target is found, showcasing how you can perform actions as soon as the camera sees a target. The other two scripts, ChestCollision and GUIFunctions, are much simpler than this one. In fact, you may be surprised at how simple the coding process of this app is. That’s because Vuforia and Unity do so much of the heavy lifting for you. Coding an AR application is much like coding any other app in Unity.
The second part of the coding process takes you to the ChestCollision script, where the app detects whenever the user gets close enough to an object.
ChestCollision
This time you’ll need using UnityEngine.UI in order to perform all the functions of this script. You may also comment out or remove the default Start and Update functions. Once you have that finished, create a new text variable.
|
1 |
public Text gameText; |
Much like the gameText variable from PlayerInput, this contains the information for the text that appears whenever an object is detected. The difference between the two is that this is text data while the gameText variable seen in PlayerInput was gameobject data. In PlayerInput you’re simply enabling or disabling the object, which makes it visible or invisible, whenever the image target is located. Here in ChestCollision the goal is to change the text, and it’s easier to do that with the Text type.
Now comes the actual collision code. Since the two colliders attached to ARCamera and chest have been marked as triggers, you’ll need to use OnTriggerEnter and OnTriggerExit. Within the functions, you’ll make sure that the chest is colliding with an object that has the tag MainCamera. In this case, that object would be ARCamera. Or, to put it another way, your mobile device. When the two initially collide, the text updates to say you’re near an object. Once you leave the chest’s collision area, the text returns to stating the object has been found.
|
1 2 3 4 5 6 7 8 9 10 |
void OnTriggerEnter(Collider col) { if (col.CompareTag("MainCamera")) gameText.text = "Near object"; } void OnTriggerExit(Collider col) { if (col.CompareTag("MainCamera")) gameText.text = "Object Found!"; } |
This script’s entire purpose is to detect collisions with the mobile device, so ChestCollision is finished. Move on to GUIFunctions to program the functionality of the on-screen UI.
GUIFunctions
Once again, add using UnityEngine.UI and delete or comment out the Start and Update functions. Then create the following variables:
|
1 2 3 |
public Animator guiAnim; public Text pressedText; private int numOfPresses = 0; |
You’ll need the Animator data in order to trigger animations for the UI in the top left corner of the screen. The text is also updated whenever a button is pressed, so you’ll need a way to update that as well. Finally, an int is created to keep track of the number of times a button has been pressed.
The script’s function is very simple, as it only has you setting the trigger for guiAnim. Whenever this trigger is activated, the UI plays an animation that reveals or hides it from the side of the screen.
|
1 2 3 4 |
public void ShowOrHideButton() { guiAnim.SetTrigger("Visible"); } |
In the next function, numOfPresses is incremented by one with each tap of the button, followed by updating on-screen text to reflect the number of times the button has been pressed.
|
1 2 3 4 5 |
public void ButtonAction() { numOfPresses++; pressedText.text = "Times Pressed: " + numOfPresses; } |
Finally, a function is made for exiting the game. This is especially useful if you want to make a version of the app for PC that uses a webcam. Whenever the user clicks or taps on the ExitButton, you call Application.Quit() to shut down the game.
|
1 2 3 4 |
public void ExitGame() { Application.Quit(); } |
All the project’s code is now ready to go. All that’s left is to assign functions to UI elements, fill in some variables in the Unity editor, and then test out the AR app.
Finishing Touches
The scripts should already be attached to their respective objects, except for ImageTarget as you would have created that object while following along. You’ll need to attach PlayerInput to ImageTarget by clicking the object, then clicking Add Component and searching for PlayerInput. Oce that’s done, all that’s needed is to fill the empty fields. Start with ImageTarget, which has the PlayerInput script. Find the ObjectLocatedText in the Hierarchy (located under Canvas) and drag that into Game Text. Then grab the chest (found under ImageTarget) object, which should be found under ImageTarget, and drag it into ChestAnim as shown in Figure 14.
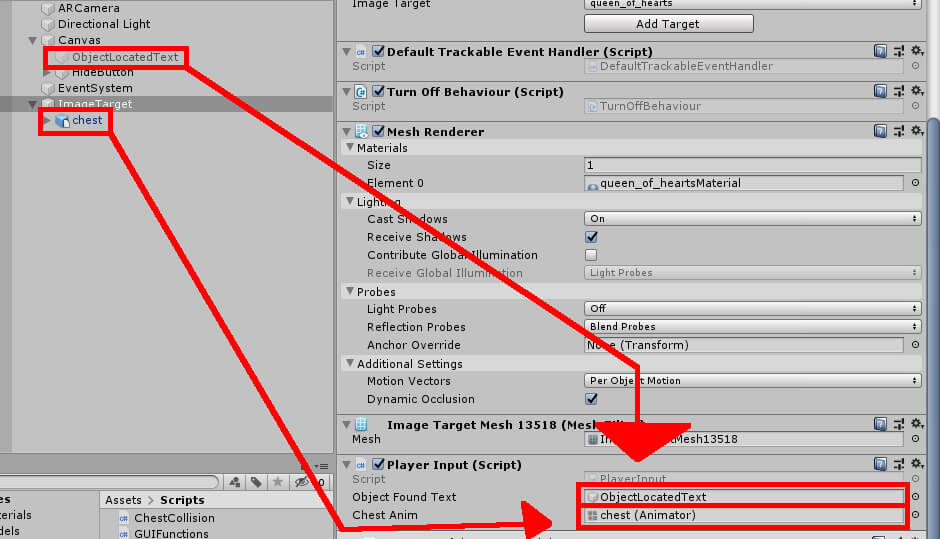 Figure 14: Setting the Player Input fields.
Next, click Canvas and fill out the fields in GUIFunctions. Drag HideButton into GuiAnim and TimesPressedText (found under HideButton) into Pressed Text as shown in Figure 15.
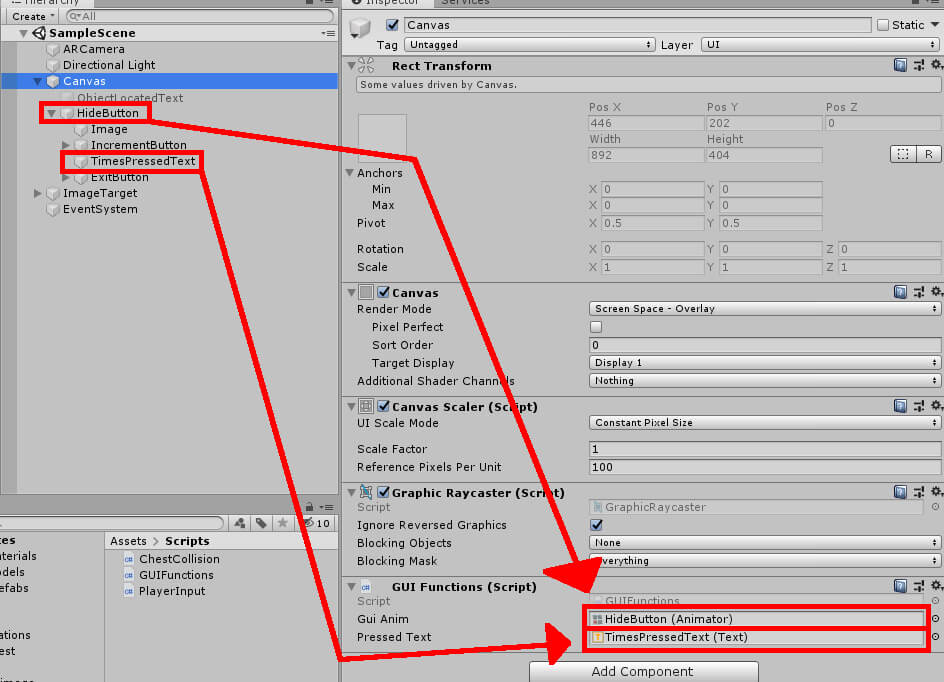 Figure 15: Setting the GUIFunctions fields.
Move on to the Chest object, which contains the ChestCollision script. Simply drag the ObjectLocatedText object in the Hierarchy into the Game Text field.
Now all that’s left is to assign the functions created in GUIFunctions to their corresponding buttons. Start with HideButton and move to the Inspector. Find the OnClick event list and add a new event. Drag Canvas into the object field as shown in Figure 16.
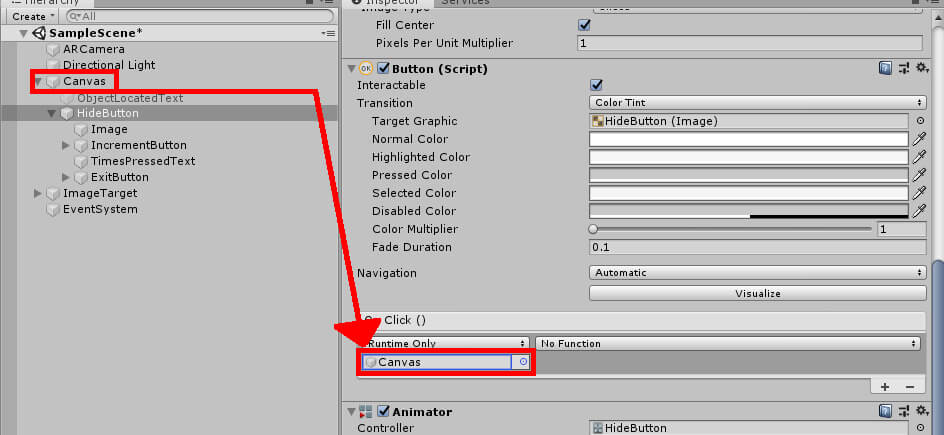 Figure 16: Creating a new OnClick event for HideButton.
Select the button that says NoFunction and navigate to GUIFunctions->ShowOrHideButton as shown in Figure 17.
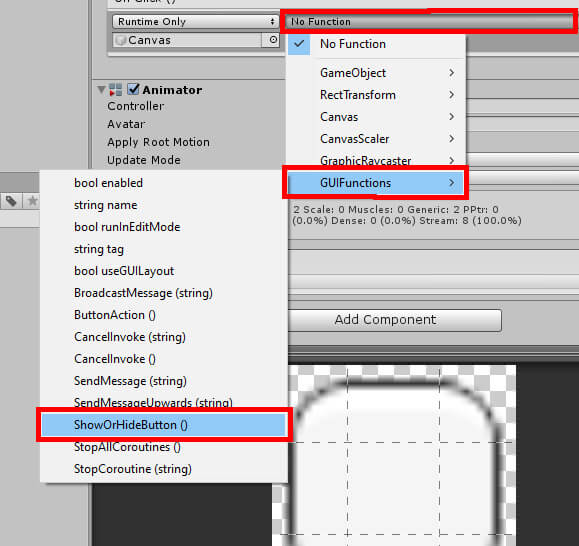
Figure 17: Selecting the function.
Repeat this process for IncrementButton and ExitButton. Choose GUIFunctions->ButtonAction for IncrementButton and GUIFunctions->ExitGame for ExitButton. This will complete the setup for the project. If you have a webcam attached to your computer, you can test out the program with that. Otherwise, you can test the app on your mobile device by selecting File->Build and Run from the top menu. The chest will appear if the app sees the card as shown in Figure 18. If this is the first time running a Unity app on your mobile device, refer to this link for Android setup or this link for iOS setup. You can also check out this article which walks you through the steps to build a mobile app.
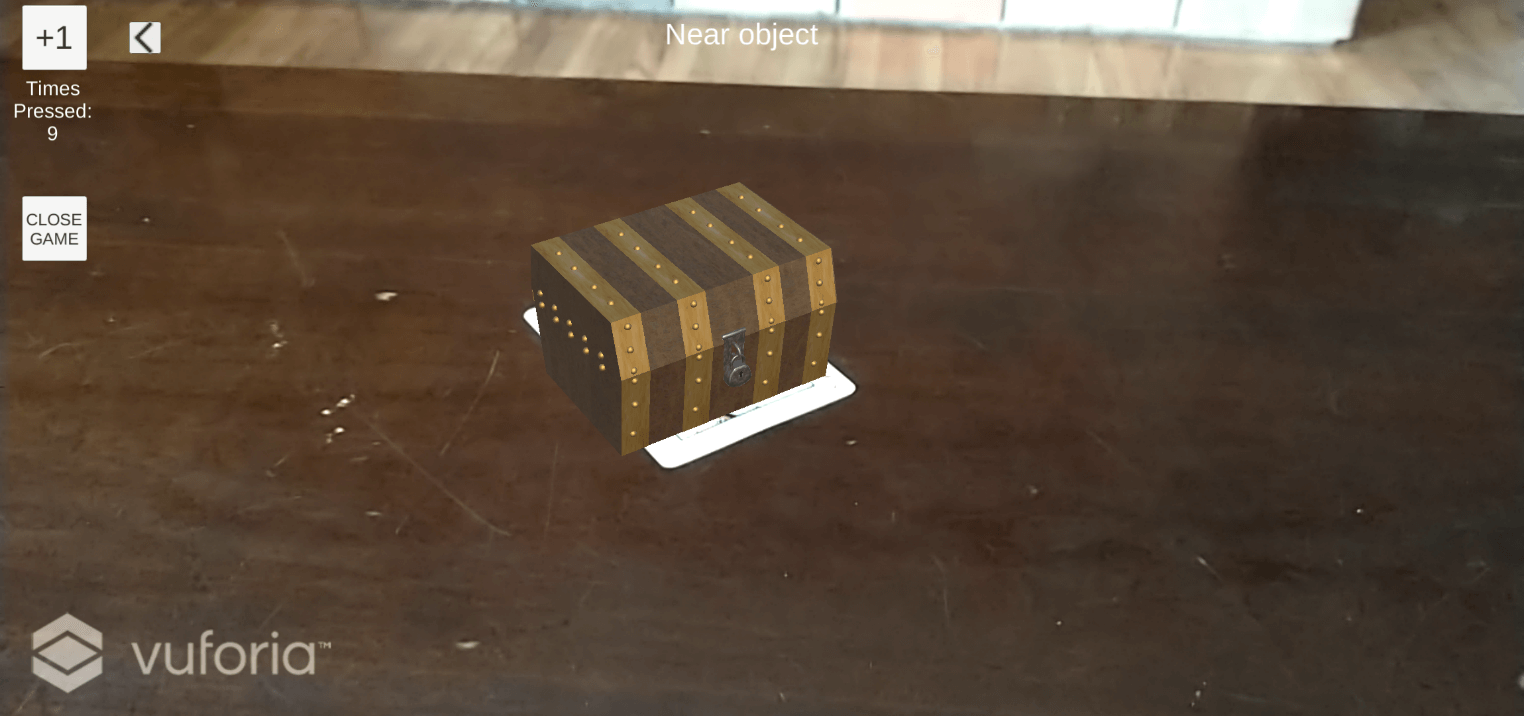 Figure 18: The chest appears when the queen of hearts is found.
Conclusion
As mentioned from the start, this is merely a sampling of AR development. There are other features available such as allowing the user to place objects in the world in real-time. With Vuforia, you can also detect a variety of targets beyond simple images. These range from cylinder objects like bottles to “Area Targets” – 3D scans of rooms and other large spaces. That said, it’s worth noting that not all Vuforia features function on every device, so it’s highly recommended you check out Vuforia’s list of recommended devices before starting your AR app. In addition, the process of integrating AR functionality into a Unity app has been simplified so that you can focus on the design and creation of the app and not have to worry about the AR setup. Thanks to all these tools, creating AR applications has never been easier.
This document contains proprietary information and is protected by copyright law.
Copyright © 2026 Red Gate Software Limited. All rights reserved
Load comments