
Manipulate the GridView control in ASP.NET to display your data the right way
The GridView in ASP.NET is a very powerful control that provides an easy interface to add, update, delete, and display data. The GridView also lets you perform other tasks very easily, such as paging and sorting your data, but not everything is as straightforward as it seems. Most of the time, we would display the data exactly as it comes out of our datasources, but sometimes we may need to manipulate the text, cells, and rows to fit our needs. In this article I will explain how to use the events and properties of the GridView to allow us to customise the way the data appears.
Taking advantage of the GridView events and properties
GridView is great for very simple tables, but the real world is not always as straightforward as we would like it to be. Sometimes we need to specify the format of the data, and the way it is rendered in the table, more exactly. Many people will tell you to use other type of controls such as the DataList for this, because it gives the user more choices in the way that the grid is rendered. Unfortunately the DataList, unlike the Gridview, does not have all the features such as paging and sorting that are commonly required. So if you still need or want to use the GridView, but also need more control on the way that the table is rendered, you can use the GridView events and properties.
The most used event of the GridView is the RowDataBound. This event is fired every time a row is bound to data. What does this mean to us, the developers? This means that, whenever this event is fired, we will have access to the current row and all of its data, so we can manipulate the table, row, cells, and or controls of the table accordingly. I will come back to this later.
Other important events are the DataBound and the Load event. The Load event fires when the GridView is loaded and has not been attached to any data yet. In this event the user can set properties such as the color of the border, themes, or any other rendering options that are not dependent on the data itself. The DataBound is similar to the RowDataBound in that both are fired after a bound event has happened. The difference is that DataBound is fired once after the entire Grid has been bound; while the RowDataBound is fired every time a row is bound, meaning it will almost always be fired more than once. So you can use the DataBound to manipulate the table based on the data contained in it.
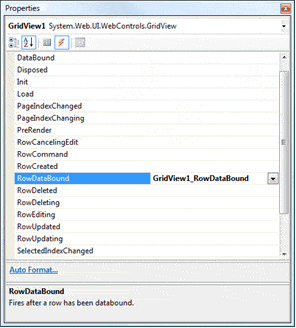
FIGURE 4: Events of the GridView
The RowDataBound is your friend.
Let’s look at the parameters needed for the RowDataBound event. Like every .NET event it has two parameters: sender of type object and e of type GridViewRowEventArgs. The sender parameter contains a reference of the GridView that is firing the event and e contains a very important property named Row which references the row that is being bound. The Row property is very important. Table 1 contains the most used properties of the GridViewRow taken from the MSDN documentation.
| Property | Description |
|---|---|
| Attributes | Gets the collection of arbitrary attributes (for rendering only) that do not correspond to properties on the control.(inherited from WebControl) |
| Cells | Gets a collection of TableCell objects that represent the cells of a row in a Table control.(inherited from TableRow) |
| DataItem | Gets the underlying data object to which the GridViewRow object is bound. |
| RowIndex | Gets the index of the GridViewRow object in the Rows collection of a GridView control. |
| RowType | Gets the row type of the GridViewRow object. |
Table 1: Most used properties of the Row
Imagine that your boss asks you to create a table of all the products with their price and Units in Stock and Units on Order. So you would simply create a GridView with a SqlDataSource with the following query: select ProductName, UnitPrice, UnitsInStock, UnitsOnOrder from Products. This is a very easy and straightforward task. Figure 5 displays the end result.
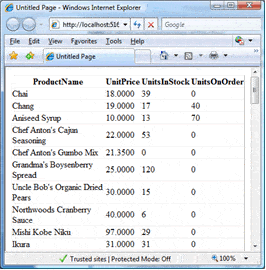
FIGURE 5: End result of the GridView displaying the products.
Your boss sees the page and says he would love to be able to quickly distinguish all the products that need to be reordered, and also the products that have already been reordered. So you could then simply tell him that not only will you display the numbers as they are, but also display the products that need to be reordered in red and the ones that have been reordered in blue. Your boss loves the idea, but you have no clue how to do that with a GridView. The way to do this is to use the RowDataBound event. The code on Figure 6 shows how to accomplish this simple, but not intuitive task.
|
1 2 3 |
protected void GridView1_RowDataBound(object sender, GridViewRowEventArgs e) { if (e.Row.RowType == DataControlRowType.DataRow) { //We're only interested in Rows that contain data //get a reference to the data used to databound the row DataRowView drv = (DataRowView)e.Row.DataItem; if (Convert.ToInt32(drv["UnitsInStock"]) == 0) { //The current product has 0 items in stock e.Row.Font.Bold = true; //Make the font bold e.Row.ForeColor = System.Drawing.Color.Red; //Set the text color red if (Convert.ToInt32(drv["UnitsOnOrder"]) > 0) { //The current out of stock item has already been ordered //Make it blue e.Row.ForeColor = System.Drawing.Color.Blue; } } } } |
FIGURE 6: Code for setting fore color of each row.
The GridView fires the RowDataBound event on every row, including the header and footer. Therefore we need to make sure, when the event is fired, that it is fired on a DataRow. If it is, then we get a reference to the DataRowView, which represents the row of the datasource to which the row of the GridView was tied to. In our case this represents a row from the database result set. Please note that the e.Row.DataItem returns an object. The reason for that is that you can bind a GridView to any item that implements the ICollection interface: DataTable, DataSet, List, Array, etc. The type of the DataItem will vary with the DataSource used. Once we get a reference to the DataRowView, we then check to see if that Product is out of stock or if it is in the process of restocking and set the ForeColor of the row equal to the correct color. Figure 7 shows the end result.
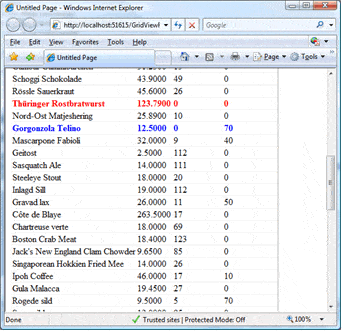
Figure 7: The new GridView with the color change
Your boss is now in a good mood, and knows that you can do a lot for him: He therefore wants a new report. This new report will include all the products by Category. He does not want to see the category repeated every time. Your data comes in the format displayed in Figure 8.
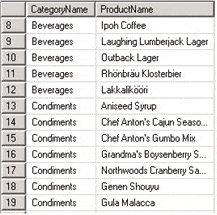
FIGURE 8: Data from datasource
The idea is the same as in the previous example. We need to implement the RowDataBound event and check when the CategoryName changes. If it does, then we will display it, if it does not, then we hide it. But to make it more complicated, not only are we going to hide it, but we are going merge the rows together. Figure 9 displays the code needed to make this happened and Figure 10 displays the end result.
|
1 2 3 |
string previousCat = "";int firstRow = -1;protected void GridView1_RowDataBound(object sender, GridViewRowEventArgs e) { if (e.Row.RowType == DataControlRowType.DataRow) { //We're only interested in Rows that contain data //get a reference to the data used to databound the row DataRowView drv = ((DataRowView)e.Row.DataItem); if (previousCat == drv["CategoryName"].ToString()) { //If it's the same category as the previous one //Increment the rowspan if (GridView1.Rows[firstRow].Cells[0].RowSpan == 0) GridView1.Rows[firstRow].Cells[0].RowSpan = 2; else GridView1.Rows[firstRow].Cells[0].RowSpan += 1; //Remove the cell e.Row.Cells.RemoveAt(0); } else //It's a new category { //Set the vertical alignment to top e.Row.VerticalAlign = VerticalAlign.Top; //Maintain the category in memory previousCat = drv["CategoryName"].ToString(); firstRow = e.Row.RowIndex; } } } |
FIGURE 9: Code to get rid of the repeated category
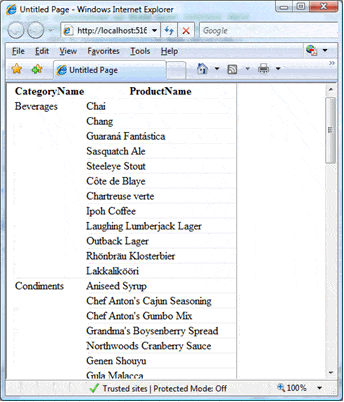
FIGURE 10: Products by Category
The code is very similar to the previous example. This time we are using the help of two global variables: previousCat and firstRow. The variable previousCat is used to save the category of the previous row, so if the category is the same we increment the row span of the row containing the category and then delete the first cell of the current row. Whenever a new category arrives we leave the row intact and save the previousCat and firstRow to their corresponding values. Please note that this code will only work correctly if the data is sorted by the category name.
Your boss is now ecstatic; he knows he had made a great investment by hiring you. He knows you are on a roll and that is why he wants to change the first report by adding an image right next to the discontinued products. Figure 11 shows the code to accomplish the task and Figure 12 shows the end result.
|
1 2 3 |
protected void GridView1_RowDataBound(object sender, GridViewRowEventArgs e) { if (e.Row.RowType == DataControlRowType.DataRow) { //We're only interested in Rows that contain data //get a reference to the data used to databound the row DataRowView drv = (DataRowView)e.Row.DataItem; if (Convert.ToInt32(drv["UnitsInStock"]) == 0) { //The current product has 0 items in stock e.Row.Font.Bold = true; //Make the font bold e.Row.ForeColor = System.Drawing.Color.Red; //Set the text color red if (Convert.ToInt32(drv["UnitsOnOrder"]) > 0) { //The current out of stock item has already been ordered //Make it blue e.Row.ForeColor = System.Drawing.Color.Blue; } } if ((bool)drv["Discontinued"]) { //Discontinued product //Add the image Image img = new Image(); img.AlternateText = "Discontinued Product"; img.ImageAlign = ImageAlign.AbsMiddle; img.ImageUrl = "arrow_down.gif"; img.Width = Unit.Pixel(10); img.Height = Unit.Pixel(11); e.Row.Cells[0].Controls.Add(img); //Add the text as a control e.Row.Cells[0].Controls.Add(new LiteralControl(" " + e.Row.Cells[0].Text)); } } } |
FIGURE 11: Code for setting fore color and discontinued image.
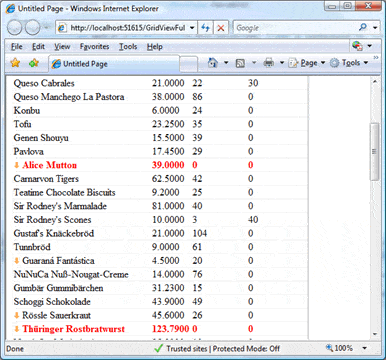
FIGURE 12: End result of the discontinued product
The code is the same code as in the first example with the addition of the discontinued part. We first have to check whether the current product is discontinued. If it is, then we create a new image and add it to the controls collection of the cell. Since we are adding a control to the collection, the GridView gives priority to the controls and ignores the text property, which is why we need to add the text as a control. This makes the GridView render the cell as an image with text right next to it.
Conclusion
From design time to run time formatting, from declarative programming to imperative programming, the GridView is one of the most complex and simple controls in the ASP.NET arsenal. It allows you to create simple tables with very little programming and also allows you to have full control of its formatting to create very complicated grids. Not only is the GridView a very powerful control for normal day to day functions such as displaying, adding, updating, and deleting data or for nice features such as paging and sorting, but also is a very powerful control in that it enables you to have full control of how it renders itself. I hope the next time you are creating a grid for your boss you can play around with the GridView Events and properties to come up with a neat solution.
Happy Programming!
This document contains proprietary information and is protected by copyright law.
Copyright © 2026 Red Gate Software Limited. All rights reserved
Load comments