
Microsoft has recognised that the web front end, especially JavaScript & CSS, can be just as complex as any other aspect of a web-based application. Having myself been involved some years ago in building a JavaScript Single Page Application I can vouch for the fact that that web front ends can be really complex. At that time there wasn’t a Visual Studio (VS) solution so I used Node.js, which has lots of web development tools, as a separate application.
However Microsoft have now added new features to Visual Studio 2015 (VS2015) which make existing web tools used by the general web developer community available inside Visual Studio. Many of these tools switch on automatically if you create a new ASP.NET 5/MVC6 application, now known as ASP.NET Core 1.0, which is how I will refer to it in this article. However the same tools are also available for existing ASP.NET MVC5 projects if you know how to unlock them. This is what this article is about – unlocking and using these new web tools.
Note: While this article talks about VS2015 it is also applicable to VS2013 as the same Bower, Grunt and Gulp features are available for VS2013 via add-on extensions. If you have VS2013 then read this article by Scott Hanselman on what packages you need.
I personally needed the power of these tools on an ASP.NET MVC5 e-commerce project which is nearing completion and we are doing fairly drastic things to the design and JavaScript front-end. I didn’t want to upgrade to ASP.NET Core 1 this late in the project, especially as ASP.NET Core 1 is very different to MVC5 and is not released yet anyway. I therefore set about harnessing these tools in an existing project, with the aim of following the ASP.NET CORE 1 style to make upgrading later as simple as possible.
This article should be useful to people who want to see what the changes are between the current system of using NuGet, BundleConfig and Web Essentials and the new approach based on a web package manager called Bower plus build automatic systems using Grunt and/or Gulp . It covers how to convert an existing MVC5 application to use Bower and Grunt, but also refers to how an ASP.NET CORE 1 project would tackle the same problem.
Note:This article is accompanied by an open-source sample application which you are welcome to look at or download. This application started as an empty MVC5 web application using NuGet and BundleConfig and I then converted the project to use Bower and Grunt.
Why swap from NuGet to a dedicated web package manager?
Before I start, it is worth questioning why you should consider swapping away from NuGet and Web Essentials. If you have built web applications inside VS, then you know that NuGet can provide web packages like JQuery, BootStrap.js etc. So why change?
There are, in fact, other dedicated web package managers such as NPM or Bower that are used across the whole of the web community. Because of this widespread use, these web package managers have better coverage of the various web libraries and, more importantly, they are often more up to date than NuGet’s similar offerings.
On the building of web packages, the VS extension Web Essentials is really good, but, on the other hand, there are build automation packages such as Grunt and Glup that are used by the web development community at large. It makes sense to use these tools because they have many more features and are quicker to adapt to the introduction of new tools and technologies.
This is definitely a good step forward for serious web developers, but like everything we need to learn some new ways of doing things.
Swapping from NuGet to Bower
If you create a brand-new ASP.NET CORE 1/MVC solution in VS2015, then the MVC project looks very different to the current ASP.NET MVC5 structure. This is because the whole structure has been reconfigured to be more applicable to modern web development (see the ASP.NET CORE 1 overview article for more information).
We are interested in how it handles the web packages because, if we are going to adopt Bower etc., we would want to use the same approach as the new ASP.NET structure so that any future upgrades will be simpler. There are many changes in ASP.NET CORE 1 but the key web package changes are:
- It automatically uses Bower, not NuGet, to load web packages such as JQuery, Bootstrap etc.
- It includes a ‘Dependencies’ virtual folder that contains:
- It doesn’t have an App_Start/BundleConfig.cs because Gulp does the bundling/minification.
So let us now change our existing MVC5 project to match this approach.
1. Use Bower, not NuGet for web package management
If you have an existing MVC5 application, you won’t see the Manage Bower Packages option in any of your menus. It needs a file to unlock the feature. Therefore the first step is to create a bower.json file to your MVC5 project, by right-clicking the MVC project folder in the Solution Explorer and select: Add >New Item and then find the ‘ Bower Configuration file‘ in the list of templates, e.g.
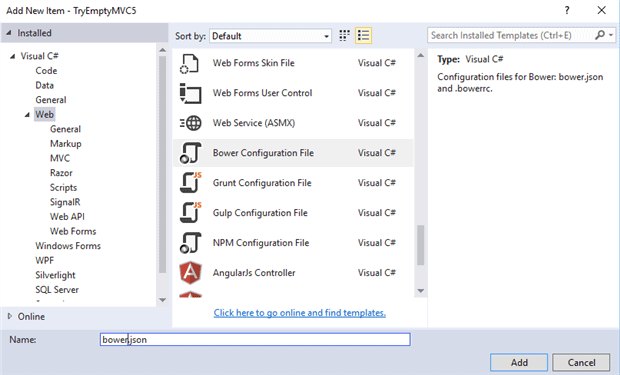
This will create two files and activate Bower. The two files are:
- bower.json: This is the file that Bower writes to when you load a packages. This is useful for package restore, which means, in this case, restoring the Bower files if they are not already loaded. As you don’t normally include the web packages in your source control, then you need this if you are loading the application into a different development environment.
- .bowerrc: This is the Bower configuration file and contains things like what directory where the packages will be written to. By default this is ‘wwwroot/lib’, which fits the new ASP.NET CORE 1 directory structure. For MVC5, however, I recommend that you change it to just ‘ lib‘, so that the lib directory lives at the top level.
Once you have these files, you should find that, when you right click the MVC project folder in the solution explorer, there is now a new option: Manage Bower Packages.
Note: I have found that this command doesn’t immediately appear once you have added the files. Restarting the Visual Studio and reloading the solution fixes this.
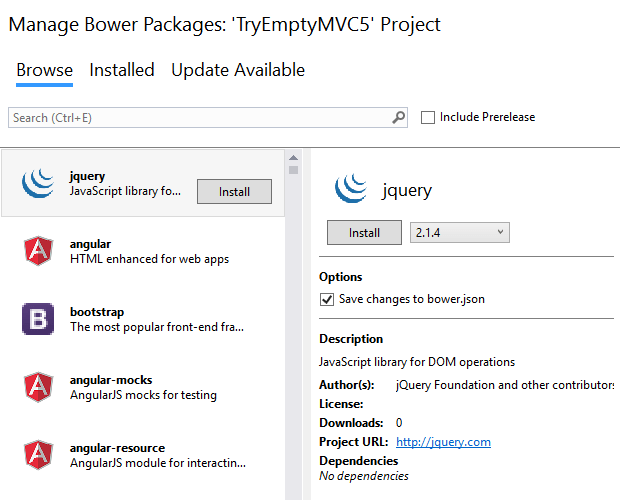
By selecting the Manage Bower Packages function, you will bring up a screen (shown below) which is very like the new V3 NuGet screen. However, in this case it is accessing the bower.io API to allow you to browse the packages available via Bower.
Be warned: I have found a few of issues in the current Bower interface:
- I used the interface to try and find a package called ‘fontspy‘ but it could not find it, although Bower’s online search said it was there. However if I went into the bower.json file and typed “fontspy” intellisence knew about it and gave me the version. I then right-clicked the bower.json file and selected Restore Packages and fontspy loaded ok. The interface never showed that fontspy was loaded.
- I found Underscore using the interface, but it only gave version 1.5.2, which is an older version. If I went into bower.json and typed “underscore” it found version 1.8.3. I used that version by using Restore Packages to load it (see point 1).
- The interface says ‘No dependencies’ for packages that do actually have dependences, which is a bit confusing. Clicking the ‘project URL’ and looking at a file called ‘bower.json‘ will show you the actual dependencies. However, even if the screen doesn’t show the dependencies, Bower will load any dependant packages if required.
If you select and install a package two things happen:
- The bower.json file is updated with the loaded package(s).
- The package and any of its dependant packages are loaded to the directory pointed to by . bowerrc .
Here are the contents of bower.js on after JQuery, BootStrap and Microsoft.jQuery.Unobtrusive.Validation has been loaded.
|
1 2 3 4 5 6 7 8 9 |
{ "name": "ASP.NET", "private": true, "dependencies": { "jquery": "2.1.4", "bootstrap": "3.3.5", "Microsoft.jQuery.Unobtrusive.Validation": "~3.2.3" } } |
By default, the loaded packages are not included in the project, which is good as we don’t want them to be sent to the web site, or stored in source control. However this means that, in order to see them, we need to turn on the ‘ Show all Files’ option in VS’s Solution Explorer, and after installing a new package you will need to ‘ Refresh ‘ the Solution Explorer view. Here is a view of the loaded packages directories with bootstrap opened up.
Note: You won’t see the lib directory in the sample application as it is not included in source control. If you download the application, you need to right-click on the ‘bower.json’ file and click ‘Restore Packages’. That will download the packages and populate the lib directory.
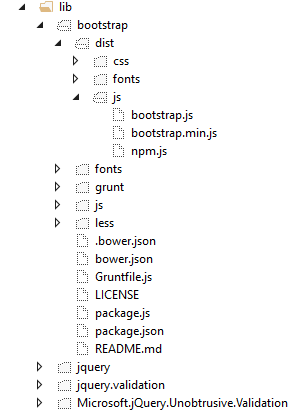
Note: you will see that the package jquery.validation is loaded even though it does not appear in the bower.json file. This is because the bower.json files for Microsoft.jQuery.Unobtrusive.Validation says it depends on jquery.validation so Bower automatically loads that, if it is not already there.
2. Remove web packages loaded by NuGet
Tip: It took me a bit of searching to find the equivalent web packages in Bower. JQuery was easy but some of the packages have difference versions with very similar names. It’s worth cross-referencing the files that NuGet loaded with the bower equivalent before you uninstall the NuGet versions.
Previously you used NuGet to load your web packages, but when changing to Bower I really recommend that you remove those packages from NuGet. This ensures that you won’t be confused between the two packages and, more importantly, if Bower updates its packages there isn’t a chance that you are using an older package loaded by NuGet. I also prefer not to have a long list of JavaScript files under the ‘Script’ directory – now I can put my JavaScript files in there and it’s not confusing.
To Uninstall NuGet loaded packages, then simply open NuGet and select the ‘ Installed‘ tab, then ‘Uninstall’ the packages that Bower is now handling. Note that your current views and layouts will stop working, which leads me on to the next section.
Swapping from BundleConfig to Grunt/Gulp
In ASP.NET MVC5 CSS and JavaScript, files were normally delivered by App_Start/BundleConfig.cs which also looked after bundling and minification in a released application. Also, if you required compiling of Less, Sass, TypeScript, CoffeeScript, templates, image spriting etc. you may have used Web Essentials.
The new way is to use build automation tools like Grunt or Glup to achieve the same thing. As I explained earlier these tools have a large base of ‘Plugins’ which include all the features of Web Essential and more.
You have a choice of using either Grunt or Gulp, or both. They both do the same thing but in slightly different ways. I ended up using Grunt for no more reason than I found some useful commands in Grunt format. Gulp is the standard automation tool if you create a new ASP.NET CORE 1 project, but either will do the job.
Note: If you want to use Gulp instead of Grunt, then I recommend this ASP.NET CORE 1 documentation on Gulp. If you want an example Gulp file, then create an ASP.NET CORE 1/MVC project and look at the gulpfile.js that it produces.
1. Installing Grunt
The build automation tools need to be loaded, and for that we use NPM. NPM is a library system that makes it easy to share code. Grunt (and Gulp), plus their plugins, can be loaded by NPM into your application.
First you need to add a NPM configuration file to the project just as you did for the Bower configuration file: You right-click the MVC project folder in the Solution Explorer and select: Add >New Item and then find the ‘ NPM Configuration file ‘ in the list of templates.
This adds a file called package.json and opens you a window into that file. Now you manually add the Plugins that you need. Thankfully, you get great intellisense help with package names and their versions, so it’s not too hard. What you put in depends on what you want to do, but here is my file as a start:
|
1 2 3 4 5 6 7 8 9 10 11 12 13 14 15 |
{ "version": "1.0.0", "name": "ASP.NET", "private": true, "devDependencies": { "grunt": "0.4.5", "grunt-contrib-clean": "0.6.0", "grunt-contrib-cssmin": "0.14.0", "grunt-contrib-jshint": "0.11.0", "grunt-contrib-concat": "0.5.1", "grunt-contrib-uglify": "0.8.0", "grunt-contrib-watch": "0.6.1", "grunt-contrib-copy": "0.8.2" } } |
Here is link to the reference article that I got this from. The only extra command I added was grunt-contrib- copy, which I needed for copying the bootstrap font files and some other standard library files.
Once you have filled or changed the package.json file you should right-click the file and click Restore Packages. This will cause npm to look for those packages and load them. If you do a Refresh in the VS Solution Explorer you should find the package/plugins in the ‘node_modules’ directory.
Be warned: If you have made a mistake in the file you won’t get any kind of error feedback when you run ‘Restore Packages’ – it still says ‘Installing packages complete’. However, if the files don’t seem to update look at the Output Window>Bower/NPM.
Many of the names tell you what each plugin does, like grunt-contrib-cssmin , -conat . Less obvious is grunt -contrib-uglify which is a minifier of JavaScript, grunt-contrib-clean is useful for deleting old file/directories and grunt-contrib-watch is a useful tool for watching if files change and automatically running some commands.
2. Define your Grunt tasks
You define the tasks you want to call in the Grunt configuration file, using the normal right-click the project and select Add > New Item. Select the Grunt Configuration file option, leave the default name, gruntfile.js, and click the Add button.
There are lots of ways of doing this and not really the space to explain all the possibilities, but I do give some links later. To give you a general introduction I have listed a very cut-down g runtfile.js which only concatenates and minifies the CSS files.
|
1 2 3 4 5 6 7 8 9 10 11 12 13 14 15 16 17 18 19 20 21 22 23 24 25 26 27 28 29 |
module.exports = function (grunt) { // Project configuration. grunt.initConfig({ concat: { css: { src: ['lib/bootstrap/dist/css/bootstrap.css', 'Content/Site.css'], dest: 'css/styles.css' }, }, cssmin: { css: { src: 'css/styles.css', dest: 'css/styles.min.css' } } }); // Load the plugin that provides the tasks we need grunt.loadNpmTasks('grunt-contrib-concat'); grunt.loadNpmTasks('grunt-contrib-cssmin'); // Default task(s). grunt.registerTask('default', []); // Build task(s). grunt.registerTask('build:css', ['concat:css', 'cssmin:css']); }; |
In the example above, I listed the files I wanted to concatenate from the packages that Bower loaded earlier. The simplest way to do this is compare the names of the files you loaded via your existing BundleConfig class and look for the same name in the lib directory. The files you want are often in a directory called ‘ dist‘, but some packages like Microsoft.jQuery.Unobtrusive.Validation don’t follow that rule.
With the gruntfile.js set to the code shown above up then if you can open the Task Runner Explorer window (try View > Other Windows > Task Runner Explorer) then you should see something like this:
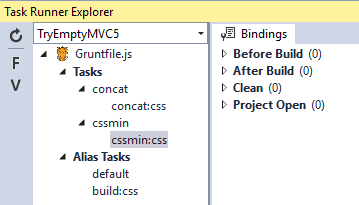
You can see the concat:css and cssmin:css tasks, plus the build:css task which executes concat:css followed by cssmin:css. The result of running concat:css is you will find a file called ‘ styles.css’ which is a combination (bundle) of the bootstrap.css file followed by the Site.css file. If you run cssmin:css, then a second file called ‘styles.min.css’ will appear: This is the minified version of ‘styles.css’.
You run commands by right-clicking on a command and selecting Run. Feedback is pretty good, with the output of the task shown to the right of the command part of the window.
There is plenty more you can do, but the example above gives you the basic idea. I would refer you to these useful articles for more information.
- Grunt documentation on a sample Gruntfile.
- The ASP.NET documentation on configuring Grunt.
Note: different gruntfile in the sample application.
You will find that, in the sample application, I use a different approach to specifying the files that are in each bundle, because I want another feature, BundlerForBower (explained later), to also have access to the list of bundles and their files. Therefore I place the array of files in a json file which I store in the App_Data directory. You can see the complete version of my gruntfile.js and the json file it reads.
3. Binding actions to Visual Studio Events
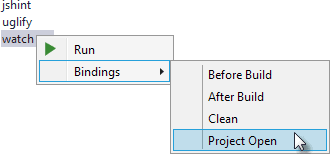
You can bind any of the actions in the GruntFile to a Visual Studio event: Before Build, After Build, Clean and Project Open. You do this by right-clicking on a command you want to link to, and selecting Bindings. Below is an example taken from the ASP.NET grunt documentation, where you bind the watch feature to Project Open.
These bindings are stored as a specially formatted comment at the top of the gruntfile.json.
4. Delivering CSS/JavaScript to the Brower
The new ASP.NET CORE 1/MVC6 project does not use BundleConfig.cs to combine and minify CSS and JavaScript. It uses some new razor < environment names=”Development”> feature to choose between individual files or the concatenated & minified files produced by the Grunt/Glup task. It seems that the approach is to include all the individual files in in Development mode. In Production/Release it includes the concatenated and minified file with a cache buster suffix added using the new asp-append-version tag inside a HTML < script>. The asp-append-version tag generates a unique hash based on the file content (see this helpful stackoverflow answer explanation).
In an existing MVC5 project, we don’t have the new < environment> or the asp-append-version tag so we need to find an alternative. There are two ways to do this:
a. Use BundleConfig.cs to deliver the concatenated files
One of the reasons I chose the Grunt approach is that it created both a concatenated, non-minified file and the minified file for both CSS and JavaScript. This means I could create a bundle inside BundleConfig.cs that looked like this:
|
1 2 |
bundles.Add(new StyleBundle("~/Content/css").Include( "~/css/mainCss.css")); |
In development mode it would deliver one large CSS file, styles.css, which isn’t minified. In release mode it would use the styles.min.css file with a cache buster suffix, i.e. a string that changes when the file changes, which makes sure an older, browser-cached version isn’t used.
b. Building a BundlerForBower class
The above solution works but throws up loads of issues when debugging of JavaScript. As the whole point of using Bower etc. is because you have a lot of front-end code to debug the first solution is less than idea.
I therefore built a specialised version of the MVC5 BundleConfig, called BundlerForBower or B4B for short , which is specifically written to work closely with Bower, Grunt and Gulp. It also follows some of the design styles used in the current ASP.NET Core 1 applications.
B4B consists of some code that performs a similar role at MVC’s BundleConfig class plus two extension methods that are very similar Html helper methods to MVC5’s `Styles` and `Scripts` classes to deliver bundles in a view. It is therefore quite easy to convert an existing MVC5 views over to B4B by making the following replacements:
|
1 |
@Styles.Render("~/Content/cssBundle") |
… is replaced by …
|
1 |
@Html.HtmlCssCached("cssBundle") |
… and …
|
1 |
@Scripts.Render("~/bundles/javaScriptBundle") |
… is replaced by …
|
1 |
@Html.HtmlScriptsCached("javaScriptBundle") |
As well as bundles that deliver groups of files from within your application ASP.NET Core 1 has a set of tags for delivering files from a Content Delivery Network (CDNs), with fallback capabilities. I have reproduced this feature in B4B as it is so useful. Public CDNs are available across the world for many of the standard libraries like JQuery and Bootstrap, and can be faster than local delivery especially if the user has already loaded the standard library when using another web site.
I have written an article called ‘ Introduction to BundlerForBower for ASP.NET MVC5‘ which goes through in detail how B4B works. It is an open-source (MIT) project and is included in the sample application.
My reflections on using Bower and Grunt
I think that Bower and Grunt/Gulp are a really good step up from the old NuGet, BundleConfig and Web Essentials. I spotted a few issues that I have noted in this article, but they were easy to get round and are likely to be fixed soon. The difference was immediately apparent as I was now much more in control of my web packages. It solved three problems that I had with the ‘NuGet, Web Essential’s approach’ which are worth listing, as they point out some of the gains this new approach brings.
1. Better coverage of packages
I use a JavaScript package called JQuery-FontSpy, which isn’t in NuGet. Previously I had to copy the files I needed by hand from GitHub. However JQuery-FontSpy is, of course, available in Bower. This is typical of more specialised packages and one of the reasons to switch to Bower.
2. More up to date packages
I am using handlebars.js templates in my web application to dynamically create complex HTML at runtime via JavaScript. While a handlebars package is available via Nuget, it is at version 3.0.0 which isn’t the latest and misses a feature I would have liked to use. However, the Bower version is at version 4.0.3, which is the latest, and because Bower is the main way of releasing packages like this then it will always have the latest.
This reminds us that web packages only get into NuGet because someone takes the trouble to transfer it to NuGet, and they may not feel the need to keep it updated. Whereas Bower is the primary tool for deploying web packages so the latest and greatest of a package will be available.
3. Bower libraries can contain more information
The Nuget version of libraries like BootStrap and JQuery contain just the final .js and .min.js versions of the file. However if you load these libraries via Bower you find they have a directories that contain the various parts of the library.
This is very helpful for me in the task of making the transition of my e-commerce site from using BootStrap to the final CSS design scheme. While I don’t want much of BootStrap’s CSS, I would like to use some of its modules such as Moda ls to save me reinventing that code. If I was using NuGet, I would have had to go the bootstrap site and make a custom download, which I would have to redo if any new version came out. However, with Bower, I simply installed the bootstrap package and add the individual modal JavaScript and CSS, via less, files I need from the bootstrap\js and bootstrap \less directories to my gruntfile.js build script. If I want to add another module, like tooltip, I just include those files in my build script too. This is a much nicer approach than a custom download.
Even more web tools…
I should mention an alternative/adjunct to Bower etc. in the form of ‘ Node.js tools for Visual Studio‘ extension for VS. This has some extra features over the plain Bower, Grunt/Glup such as JavaScript debugging and profiling. It is definitely worth a look.
As I said at the start I used Node.js as a separate application some years ago when developing a Single Page Application and Node.js was great, if a bit daunting to learn coming from a VS background. Apparently, ASP.NET CORE 1 is going to use Bower, Grunt/Gulp as standard so I decided to start with that for now. You can use both the build in Bower and the Node.js extension together, so maybe I might progress to the Node.js extension in the future.
Conclusion
In this article I have described four things:
- How the new ASP.NET CORE 1 application works with Bower and its web build automation system.
- I have described how to change an existing ASP.NET MVC5 so that it uses Bower and a web build automation system instead of NuGet and BundleConfig.cs
- I have introduced a useful, open-source package called BundlerForBower which provides similar features to BundleConfig.cs, but specifically designed to work with Bower, Grunt and Gulp.
- I have made the MVC5 application’s web structure as close as possible to the way that ASP.NET CORE 1 handles web packages.
Coupled with the open-source sample application on GitHub this should provide you with a simple example of what a converted MVC5 application would look like. It also offers you a possible solution to serving individual or minified files without the help of some of the new ASP.NET CORE 1 tags.
So, whether you are sticking to MVC5 or jumping into ASP.NET CORE 1 the article helps you take the step away from NuGet and BundleConfig.cs into the new, and better, approach to handling web packages in Visual Studio.
I hope all this will make it easier for you to adopt the new way of working with front-end code. Hopefully you will find it as rewarding as I have.
This document contains proprietary information and is protected by copyright law.
Copyright © 2026 Red Gate Software Limited. All rights reserved
Load comments