
Contents

In my previous PowerShell exploration (A Study in PowerShell Pipelines, Functions, and Parameters) I concentrated on describing how parameters were passed to functions, explaining the bewildering intricacies on both sides of the function interface (the code doing the calling and the code inside the function doing the receiving). I didn’t mention how to go about actually creating a function because it was so simple to do that it could safely be left as an extracurricular exercise. With modules, by contrast, the complexity reverses; it is more intricate to create a module than to use a module, so that is where you are heading now. The first half of this article guides you along the twisted path from raw code to tidy module; the second half introduces a set of best practices for module design.
Encapsulation
As you likely know, encapsulation makes your code more manageable. Encapsulation is the process of separating an interface from its implementation by bundling data and code together and exposing only a well-defined portion of it. The following sections walk you along the road to encapsulation in PowerShell.

Refactor Inline Code into Functions
Encapsulation encourages you to convert a single code sequence with inordinate detail into a more digestible and simpler piece of code (Figure 1).
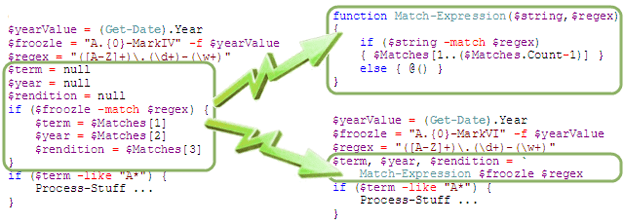
Figure 1: Refactoring inline code to a function
Refactoring the first example into the second ended up only moving one or two lines of code (depending on how you count it) into the separate Match-Expression function. But look at how much easier it is to comprehend the code! The main program lets a reader of your code observe that Match-Expression uses the given regular expression to find several values from a given string. It does not reveal how-the Match-Expression function hides the details of how the match operator works. And that’s great, because your reader does not care. Before you argue the point, consider a different context such as some .NET-supplied function, e.g. String.Join. Except in rare circumstances you simply do not care about the implementation of String.Join; you just need to know what it does.
Refactoring to functions is useful and important to do, of course, but there is one cautionary note: if instead of the simple Match-Expression function you have a more complex function that includes several support functions and variables, all of those support objects are polluting your current scope. There is nothing to prevent another part of your script from using one of these support functions that was specifically designed to be used only by Match-Expression (or rather its complex cousin). Or worse, in your zeal to refactor into smaller and smaller functions you might create a function with the same name as a built-in cmdlet; your function would supersede the built-in one. The next section returns to this consideration after a fashion.
Refactor Functions into Files
Now you have this Match-Expression function that came in quite handy in your script. You find it so useful, in fact, that you want to use it in other scripts. Good design practice dictates the DRY principle: Don’t Repeat Yourself. So rather than copying this function into several other script files, move it into its own file (Expressions.ps1) and reference it from each script. Modify the above example to use dot-sourcing (explained in the Using Dot Source Notation with Scope section of the help topic about_Scopes) to incorporate the contents of Expressions.ps1 (Figure 2).
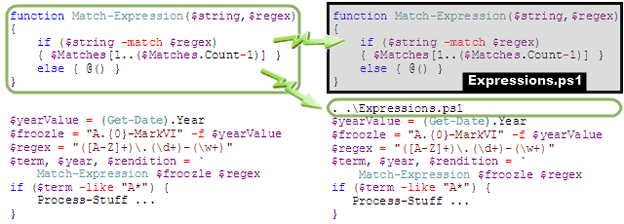
Figure 2: Refactoring an inline function to a separate file
The code on the right is exactly equivalent to the code on the left. The elegance of this is that if you want to change the function you have only one piece of code to modify and the changes are automatically propagated everywhere you have referenced the file.
Dot-sourcing reads in the specified file just as if it was in the file.
Dot-Sourcing Pitfall
There is, however, a potential problem. As you have just seen, dot-sourcing syntax includes just two pieces: a dot (hence the name!) and a file path. In the example above I show the file path as a dot as well, but there it means current directory. The current directory is where you happen to be when you invoke the script; it is not tied to the script’s location at all! Thus, the above only works because I specifically executed the script from the script directory. What you need then is a way to tell PowerShell to look for the Expressions.ps1 file in the same directory as your main script-regardless of what your current directory is.
A web search on this question leads you to the seemingly ubiquitous script that originated with this post by Jeffrey Snover of the PowerShell team:
|
1 2 3 4 5 |
function Get-ScriptDirectory { $Invocation = (Get-Variable MyInvocation -Scope 1).Value Split-Path $Invocation.MyCommand.Path } |
If you include the above in your script (or in a separate file and dot-source it!) then add this line to your script:
|
1 |
Write-Host (Get-ScriptDirectory) |
…it will properly display the directory where your script resides rather than your current directory. Maybe. The results you get from this function depend on where you call it from!
It failed immediately when I tried it! I was surprised, because I found this code example proliferated far and wide on the web. I soon discovered that it was because I used it differently to Snover’s example: Instead of calling it at the top-level in my script, I’d called it from inside another function in a way I refer to as “nested twice” in the following table. It took just a simple tweak to make Get-ScriptDirectory more robust: You just need to change from parent scope to script scope; -scope 1 in the original function definition indicates parent scope and $script in the modified one indicates script scope.
|
1 2 3 4 |
function Get-ScriptDirectory { Split-Path $script:MyInvocation.MyCommand.Path } |
To illustrate the difference between the two implementations, I created a test vehicle that evaluates the target expression in four different ways (bracketed terms are keys in the table that follows):
- Inline code [inline]
- Inline function, i.e. function in the main program [inline function]
- Dot-sourced function, i.e. the same function moved to a separate .ps1 file [dot source]
- Module function, i.e. the same function moved to a separate .psm1 file [module]
The first two columns in the table define the scenario; the last two columns display the results of the two candidate implementations of Get-ScriptDirectory. A result of script means that the invocation correctly reported the location of the script. A result of module means the invocation reported the location of the module (see next section) containing the function rather than the script that called the function; this indicates a drawback of both implementations such that you cannot put this function in a module to find the location of the calling script. Setting this module issue aside, the remarkable observation from the table is that using the parent scope approach fails most of the time (in fact, twice as often as it succeeds)!
|
Where Called |
What Called |
Script Scope |
Parent Scope |
|
Top Level |
inline |
script |
error |
|
inline function |
script |
script |
|
|
dot source |
script |
script |
|
|
module |
module |
module |
|
|
Nested once |
inline |
script |
script |
|
inline function |
script |
error |
|
|
dot source |
script |
error |
|
|
module |
module |
module |
|
|
Nested twice |
inline |
script |
error |
|
inline function |
script |
error |
|
|
dot source |
script |
error |
|
|
module |
module |
module |
(You can find my test vehicle code for this in my post on StackOverflow.)
Dot-Sourcing: The Dark Side
Dot-sourcing has a dark side, too, however. Consider again if instead of the simple Match-Expression function you have a more complex function that includes several support functions and variables. Moving those support functions out of the main file and hiding them (i.e. encapsulating them) in the file you will include with dot-sourcing is clearly a good thing to do. But the problem of dot-sourcing, then, is precisely the same as the benefit:
Dot-sourcing reads in the specified file just as if it was in the file.
That means dot-sourcing pollutes your main file with all of its support functions and variables-it is not actually hiding anything. In fact, the situation is far worse with dot-sourcing than it was with just refactoring in the same file: here the detritus is hidden from you (because you no longer see it in your main file) yet it is present and polluting your current scope all the same. But do not despair! The next section provides a way out of this quagmire.
Refactor Functions into Modules
A module is nothing more than a PowerShell script with a .psm1 extension instead of a .ps1 extension. But that small change also addresses both of the issues just discussed for dot-sourcing a script. Figure 3 returns to the familiar example again. The contents of Expressions.ps1 and Expressions.psm1 are identical for this simple example. The main program uses the Import-Module cmdlet instead of the dot-sourcing operator.
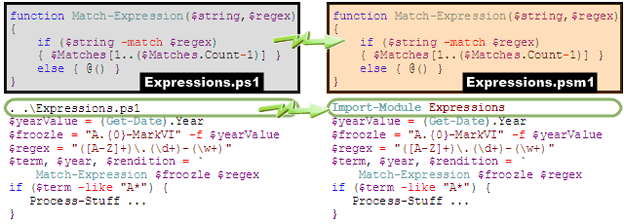
Figure 3: Refactoring code from dot-sourcing to module importation
Notice that the Import-Module cmdlet is not referencing a file at all; it references a module named Expressions, which corresponds to the file Expressions.psm1 when it is located under one of these two system-defined locations (See Storing Modules on Disk under Windows PowerShell Modules):
|
Machine-specific |
C:\Windows\System32\WindowsPowerShell\v1.0\Modules |
|
User-specific |
C:\Users\username\Documents\WindowsPowerShell\Modules |
Thus, the whole issue of current directory and script directory, a problem for dot-sourcing, becomes moot for modules. To use modules you must copy them into one or the other of these system repositories to be recognized by PowerShell. Once deposited you then use the Import-Module cmdlet to expose its interface to your script. (Caveat: you cannot just put Expressions.psm1 in either repository as an immediate child; you must put it in a subdirectory called Expressions. See the next section for the rules on this interesting topic.)
The second issue with dot-sourcing and inline code was pollution due to “faux encapsulation”. A module truly does encapsulate its contents. Thus, you can have as much support code as you want in your module; your main script that imports the module will be able to see only what you want exposed. By default, all functions are exposed. So if you do have some functions that you want to remain private, you have to use explicit exporting instead of the default. Also, if you want to export aliases, variables, or cmdlets, you must use explicit exporting. To explicitly specify what you want to export (and thus what a script using the module can see from an import) use the Export-ModuleMember cmdlet. Thus, to make Expressions.psm1 use explicit exporting, add this line to the file:
|
1 |
Export-ModuleMember Match-Expression |
Best Practices for Module Design
Before you launch into creating modules willy-nilly, there are a few more practical things you should know, discussed next.
Extracting Information about Modules
Before you can use modules you have to know what you already have and what you can get. Get-Module is the gatekeeper you need. With no arguments, Get-Module lists the loaded modules. (Once you load a module with Import-Module you then can use its exported members.) Here is an example:
|
1 2 3 4 5 6 7 8 |
ModuleType Name ExportedCommands ---------- ---- ---------------- Manifest Assertions {Set-AbortOnError, Assert-Expression,Set-MaxExpressionDisplayLe... Manifest IniFile Get-IniFile Manifest Pscx {} Script Test-PSVersion {} Script TestParamFunctions {} Manifest BitsTransfer {} |
The module type may be manifest, script, or binary (more on those later). The exported commands list identifies all the objects that the module writer exported with explicit exports. An empty list indicates default or implicit export mode, i.e. all functions in the module.
Guideline #1: Use explicit exports so Get-Module can let your user know what you are providing
Get-Module has a ListAvailable parameter to show you what is available to load, i.e. what you have correctly installed into one of the two system repository locations provided earlier. The output format is identical to that shown just above.
The default output of Get-Module shows just the three properties above, but there are other ones that are important as well. To see what other interesting properties you could extract from Get-Module, pipe it into the handy Get-Member cmdlet:
|
1 |
Get-Module | Get-Member |
Notable properties you find in the output include Path (the path to the module file), Description (a brief summary of the module), and Version. To display these properties with Get-Module, switch from its implicit use of Format-Table to explicit use, where you can enumerate the fields you want:
|
1 |
Get-Module -ListAvailable | Format-Table Name, Path, Description, Version |
|
1 2 3 4 5 6 7 8 9 10 11 12 |
Name Path Description Version ---- ---- ----------- ------- Assertion C:\Users\ms\Documents\Wi... Aborting and non-abortin... 1.0 EnhancedChildItem C:\Users\ms\Documents\Wi... Enhanced version of Get-... 1.0 inifile C:\Users\ms\Documents\Wi... INI file reader 1.0 SvnKeywords C:\Users\ms\Documents\Wi... 0.0 MetaProgramming C:\Users\ms\Documents\Wi... MetaProgramming Module 0.0.0.1 TestParamFunctions C:\Users\ms\Documents\Wi... 0.0 AppLocker C:\Windows\system32\Wind... PowerShell AppLocker Module 1.0.0.0 BitsTransfer C:\Windows\system32\Wind... 1.0.0.0 PSDiagnostics C:\Windows\system32\Wind... 1.0.0.0 TroubleshootingPack C:\Windows\system32\Wind... Microsoft Windows Troubl... 1.0.0.0 |
If you actually want to see the value of some fields, though, particularly longer fields like Path or Description, it might behoove you to use Format-List rather than Format-Table:
|
1 |
Get-Module -ListAvailable | Format-List Name, Path, Description, Version |
|
1 2 3 4 5 6 7 8 9 10 11 12 13 |
Name : Assertion Path : C:\Users\ms\Documents\WindowsPowerShell\Modules\CleanCode\Assertion\Assertion.psm1 Description : Aborting and non-aborting validation functions for testing. Version : 1.0 Name : EnhancedChildItem Path : C:\Users\ms\Documents\WindowsPowerShell\Modules\CleanCode\EnhancedChildItem\ EnhancedChildItem.psd1 Description : Enhanced version of Get-ChildItem providing -ExcludeTree, -FullName, -Svn, -ContainersOnly, and -NoContainersOnly. Version : 1.0 etc. . . |
The Get-Member cmdlet quite thoroughly tells you what you can learn about a module but if, like me, you occasionally prefer to bore down into the raw details, you can follow the object trail to its source. First, you can determine that the .NET type of an object returned by Get-Module is called PSModuleInfo via this command:
|
1 |
(Get-Module)[0].GetType().Name |
Lookup PSModuleInfo on MSDN and there you can see that the list of public properties are just what Get-Member showed you. On MSDN, however, you can dig further. For example, if you follow the links for the ModuleType property, you can drill down to find that the possible values are Binary, Manifest, and Script, as mentioned earlier.
Finally, for loaded modules (i.e. not just installed but actually loaded) you can explore further with the Get-Command cmdlet, specifying the module of interest:
|
1 |
Get-Command -Module Assertion |
|
1 2 3 4 5 6 |
CommandType Name Definition ----------- ---- ---------- Function Assert-Expression param($expression, $expected)... Function Get-AssertCounts ... Function Set-AbortOnError param([bool]$state)... Function Set-MaxExpressionDisplayLength param([int]$limit = 50)... |
Again, you can use Get-Member to discover what other properties Get-Command could display.
Installing Modules
Now that you know how to see what you have installed here are the important points you need to know about installation. As mentioned earlier you install modules into either the system-wide repository or the user-specific repository. Whichever you pick, its leaf node is Modules so in this discussion I simply use “Modules” to indicate the root of your repository. The table shows what Get-Module and Import-Module can each access for various naming permutations.
|
# |
Location |
Get-Module ? |
Import-Module ? |
|
1 |
name\name.psm1 |
name |
name |
|
2 |
name.psm1 |
X |
X |
|
3 |
namespace\name\name.psm1 |
name |
namespace\name |
|
4 |
namespace\folder\name\name.psm1 |
name |
namespace\folder\name |
|
5 |
name\other-name.psm1 |
X |
name\other-name |
Standard module installation (line 1 in the table) requires that you copy your module into this directory:
Modules/module-name/module-name.psm1
That is, whatever your modules base file name is, the file must be stored in a subdirectory of the same name under Modules. If instead you put it in the Modules root without the subdirectory:
Modules/module-name.psm1
…PowerShell will not recognize the module (line 2 in the table)! This peculiar behavior is probably what you would try first, so it is a common source of frustration with modules not being recognized.
Putting a module in the Modules directory is not good enough; only in an eponymous subfolder will it make be recognized by PowerShell.
Line 3 illustrates that you can use namespaces rather than clutter up your Modules root with a hodgepodge of modules from different sources. When you use Get-Module, though, the default output shows just the name; you must look at the Path property of Get-Module if you want to see the namespace as well. If you ask Get-Module to find a particular module, you again provide only the name. However, when you use Import-Module you specify the path relative to the Modules root.
Note that namespaces are purely a convention you may or may not choose to use; PowerShell has no notion of namespaces per se (at least as of version 2-Dmitry Sotnikov has made a plea via Microsoft Connect to add namespaces in future versions; see We Need Namespaces!).
Line 4 extends the case of line 3, showing that you can make your namespace as nested as you like-as long as your modules end up in like-named leaf directories.
Given the above discourse, here is the next cardinal rule for modules:
Guideline #2: Install a module in an eponymous subdirectory under your Modules root
Line 5 in the table presents an interesting corner case showing what happens if you violate Guideline #2. The module is invisible to Get-Module -ListAvailable yet you can still load it by specifying the differing subdirectory name and module name. This is, of course, not advisable.
Associating a Manifest to a Module
The first half of the article showed the progression from inline code to script file to module file. There is a further step – introducing a manifest file associated with the module file. You need to use a manifest to specify details of your module that may be accessed programmatically. Recall that when discussing Get-Module one example showed how to get additional properties beyond the default – including description and version. But in the example’s output, some entries showed an empty description and a 0.0 version. Both description and version come from the manifest file; a module lacking a manifest has just those default values.
To create a manifest file, simply invoke the New-ModuleManifest command and it will prompt you to enter property values. If you do this in a standard PowerShell command-line window, you receive a series of prompts for each property. If, on the other hand, you use the PowerGUI script editor it presents a more flexible pop-up dialog, as shown in figure 4. I also entered a couple other common properties, author and copyright.
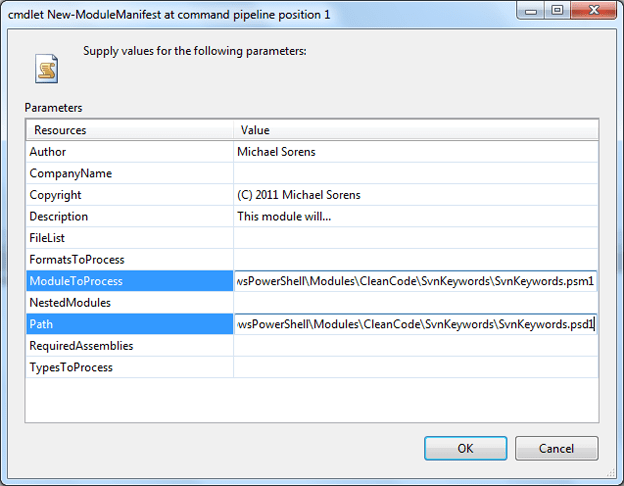
Figure 4: New-ModuleManifest dialog from PowerGUI Script Editor
The ModuleToProcess property must reference your module script file. Upon selecting OK, the dialog closes and the manifest file is created at the location you specified for the Path property. The path of the manifest file must also follow rule #2, this time with a .psd1 extension. Once the manifest exists, PowerShell now looks to the manifest whenever you reference the module, notably in both the Get-Module and Import-Module cmdlets. You can confirm this with Get-Module: recall that Get-Module displays the ModuleType property by default; now you will see it display Manifest instead of Script for the ModuleType.
Guideline #3: Use a manifest so your users can get a version and description of your module
Once you create your manifest, or at any time later, you can use Test-ModuleManifest to validate it. This cmdlet checks for existence of the manifest and it verifies any file references in the manifest. For more on manifests, see How to Write a Module Manifest on MSDN.
Unapproved Verbs
If you imported the Expressions.psm1 module given earlier, you likely received this warning message:
WARNING: Some imported command names include unapproved verbs which might make them less discoverable. Use the Verbose parameter for more detail or type Get-Verb to see the list of approved verbs.
PowerShell wants to encourage users to use standard naming conventions so it is easier for everybody who uses external modules to know what to expect. Cmdlets and functions should use the convention action-noun (e.g. Get-Module). PowerShell does not make any guesses about your choice of nouns, but it is particular about your choice of actions. You can see the list of approved actions, as the warning about indicates, by executing the Get-Verb cmdlet.
Note that I use the term action rather than verb in this paragraph, because PowerShell’s definition of verb is rather non-standard(!). Humpty Dumpty really had the right idea – I use this quote frequently…
To PowerShell a verb is “a word that implies an action”, so a construct such as New-ModuleManifest qualifies. See Cmdlet Verbs in MSDN for more details on naming.
Guideline #4: Name your functions following PowerShell conventions
Documenting a Module
The help system in PowerShell is a tremendous boon: without leaving the IDE (or PowerShell prompt) you can immediately find out almost anything you care to know about any PowerShell cmdlet (e.g. Get-Help Get-Module) or general topic (e.g. Get-Help about_modules). When you create a module you can easily provide the same level of professional support for your own functions. Implementing the help is the easy part; writing your content is what takes most of your time.
To implement the integrated help support, you add documentation comments (“doc-comments”) to your module script file just like you would with your other favorite programming language. Some IDEs provide great support for adding doc-comments. Visual Studio, for example, with the GhostDoc add-on almost writes the doc-comments for you. Alas, PowerShell does not yet have such a ghost writer available. To do it yourself, start with about_Comment_Based_Help (which you can also access from the PowerShell prompt by feeding that to Get-Help!). Scroll down to the Syntax for Comment-Based Help in Functions section. Note that the page also talks about adding help for the script itself; that applies only to main scripts (ps1 files); it does not apply to modules (psm1 files). What you will see here is that you must add a special comment section that looks like this for each function:
|
1 2 3 4 5 |
<# .< help keyword> < help content> . . . #> |
…and that you can place that in any of three positions relative to your function body. You can then pick your relevant help keywords from the subsequent section, Comment-Based Help Keywords.
One small annoyance (hard to say if it is a feature or a defect, since it documents it as both in adjoining paragraphs!): for each function parameter, Get-Help displays a small table of its attributes. But the default value is never filled in! Here is an example from Get-Module‘s ListAvailable parameter:
|
1 2 3 4 5 6 7 8 9 10 11 12 13 |
-ListAvailable [<SwitchParameter>] Gets all of the modules that can be imported into the session. Get-Module gets the modules in the paths specified by the $env:PSModulePath environment variable. Without this parameter, Get-Module gets only the modules that have been imported into the session. Required? false Position? named Default value Accept pipeline input? false Accept wildcard characters? false |
You can see this feature/issue documented under Autogenerated Content > Parameter Attribute Table. The documentation is certainly thorough on this point, though, even to the extent of providing a workaround-it suggests you mention your default in your help text. And that is just what all the standard .NET cmdlets do!
PowerShell provides support for help on individual modules, allowing Get-Help to access your help text, as you have just seen. If you produce libraries rather than just individual modules you will next be looking for the way to create an API documentation tree that you can supply with your library. Wait for it… sigh. No, PowerShell does not provide any such took like javadoc for Java or Sandcastle for .NET. Well, I found that rather unsatisfactory so I undertook to create one. My API generator for PowerShell (written in PowerShell, of course!) is in my PowerShell library, scheduled for release in the fourth quarter of 2011. You can find it here on my API bookshelf, alongside my libraries in five other languages. As an enthusiastic library builder, I have created similar API generators for Perl (see Pod2HtmlTree) and for T-SQL (see XmlTransform). (Note that the Perl version is Perl-specific while the T-SQL one is my generic XML conversion tool configured to handle SQL documentation, described in Add Custom XML Documentation Capability To Your SQL Code.)
Guideline #5: Add polish to your modules by documenting your functions
Enhancing Robustness
I would be remiss if I did not add a mention, however brief, of an important guideline for any PowerShell script, module or otherwise. Let the compiler help you-turn on strict mode with Set-StrictMode:
|
1 |
Set-StrictMode -Version Latest |
Guideline #6: Tighten up your code by enforcing strict mode
It is regrettable that that setting is not on by default.
Name Collisions – Which One to Run?
If you create a function with the same name as a cmdlet, which one does PowerShell pick? To determine that you need to know the execution precedence order (from about_Command_Precedence):
- Alias
- Function
- Cmdlet
- Native Windows commands
If you have two items at the same precedence level, such as two functions or two cmdlets with the same name, the most recently added one has precedence. (Hence the desire by some to have namespaces introduced in PowerShell, as mentioned earlier.)
When you add a new item with the same name as another item it may replace the original or it may hide the original. Defining a function with the same name as an existing cmdlet, for example, hides the cmdlet, but does not replace it; the cmdlet is still accessible if you provide a fully-qualified name. To determine the name, examine the PSSnapin and Module properties of the cmdlet:
|
1 |
Get-Command Get-ChildItem | Format-List -property Name, PSSnapin, Module |
|
1 2 3 |
Name : Get-ChildItem PSSnapIn : Microsoft.PowerShell.Management Module : |
The fully qualified name, then, for the Get-ChildItem cmdlet is:
|
1 |
Microsoft.PowerShell.Management\Get-ChildItem |
To avoid naming conflicts in the first place, import a module with the Prefix option to the Import-Module cmdlet. If you have created, for example, a new version of Get-Date in a DateFunctions module and run this:
|
1 |
Import-Module -name DateFunctions -prefix Enhanced |
…then your Get-Date function is now mapped to Get-EnhancedDate, i.e., the action in the command is affixed with the prefix you specified.
Conclusion
Modules let you organize your code well and to make your code highly reusable. Now that you are aware of them, you will probably start noticing code smells that shout “Module!”. That is, be on the lookout for chunks of code that perform a useful calculation but are generic enough to deserve separating out from your main code. I have found that taking the effort to move generic functionality into a separate module forces me to think about it in isolation and often leads me to find corner cases that I missed in the logic. Also, modularizing lets you then focus more fine-grained and more specific unit tests on that code as well. For further reading, be sure to take a look at the whole section on modules on MSDN at Writing a Windows PowerShell Module.
This document contains proprietary information and is protected by copyright law.
Copyright © 2026 Red Gate Software Limited. All rights reserved
Load comments