
The basics of asynchronous processing
In Windows Forms applications, we often need to perform some complex processing in the background, while still continuing with other tasks, such as monitoring user input and updating the user interface. For example, if you think of a web browser, it fetches and renders a web page without the main form hanging, so we can still press the Stop or Back buttons without waiting for the current page to load. This is achieved through asynchronous processing; that is, processing that takes advantage of Windows’ multi-threading abilities to perform (as it appears to the user) two tasks at the same time.
When we call a method in the normal (synchronous) fashion, it executes on the same thread as the calling method, which will therefore block until the called method has finished executing. Consequently, if a Windows application uses only synchronous processing, it will appear very unresponsive and hang whenever any lengthy processing needs to be carried out. Users may accept this in a very simple form, where there is nothing to be done until the processing is complete, but more frequently they will be very frustrated about being unable to interact with the application, and (if the delay is too long) may even believe that the program has crashed. To call a method asynchronously, we need to spawn a new thread, perform some processing on that thread, and perhaps also be notified when this processing is complete. We also need to be able to pass data between methods executing on different threads, and ensure that this data isn’t accessed by two threads at the same time, which could result in data being compromised or in non-repeatable reads.
In this article we’ll see how to take advantage of asynchronous processing in .NET code. The code in this article is valid both for .NET 1.1 and .NET 2.0; we’ll look in a second article at ways to synchronize the processing occurring on different threads and the problems that can arise if this isn’t done correctly; and finally in a third article we’ll look at the new asynchronous features provided by .NET 2.0.
Starting a new thread
When we want to perform an asynchronous operation, the first task is to start execution of a method on a new thread. .NET provides a number of ways to spawn a new thread within the process of our application. However, the fundamental choice to make is whether we want the new thread to run on a thread that we manage entirely from our code, or on a thread taken from the thread pool, which is managed by the system.
Using the thread class
We’ll look at the thread pool shortly, but let’s look first at starting a new thread that is controlled entirely by your application. Probably the simplest way to spawn a new thread in .NET is to call the Start() method of an instance of the System.Threading.Thread class that is initialized with a ThreadStart delegate instance pointing to the method that we want to run on the new thread. For example:
|
1 2 3 4 5 6 7 8 9 10 |
// Instantiate a ThreadStart delegate pointing to the method // to be run asynchronously // (in this case, our asynchronous method is called DoStuff) ThreadStart ts = new ThreadStart(DoStuff); // Initialize a new Thread object with this delegate Thread t = new Thread(ts); // Start the method t.Start(); |
One of the problems with this approach is that the ThreadStart delegate is void and parameterless, so this technique can’t be used to run methods that have a return value or parameters. If you’re writing a method to be run asynchronously in this way, you’ll need to design it to match this delegate. If you want to call an existing method in this way, you’ll need to create a new method that is void and parameterless, pass the required data into it (we’ll see how to do this shortly), and then call the existing method from there.
The thread pool
A .NET application has available to it a pool of threads that are managed by the system. When we queue a task to be executed on a thread-pool thread, it will be executed on any free thread taken from the pool. The thread pool is created the first time it is used by an application, and contains by default a maximum of 25 worker threads per processor (this can be changed by calling the unmanaged method CorSetMaxThreads, defined in mscoree.h). If the maximum number of threads is reached and all threads in the pool are busy when the method is called, a thread will be allocated when one becomes available.
You can establish the maximum number of thread-pool threads by calling the ThreadPool.GetMaxThreads() static method, and you can determine how many threads are currently available by calling the ThreadPool.GetAvailableThreads() static method. Both these methods take two output parameters of type int. The first will be populated with the number of worker threads available for background processing and the second the number of additional threads known as completion port threads that can be started for asynchronous I/O operations.
The thread pool is best suited for applications that require multiple threads that will execute only for a short time or spend most of their time in the sleeping state, as threads that take a long time will block other tasks. The thread pool allows the system to optimise thread usage for this scenario. Also, because the thread pool is managed by the system, it allows the system to optimise thread usage even with respect to other processes, about which your application knows nothing. Moreover, the thread will quite likely already exist, so there’s no start up overhead.
Method calls can be queued to the thread pool in a number of ways: using asynchronous delegates, by calling the ThreadPool.QueueUserWorkItem() method, or by calling a BeginXxxx() method on a built-in class, such as HttpWebRequest.BeginGetResponse(). Here we’ll focus on asynchronous delegates.
Asynchronous delegates
Probably the easiest way to invoke a method on a thread-pool thread is to call an asynchronous delegate. When our source code is compiled, the compiler generates a class for each delegate type that contains methods called BeginInvoke() and EndInvoke(). The implementation for these methods is provided by the CLR, and we can call them on any delegate instance. BeginInvoke() causes the method represented by delegate to be queued to the thread pool, while EndInvoke() blocks the thread on which it is called until the asynchronous method has completed, and allows us to retrieve the return value for that method. The parameters for BeginInvoke() are:
- Any parameters required for the asynchronous method
- An
AsyncCallbackdelegate instance that points to the method that will be called when the invoked method terminates - An object to contain state for the asynchronous operation
BeginInvoke() returns an object that implements the IAsyncResult interface, which can be used to access the asynchronous delegate instance and hence call EndInvoke() to get the return value from the asynchronous method. This IAsyncResult implementation is passed into the callback method, so EndInvoke() can be called either from the original method, or from the callback method. Note that the callback method executes on the thread-pool thread, not the original thread, so in the latter scenario you may need to pass the return value back to the original thread.
The following very simple console application demonstrates the user of asynchronous delegates. Here we use the technique to execute on a thread-pool thread a static method named Add() that returns (as a long) the sum of two integers passed in as parameters (after a brief delay to simulate the type of complicated operation that you’d normally want to perform asynchronously). When the method has finished executing, a callback method named PrintResult() will be invoked. Like all callback methods for use with asynchronous delegates, this has a return type of void and takes a single parameter of type IAsyncResult.
|
1 2 3 4 5 6 7 8 9 10 11 12 13 14 15 16 17 18 19 20 21 22 23 24 25 26 27 28 29 30 31 32 33 34 35 36 37 |
using System; using System.Threading; using System.Runtime.Remoting.Messaging; namespace AsyncTest { public delegate long AddDelegate(int x, int y); class Class1 { [STAThread] static void Main(string[] args) { int x = 23; int y = 42; AddDelegate addDelegate = new AddDelegate(Add); AsyncCallback ac = new AsyncCallback(PrintResult); IAsyncResult ar = addDelegate.BeginInvoke(x, y, ac, null); Console.ReadLine(); } static long Add(int x, int y) { Thread.Sleep(1000); return x + y; } static void PrintResult(IAsyncResult ar) { AddDelegate addDelegate = (AddDelegate) ((AsyncResult)ar).AsyncDelegate; long sum = addDelegate.EndInvoke(ar); Console.WriteLine(sum); } } } |
The PrintResult() method takes the IAsyncResult implementation that the system passes into it when the method is invoked, and casts it to System.Runtime.Remoting.Messaging.AsyncResult, which is the actual type of the object. This class has a property named AsyncDelegate, which we call to retrieve the delegate instance on which the BeginInvoke() call was made. This is returned as an object, so we need to cast it to our delegate type. We can then call its EndInvoke() method, passing in the IAsyncResult implementation, and this returns the value returned from our asynchronous method call – the sum of the two numbers we wanted to add. All that remains to do is print the result out.
The Thread class
Once we’ve started a new thread, we can manipulate it using the System.Threading.Thread class. We can get a reference to an instance of this class representing a specific thread either by starting a thread manually (see the section on ‘Starting a New Thread’ above) or by calling the Thread.CurrentThread static property, which returns a Thread instance representing the thread on which the call is executed.
The Thread class provides a number of methods and properties that provide information about the thread and are very useful for asynchronous programming. We won’t look at all of these here, as the details can be seen on MSDN, and we’ll delay looking at some of the functionality until Part 2. We’ve already met the static Sleep() method, which blocks the current thread for a set number of milliseconds or for a TimeSpan instance. If we specify a value of zero, this will give other threads a chance to execute without actually blocking this one for a set time.
We can also suspend a thread indefinitely by calling the Suspend() method, and restart it by calling Resume(). If a thread is already suspended when Suspend() is called, the call is ignored, but if it isn’t in the suspended state when Resume() is called, a ThreadStateException will be thrown.
The ThreadState property
For this reason, we need to be able to examine the current state of a thread, and this is available through the ThreadState property. This returns a bitmasked ThreadState enumeration value, consisting of a combination of the following values:
|
Name |
Description |
Value |
|
|
The thread is running. |
0 |
|
|
The thread is being requested to stop (internal use only). |
1 |
|
|
A request has been made to suspend the thread. |
2 |
|
|
The thread is a background thread. |
4 |
|
|
The |
8 |
|
|
The thread has stopped. |
16 |
|
|
The thread is blocked because one of the |
32 |
|
|
The thread has been suspended. |
64 |
|
|
A |
128 |
|
|
A |
256 |
Because this returned value is a bitmask, we need to perform a bitwase AND operation on the value to determine whether it includes a specific value. For example, to see if the current thread is a background thread, we would use the following code:
|
1 2 3 4 5 6 7 8 |
// Get a reference to the current thread Thread t = Thread.CurrentThread; // Check whether the ThreadState includes the Background value if ((t.ThreadState & ThreadState.Background) == ThreadState.Background) { // Thread is a background thread } |
Aborting threads
To abort a thread, we can call the Abort() method on the thread we wish to terminate. This causes the CLR to throw a ThreadAbortException on that thread. This exception can of course be caught and handled just like any other .NET exception object. We can even stop the abort by calling the Thread.ResetAbort() static method. Note that the exception must be handled on the same thread that it’s thrown on – it won’t be bubbled up to the thread from which the asynchronous method call was made. You therefore need to be very careful when aborting threads from a separate thread: you need to make sure that aborting the thread won’t cause data to be lost or corrupted, so it’s a good idea to catch ThreadAbortExceptions in any method that may be executing if a thread is to be aborted in this way.
Passing data between threads
We saw earlier that when we create a new Thread object, the delegate we pass into the constructor must be parameterless and void. This means that any data passed between the threads must be stored in either static fields or fields of a class instance. The following example illustrates this (and also potentially indicates the sort of bugs that can occur in multi-threaded applications). The class for the example has a static integer field called count. This is used in a static method named Start(), which reads and increments this static value, and displays it together with the name of the thread on which the method is executing, before sleeping to allow other threads to execute. This entire procedure is then repeated four times. The Main() method for the example calls this method asynchronously five times, each time giving the thread a different name based:
|
1 2 3 4 5 6 7 8 9 10 11 12 13 14 15 16 17 18 19 20 21 22 23 24 25 26 27 28 29 30 31 32 |
using System; using System.Threading; namespace AsyncTest2 { class Class1 { public static int count = 0; [STAThread] static void Main(string[] args) { for (int i = 1; i < 6; i++) { ThreadStart tsDelegate = new ThreadStart(Start); Thread t = new Thread(tsDelegate); t.Name = “Thread ” + i; t.Start(); } } public static void Start() { for (int i = 0; i < 5; i++) { Class1.count++; Console.WriteLine(“{0} ({1})”, count, Thread.CurrentThread.Name); Thread.Sleep(0); } } } } |
|
1 2 3 4 5 6 7 8 9 |
1 (Thread 1) 2 (Thread 2) 3 (Thread 3) 4 (Thread 4) 5 (Thread 5) 6 (Thread 1) … 25 (Thread 5) |
Synchronization and the lock keyword
The problem with this code is that we don’t know when the operating system will switch execution from one thread to another, so it’s perfectly feasible that between reading the value of count and incrementing it, another thread will have read and incremented the value, so the value of count will in effect only be incremented once instead of twice. To see this happen, change the Start() method so that the call to Thread.Sleep() occurs between reading and incrementing the value of count:
|
1 2 3 4 5 6 7 8 |
public static void Start() { for (int i = 0; i < 5; i++) { int temp = Class1.count; Thread.Sleep(0); Class1.count = temp + 1; Console.WriteLine("{0} ({1})", count, Thread.CurrentThread.Name); } } |
|
1 2 3 4 5 6 7 |
1 (Thread 5) 1 (Thread 4) 1 (Thread 3) 1 (Thread 2) 1 (Thread 1) 2 (Thread 5) etc... |
Although we’ve deliberately made the bug obvious and easy to replicate in this case, this type of error can frequently lead to very subtle bugs (called race conditions) that are extremely difficult to reproduce and track down. For this reason, it’s important to ensure that multiple threads don’t access the same piece of data at the same time, particularly when changing it. This process of controlling how multiple threads interact with each other is known as synchronization. We’ll look at .NET’s synchronization features in Part 2, but for the moment we’ll introduce the most common synchronization device – the C# lock keyword ( SyncLock in VB).
The lock keyword places a lock known as a monitor on a specific section of code (called a critical section), using a particular object. Only one thread can have a monitor lock on any particular object at the same time, so if a second thread requests a lock on the same object, it will be blocked until the first thread exits the protected code section and releases the lock. The compiled code produced by the lock keyword releases the lock within a finally section, so this ensures that the lock is always released, even if an exception occurs in the protected code.
The object used for the lock must be an instance of a reference type. The most common object is the current instance of the class that the code is running in, by using the this keyword, or (if the code is in a static method) the Type object for the class. For example:
|
1 |
lock (this){ // Code here is protected, and no other thread can execute code // that's locked with this object} |
|
1 |
lock (typeof(Class1)){ // No other thread can execute code locked with the Class1 Type object} |
|
1 2 3 4 5 6 7 8 9 10 11 12 13 |
public static void Start() { for (int i = 0; i < 5; i++) { lock (typeof(Class1)) { int temp = Class1.count; Thread.Sleep(0); Class1.count = temp + 1; } Console.WriteLine(“{0} ({1})”, count, Thread.CurrentThread.Name); } } |
|
1 2 3 4 |
1 (Thread 1) 2 (Thread 2) 3 (Thread 2) etc… |
A multi-threaded Windows Forms application
To illustrate working with threads in .NET, we’ve provided a simple application that demonstrates some of the functionality available. The application displays a number of coloured strings scrolling across a panel at different angles and different speeds. The movement of each string is controlled on a separate, manually-started thread. The user can change the speed and angle of existing strings, and can also start new threads, and abort, pause or resume existing threads. The interface appears as in the screenshot below:
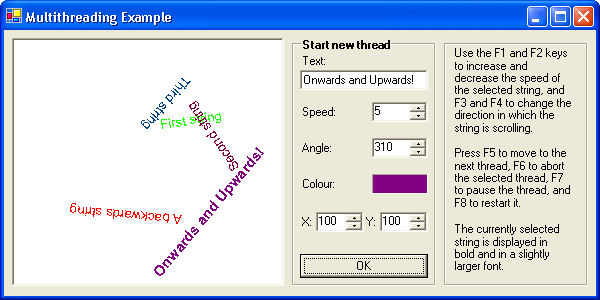
Each string is represented by an instance of a class called DrawString. This class contains information about the colour of the string, its current position, speed and angle, and whether or not it’s the selected string that the user can manipulate. It will also contain references to the GDI+ Brush object used to draw the string, the parent Windows control on which it will be painted, and the thread on which it’s executing:
|
1 2 3 4 5 6 7 8 9 10 11 12 |
public class DrawString : IDisposable { private string text; private float angle; private float x; private float y; private bool selected; private Color colour; private int speed; private SolidBrush brush; private Control ctrl; private Thread thread; |
When a DrawString object is instantiated, we store the initial details of its appearance and position in the class’s fields, together with the reference to the parent Windows control. Whenever a new string is created, it will automatically be set as the selected string, so we set the selected field to true. We also create a GDI+ SolidBrush object of the correct colour, which will be used when we draw the control:
|
1 2 3 4 5 6 7 8 9 10 11 |
public DrawString(string text, Color colour, float angle, float x, float y, int speed, Control ctrl) { this.text = text; this.angle = angle; this.x = x; this.y = y; this.colour = colour; this.speed = speed; this.ctrl = ctrl; selected = true; brush = new SolidBrush(colour); } |
In order to access these fields from the Windows Form, we’ll create public properties. The angle and speed can be changed by the user, so these are read-write properties. We’ll also use set the Selected property to read-write, as this will need to be changed when a new string is selected. The other properties are all read-only:
|
1 2 3 4 5 6 7 8 9 10 11 12 13 14 15 16 17 18 19 20 21 22 23 24 25 26 27 28 29 30 31 32 33 34 35 36 37 38 39 40 41 42 43 44 45 46 47 48 49 50 51 52 53 54 |
public string Text { get { return text; } } public float Angle { get { return angle; } set { angle = value; } } public float X { get { return x; } } public float Y { get { return y; } } public Color Colour { get { return colour; } } public SolidBrush Brush { get { return brush; } } public int Speed { get { return speed; } set { speed = value; } } public bool Selected { get { return selected; } set { selected = value; } } public Thread Thread { get { return thread; } } |
The movement of the string across the panel is controlled by a method named Start(). This is the method that is called on a new thread, and so we start by storing a reference to the Thread object for the current thread. This will be used to pause, restart and abort the thread from the main application thread. To prevent a ThreadAbortException bubbling up to the main thread if the thread is aborted, we wrap the code for this method in a try block and catch any ThreadAbortExceptions.
The bulk of the method consists of an infinite loop; on every iteration of this loop, we call Thread.Sleep() to pause the thread for a time depending on the speed of the string, and then increase the X and Y coordinates of the string according to the angle in which it’s moving. When one edge of the panel is reached, the X or Y coordinate is set to the opposite edge. Note that we lock the thread before altering the X and Y values. This is because the X and Y values are read from the main thread when the panel is drawn, so we need to ensure that the values aren’t read while they’re in the process of being rewritten. Once the values have been updated, we refresh the control so that the string will appear in its new position.
|
1 2 3 4 5 6 7 8 9 10 11 12 13 14 15 16 17 |
public void Start() { try { thread = Thread.CurrentThread; for (;;) { Thread.Sleep(new TimeSpan((11 - speed) * 100000)); lock(this) { x += (float) Math.Cos(Math.PI * angle / 180); y += (float) Math.Sin(Math.PI * angle / 180); if (x >= ctrl.Width) x = x - ctrl.Width; if (y >= ctrl.Height) y = y - ctrl.Height; if (x < 0) x = x + ctrl.Width; if (y < 0) y = y + ctrl.Height; } ctrl.Refresh(); } } catch (ThreadAbortException) {} } |
The last method of the DrawString class is the Dispose() method. Here we simply dispose of the Brush object:
|
1 2 3 4 |
public void Dispose() { brush.Dispose(); } } |
We can now turn to the MultithreadExample class that represents our Windows form. We won’t go through all the UI code for this class, as much of it is autogenerated by VS, but instead highlight the relevant added code.
We add four private fields to the form class: an ArrayList that contains all the DrawString instances; a reference to the currently selected DrawString; and two Font objects. The first of these is used to draw the selected string, and the other is used for all other strings:
|
1 2 3 4 |
private ArrayList drawStrings; private DrawString selectedString; private Font boldFont = new Font("Arial", 11, FontStyle.Bold); private Font normalFont = new Font("Arial", 10); |
In the constructor for the form, we have the usual call to InitializeComponent(), and then create the drawStrings ArrayList. Next, we start off a string to get things going. First we calculate a random colour, speed, angle and position for the string, and pass these into the DrawString constructor. We then add the new DrawString object to the drawStrings array and set it as the selected string. Finally, we need to execute the DrawString object’s Start() method on a new thread. To do this, we create a new ThreadStart delegate instance that points to this method, and use that to instantiate a new Thread object. We want the application to terminate once the form is closed and the main thread has finished, so all the DrawString threads must be background threads. Therefore, we set the Thread’s IsBackground property to true before we call its Start() method to start the execution and set the string moving.
|
1 2 3 4 5 6 7 8 9 10 11 12 13 14 15 16 17 18 19 |
public MultithreadExample() { InitializeComponent(); drawStrings = new ArrayList(); Random rnd = new Random(); int speed = rnd.Next(10) + 1; int x = rnd.Next(panel1.Width); int y = rnd.Next(panel1.Height); int angle = rnd.Next(360); int red = rnd.Next(256); int green = rnd.Next(256); int blue = rnd.Next(256); DrawString ds = new DrawString("First string", Color.FromArgb(red, green, blue), angle, x, y, speed, panel1); drawStrings.Add(ds); selectedString = ds; ThreadStart startDelegate = new ThreadStart(ds.Start); Thread t = new Thread(startDelegate); t.IsBackground = true; t.Start(); } |
The code to draw the strings is placed in the panel1_Paint() method, which is called whenever the panel control is redrawn. This has little to do with asynchronous processing, except that we lock each DrawString object before reading its properties to ensure data integrity, so we’ll just glance over it quickly. We get the GDI+ Graphics object from the PaintEventArgs object that is passed into the method. For each DrawString object in the drawStrings array, we transform the (0, 0) coordinates of the control to the coordinates of the DrawString object, rotate the drawing direction to the required angle, and then draw the string using the information in the DrawString object. Finally, we reset the coordinates and rotation of the control, so that the next string won’t be positioned relative to this one:
|
1 2 3 4 5 6 7 8 9 10 11 12 13 14 15 16 17 |
private void panel1_Paint(object sender, System.Windows.Forms.PaintEventArgs e) { Graphics dc = e.Graphics; StringFormat format = new StringFormat(StringFormat.GenericTypographic); foreach (DrawString ds in drawStrings) { lock (ds) { dc.TranslateTransform(ds.X, ds.Y); dc.RotateTransform(ds.Angle); dc.DrawString(ds.Text, ds.Selected ? boldFont : normalFont, ds.Brush, 0, 0, format); dc.ResetTransform(); } } } |
One important point to note is that this method is always called by the CLR on the main application thread for the Windows form. The main thread for a Windows Forms application serves as the user interface thread, and is used to handle user input and to update the UI. Updating the UI from other threads is not allowed. All updates to the UI using GDI+ should be made from the method for the control’s Paint event, or its overwritten OnPaint() method. These methods will be called on the UI thread as necessary by the CLR.
When a new string is created by the user, we instantiate a new DrawString object based on the information supplied by the user. The code to start the new string is identical to that which we saw when we created the first string when the application started:
|
1 2 3 4 5 6 7 8 9 10 11 12 |
private void button1_Click(object sender, System.EventArgs e) { if (textBox1.Text.Trim() == "") return; if (selectedString != null) selectedString.Selected = false; DrawString ds = new DrawString(textBox1.Text, label7.BackColor, (float) numericUpDown1.Value, (float) numericUpDown2.Value, (float) numericUpDown3.Value, (int) numericUpDown4.Value, panel1); selectedString = ds; drawStrings.Add(ds); panel1.Refresh(); ThreadStart startDelegate = new ThreadStart(ds.Start); Thread t = new Thread(startDelegate); t.IsBackground = true; t.Start(); } |
|
1 2 3 4 |
private void MultithreadExample_KeyUp(object sender, System.Windows.Forms.KeyEventArgs e) { if (selectedString == null) return; Keys keyPress = e.KeyCode; switch (keyPress) { |
If the F1 or F2 key was pressed, we will increase or decrease the speed of the string’s movement by modifying its Speed property (up to a maximum of 10, from a minimum of 1). We acquire a lock on the selected DrawString object to ensure the data integrity of the speed:
|
1 2 3 4 5 6 7 8 9 10 11 12 13 14 |
case (Keys.F1): { lock(selectedString) { if (selectedString.Speed < 10) selectedString.Speed++; } break; } case (Keys.F2): { lock(selectedString) { if (selectedString.Speed > 1) selectedString.Speed--; } break; } |
If F3 or F4 is pressed, we increase or decrease the angle of the string by 10 degrees, and then refresh the display. Again, we acquire a lock on the selected DrawString object:
|
1 2 3 4 5 6 7 8 9 10 11 12 13 14 15 16 17 18 |
case (Keys.F3): { lock(selectedString) { selectedString.Angle -= 10; if (selectedString.Angle < 0) selectedString.Angle += 360; } panel1.Refresh(); break; } case (Keys.F4): { lock(selectedString) { selectedString.Angle += 10; if (selectedString.Angle >= 360) selectedString.Angle -= 360; } panel1.Refresh(); break; } |
When the user presses F5, we deselect the current DrawString object, and move the selection to the next item in the drawStrings array. We get the index of the currently selected item in the array, and increment it; if the selected item was the last, we move back to the beginning (position 0). Then we set the Selected property of the originally selected DrawString object to false, set the selectedString field to refer to the new string, and set its Selected property to true. Finally we refresh the display so that the user will be able to see the new string has been selected:
|
1 2 3 4 5 6 7 8 9 10 11 12 |
case (Keys.F5): { int index = drawStrings.IndexOf(selectedString); if (++index > drawStrings.Count - 1) index = 0;lock(selectedString) { selectedString.Selected = false; } selectedString = (DrawString) drawStrings[index];lock(selectedString) { selectedString.Selected = true; } panel1.Refresh(); break; } |
If the user presses F6, we need to abort the thread for the selected string, remove the DrawString object from the drawStrings array, and move the selection to the next string. Before aborting the thread, we need to check first that it’s not in the suspended state, as trying to abort a suspended thread generates an exception. If it is, we resume the thread. Then we abort the thread by calling the Abort() method of the Thread object exposed through the DrawString‘s Thread property. We don’t need to catch the ThreadAbortException here, as that was caught in the DrawString‘s Start() method. After we’ve removed the string from the drawStrings array, the index value will point to the next item in the array unless it was the last item (in which case we need to set the index back to zero). If there are no more strings left in the array, we set the selectedString field to null; otherwise, we set it to the next DrawString, and set its Selected property to true. Finally, we update the display so that the deleted string will be removed from the panel:
|
1 2 3 4 5 6 7 8 9 10 11 12 13 14 15 |
case (Keys.F6): { int index = drawStrings.IndexOf(selectedString);drawStrings.Remove(selectedString); if ((selectedString.Thread.ThreadState & ThreadState.Suspended) == ThreadState.Suspended) selectedString.Thread.Resume();selectedString.Thread.Abort();selectedString.Dispose(); if (index > drawStrings.Count - 1) index = 0; if (drawStrings.Count == 0) selectedString = null; else { selectedString = (DrawString) drawStrings[index]; lock(selectedString) { selectedString.Selected = true; } } panel1.Refresh(); break; } |
The last two key presses we want to handle are F7 and F8, which are used respectively to suspend and resume the selected thread. If we’re suspending the thread, this is simply a case of calling the Suspend() method of the Thread object (if the thread is already suspended, this will be ignored), but if we’re restarting it, we need to check that the thread has actually been suspended before calling its Resume method:
|
1 2 3 4 5 6 7 8 9 10 11 |
case (Keys.F7): { selectedString.Thread.Suspend(); break; } case (Keys.F8): { if ((selectedString.Thread.ThreadState & ThreadState.Suspended) == ThreadState.Suspended) selectedString.Thread.Resume(); break; } } |
Conclusion
In this article, we’ve looked at the basics of asynchronous processing in .NET, including a sample Windows Forms application that allowed the user to perform simple manipulation of a number of threads. In Part 2, we’ll look in more detail at synchronization in .NET, and also look at the features provided for asynchronous programming in .NET 2.0.
This document contains proprietary information and is protected by copyright law.
Copyright © 2026 Red Gate Software Limited. All rights reserved
Load comments