
Converting an existing SQL Server database to In-Memory OLTP is technically possible but comes with significant limitations. Foreign keys between in-memory and disk-based tables are not supported, which means a partial migration loses referential integrity.
You cannot ALTER TABLE to convert a disk-based table to memory-optimized; you must create a new table, migrate data, and update all references. Many data types, triggers, and constraints are unsupported. This article walks through a complete AdventureWorks migration, documenting every limitation and providing workarounds, including a conversion tool available on GitHub.
Read also:
Beginner guide to in-memory optimized tables
Introduction
Microsoft In-Memory OLTP was introduced with SQL Server 2014. In the pre-release mode, I saw quite a few videos that demonstrate the strength of this new technology. When the final release came to light, I was very disappointed. First, this technology was available only in Enterprise (the most expensive) Edition, and, furthermore, it had a lot of limitations.
Then a few years later, Microsoft made us happy when releasing SP1 for SQL Server 2016 by making In-Memory OLTP available for any edition. They also made many improvements in this technology but, in my opinion, the main use case is still not supported. Even with SQL Server 2017, we have the same situation today.
What is the main use case? Many of us would like to port our (known) databases to In-Memory technology. Why? Because we know our data and we know the weaknesses of our database normalization. Furthermore, we know the potential bottlenecks. By comparing known databases with the In-Memory ‘equivalent’, we can judge how powerful In-Memory OLTP technology is.
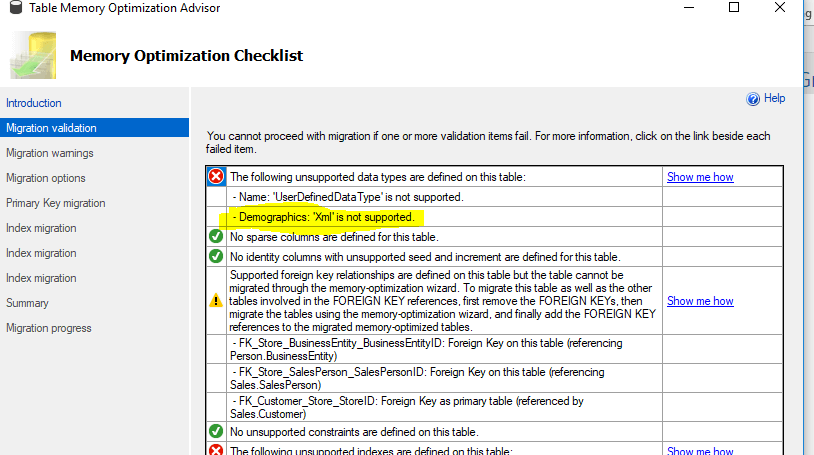
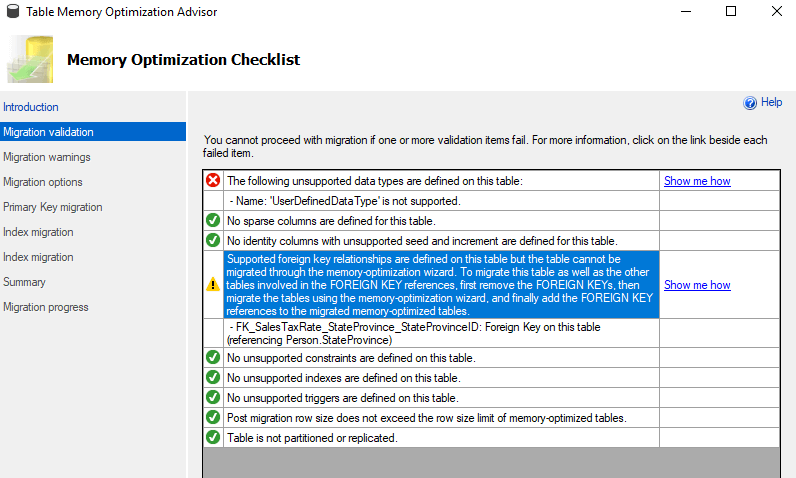
Although there is a Memory Optimization Advisor in SSMS, see image below, a wizard that will help you in migrating your tables, you will be, in most cases, unable to migrate your existing database to In-Memory OLTP using this tool. The Advisor stops working on the first error which includes foreign keys, incompatible types, more than 8 indexes on a table, and so on (NOTE: The limitation of 8 indexes is overcome in SQL Server 2017). Furthermore, the Advisor must be run on once for every table. That makes it unusable for me.
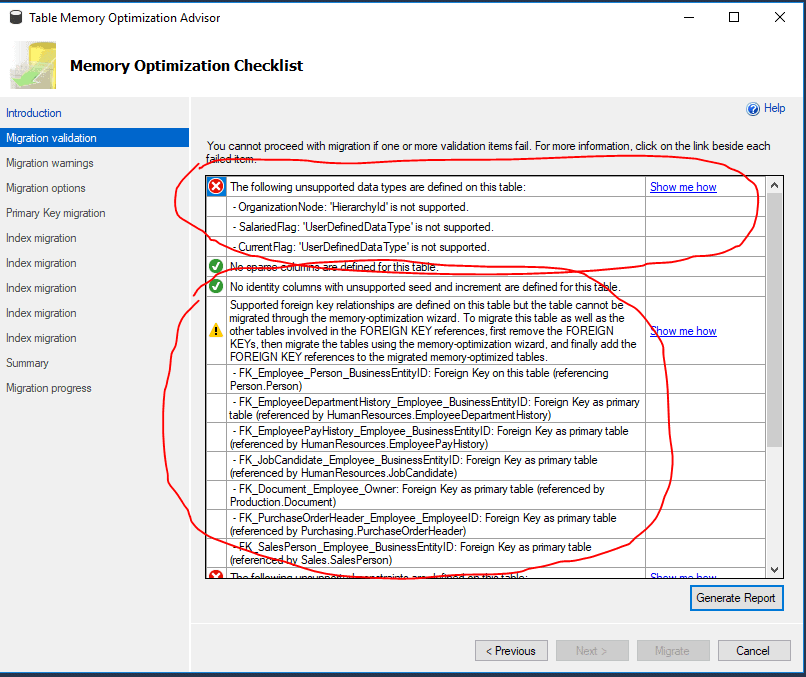
So, the wizard is pretty much useless. If you decide to migrate a small number of tables, you will get another unpleasant surprise. It’s not possible to establish a relationship between an In-Memory table and a disk-based table. Foreign keys between In-Memory and disk-based tables are not supported. Basically, you will end up with a database without referential integrity. Furthermore, if you would like to use triggers to establish referential integrity, you get another surprise: there are no possibilities to access disk-based tables in natively compiled triggers, and only that kind of trigger (natively compiled) is allowed on In-Memory optimized tables. Even if you could access disk-based tables from natively compiled triggers, they only support AFTER triggers which are not really useful for referential integrity since you can’t rollback a transaction.
My conclusion is that In-Memory OLTP does not support migrations in most cases. When I mention migration, I mean tables, referential integrity, check constraint and so on. It is good for new projects where you expect many transactions, but migrating an existing database is not properly supported.
Furthermore, Microsoft documentation states:
You cannot issue an ALTER TABLE statement to convert a disk-based table into a memory-optimized table. Instead, you must use a more manual set of steps
- Suspend application activity. (Author’s comment : LOL )
- Take a full backup.
- Rename your disk-based table.
- Issue a CREATE TABLE statement to create your new memory-optimized table.
- INSERT INTO your memory-optimized table with a sub-SELECT from the disk-based table.
- DROP your disk-based table.
- Take another full backup.
- Resume application activity
Successfully migrating a table to In-Memory OLTP is a lot of work. Imagine that you have to use this recipe for converting hundreds of tables. That does not sound good!
In the article, I will show you how it is possible to migrate an existing database by using .NET & SMO, so not everything is bad, there are good things as well. Furthermore, the migration of AdventureWorks2017(6) database is successfully accomplished on SQL Server 2017 Express Edition. (NOTE: Some objects are not migrated, so maybe ‘successfully’ sounds too optimistic).
In the first section, I will address the main issues encountered during the process of converting the AdventureWorks2016(7) database to the In-Memory equivalent. This means at the end, you will have a brand-new database that contains the same tables, indexes, and relationships as the source database.
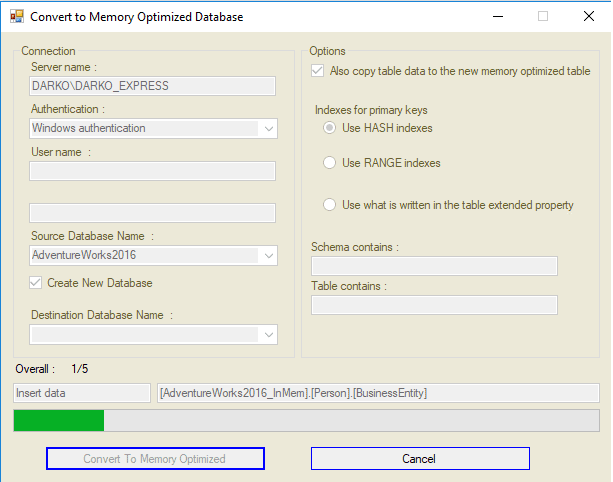
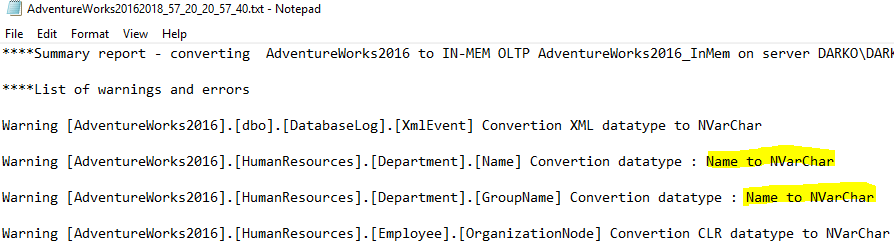
There is no renaming tables to ‘old’, which is what the Microsoft Advisor provides. At the end of the conversion process, there will be two separate databases. The source (disk-based database) will be intact, and the new one, an In-Mem OLTP database. Of course, the process of converting will not be 100% accurate, but, at the end of the conversion process, a report will be created that displays all warnings and errors that happen during the conversion process. The image below displays the conversion tool that I’ll describe in the rest of the article. During the conversion process, you do not have to suspend application activities. However, if your application has some exclusive locks, the conversion process will have to wait in order to copy data.
Main Issues
There are several issues you will probably encounter when converting your database. This section will cover how to overcome most of them.
Unsupported Types
CLR types, XML type, SQL Variant, user-defined types, and LOB legacy types (TEXT, NTEXT & IMAGE) are not supported in In-memory OLTP tables. What is the workaround for this? The conversion process can convert most of the unsupported types to nvarchar(MAX).
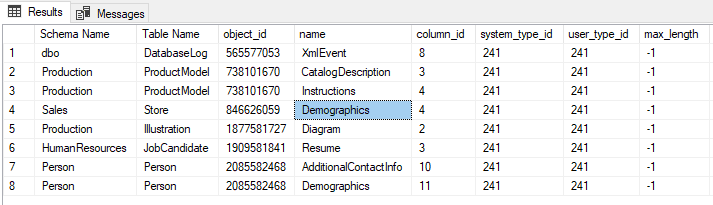
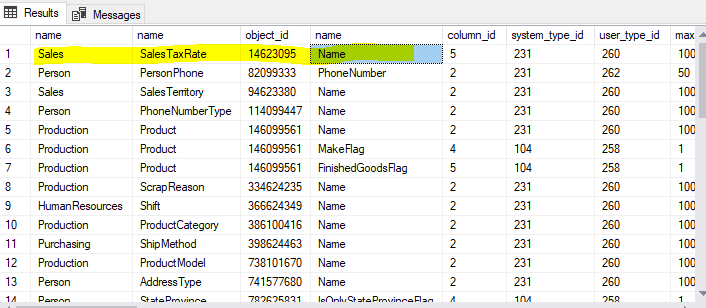
To get a list of all columns that have the XML type, you can execute following T-SQL snippet.
|
1 2 3 4 5 6 7 8 9 10 11 12 13 |
-- -- Get all columns that have XML data type -- XML is recognised by system_type_id 241 SELECT s.name [Schema Name] ,t.name [Table Name] ,c.* FROM SYS.columns c INNER JOIN sys.tables t ON c.object_id = t.object_id INNER JOIN sys.schemas s ON t.schema_id = s.schema_id WHERE system_type_id = 241; |
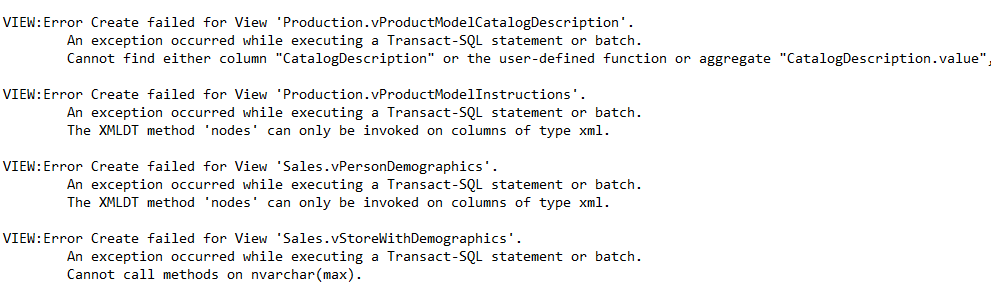
One of the XML columns in the AdventureWork2016 database is the Demographics column as shown in the image below.
Although XML as the type is not supported, you can safely change XML to NVARCHAR. Then, in the client application, you can execute the following T-SQL in the context of an In-Memory OLTP database.
|
1 2 3 4 5 6 7 8 |
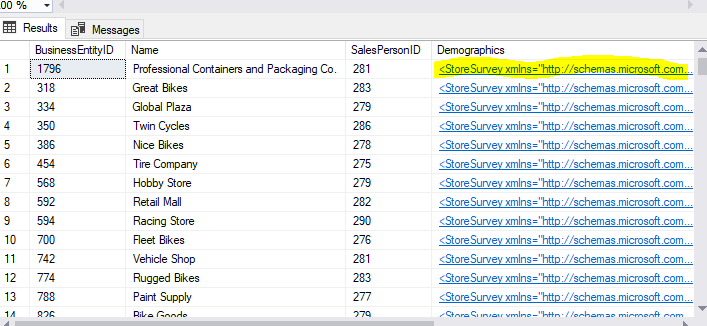
SELECT BusinessEntityID ,Name ,SalesPersonID ,CAST(Demographics AS XML) Demographics ,rowguid ,ModifiedDate FROM [Sales].[Store]; |
The image below shows the query result. As you can see, casting is accomplished successfully.
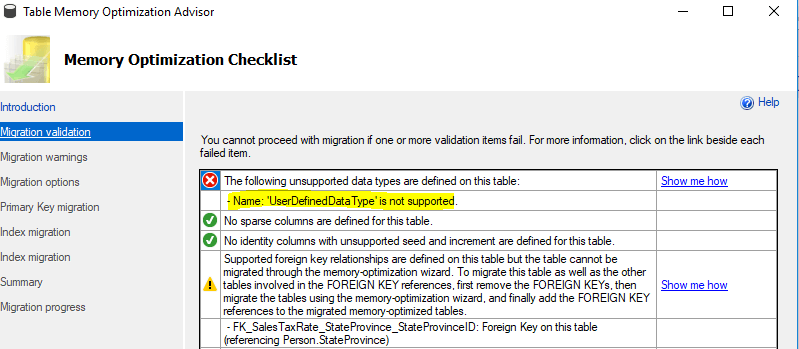
On the other hand, when you run the Microsoft Table Memory Optimization Advisor, you receive a fatal error as shown in the image below.
Similar to the XML type, you can convert other unsupported types as shown in the table below.
Unsupported Type
Convert to
|
DateTimeOffset |
DateTime2 |
|
CLR types (HierarchyId, Geography, Geometry) |
NvarChar(max) |
|
Text, NText |
NvarChar(max) |
|
Image |
Varbinary(max) |
A Computed column in an In-Memory optimized table is supported starting with SQL Server 2017, but earlier versions can convert computed column’s data. You cannot convert the ‘ComputedText’ property, i.e. formula. So, after converting we have to ensure in our application that these columns are filled in the future, or we can completely remove those columns and create an appropriate view that will include the formula that is forbidden in In-Memory tables prior to SQL Server 2017. The first solution, migrating all values and correcting the application is my choice. In that case, during a conversion, you will receive the warnings. As you can probably guess, in Microsoft Advisor you receive a fatal error.
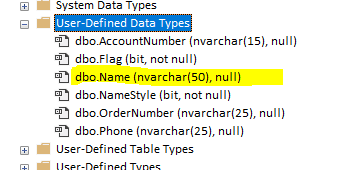
To conclude the first issue about types, here is what can be done with User Defined Types. To get all columns with User Defined Data Types execute following T-SQL snippet.
|
1 2 3 4 5 6 7 8 9 10 11 12 13 14 15 16 17 18 19 20 21 22 23 |
--- --- Get all columns that have user-defined data types --- ; WITH X AS (SELECT * FROM sys.types WHERE is_user_defined = 1) SELECT s.name ,t.name ,c.* FROM SYS.columns c INNER JOIN sys.tables t ON c.object_id = t.object_id INNER JOIN sys.schemas s ON t.schema_id = s.schema_id WHERE EXISTS (SELECT * FROM x WHERE x.user_Type_id = c.user_type_id); |
In the context of the AdventureWorks2016 database, you get the following result, as shown in the image below.
Starting Microsoft Advisor on the highlighted table shows a fatal error as you can probably guess.
Can you overcome this problem? In my opinion, in most cases, yes. So, again, there is no need for receiving a fatal error. As you can see in the image below, all UDT columns can be described by native data types.
The conversion process can detect when a column has a user-defined data type and convert that column to a native type. An example of warnings, you can see during the conversion process is displayed on the image below. Highlighted with yellow is a conversion from UDT to a native type.
Read also: Temporal tables with in-memory support
Index Limitations
In SQL Server 2016, only eight indexes including the primary key index are allowed for each memory-optimized table or table type. Starting with SQL Server 2017, there is no longer a limit on the number of indexes specific to memory-optimized tables and table types.
AdventureWork2016 has no tables with eight or more indexes. As you probably expect by now, Microsoft Advisor will return a fatal error when trying to convert tables with more than eight indexes. In my opinion, you have to ensure that an index is created on the primary key. That should be required, and then create up to seven additional indexes. Furthermore, a warning should be displayed in the conversion log, as shown in the image below.

IDENTITY Columns
IDENTITY columns seed and increment must be set to 1. To get all columns that have an identity with a seed or increment different from 1, execute T-SQL snippet as shown below.
|
1 2 3 4 5 6 7 8 9 10 11 12 |
SELECT s.name ,t.name ,c.seed_value ,c.increment_value FROM sys.identity_columns c INNER JOIN sys.tables t ON c.object_id = t.object_id INNER JOIN sys.schemas s ON t.schema_id = s.schema_id WHERE seed_value <> 1 OR increment_value <> 1; |
The AdventureWorks2016 database has only one such column as shown in the image below.

During the conversion process, you have to reset the seed and the increment to one and create a warning message, as shown in the image below.

Then during data insertion in the In-Memory table, you have to allow INSERT in the identity columns. That can be done by executing T-SQL SET IDENTITY_INSERT ON. At any time, only one table in a session can have the IDENTITY_INSERT property set to ON. In the conversion tool, this is handled properly.
Foreign Keys
As I wrote earlier, every foreign key will result in warnings and errors. The Microsoft Advisor reports that is not possible to convert such a table by using the wizard as shown in the image below.
On the other hand, as you can see in the article and using the solution, the relationship is reestablished after the conversion of all tables. If the creation of one relationship fails, the process of conversion continues to work and an entry in the conversion log is created.
Option CASCADE Not Supported
There is no elegant way to solve this problem. In my solution, such situations are logged and a message like this one is displayed in the log: Warning FK_SalesOrderDetail_SalesOrderHeader_SalesOrderID Delete action CASCADE is not supported [AdventureWorks2016].[Sales].[SalesOrderDetail]
Obviously, the client application must handle such situations. To get all relationships that have some actions on DELETE or UPDATE, execute the T-SQL as shown in the snippet below.
|
1 2 3 4 5 6 7 8 9 10 11 12 13 14 15 16 17 18 19 |
SELECT f.name AS ForeignKey ,SCHEMA_NAME(f.SCHEMA_ID) SchemaName ,OBJECT_NAME(f.parent_object_id) AS TableName ,COL_NAME(fc.parent_object_id, fc.parent_column_id) AS ColumnName ,SCHEMA_NAME(o.SCHEMA_ID) ReferenceSchemaName ,OBJECT_NAME(f.referenced_object_id) AS ReferenceTableName ,COL_NAME(fc.referenced_object_id, fc.referenced_column_id) AS ReferenceColumnName ,f.delete_referential_action_desc ,f.update_referential_action_desc FROM sys.foreign_keys AS f INNER JOIN sys.foreign_key_columns AS fc ON f.OBJECT_ID = fc.constraint_object_id INNER JOIN sys.objects AS o ON o.OBJECT_ID = fc.referenced_object_id WHERE f.delete_referential_action != 0 OR f.update_referential_action != 0 ORDER BY SCHEMA_NAME(f.SCHEMA_ID); |
The AdventureWorks2016 database has the following cascading foreign keys shown in the image below:

Constraints Contain Forbidden Functions
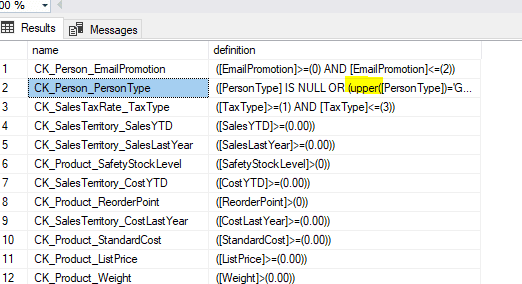
Functions like Upper and CharIndex are not allowed. Furthermore, LIKE is not allowed. As you probably expect by now, Microsoft Advisor will fail when any tables use these functions in constraints. In my opinion, it’s just fine is to log such situations. For example, a message like this one is logged in the conversion log: Warning CK_Employee_Gender cannot apply a constraint on the table [AdventureWorks2016].[HumanResources].[Employee] because it contains forbidden functions.
To get all check constraints, examine system views as shown in the snippet below.
|
1 2 3 4 |
SELECT name ,definition FROM SYS.check_constraints; |
The result is shown in the image below.
Obviously, you must handle such situations in you client application, which is an extra work.
A similar situation exists with default contraints. To get all default constraints, examine system views as shown in the snippet below.
|
1 2 3 4 5 6 7 8 9 10 11 12 13 |
SELECT s.name ,t.name ,col.name ,def.definition FROM sys.columns AS col INNER JOIN sys.default_constraints def ON col.column_id = def.parent_column_id INNER JOIN sys.tables t ON col.object_id = t.object_id INNER JOIN sys.schemas s ON t.schema_id = s.schema_id ORDER BY s.name, t.name, col.name; |
Function like db_name and host_name are forbidden, too. In the conversion tool behavior is similar to check constraints.
DML Triggers
DML (data manipulation language) triggers cannot be created automatically. In the solution, DML triggers are not created, so the creation of triggers is skipped and logged in the conversion log. As I mentioned earlier, the natively compiled triggers cannot access traditional disk-based tables, so extra work should be done after the conversion.
NOTE: DDL (data definition language) triggers are not allowed in In-Memory Database.
Cross-database Queries
Cross-database transactions and queries are not supported if they include In-Memory optimized tables. If a transaction accesses a memory-optimized table, the transaction cannot access any other database except for the tempdb database and read-only from the master database. This is very important because as you probably understand by now, the conversion tool will iterate through tables in the disk-based database, create table by table in the In-Memory database and after the creation of the table (execution of DDL statements) has to insert data. If you try to insert data in the memory optimized table in such way e.g. by execution INSERT INTO <In-Memory table – full name > … SELECT * FROM <Disk-based table-full name>, you get an exception. The exception message looks similar what is written above : A user transaction that accesses memory-optimized tables or natively compiled modules cannot access more than one user database or databases model and msdb, and it cannot write to master. Of course, there is a workaround for this. In the conversion tool, the first data transfer is accomplished by creating helper disk-based tables in the new memory-optimized database. After that, a second insertion occurs, this time from the helper table into the newly create an In-Memory optimized table.
Here is an example of the DML that is executed in the context of the AdventureWorks2016 database and for the table HumanResources.Employee:
|
1 2 3 4 5 6 7 8 9 10 11 12 13 14 15 16 17 18 19 20 21 22 23 24 25 26 27 28 29 30 31 32 33 34 35 36 37 38 39 40 41 42 |
-- -- The first insert into a helper table -- SELECT * INTO AdventureWorks2016_InMem.dbo.TEST FROM AdventureWorks2016.HumanResources.Employee; -- -- The second insert into new In-Memory table -- INSERT INTO AdventureWorks2016_InMem.HumanResources.Employee ([BusinessEntityID] , [NationalIDNumber] , [LoginID] , [OrganizationNode] , [JobTitle] , [BirthDate] , [MaritalStatus] , [Gender] , [HireDate] , [SalariedFlag] , [VacationHours] , [SickLeaveHours] , [CurrentFlag] , [rowguid] , [ModifiedDate]) SELECT [BusinessEntityID] ,[NationalIDNumber] ,[LoginID] ,[OrganizationNode] ,[JobTitle] ,[BirthDate] ,[MaritalStatus] ,[Gender] ,[HireDate] ,[SalariedFlag] ,[VacationHours] ,[SickLeaveHours] ,[CurrentFlag] ,[rowguid] ,[ModifiedDate] FROM AdventureWorks2016_InMem.dbo.test; |
What Microsoft recommends for cross-database queries is very interesting. Microsoft recommends creation of a User Defined Table Type for every table and then they create a Table Variable of that type. For example, if you would like to transfer hundreds of tables to In-Memory OLTP database, you should create an adequate number of table types. That does not sound good!
Every Table Must Have a Primary Key and Each Table Type Must Have At Least One Index or a Primary Key
In my opinion, the first one seems very reasonable. It is a good practice to include a primary key in every table. If you do not have a natural primary key, an identity value is a good choice. The conversion tool just skips the conversion for such tables and makes an entry in the log. At least one index is required because that is how the table is linked together.
The second restriction seems to be very cruel. User Defined Table Types were introduced with SQL Server 2008 and are perfectly mapped with the .NET object DataTable. I used them frequently in all kinds of batches when a large number of insertions could be done otherwise. Using a table type is much faster than the .NET DataAdapter class. I’ve rarely created a primary key or index on a table type. The conversion tool, in that case, when detecting a table type without a primary key or index and, generates one for you.
And More…
Of course, there are many more limitations and unsupported features. Some of the unsupported features are:
- DDL triggers
- Linked servers
- Mirroring
- Change Data Capture ( CDC )
- Change Tracking
- Minimal logging
- Replication
- Data compression, and so on.
In this section, I addressed the main issues involving the conversion process. In the next section, I will write about the requirements for using Memory-Optimized Tables as well as requirements for using the conversion tool.
Requirements
Although In-Memory OLTP tables are available in SQL Server 2014 to SQL Server 2016 pre SP1, I recommend to you that only SQL Server 2016 SP2 and above should be considered as a good choice.
The conversion tool checks the server version and does not allow any conversion if the server version is below 2016 SP2. In the solution, there is a constant that serves that purpose as shown in the snippet below.
|
1 2 3 4 |
// // https://support.microsoft.com/en-us/help/3177312/sql-server-2016-build-versions // SQL Server 2016 SP2 private const string C_SERVER_VERSION = "13.0.5026.0"; |
Above that version, there is no limitation on Editions. As I wrote above, I successfully ported AdventureWorks2016(7) on SQL Server 2017 Express Edition as shown in the image below.
Microsoft sample databases are small, so in this situation, Express Edition could be used. In a situation that you have databases with a couple of GB, Express Edition would not work.
Moreover, during testing of the conversion tool, I noticed that 16 GB is the magic number. Try to convert a database beyond that size, and you will get a lot of trouble. When we are talking about 70 tables as AdventureWorks has, it is not a big deal. The conversion process takes a couple of minutes. For a bigger database that has a 10 GB data file and thousands of tables, relations, check constraints and indexes, the conversion process could take hours. If you have a server that has less than 10GB of RAM and you try to execute a lot of DDL statements using SSMS or my conversion tool, you will probably receive this message: There is insufficient system memory in resource pool ‘default’ to run this query.
Many authors suggest you that you change Resource Governor settings. I read a lot of articles that suggest you create a new Resource Governor pool and bind that newly create a pool to your database. In such advice, as I noticed one thing is missing. Resource Governor is only available in Enterprise and Developer Edition.
My suggestion to you if you receive such a message is to try to increase available memory of your SQL Server because these tables live in memory, not disk, so there must be enough memory to accommodate them.
If you have Enterprise or Developer Edition and run into problems with available memory, creating a separate resource pool will help you. The following snippet shows you have to create the resource pool and bind it to your database.
|
1 2 3 4 5 6 7 8 9 10 11 12 13 14 |
--Enable resource governor ALTER RESOURCE GOVERNOR RECONFIGURE; -- Create dedicated pool CREATE RESOURCE POOL <pool_name> WITH (MIN_MEMORY_PERCENT=50, MAX_MEMORY_PERCENT=50); -- Update configuration ALTER RESOURCE GOVERNOR RECONFIGURE; --Bind the pool to your database EXEC sp_xtp_bind_db_resource_pool '<your database name>' ,'<pool name>' -- Put the database offline ALTER DATABASE <your database name> SET OFFLINE; -- Bring the database online. It takes time! ALTER DATABASE <your database name> SET ONLINE; |
Moreover, Microsoft suggests switching the compatibility level of the database to 130. The conversion tool does that automatically.
Microsoft documentation states: When tables are created in a database that has a compatibility level of at least 130, automatic update of statistics is enabled for all statistics on that table, and no further action is needed. If a database has memory-optimized tables that were created in an earlier version of SQL Server or under a lower compatibility level than 130, the statistics need to be updated manually once to enable automatic update going forward. To enable automatic update of statistics for memory-optimized tables that were created under an older compatibility level, follow these steps:
- Update the database compatibility level: ALTER DATABASE CURRENT SET COMPATIBILITY_LEVEL=130
- Manually update the statistics of the memory-optimized tables. Below is a sample script that performs the same.
- Manually recompile the natively compiled stored procedures to benefit from the updated statistics“.
And finally, the conversion tool requires that your credential is a part of the sysadmin fixed server role. The next section discusses the solution.
The Solution
The solution is composed of three projects. The first one is a class library, and two others are GUI testers. The solution uses SMO (SQL Server Management Objects) in order to accomplish the conversion of disk-based tables.
NOTE: More about SMO can be found in my article Programming SQL Server with SQL Server Management Objects Framework.
The main idea of the solution is to extend SMO classes such as Database, Table, View, and so on. As you probably understand, each class describes a SQL Server object type. The Table class describes a SQL Server table, the View class, a SQL Server view and so on. The extension adds a new method to all of these classes SwtichToMO (MO is an acronym for memory-optimized).
In order to create a new In-Memory Optimized database and transfer all tables with relationships, indexes, check constraints as well as data, you should call the new method as shown in the snippet below.
|
1 |
bool success = db.SwichToMo(dbInMemory, (ILog)this, cnf, o); |
Besides the SMO class extensions, there is an extension of the Exception class. When an exception arises when working with SMO, usually the innermost one contains the information that you need. In order to collect all exception text, you have to travel through the exception hierarchy.
In order to simplify this process, I made an extension of the Exception class for that purpose as shown in the snippet below.
|
1 2 3 4 5 6 7 8 9 10 11 12 13 14 15 16 17 18 19 20 21 22 23 24 25 26 27 28 29 30 |
using System; using System.Collections.Generic; namespace Converter.Extension { public static class ExceptionExtensionMethods { public static IEnumerable<TSource> CollectThemAll<TSource>( this TSource source, Func<TSource, TSource> nextItem, Func<TSource, bool> canContinue) { for (var current = source; canContinue(current); current = nextItem(current)) { yield return current; } } public static IEnumerable<TSource> CollectThemAll<TSource>( this TSource source, Func<TSource, TSource> nextItem) where TSource : class { return CollectThemAll(source, nextItem, s => s != null); } } } |
In the client code, the Exception extension is used as shown in the snippet below.
|
1 2 3 4 5 6 7 8 9 10 11 12 |
try { logger.Log("Create table ", newTable.FName()); newTable.Create(); } catch (Exception ex) { var error1 = ex.CollectThemAll(ex1 => ex1.InnerException) .Select(ex1 => ex1.Message); error = String.Join(Environment.NewLine + "\t", error1); return false; } |
And the result is wrapped text of all exception hierarchies as displayed in the image below.
All extensions are located in Extension folder. The table extension is located in TableExtension.cs , the column extension is located in ColumnExtension.cs, and so on.
In the class library, there is also a configuration class. The purpose of this class is to collect all parameters from an app.config file. Part of the class properties is settable from the app.config file and this is regulated by a special attribute. The configuration class, as well as the special attribute, is located in Configuration.cs.
Beyond classes, there is an interface definition as well. My aim was to define everything needed for logging in the interface. The interface definition is located in ILog.cs.
The second project in the solution is GUI Tester. It could be any kind of application, but I decided to test in a Win-Form application as well as a WPF application. In both projects, there is only one form which is divided into two panes (group boxes), as shown in the image below.
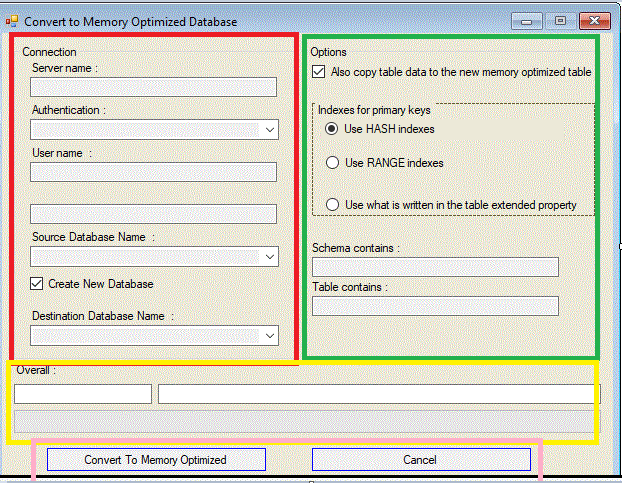
Highlighted with red is the group box that contains controls which define a connection. So, these are a standard set of controls, pretty much self-describing.
The most interesting control in the first group box is the checkbox labeled with Create New Database. It’s checked by default, and, in that case, the conversion tool will create a new database as In-Memory optimized and assign it a name as the source database plus suffix InMem.
Of course, there is an option to choose your own destination by unchecking the checkbox and choosing an appropriate database from the drop-down list.
Highlighted with red is an option group box. Similar to Microsoft Advisor, you could opt to transfer data or not. You can transfer all tables or just part of them. In that case, you have to fill one or both of textboxes labeled with Schema contains or Table contains.
By default, primary key indexes are created as Hash indexes. You can change this behavior by selecting the second radio button. The third choice is to add a custom extended property, namely MOIndexEp, to the table that specifies what kind of primary key index for that table you prefer to be created. All other indexes are created as Range indexes.
Highlighted with yellow are set of labels that are used for logging as well as the Progress bar. And finally highlighted with pink are two buttons.
Once you click on the button labeled Convert To Memory Optimized, a thread is created and started. A timer control is responsible for checking the status of the thread.
In this section, I briefly described the solution and its parts. Next, it’s time to deep dive into every part of the solution. First, it describes the creation of the database.
Read also: Columnstore indexes for analytical workloads
Database Creation
In the solution, the database creation is accomplished by calling the Create method inside the CreateDatabase static class. The method is just wrapper that does three things:
- Create the database if not exists
- Create filegroup that holds memory-optimized dana
- Create file container
During database creation, the newly created database is put into Simple Recovery mode, the compatibility level will be set to 130, the AutoClose property will be set to false, and MEMORY_OPTIMIZED_ELEVATE_TO_SHAPSHOT is set to ON.
NOTE: Writing about transactions is out of the scope of the article, but maybe that would be the content of a new one.
The code snippet below illustrates all actions accomplished during the database creation.
|
1 2 3 4 5 6 7 8 9 10 11 12 13 14 15 16 17 18 19 20 21 22 23 24 25 26 |
Database dbnew = new Database(srv, databaseName); // ON EXPRESS EDITION could be true which on the other hand results with failure in database creation dbnew.AutoClose = false; dbnew.RecoveryModel = RecoveryModel.Simple; srv.Databases.Add(dbnew); try { srv.Databases[databaseName].Create(); srv.Refresh(); dbnew.ExecuteNonQuery(string.Format("ALTER DATABASE {0} " + " SET MEMORY_OPTIMIZED_ELEVATE_TO_SNAPSHOT = ON; ", dbnew.Name)); if (dbnew.CompatibilityLevel < CompatibilityLevel.Version130) { dbnew.CompatibilityLevel = CompatibilityLevel.Version130; dbnew.Alter(); srv.Refresh(); } } catch (Exception ex) { } |
The same routine is used when an existing database should be adopted to In-Memory OLTP. In that case, the process of the database creation is skipped.
In-Memory OLTP allows that only one memory optimized file group exists per database. The conversion tool takes care of that limit.
And finally, a file container is created. Although more than one container is allowed, the conversion tool creates only one.
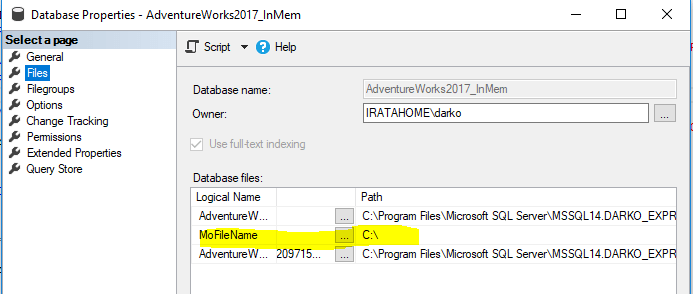
In the configuration class, there are properties connected with the file group name and the location of the container. These properties are read from the app.config file, as shown in the image below.

In-Memory OLTP requires that the destination folder does not exist up front. If not so, the process of creation will fail with the following error
Msg 5170, Level 16, State 2, Line 1
Cannot create file ‘c:\temp’ because it already exists. Change the file path or the file name, and retry the operation.
So, in order to avoid such a pain point, the solution appends the current timestamp to the path during database creation.
In SSMS, the path of the container is not displayed properly as shown in the image below.
But, when you export the script of database creation, again by using SSMS, the path is shown correctly as displayed in the snippet below.
|
1 2 3 4 5 6 7 8 9 10 11 12 13 14 15 16 17 18 |
USE [master] GO /****** Object: Database [AdventureWorks2017_InMem] Script Date: 23.4.2018. 12:17:49 ******/ CREATE DATABASE [AdventureWorks2017_InMem] CONTAINMENT = NONE ON PRIMARY ( NAME = N'AdventureWorks2017_InMem', FILENAME = N'C:\Program Files\Microsoft SQL Server\MSSQL14.DARKO_EXPRESS\MSSQL\DATA\AdventureWorks2017_InMem.mdf' , SIZE = 73728KB , MAXSIZE = UNLIMITED, FILEGROWTH = 65536KB ), FILEGROUP [MoFg] CONTAINS MEMORY_OPTIMIZED_DATA DEFAULT ( NAME = N'MoFileName', FILENAME = N'C:\MOCONTAINTER22_04_2018_20_59_14' , MAXSIZE = UNLIMITED) LOG ON ( NAME = N'AdventureWorks2017_InMem_log', FILENAME = N'C:\Program Files\Microsoft SQL Server\MSSQL14.DARKO_EXPRESS\MSSQL\DATA\AdventureWorks2017_InMem_log.ldf' , SIZE = 139264KB , MAXSIZE = 2048GB , FILEGROWTH = 65536KB ) GO |
Microsoft documentation states:
The following limitations apply to a memory-optimized filegroup: Once you create a memory-optimized filegroup, you can only remove it by dropping the database. In a production environment, it is unlikely that you will need to remove the memory-optimized filegroup
This is partially true because it’s possible to remove a memory-optimized filegroup as well as a file container, but just after creation and before adding any kind of objects. In my opinion, it is a big limitation.
In this section, I explained the steps involved in process of the database creation and limitations. Now, it’s time to see how a table is created.
Table Creation
Similar as for databases, switching tables to In-Memory OLTP is accomplished as an extension of SMO’s Table class. Again, the method name is SwitchToMo as shown in the snippet below.
|
1 2 3 4 5 |
if (tbl.SwitchToMo(dbInMemory, self, cnf, o, ref error, logger) == false) { logger.LogWarErr("TABLE:Error ", error); } |
The process of converting disk-based tables to In-Memory OLTP tables consists of following steps:
- Generating a columns list and making columns conversions if necessary (for example, if a column has an unsupported data type)
- Gathering information about the indexes and determining the correct type
- Gathering check and default constraints
- Creating the In-Memory table
- Logging DML triggers
- Inserting ( transferring ) data
During the conversion process, the conversion tool tries to do as much as possible without interrupting (breaking) the conversion. By now, it is clear how unsupported types are handled in the conversion tool as well as check constraints.
Let’s see how index creation is accomplished in the conversion tool. Microsoft’s recommendation is as follows: “When implementing memory-optimized tables in an existing application, the general recommendation is to start with nonclustered indexes, as their capabilities more closely resemble the capabilities of traditional clustered and nonclustered indexes on disk-based tables.”
On the other hand, hash indexes are primarily used for point lookups and not for range scans. A hash index is preferable over a nonclustered index when queries use equality predicates, and the WHERE clause maps to all index key columns.
In the conversion tool, all indexes are Range (Non-Clustered indexes), except for primary keys, where you have an option. You can choose these options from the GUI Tester as shown in the image below highlighted with red. The first two options are understandable, but the third one needs an explanation.
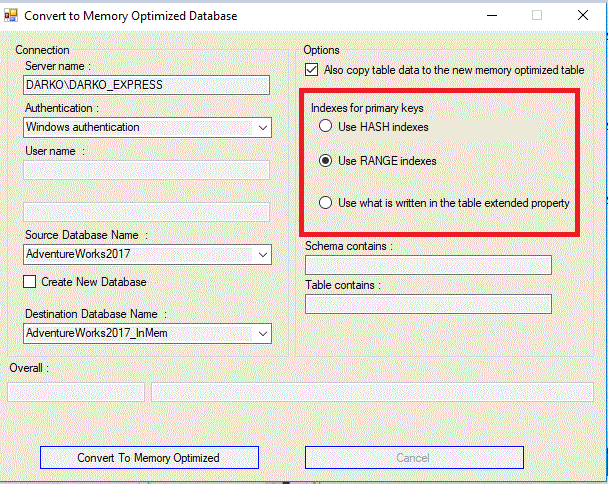
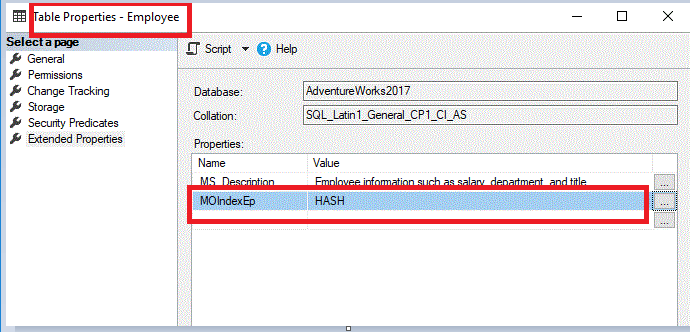
You can add an extended property to the tables, which the conversion tool will read during the conversion process. Depending on the value of that extended property, it will create a primary key index for the table as Hash or Range. It is not as complicated as it sounds. To illustrate this possibility, add such extended property before starting the conversion tool to each table to be converted. For example, add a property MoIndexEp and its value should be Hash, as shown in the image below. The property name is configurable through the app.config file, and properties values could be Hash and Range. When you choose the third option Use what is written in the table extended property, a Hash index will be created for the HumanResources.Employee table.
Furthermore, there are many more difficulties with Hash indexes. Microsoft’s documentation states: “A hash index consists of an array of pointers, and each element of the array is called a hash bucket. Each bucket is 8 bytes, which are used to store the memory address of a link list of key entries. Each entry is a value for an index key, plus the address of its corresponding row in the underlying memory-optimized table. Each entry points to the next entry in a link list of entries, all chained to the current bucket. The number of buckets must be specified at index definition time: The lower the ratio of buckets to table rows or to distinct values, the longer the average bucket link list will be. Short link lists perform faster than long link lists. The maximum number of buckets in hash indexes is 1,073,741,824.”
You have to know the number of buckets before the index is created. In the conversion tool, it is a number of records in the appropriate table multiplied by two. Even if the table has no records, the bucket count cannot be null. In that case, a run-time exception occurs. To avoid the error, a bucket count of 64 is used.
As you probably noticed, besides index creation, there is an option to copy table data and to filter the conversion process only for particular schemas and/or tables.
Every object that already exists in the destination database will be skipped during the conversion process.
And finally, stored procedures are not converted automatically to natively compiled procs. The conversion tool tries to create as much as possible. If the creation of stored procedure fails, an entry is written in the log. In addition to stored procedure conversion, the process includes conversion of table types, functions, and views.
Summary
Although Microsoft has invested a lot of effort in In-Memory OLTP technology, currently the functionality is not satisfactory. We cannot migrate databases without losing referential integrity or do a lot of manual work. The article addresses the main issues that are involved when you try to migrate your disk-based database to In-Memory technology. You can find source code for the conversion tool on GitHub.
Fast, reliable and consistent SQL Server development…
Frequently Asked Questions (FAQs)
1. Can you convert an existing SQL Server database to In-Memory OLTP?
Yes, but with significant limitations. You cannot ALTER TABLE to convert; you must create new memory-optimized tables and migrate data. Foreign keys between in-memory and disk-based tables are not supported. Many data types (LOB, XML, hierarchyid), triggers, and constraints have restrictions. The Memory Optimization Advisor helps table-by-table but stops at the first error.
2. What are the main limitations of In-Memory OLTP in SQL Server?
No foreign keys between memory-optimized and disk-based tables, no ALTER TABLE on memory-optimized tables, limited data type support, natively compiled procedures have a restricted T-SQL surface area, and no cross-database queries. These have improved across versions but the foreign key restriction remains.
3. How does In-Memory OLTP compare to columnstore indexes?
Different problems. In-Memory OLTP is for high-throughput OLTP: concurrent single-row operations with latch-free architecture. Columnstore indexes are for OLAP: large-table aggregations and reporting. You can combine both: memory-optimized table with a nonclustered columnstore index for real-time operational analytics.
This document contains proprietary information and is protected by copyright law.
Copyright © 2026 Red Gate Software Limited. All rights reserved
Load comments