
- Practical PowerShell for SQL Server Developers and DBAs – Part 1
- Practical PowerShell for SQL Server Developers and DBAs – Part 2
- Introduction
- Configuring Your PowerShell Environment for SQL Server Support
- Executing Queries with Invoke-SqlCmd
Introduction
PowerShell has a lot to offer to both DBAs and database developers. It is uniquely positioned to be both a shell (for doing things) and a scripting language (for programming) and it excels at both. This is due in large part to having all that has come before-on not just Windows-based systems but also Linux-based ones-as stepping stones to know what has worked well and what not so well.
Arguably the most common task you do with SQL Server Management Studio is to execute queries, with the benefits of interactive query editing windows. From the command line, the equivalent tool is the sqlcmd utility, which lacks the benefits of interactivity but gains the power of scripting. PowerShell provides an adaptation of sqlcmd in the form of the Invoke-Sqlcmd cmdlet, its principal workhorse for query execution. Part 1 covers querying with Invoke-Sqlcmd as well as configuring PowerShell to use it.
Besides providing this and a few other cmdlets, though, PowerShell also adds a new dimension to interacting with your database through its unique ability to navigate through your database hierarchy from the command line. This is loosely analogous to using the object explorer in SQL Server Management Studio. But you will see in Part 2 how this unique interface to databases on top of PowerShell’s native environment can make you very productive indeed. Also see the accompanying wallchart that distills the key details out of both parts into a one-page reference.
Configuring Your PowerShell Environment for SQL Server Support
To use the Invoke-Sqlcmd cmdlet you must load (import) the sqlps module. To import it, you must install it. To install it, you must find and download it. Don’t laugh; while it is installed with SQL Server 2012 it is not available with earlier SQL Server versions and it is not at all obvious where to get it. There is no official download from Microsoft for this but Chad Miller, a prolific PowerShell aficionado as well as coordinator for the SQL Server PowerShell Extensions package, kindly wrapped the necessary components of sqlps together into a convenient download so that you may use it with pre-SQL Server 2012 installations; you can download the module at the end of his Making A SQLPS Module article. Once you download it, unzip it and copy the SQLPS directory and contents into one of the two standard repositories for PowerShell modules (see Storing Modules on Disk under Windows PowerShell Modules):
|
System-level |
$env:windir\System32\WindowsPowerShell\v1.0\Modules |
|
User-level |
$HOME\Documents\WindowsPowerShell\Modules |
That is, assuming you use the user-level repository, you should end up with a directory $HOME\Documents\WindowsPowerShell\Modules\SQLPS which contains a readme.txt, 6 PowerShell component files, and 2 subdirectories.
To automatically load the sqlps module each time you start PowerShell, add a line to your startup profile to import the module (the DisableNameChecking option suppresses warnings about the non-standard names used for two of the cmdlets):
|
1 |
Import-Module sqlps -DisableNameChecking |
Your profile may be in one of four places. If present, the profiles are loaded in the order shown; thus the more specific ones have precedence over the less specific ones. Typically, the last profile may be all you need (see Windows PowerShell Profiles).
|
all users and all shells |
$env:windir\System32\WindowsPowerShell\v1.0\profile.ps1 |
|
all users and Microsoft.PowerShell shell |
$env:windir\System32\WindowsPowerShell\v1.0\ Microsoft.PowerShell_profile.ps1 |
|
current user and all shells |
$HOME\Documents\WindowsPowerShell\profile.ps1 |
|
current user and Microsoft.PowerShell shell |
$HOME\Documents\WindowsPowerShell\Microsoft.PowerShell_profile.ps1 |
Here is a flowchart/checklist summarizing the steps needed to configure your environment for SQL Server support:
|
Is sqlps module installed? |
 |
|
If not: |
Install SQL Server 2012. |
|
Is sqlps module loaded? |
 |
|
If not: |
Execute this command interactively: |
|
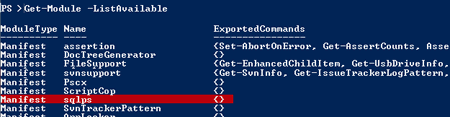
What commands are provided by sqlps? |
 |
The internet is an incredible resource for finding information but when it comes to technology that rapidly changes it is often difficult to distinguish current information from obsolete information. There are actually two ways to provide SQL Server support in PowerShell. Quoting from Import the SQLPS Module on MSDN, “The recommended way to manage SQL Server from PowerShell is to import the sqlps module into a Windows PowerShell 2.0 environment.” (Also true for PowerShell 3.0-yes, things keep a’changing!) In PowerShell 1.0, which did not have modules, the recommended approach was to use snap-ins. If you do a web search you will find a lot of articles espousing the snap-in approach but that is largely because they were written before PowerShell 2.0. Versions 2.0 and 3.0 still support snap-ins, though, and you could use them if you so choose. (See JP Blanc’s answer on this StackOverflow post succinctly summarizing the differences between snap-ins and modules.) There is one snap-in for the SQL Server cmdlets (including Invoke-Sqlcmd) and one for the SQL Server provider (described later in this article), and they are unique to your SQL Server version:
|
|
SQL Server 2008 & 2008 R2 |
SQL Server 2012 |
|
Cmdlet support |
SQLServerCmdletSnapin100 |
SQLServerCmdletSnapin110 |
|
Provider support |
SQLServerProviderSnapin100 |
SQLServerProviderSnapin110 |
This table shows analogous commands for examining snap-ins compared to examining modules.
The main reason I mention this is that there are also articles out there that describe how to check if SQL Server support is loaded by just checking snap-ins, then loading the snap-ins if not detected. For example, Dan Jones from Microsoft provides some helpful code samples in this blog entry. But modules and snap-ins are distinct, so if you have loaded support with one technology then check for the other, you will be misled that it is not present.
Finally, it is worth a brief mention of the elephant in the room (for those of you who have seen it and were stymied by it). Prior to SQL Server 2012, it was always possible to load the sqlps module into PowerShell 2 but it wasn’t elegant (unless, of course, you found Chad Miller’s package!). Rather likely what most developers were exposed to was the SQL mini-shell -a standalone utility that included the PowerShell version 1.0 executable with the SQL Server snap-ins. This mini-shell was a non-extensible version of PowerShell with a set of baked in cmdlets and providers… and therein lies the problem. Jeffrey Snover, the architect of PowerShell, explains in his blog entry SQL Use of Mini-shells:
“The problem is not that SQL shipped a mini-shell but rather that there are SQL UX scenarios that use the mini-shell instead of a general purpose PowerShell. The SQL Management Studio GUI has context menus which launch their mini-shell. This is where we made a mistake. By definition, this is an escape out to an environment to explore and/or perform ad hoc operations. This environment does not benefit from the tight production promises that a mini-shell provides, in fact it is hampered by them. Because the mini-shell is a closed environment, you can’t even manually add snap-ins. This is what sent people’s meters into the red–and understandably so.”
But wait-it gets worse! This mini-shell was called sqlps! Yes, the name that left a bad taste in many developers’ mouths was recycled to label the much more palatable sqlps module, discussed above. So if you were one of those who took issue with the sqlps utility, be assured that it is deprecated (see the second paragraph of its MSDN page) and the sqlps module has taken its place.
Finally, there is one last twist added to an already convoluted story. With SQL Server 2012 the sqlps utility has metamorphosed into an unrestricted PowerShell while being deprecated at the same time. The key points of the What’s New section in SQL Server 2012’s documentation, under Manageability Enhancements, describe this succinctly:
“The sqlps utility is no longer a PowerShell 1.0 mini-shell; it now starts PowerShell 2.0 and imports the sqlps module. This improves SQL Server interoperability by making it easier for PowerShell scripts to also load the snap-ins for other products. The sqlps utility is also added to the list of deprecated features starting in SQL Server 2012.“
Executing Queries with Invoke-SqlCmd
Invoke-Sqlcmd is an adaptation for use in PowerShell of the sqlcmd command-line utility included with SQL Server since 2005. Most things you can do with sqlcmd from a standard command prompt can also be done with Invoke-Sqlcmd at a PowerShell prompt. The Comparing Invoke-Sqlcmd and the sqlcmd Utility section of the Invoke-Sqlcmd documentation page provides a comprehensive table listing the sqlcmd options and the Invoke-Sqlcmd parameters side-by-side. I would like to reproduce the table here for convenience but copyright precludes it; Figure 1 shows a glimpse of it showing the most common parameters:
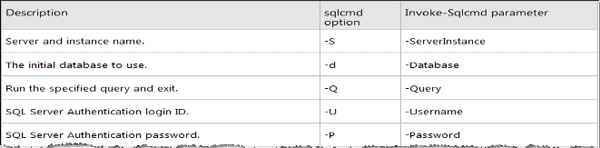
Figure 1: Comparing traditional sqlcmd options with Invoke-Sqlcmd parameters.
Thus this traditional command…
|
1 |
sqlcmd -S Server1 -d TestDB -Q "select GetDate()" |
…maps directly to this PowerShell command:
|
1 |
Invoke-Sqlcmd -ServerInstance Server1 -Database TestDB -Query "select GetDate()" |
Furthermore, just like with sqlcmd, you can pass not just a string literal to Invoke-Sqlcmd but also a file name, thus allowing you to execute arbitrarily complex T-SQL code.
Default Context
While sqlcmd does not require you to specify the server (if you have defined the SQLCMDSERVER environment variable) or the database (defaults to your login’s default-database property), Invoke-Sqlcmd provides a much more flexible default context. The next part of this article goes into much more detail, but to continue you need to be aware of what I call SQL Server space. Once you install the SQL Server provider as described above, you have access to SQL Server space where you can navigate analogously to navigating your file system space with chdir. (In PowerShell the command is actually Set-Location but it provides both chdir and cd aliases to make it quicker to type.) To illustrate the default context consider the query SELECT DB_NAME(), which tells you the name of the current database. On my system I have a database called sandbox that I use for experimentation. To set my default context to this database I navigate to the root of the database in SQL Server space:
|
1 |
Set-Location SQLSERVER:\SQL\localhost\sqlexpress\databases\sandbox |
When you are located within the database (by either being here at its root or lower in the hierarchy), both your default server/instance and default database are well-defined: localhost\sqlexpress and sandbox, respectively. So now you can execute the DB_NAME() query; it conveniently reports the default context along with the result of the query. You can report the current location by just evaluating the $PWD environment variable; both are shown here:
| $PWD |
|---|
| Path —- SQLSERVER:\SQL\localhost\sqlexpress\databases\sandbox |
| Invoke-Sqlcmd -Query “SELECT DB_NAME() as [Database]” |
| WARNING: Using provider context. Server = localhost\SQLEXPRESS, Database = sandbox. Database ——- sandbox |
As you would expect, if you descend in the hierarchy, e.g. cd Tables, the result will be identical. But instead, move up in the hierarchy (if you’re still at the DB root a simple cd .. suffices to move up one level, just as with a traditional command prompt). Notice here that there is no longer a default database; just as sqlcmd does, Invoke-Sqlcmd uses your login’s default database, in this case master:
| cd .. |
|---|
| SQLSERVER:\SQL\localhost\sqlexpress\databases |
| Invoke-Sqlcmd -Query “SELECT DB_NAME() as [Database]” |
| WARNING: Using provider context. Server = localhost\SQLEXPRESS. Database ——- master |
Ascending one more level, as you can surmise, returns the same result because you are still within the context of the server and instance. Instead let’s ascend two levels:
| cd ..\.. |
|---|
| SQLSERVER:\SQL\localhost |
| Invoke-Sqlcmd -Query “SELECT DB_NAME() as [Database]” |
| Invoke-Sqlcmd : A network-related or instance-specific error occurred while establishing a connection to SQL Server. The server was not found or was not accessible. Verify that the instance name is correct and that SQL Server is configured to allow remote connections. |
There is no longer sufficient context to determine where you want to send your query so you get an error. Similarly, if you return to file system space, e.g. cd c:\temp and attempt to execute a query without specifying your server or database you will get the same error. But if you add the server back in explicitly things work fine:
| cd c:\temp |
|---|
| SQLSERVER:\SQL\localhost |
| Invoke-Sqlcmd -Query “SELECT DB_NAME() as [Database]” -Server .\sqlexpress |
| Database ——– master |
Custom Aliases
You learned just above that cd is really just an alias for Set-Location; when you’re working at the command prompt it is so much more convenient to have short aliases for common commands. Invoke-Sqlcmd does not provide an alias by default, but it is a simple matter to create one:
|
1 |
New-Alias sql Invoke-Sqlcmd |
Store this command in your profile (discussed earlier) so it is created whenever you launch PowerShell and you can then type the much more convenient “sql …”.
Organizing Your Output
So far the couple queries used for illustration have returned just one column, one row result sets. Now consider a more practical result set containing many columns. Looking in my master database I have the standard tables you should have as well (-Force shows the system tables, normally suppressed):
| ls SQLSERVER:\sql\localhost\sqlexpress\databases\master\tables -Force |
|---|
| Schema Name Created —— —- ——- dbo MSreplication_options 10/14/2005 2:00 AM dbo spt_fallback_db 4/8/2003 9:18 AM dbo spt_fallback_dev 4/8/2003 9:18 AM dbo spt_fallback_usg 4/8/2003 9:18 AM dbo spt_monitor 10/14/2005 1:53 AM dbo spt_values 10/14/2005 1:53 AM |
From that I am going to display the contents of spt_monitor, having multiple columns but just one row:
| sql -Server localhost\sqlexpress “select * from spt_monitor” |
|---|
| lastrun : 10/14/2005 1:53:53 AM cpu_busy : 8 io_busy : 7 idle : 7773 pack_received : 28 pack_sent : 28 connections : 12 pack_errors : 0 total_read : 0 total_write : 0 total_errors : 0 |
This output looks like standard PowerShell output and, indeed, it is. The re’s nothing special about output retrieved from your database. As you will see in the second part of this article, you can manipulate PowerShell output to be displayed as a list (one field per line) as shown above or as a table (one record per line). Piping the above command through Format-Table does the latter:
| sql -Server .\sqlexpress “select * from spt_monitor” | Format-Table |
|---|
| lastrun cpu_busy io_busy idle pack_rec pack_sen connecti pack_err total_re total_wr eived t ons ors ad ite ——- ——– ——- —- ——– ——– ——– ——– ——– ——– 10/14/… 8 7 7773 28 28 12 0 0 0 |
You do, however, get some unfortunate display artifacts: the column names are quite difficult to read due to wrapping; the data in the first column is truncated; and, though not evident, some of the columns are not even displayed-these are all necessary evils as PowerShell attempts to fit the width of your console with as much useful information as possible. Sometimes that is sufficient, but when it is not, pull out the power tool: Out-GridView:
|
1 |
sql -Server .\sqlexpress "select * from spt_monitor" | Out-GridView -Title "select * from spt_monitor" |
Here you can use the same SQL command, but pipe it to Out-GridView to open up a new window containing an interactive GridView component (Figure 2). This provides all the power and convenience of an output grid you are used to in SQL Server Management Studio:
- scroll bars
- draggable column widths
- sortable columns (left click header)
- hideable columns (right-click header)
- copy rows to another application
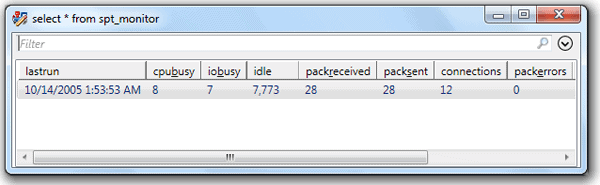
Figure 2: Interactive grid resulting from sending PowerShell output to the Out-GridView cmdlet.
Unlike SSMS, you also have a quick filter box at the top of the window. As you type text into the filter box the grid is immediately filtered to show only rows where your text appears in some. Multiple words, separated by white space, are applied conjunctively-all words must be present. Furthermore, you can restrict each search term to a specific column by prefixing it with a column name, so whereas 16 will find those characters in any column, InvoiceNumber:16 only matches 16 if it appears in the InvoiceNumber column.
Note that the Out-GridView cmdlet does not automatically put the query in the title bar of the window; I did that manually by specifying the -Title parameter to be the same as the query itself, which I find quite handy. To eliminate the duplication of typing the query twice I use a convenient alias to do this in a much tidier way:
|
1 |
Out-SqlGrid "select * from spt_monitor" |
Technically Out-SqlGrid is not an alias because it is not just a different name for a single command. It is, in fact, a full-fledged function that I also put in my profile so it is always available:
|
1 2 3 4 5 6 7 8 9 |
function Out-SqlGrid( [string]$query, [string]$title=$query, [string]$ServerInstance=".\sqlexpress", [string]$Database="master" ) { Invoke-Sqlcmd -ServerInstance $ServerInstance -Database $Database -Query $query | Out-GridView -Title $title } |
The function itself is just the same two commands shown above: Invoke-Sqlcmd piped to Out-GridView. But it also provides the convenience of setting the title of the GridView to the text of the query-unless you wish to override it by explicitly specifying a -Title parameter. Similarly, it uses a default for server and database so you do not have to type these every time. Modify those defaults to suit your own needs.
Finally, Figure 3 shows one more query sent to a GridView. Just at the right end of the search bar is an open/close button to hide or reveal additional filtering options. When revealed, you have a button to add criteria. Selecting that opens the drop down shown, enumerating all columns. Select the ones you want to allow filtering on, close the dropdown, and you get a filter line for each one above the button. Each filter line provides relevant choices for filtering values in that column; selecting the hyperlinked operator opens a dropdown with other choices. For a string column, for example, you can change contains to starts with or equals or several others. You can add more than one criterion on a single field-the figure, for example, shows two criteria referencing the name field. However, you have no choice on joining all the criteria: each criterion you add referencing a distinct field adds a conjunction, while criteria on the same field add a disjunction.
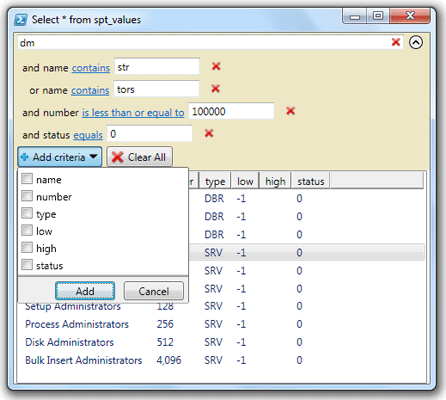
Figure 3: Complex filtering capabilities of the Out-GridView cmdlet.
This concludes part 1, which has just set the stage. Stay tuned for Part 2, picking up from here with practical PowerShell tips for SQL Server work!
This document contains proprietary information and is protected by copyright law.
Copyright © 2026 Red Gate Software Limited. All rights reserved
Load comments