
Given that Microsoft now considers Linux a ‘first-class citizen’, SQL Server 2017 offers native support for Linux. It is engineered to be cross-platform, and that’s good news for Linux administrators and open source developers. Microsoft’s support for Linux (and open source in general), has come into clearer focus, and the company’s mission now seems to be all about bringing its tools to wherever its users are.
Microsoft has been known for proprietary software, and this openness to the open source community came as a surprise; the development is quite recent, and one in the right direction. SQL Server has had a myriad of GUI and CLI tools. These tools have also, along with SQL Server itself, have become cross platform. These tools are almost equally as good on Linux as Windows, and they help effectively manage, develop, and administer SQL Server. Some of the tools are:
- SSMS
- Sqlcmd
- Bcp
- Sqlpackage
- Mssql-conf
- Mssql-scripter
- DMV tool
- SQL Operations Studio
- MSSQL-Cli
- SQL Extension for VS code
At first, it seems like a myriad of them. Taking one piece at a time helps with understanding the tools. Let us try to classify these tools based on what they are useful for:
|
SSMS |
Sqlcmd |
bcp |
SqlPackage |
Mssql-conf |
Mssql-scripter |
DMV |
SQL Ops Studio |
MSSQL-Cli |
SQL Extension for VS Code |
|
|
Cross-platform support |
Yes |
Yes |
Yes |
Yes |
Yes |
Yes |
Yes |
Yes |
Yes |
|
|
SQL development |
Yes |
Yes |
Yes |
|||||||
|
Administration and configuration |
Yes |
Yes |
Yes |
Yes |
Yes |
Yes |
Yes |
|||
|
Continuous Integration & Continuous Deployment |
Yes |
Yes |
Yes |
Yes |
Yes |
Yes |
Yes |
|||
|
Data Loading, Extraction and Migration |
Yes |
Yes |
Yes |
Yes |
Yes |
Yes |
||||
|
Miscellaneous Tools (Wizards and Monitoring Solutions) |
Yes |
Yes |
To have a better understanding of what to use these tools for, consider the following points:
- If you want to manage SQL Server instances or databases, use customized widgets, integrated terminals such as PowerShell and Bash in a light-weight editor on Windows, Linux or Mac then Microsoft SQL Ops Studio would be the tool of choice.
- If you are used to SSMS and Windows, and love to manage SQL Server instances or databases with the most traditional way with full GUI (Graphical User Interface) support then SQL Server Management Studio (SSMS) is a good choice.
- Choose SSDT (SQL Server Data Tools) to create or maintain database code, and have designer support on Windows
- Use Visual Studio Code and mssql extension to write T-SQL scripts in a light-weight editor across platforms: Windows, Linux or Mac
- If you are working with a Linux SQL Server instance and would like to change the configuration script for Red Hat Enterprise Linux, SUSE Linux Enterprise Server, and Ubuntu, then mssql-conf utility can be used to set the various server and database level parameters
- The tools such as Visual Studio SQL Server Data Tools (SSDT), mssql-scripter, sqlcmd, bcp, sqlpackage are SQL Server DevOps tools are used to build applications in a transparent and flexible way.
In this article, I would like to talk about the ‘DMV TOOL’, a command line, cross-platform tool that allows accessing live data by mounting DMVs (Dynamic Management Views) to a virtual directory using FUSE and by querying file structure as an object. This article covers the following aspects:
- Introduction to the DMV tool
- Explain DBFS concepts
- Step by step installation of DMV tools
- Discuss configuration details
- Data extraction process
- How to Setup DBFS to run custom queries
- and more…
The DMV data can also be accessed using various data extraction commands that will be discussed later in this article.
The two most common ways of interacting with systems are the graphical interface (GUI) and the command-line interface (CLI). The former makes interaction easy, but sometimes at the cost of efficiency; the latter has a learning curve, but once you’re comfortable with the command line, you skyrocket in terms of efficiency.
The advent of these tools supercharges the command line interface itself. In general, it’s known that going away from the GUI and using CLI increases efficiency. You really need to start working with command line tools in order to get a taste of efficient management.
Using the DMV Tool, the SQL queries that fetch metadata can be run without the need to directly log into the SQL instance. The tool uses the database configuration file to facilitate database administrators to write commands to fetch the metadata of the SQL instance without directly accessing the underlying system objects. We’ll go through the how-to later in this article.
DBFS Concepts
Database Filesystem (DBFS) uses the FUSE module and creates zero-byte files for each of the DMVs. One of these returns the data in a CSV format and the other in JSON. When a file is read from within the filesystem, the corresponding DMV is queried for information, and the information is displayed as though simply opening a CSV or a JSON file.
One of the major contributions of the Open Source Foundation (OSF) is the ‘everything is a file’ concept. The idea here is that you can envision the interface object—in this case, the DMVs—as directory file system. When the filesystem is mounted, the programs can read data from each DMV file.
Knowing the architecture gives an idea of the metadata about the SQL instance. One’s proficiency with scripting also comes into picture. Some of us write BASH or PowerShell scripts to get data. However, traditional DBAs may prefer fetching the metadata using a SQL query rather using a script. This is because, when we deal with aggregation or data crunching, scripting seems overpowering, and overall, it is inefficient for the job at hand. That brings us to taking advantage of writing a custom query to pull related information.
The following Linux distributions support DBFS:
- Red Hat Enterprise Linux
- Ubuntu
- CentOS
The installation and configuration of DBFS outlined in this article was tested on CentOS. Since RedHat Enterprise Linux (RHEL) is the upstream distro for CentOS, the instructions are also compatible with RHEL.
Installation and Configuration
The step by step instructions to install DBFS are illustrated below:
-
- Connect to the server and enter the SU mode on the console (or explicitly call the commands using sudo)
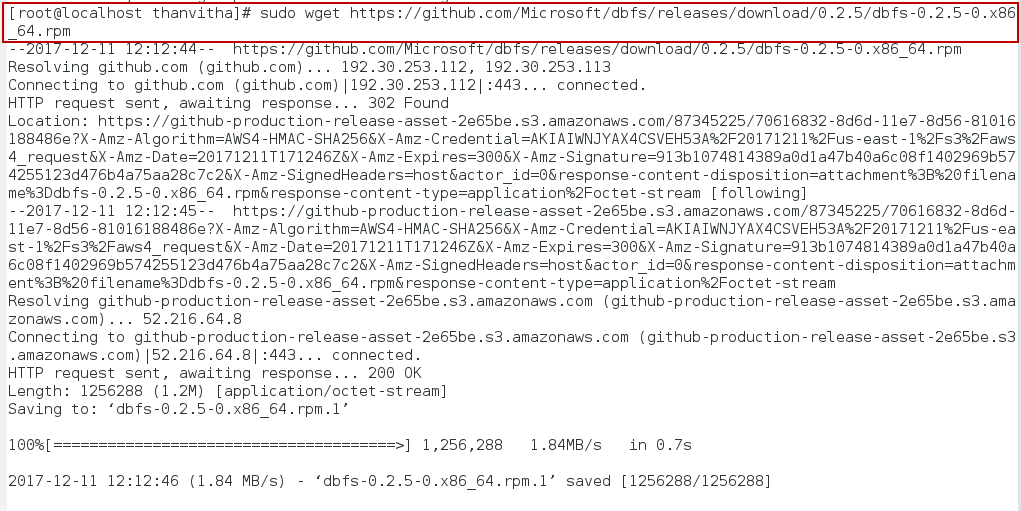
- Download the DBFS (dbfs-0.2.5-0) package using the wget utility to carry out the installation and configuration process on CentOS, the community-based-and-supported Linux distribution that draws on RHEL.
The wget utility is a non-interactive free tool to download files from the internet. By non-interactive, I mean that it can work in the background or it doesn’t require much human interference.
|
1 |
sudo wget https://github.com/Microsoft/dbfs/releases/download/0.2.5/dbfs-0.2.5-0.x86_64.rpm |
-
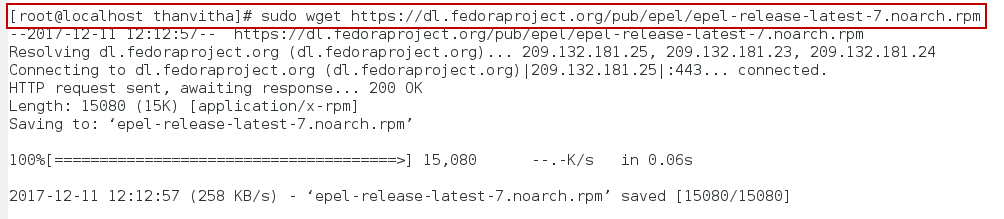
- Install the EPEL repository with the following command
Download the corresponding rpm file for the installation. The downloaded file depends on the base OS version, select the file accordingly. In my case it’s CentOS 7. The process is same for RHEL 7 as well.
|
1 |
sudo wget <a href="https://dl.fedoraproject.org/pub/epel/epel-release-latest-7.noarch.rpm">https://dl.fedoraproject.org/pub/epel/epel-release-latest-7.noarch.rpm</a> |
- Enable and Configure the EPEL (Extra Packages for Enterprise Linux) using rpm (RedHat Package Manager)
The EPEL packages are managed by a special group called EPEL group within the Fedora Project. This group creates, maintains and manages a set of additional packages that are of a high quality. Software that are not part of the core repository, or updates that have not been included in the core repository are available in the EPEL repository.
The following Linux distros support the EPEL repository:
- Red Hat Enterprise Linux (RHEL)
- CentOS
- Scientific Linux
- Oracle Linux
Depending on the operating system you use, the steps to enable the EPEL repository may vary. Installation of packages from the EPEL repository is usually straightforward, with some of the distros easing the process further.
1sudo rpm -ivh epel-release-latest-7.noarch.rpmOR
1sudo yum install epel-release-latest-*.noarch.rpm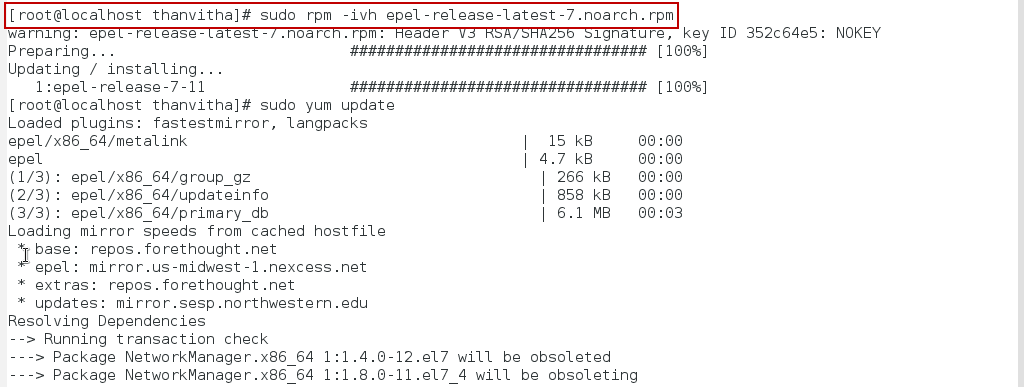
A wildcard (*) is used with the YUM command during installation, since this allows the command to work no matter which version you are installing.
- Install the DBFS package using yum. YUM is a command line tool used to install software.
1sudo yum install dbfs-0.2.5-0.x86_64.rpm

Now that the packages are downloaded and installed, you can configure DBFS.
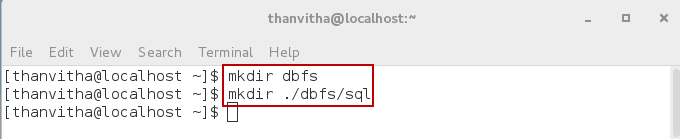
- Open a new user console or terminal for configuration
- Create the dbfs directory and sql subdirectory
12mkdir dbfsmkdir ./dbfs/sql
- Configure DMVTool. Create a dmvtool.config file in the home directory
12pwdvi dmvtool.config

- Enter the content as per your configuration
123456[server friendly name]hostname=[HOSTNAME]username=[DATBASE_LOGIN]password=[PASSWORD]version=[VERSION]customQueriesPath=[PATH_TO_CUSTOM_QUERY_FOLDER]
In the following example, node2 is the server’s friendly name. When working with the sql files, a relative path to the SQL output file is used when defining the dump directory. The location of the dump directory will be <MOUNT DIR>/<ServerFriendly Name>/CustomQueries/. Assume that the dmv1 is the mount directory. The path to the dump directory would then be ./dmv1/node2/CustomQueries/.
localhost is the hostname of the SQL instance. The username and password are the access credentials for the SQL instance. Instead of using the SA account, you may want to define a user and grant them the VIEW SERVER STATE permissions to enable the user to query the DMVs. If the version is 16 or higher (SQL Server 2016 or later), the DMV data can be exported as JSON. Otherwise, the data would be exported as Tab-Separated Values (TSV). customQueriesPath is the location of the SQL file to which the custom queries will be written. Be sure to replace the home directory with your own.
123456[node2]hostname=localhostusername=sapassword=thanVitha@2015version=16customQueriesPath=/home/thanvitha/dbfs/sql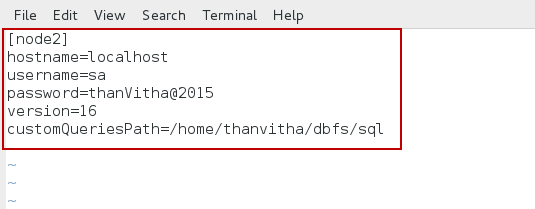
- Create the mount directory and fuse the DMVs as flat files
12mkdir dmv1dbfs -c ./dmvtool.config -m ./dmv1
Required:
-m/–mount-path
The mount directory for SQL server(s) DMV files
-c/–conf-file
The location of the configuration file
Optional:
-d/–dump-path
The dump directory. The Default path is “/tmp/sqlserver”
-v/–verbose : Start in verbose mode
Enable the logging in the verbose mode
-l/–log-file
Log file path (only be used with verbose mode)
-f
Foreground DBFS run
-h
Print
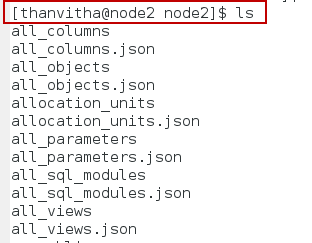
- Browse to the server friendly name and use the ls command to list out the contents.
12cd ./dmv1/node2ls
Data Extraction
The data extraction from the DMV files is relatively simple. Linux contains a rich collection of tools or command line utilities to manipulate files and related contents using a pattern. The various tools are
- Awk : Aho, Weinberger and Kernighan, this is a text pattern scanning and processing language.
- Grep : global regular expression print, in simplest terms, it will search the input files for the search string and print the matching line
- Sed : Stream Editor, it performs the basic text transformation in an input file or from a pipeline
- Cut: The cut command is used to cut out the sections from each line of files and writing the result to standard output
- Cat : cat (as in concatenate) is one of the most frequently used commands on Unix-like operating systems. It has three related functions with regard to text files: displaying them, combining copies of them and creating new ones.
- Join : It joins the lines of two files on a common field
- And more…
The GitHub source has a list of examples to try and explore the possibilities of manipulating the DMV related file structures.
Let me take you through a couple of examples to showcase the simple transformation of flat file concepts using very handy Linux/Unix commands.
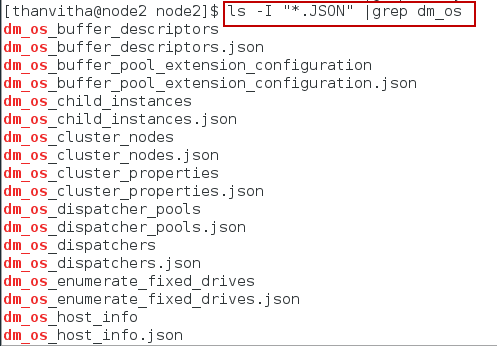
To list the case-insensitive DMVs use ls and grep
|
1 |
ls | grep -I dm_os_sys_memory |

Or
|
1 |
ls -I "*.JSON" | grep dm_os |
To view the contents of the dm_os_sys_memory, use the CAT command. CAT by default, concatenates the contents in a file and displays it in the StandardOut (the monitor). Alternatively, based on what text editor you have on your distro, you could use any of vi, vim, or even nano commands to view the contents.
|
1 |
cat dm_os_sys_memory |
To view columns 1,2,6,7 of the databases system table, use CUT
|
1 |
cut –d$ '\t' -f1,2,6,7 databases |

Or print the first column of OS information using AWK
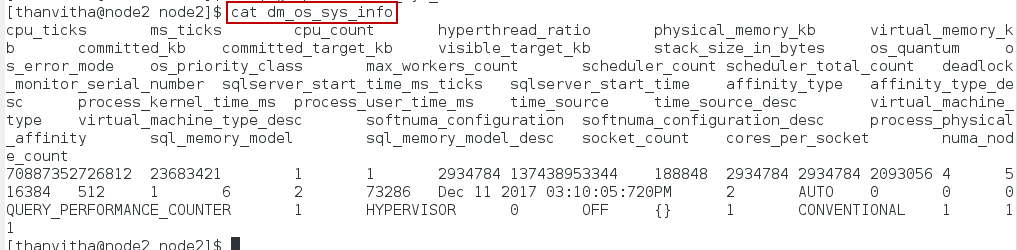
|
1 |
cat dm_os_sys_info | awk '{print $1}' |

List columns of databases with tab separation
|
1 |
awk '{print $1,$2,$3,$5,$7}' databases | column -t |

List the count of the Simple and Full database recovery models of an instance
|
1 2 |
awk '/SIMPLE/{x++;}END {print x}' databases awk '/FULL/{x++;}END {print x}' databases |

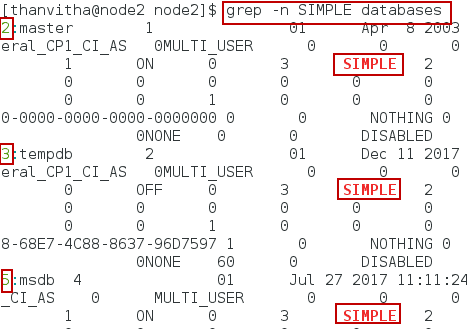
Print the line number along with the pattern matching line in the database file
|
1 |
grep -n SIMPLE databases |
How to Setup DBFS to run custom queries
This section describes the steps required to create custom queries:
Every time you create a custom SQL query, the output is dumped as virtual files which are mounted to a virtual directory. There is no need to log into the SQL Server using a GUI or command line tool or run these SQL queries.
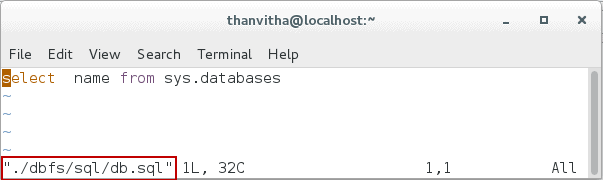
- Prepare the custom query
1select name from sys.databases
- Change the present working directory to ~ or user home
1cd ~
- Create the query file—the *.SQL file—at the custom query path defined in the config file.
1vi ./dbfs/sql/db.sql
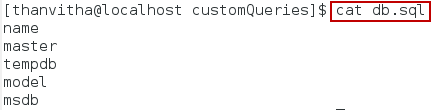
- Browse to the DBFS customQueriespath mount point, correcting the path for your environment.
1cd ./dmv1/node2/customQueries/
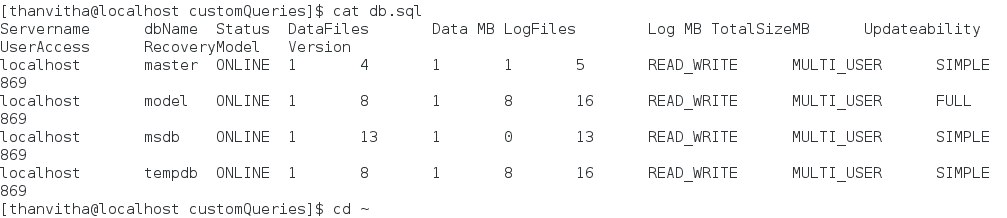
- Display the contents using the cat command.
1cat db.sql
How to edit the custom SQL query
Editing the custom query is simple. To edit the contents of the SQL file, browse to the SQL file and then modify the SQL with a multi-line SQL statement. Now, save the file. Next, browse the custom query path to view the results.
Copy the following SQL into the db.sql file:
|
1 2 3 4 5 6 7 8 9 10 11 12 13 14 |
SELECT @@SERVERNAME Servername, CONVERT(VARCHAR(25), DB.name) AS dbName, CONVERT(VARCHAR(10), DATABASEPROPERTYEX(name, 'status')) AS [Status], (SELECT COUNT(1) FROM sysaltfiles WHERE DB_NAME(dbid) = DB.name AND groupid !=0 ) AS DataFiles, (SELECT SUM((size*8)/1024) FROM sysaltfiles WHERE DB_NAME(dbid) = DB.name AND groupid!=0) AS [Data MB], (SELECT COUNT(1) FROM sysaltfiles WHERE DB_NAME(dbid) = DB.name AND groupid=0) AS LogFiles, (SELECT SUM((size*8)/1024) FROM sysaltfiles WHERE DB_NAME(dbid) = DB.name AND groupid=0) AS [Log MB], (SELECT SUM((size*8)/1024) FROM sysaltfiles WHERE DB_NAME(dbid) = DB.name AND groupid!=0)+(SELECT SUM((size*8)/1024) FROM sysaltfiles WHERE DB_NAME(dbid) = DB.name AND groupid=0) TotalSizeMB, convert(sysname,DatabasePropertyEx(name,'Updateability')) Updateability, convert(sysname,DatabasePropertyEx(name,'UserAccess')) UserAccess , convert(sysname,DatabasePropertyEx(name,'Recovery')) RecoveryModel , convert(sysname,DatabasePropertyEx(name,'Version')) Version FROM sysdatabases DB ORDER BY dbName |
Open the file using
|
1 |
vi ./dbfs/sql/db.sql |
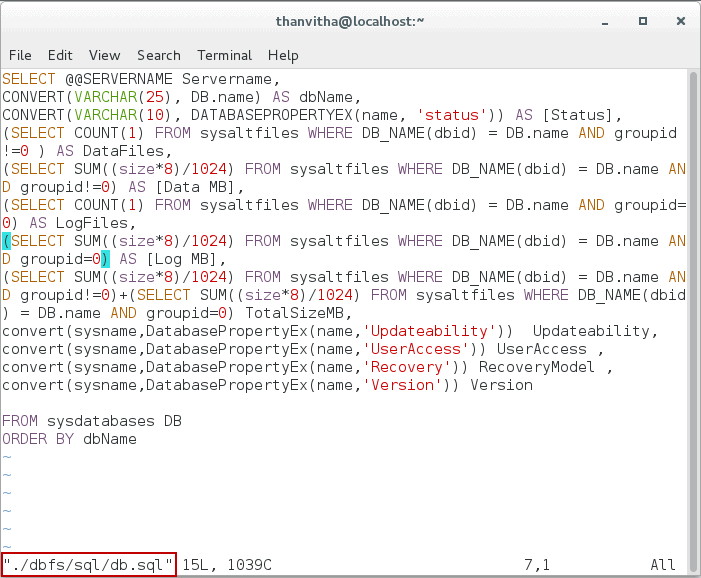
Now browse to the location of the custom query mounted directory, and using cat, display the metadata (the contents of the JSON) in a table-like format.
|
1 2 |
cd ./dmv1/node2/customQueries/ cat db.sql |
Unmount DBFS file system
Since DBFS is a file system, the FUSE module can be manually unmounted using the fusermount command along with the -u option.
It’s a good practice to unmount the filesystem before shutting down the server.
|
1 |
fusermount -u <mount_directory> |
Let’s change the present working directory to home.
|
1 |
cd ~ |
Issue the following command to unmount the dmv1 file. In this case dmv1 is the mount point.
|
1 |
fusermount -u ./dmv1 |
![]()
Wrapping Up
Microsoft’s initiative gives us the ability to consume DMVs related data from the command line in a Linux world. I’m looking forward to seeing more features in this tool!
Highlights
- Support for Custom Query execution
- Data can be viewed as JSON
- Bash supports utilities such as cut, grep, sed, and awk, etc.
- Projection of the live/real time DMV data
- Cross-platform tools which work on both SQL Server on Windows as well as SQL Server on Linux
- DBFS is available for Ubuntu, RedHat Enterprise Linux, and CentOS as of writing this article.
References
- https://blogs.technet.microsoft.com/dataplatforminsider/2017/05/17/try-new-sql-server-command-line-tools-to-generate-t-sql-scripts-and-monitor-dynamic-management-views/
- https://github.com/Microsoft/dbfs
- http://rpm.org/
- https://fedoraproject.org/wiki/EPEL
This document contains proprietary information and is protected by copyright law.
Copyright © 2026 Red Gate Software Limited. All rights reserved
Load comments