
For many DBAs, choosing an appropriate SQL Server installation is a lot like ordering breakfast at a diner: there is something to suit all appetites, tastes and budgets, and the range of choices can often be mind-boggling. A sample SQL Server breakfast menu might look something like this:
The Express Breakfast (For the cost-conscious)
- 1 SQL Server Express on top of a Windows XP Professional
- 1 large hard drive
- 2 Gig of RAM
The Continental (Enough to hold you over for a while)
- 1 SQL Server Standard Edition 32 bit on Windows Server 2003 Standard
- 1 instance of Reporting Server
- 1 instance of Analysis Server
- 250 Gig RAID 5 Disk Subsystem
- 4 Gigs of RAM
The Deluxe (When cost is no barrier to hunger)
- 1 SQL Server Enterprise Edition 64 bit Clustered
- 2 Windows Server 2003 Enterprise Edition servers
- 1 RAID 10 1TB Data Partition
- 1 RAID 10 200G Log Partition
- 1 RAID 0 100G TempDB Partition
- 64 G of RAM
It is the DBA’s task to choose the SQL Server configuration that most accurately reflects the specific needs of a given project, whether it is for cost-conscious deployments, high availability, data analysis or high-performing online transactions for a critical business application. In this article, I will investigate the myriad available installation options and propose a custom post-installation script with which to automate the most common configurations.
Specification, installation, configuration
Once the project has been decided, there are many ensuing steps to climb to get from concept to full deployment. Installing SQL Server on the chosen platform is, in reality, only a small part of the overall pre-production setup process. Pre-installation, you have the planning stage, where you need to define the capacity, memory and CPU requirements, and required disk subsystems for your physical server(s). Post-installation, the true work begins, when it is time for configuration. Fortunately, both of the rote tasks of installation and configuration can be automated, to some degree.
Specifying the physical server
Generally, the size of a given project, in terms of the number of expected users, amount of data to be stored, and so on, will dictate the capacity of the physical server, or servers, that comprise the SQL Server installation. The sort of breakfast that lands on your plate is likely to differ wildly, depending on whether you work for the ubiquitous “mom and pop” shop, or a large enterprise. In the former case, you may well find yourself ordering the parts for the servers yourself, and putting them all together, before moving on to the SQL Server installation. If you are a DBA at the Fortune 100 end of the scale, you may never even get to see your servers, let alone build them! You will just be informed, by way of an e-mail from the server administration team, that your server is powered up, with the base OS installed, and ready to endure your SQL witch-trickery.
In my career, I have sampled both the self-service buffet and the gourmet tasting menu. While I consider it a luxury to no longer have to have to build my own servers, I would not trade that experience. I am often asked how important it is for a DBA to have a technical understanding of networking, storage or even Windows Server systems. In my opinion, it is critical. I could go as far as to say that every DBA should spend two years working in technical support, troubleshooting problems and building systems from the ground up. But that is topic for a different book. Suffice to say here that, regardless of whether you are building your own server or having it delivered on a silver platter, it’s vital that a DBA understands a few important components of that physical server, and the factors that affect how you choose these components.
RAM
SQL Server, like any other application, is going to use memory. RAM, like CPU and disk arrays, comes at a cost and how much RAM you are going to need depends on several factors. If you know that you will have 250 users connected simultaneously to a 200 Gigabyte database, then 4G of RAM on SQL Standard 32-bit and Windows 2003 is not going to be enough.
Without wishing to be overly formulaic, I will say that connections come at a RAM cost. More connections equals more RAM. SQL Server will run comfortably in 1G of memory, but you would not want to roll out a production server on that amount. Ironically, one of the most important factors to consider is one that a DBA has very little control over: what application is going to access your beloved database objects? Is it “homegrown” or “third-party”? This is an important question because, if you do not “own” the database schemas, you could find yourself unable to employ basic performance tuning techniques, like adding indexes. In these situations, you are at the mercy of the vendor, whose recommendation is often to “add more RAM,” even when all that is required is to add an overlooked index.
At this planning stage, it is always safer to overestimate the need for memory. Get as much as you “think” you will need, and more if performance outweighs cost, which it should. Note though, that buying the additional physical RAM is not the only cost and is seldom the cure. You will also have to purchase software that can support the additional RAM and this might mean, for example, buying Windows Server Enterprise instead of Standard Edition.
CPU XE
Specifying processor requirements for a SQL Server is a slightly more complex task than specifying RAM. For one thing, software such as SQL Server can be licensed per processor. This can be quite expensive. As a DBA, you must understand the difference between the different processor types. For example, is the processor 32- or 64-bit architecture? Is it single-core or multi-core, meaning you can gain additional virtual processors with one physical processor? If it is multi-core, is it dual-core or quad-core, or octa-core? I’m not even sure if that last one exists yet, but it probably will soon.
Why is it important to know the answer to all these questions? Well, you do not want to be the DBA who relays to your boss that your new 2-proc, quad-core SQL Server is going to require 8 “per proc” licenses when, in fact, it will only require 1 license per “physical” processor, even if SQL Server will use all 8 cores.
The speed of the processor is important as well; what Gigabytes is to RAM, Gigahertz is to processors in determining how your new server is going to perform. Take a little time up front to investigate the server specifications, especially if someone else was responsible for ordering it. It will save you 3 months of pain later on, when the server is ill-performing.
Disk subsystem
The choice of disk subsystem is the most difficult pre-installation hardware decision that the DBA has to make. There are just so many options. Fortunately, you have put together the documentation for your SQL Server infrastructure that will help you narrow down the choices, right? You know, for example, that your performance requirements dictate that you are going to need RAID 1-0 data and log partitions, with a separate volume allocated for TempDB split across as many spindles as possible.
OK, so you don’t have that document; not a big deal. If you are able to at least have a RAID 5 configuration then you are off to a good start. It is also worth noting that if you are installing SQL Server in a clustered environment, you will need to have a shared disk array, typically implemented via a Storage Area Network (SAN) back end.
Free tools are available for you to stress test the disk subsystem of the SQL Server installation, prior to moving it to production. One such tool is SQLIO, provided by Microsoft:
Ready to install – almost
So, you have your server built and are ready to install SQL Server. Let’s say that you have chosen to install a 32-bit version of SQL Server 2008 Standard, on Windows 2003 Enterprise, with 16 Gigabytes of RAM. You have been given a 350 Gigabyte data partition, and a 200 Gigabyte partition for the logs and TempDB.
One thing you can take comfort in is that this will be your server, at least for the next several hours. If you’re lucky, and the project is not as urgent, you may even have a day or two. For this short, precious time, you have total control of this server and can do with it whatever you will. Of course, you want to get the installation right and this is where having an established, standard set of installation procedures is priceless.
The pre-installation checklist
Some DBAs I know look at each server installation as an entirely new experience. It becomes second nature to them to install, prep and release a SQL Server into production. However, mistakes can and will happen. You rattle through the installation process as normal, declare the server live, and then move on to other tasks, not realizing that you have missed a small but important step. Later, or probably sooner, someone discovers that the server is not sending mail, or that a new database has not had a log backup and has filled up the log drive, and all hell breaks loose.
It is a painful experience so, before you hunker down to install SQL Server, you will want to review your SQL Server Installation Check List. It will contain multiple instructions for different versions of SQL Server. Many of the configuration options, such as the collation of the SQL Server instance, are best set during installation so it is important to know beforehand what options you need to choose.
Check lists will vary for everyone but there are a few configurations that will be common to all lists. For example:
- Data and Log File Standard Location
- Data: E:\DataFiles
- Logs: F:\TLogs
- Service Account: (Created service account and grant local privileges)
- TempDB Location
- T:\TempDB
- Special Permissions (memory – AWE)
- Lock Pages in Memory
- Boot.ini
- Configure for /PAE switch if 32 bit Windows 2003 and SQL Server Standard or Enterprise
- Additional vendor-supplied (Non SQL) applications
- Defragmentation
- SQL Backup Compression
Automated command line
Having gathered together your pre-installation information, it’s time to install. We will place our DVD into the drive, or mount our ISO, and double-click Setup.exe. Yeah … sure we will.
Installing SQL Server is, at best, a mundane task. If you do it twice a month then it is probably OK to simply springboard through the GUI installation wizard, manually choosing, clicking, and typing your way to a successful install. However, for me and many other DBAs, standardization and automation are important. A constant theme of this book is that whenever a task can be simplified, automated and repeated, you should make it so.
Installation is no exception. I need a standard install process that can be controlled programmatically, in order to eradicate costly mistakes. As such, I want to avoid the GUI-driven installation altogether. Fortunately, Microsoft continues to support command line installs and that is what I will be demonstrating here: how to automate the installation with setup options, from the command line.
I’ll begin by examining some of the installation options available for SQL Server 2008. There are many optional parameters that I’ll ignore, but several that are required. I’ll show how to string together the command line and execute it on your new server. When it is done, assuming there are no errors, you will be ready for the real fun. If there are errors, then refer to my previous comment about the 2 years spent in Help Desk. They will stand you in good stead, as you will need every ounce of perseverance to solve any issues. I have read volumes in the various SQL Server forums on installation errors and how to overcome them. However, let’s assume, as is typical, that there will be no errors.
To get a full list of all of the available command line installation options for SQL Server 2008, including the valuable samples, simply run Setup /?, as shown in Figure 1.
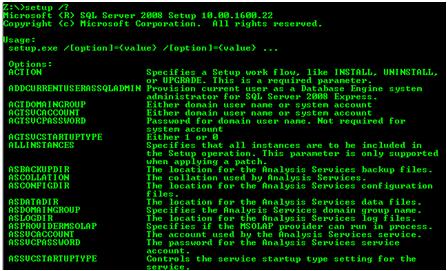
Figure 1: A few of the command line setup options.
Figure 2 shows the different, less friendly outcome performing the same step for SQL Server 2005.
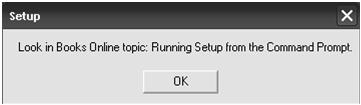
Figure 2: If you want the answer look in Books Online.
Once you’ve picked the options that are right for your install, you simply need to string them together on the command line noting that, for a SQL Server 2008 installation, there are several required options. Listing 1.1 shows a sample command for automating an install.
|
1 |
setup.exe /QUIETSIMPLE /ACTION=install /FEATURES=SQL,Tools /INSTANCENAME=MSSQLSERVER /SQLSVCACCOUNT="Network Service" /SQLSYSADMINACCOUNTS="domain\username" /AGTSVCACCOUNT="NT AUTHORITY\Network Service" /SECURITYMODE=SQL /SAPWD="*********" /SQLTEMPDBDIR="C:\TempDB\\" /SQLUSERDBDIR="C:\SQLData\\" /SQLUSERDBLOGDIR="C:\SQLLog\\" |
Listing1.1: A sample command line install.
Most of the options are intuitive. For example:
- /ACTION – this is required. It simply specifies whether the action is an install, update or uninstall. In this case, I am going to install.
- /FEATURES – determines what SQL Server features to install. The choices are “SQL, AS, RS, IS, Tools”. For this install, I chose SQL and Tools, which will install the SQL Database Engine and tools such as SQL Server Management Studio, Business Intelligence Developments Studio and configuration tools. I chose not to install Analysis Services (AS), Reporting Services (RS) or Integration Services (IS).
Each feature also has its own set of properties, such as service account credentials and installation location.
Running the command initiates the installation. If you choose the /QUIETSIMPLE option, as I did here, then you will be able to view the progress of the installation. However, there will be no user interaction. If the command executes as expected, you’ll see something similar to that shown in Figure 3, reporting the progress of the installation.
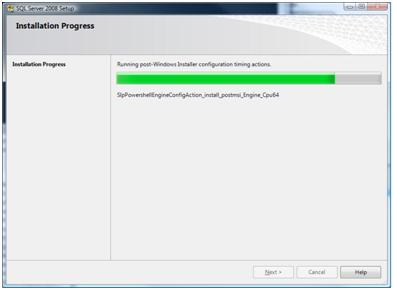
Figure 3: SQL Server 2008 installation progress.
When complete, you will have a fully installed SQL Server 2008 instance, complete with tools. There is a good chance that you will not encounter any errors. However, if you do, especially if you chose the silent mode installation, then you can review the Summary.txt file, which captures any errors during installation. You’ll typically find the file in the <Install Drive>:\Program Files\Microsoft SQL Server\100\Setup Bootstrap\Log folder.
As a DBA, you will find that it is par for the course that people bring their troubleshooting installation problems to your door, and you will be looked upon as an expert even though you may not have seen the specific error before. Knowing where to look will at least buy you time to formulate a rational answer. Of course, as DBA, you or your team should be performing all SQL installations anyway, so you can always question why whoever got the error was brazen enough to attempt the install in the first place.
If you have a service pack or hotfix to apply to your SQL Server installation, an obvious next step, then you can automate the service pack installation in the same way, by executing the setup.exe of the service pack with command line options.
NOTE: Starting with service pack 1 for SQL Server 2008, you can now “slipstream” service packs for SQL Server, much like you can do for Windows service packs. See http://msdn.microsoft.com/en-us/library/dd638062.aspx#Slipstream for further details.
Installation done, now to configure
As I said earlier, installing SQL Server is the easy part. Once that portion of your pre-production process is done, you still have many more options to configure. Making the right choices will ensure that your SQL Server performs as you want it to, and play amicably with whatever application will be beating it up every day. Truly, that is what is going to happen. I have heard it said, only half-jokingly, that the one thing you know will hinder the performance of SQL Server is to release it to a production application.
In many organizations there exists a special area, call it staging, QA (Quality Assurance) or Pre Production Modeling, where the entire system is deployed and tested prior to a move to production. If you, as DBA, have the luxury of a QA environment, you will at least know that, functionally, your server configuration is performing as it should. However, often the QA environment is not an exact physical copy of Production. For example, your SQL Server in QA may have only 4 Gigabytes of RAM and not 8. It is important to account for these performance differences.
Standard configuration options
Throughout the version history of SQL Server, several configuration options, though similar in name, functioned differently depending on a number of factors. For example, “AWE enabled”, “min server memory” and “max server memory” are all configurable options in SQL Server 2000, 2005 and 2008. However, they behave differently depending on the edition of SQL Server (standard, enterprise or data center), as well as on the operating system on which SQL Server is running. For example, SQL Server 2005 and 2008 Standard Editions allow you to take advantage of all of the memory that the base OS can utilize; for Windows 2003 Server the amount of usable memory is variable depending on whether you have Standard or Enterprise edition, and on whether you have a 32- or 64-bit installation. However, for SQL Server 2000, to take advantage of memory beyond the 4G range, you were required to purchase the Enterprise edition of SQL Server, regardless of the OS version or edition.
With the proliferation of Windows Server 2003, many of these discrepancies have been removed, but they are still very important when setting configuration options. The sample installation being performed here is for SQL Server 2008 but bear in mind that, for each option, there may be a caveat for prior versions.
There are some configuration settings that you will want to change, post-installation, depending on whether you are running a 32- or 64-bit architecture. For example, you will not need to enable AWE for 64-bit architecture, whereas if you do not enable it for 32-bit installations of SQL Server, on Windows 2003 Enterprise, you will not use the memory that you may think you should be using; SQL Server will live within the 2G memory range to which 32-bit applications are generally relegated.
However, there are also options that you will not want to change. Two of these options are “priority boost” and “lightweight pooling”. Changes to these options are typically done only with affirmation from Microsoft Support that it will help and not hinder your environment. In general, please do not change a configuration unless you have thoroughly tested it.
The automated SQL Server configuration script
So, what configuration changes can we automate? There are many, and the base script provided in the next section can be extended to support your particular environment. The options fall into three categories:
- Server-level changes you can make with sp_configure
- Database-level changes you can make with sp_dboption
- Custom configurations that you will apply, specifically custom administrative code, job schedules and DDL triggers.
What follows is the pseudo code for what the configuration script will automate for you. All told, I would estimate that the configuration script will save about 30 minutes of manual configuration effort. More important than the time saving, however, is the fact that this script offers a repeatable and accurate configuration for each server.
- SQL Server Memory
- If 64-bit, do not enable AWE
- If 32-bit SQL 2008 Standard on Windows 2003 Enterprise and RAM is more than 4G
- Set max server memory = 2G less than Total Server Memory
- If 32-bit SQL 2008 Standard on Windows 2003 Standard and RAM is less than 4G
- Set max server memory = 2G
- E-Mail
- If > 2005 automate setup with DBMail SPs
- Send Test Mail
- If < 2005 Document necessity to create MAPI profile
- Print steps to configure e-mail
- If > 2005 automate setup with DBMail SPs
- DDL Triggers
- Add Server Trigger to notify upon database create or drop
- Security
- Set to Log Successful and Failed logins
- DB Maintenance Database
- Create the _DBAMain database
- Create the stored procedures in the _DBAMain database
- Create and Schedule Maintenance Jobs via stored procedures
- Create the _DBAMain database
- Other Modifications
- Change Model Database Options
Listing 1.2 displays the actual T-SQL automation script to implement the above steps, which you can execute against your newly installed SQL Server instance. It is documented at stages to distinguish between server, database and custom additions.
|
1 2 3 4 5 6 7 8 9 10 11 12 13 14 15 16 17 18 19 20 21 22 23 24 25 26 27 28 29 30 31 32 33 34 35 36 37 38 39 40 41 42 43 44 45 46 47 48 49 50 51 52 53 54 55 56 57 58 59 60 61 62 63 64 65 66 67 68 69 70 71 72 73 74 75 76 77 78 79 80 81 82 83 84 85 86 87 88 89 90 91 92 93 94 95 96 97 98 99 100 101 102 103 104 105 106 107 108 109 110 111 112 113 114 115 116 117 118 119 120 121 122 123 124 125 126 127 128 129 130 131 132 133 134 135 136 137 138 139 140 141 142 143 144 145 146 147 148 149 150 151 152 153 154 155 156 157 158 159 160 161 162 163 164 165 166 167 168 169 170 171 172 173 174 175 176 177 178 179 180 181 182 183 184 185 186 187 188 189 190 191 192 193 194 195 196 197 198 199 200 201 202 203 204 205 206 207 208 209 210 211 212 213 214 215 216 217 218 219 220 221 222 223 224 225 226 227 228 229 230 231 232 233 234 235 236 237 238 239 240 241 242 243 244 245 246 247 248 249 250 251 252 253 254 255 256 257 258 259 260 261 262 263 264 265 266 267 268 269 270 271 272 273 274 275 276 277 278 279 280 281 282 283 284 285 286 287 288 289 290 291 292 293 294 295 296 297 298 299 300 301 302 303 304 305 306 307 308 309 310 311 312 313 314 315 316 317 318 319 320 321 322 323 324 325 326 327 328 329 330 331 332 333 334 335 336 337 338 339 340 341 342 343 344 345 346 347 348 349 350 351 352 353 354 355 356 357 358 359 360 361 362 363 364 365 366 367 368 369 370 371 372 373 374 375 376 377 378 379 380 381 382 383 384 385 386 387 388 389 390 391 392 393 394 395 396 397 398 399 400 401 402 403 404 405 406 407 408 409 410 411 412 413 414 415 416 417 418 419 420 421 422 423 424 425 426 427 428 429 430 431 432 433 434 435 436 437 438 439 440 441 442 443 444 445 446 447 448 449 450 451 452 453 454 455 456 457 458 459 460 461 462 463 464 465 466 |
/* SQL Server Automated Configuration Script 2009 - Rodney Landrum */ --Create Temp table #SerProp. This table will be used --to hold the output of xp_msver to control server property configurations SET NOCOUNT ON GO IF EXISTS ( SELECT name FROM tempdb..sysobjects Where name like '>) --If So Drop it DROP TABLE #SerProp create table #SerProp ( ID int, Name sysname, Internal_Value int, Value nvarchar(512) ) GO --Set Show Advanced Option sp_configure 'Show Advanced Options', 1 Reconfigure GO DECLARE @PhysMem int DECLARE @ProcType int DECLARE @MaxMem int INSERT INTO #SerProp Exec xp_msver Select @PhysMem = Internal_Value from #SerProp where Name = 'PhysicalMemory' Select @ProcType = Internal_Value from #SerProp where Name = 'ProcessorType' --Set Memory Configuration from server properties --(memory level and processortype) If @PhysMem > 4096 AND @ProcType = 8664 BEGIN SET @MaxMem = @PhysMem - 3072 EXEC sp_configure 'max server memory', @MaxMem Reconfigure END ELSE IF @PhysMem > 4096 AND @ProcType <> 8664 BEGIN SET @MaxMem = @PhysMem - 3072 EXEC sp_configure 'awe enabled', 1 Reconfigure EXEC sp_configure 'max server memory', @MaxMem Reconfigure END --Setup Database Mail (SQL Server > 2005 ) --Turn on Mail XPs via sp_configure --sp_configure (To turn on Mail XPs) -- Add Profile If @@microsoftversion / power(2, 24) > 8 BEGIN EXECUTE msdb.dbo.sysmail_add_profile_sp @profile_name = 'Admin Profile', @description = 'Mail Profile For Alerts' ; --Add Mail Account EXECUTE msdb.dbo.sysmail_add_account_sp @account_name = 'Admin Account', @description = 'General SQL Admin Account for DBA Notification', @email_address = '<Your DBA e-mail account>, @display_name = 'SQL Admin Account', @mailserver_name = '<Yourmailservername>; --Add Mail Account to Profile EXECUTE msdb.dbo.sysmail_add_profileaccount_sp @profile_name = 'Admin Profile', @account_name = 'Admin Account', @sequence_number = 1 ; --Send Test Mail EXEC msdb.dbo.sp_send_dbmail @profile_name = 'Admin Profile', @recipients = '<Your DBA e-mail Account>, @body = 'Sever Mail Configuration Completed, @subject = 'Successful Mail Test; END ELSE --Print Instructions for SQl Server 2000 BEGIN PRINT 'For SQL Server 2000, you will need to configure a MAPI client' PRINT 'such as Outlook and create a profile to use for SQL Mail and SQL Agent' PRINT 'mail. Instructions can be found at:______________________________' END --Setup Security Logging --Enable Successful and Unsuccessful Login Attempts --SQL Server Services must be restarted to take affect exec master.dbo.xp_instance_regwrite N'HKEY_LOCAL_MACHINE', N'Software\Microsoft\MSSQLServer\MSSQLServer', N'AuditLevel', REG_DWORD,3 --Create Maintenance Database "_DBAMain" USE [master] GO /****** Object: Database [_DBAMain] Script Date: 02/05/2009 20:41:24 ******/ IF EXISTS (SELECT name FROM sys.databases WHERE name = N'_DBAMain') DROP DATABASE [_DBAMain] GO /****** Object: Database [_DBAMain] Script Date: 02/05/2009 20:41:24 ******/ CREATE DATABASE [_DBAMain] ON PRIMARY ( NAME = N'_DBAMain_Data', FILENAME = N'C:\Data\_DBAMain_Data.MDF', SIZE = 5120KB, MAXSIZE = UNLIMITED, FILEGROWTH = 10%) LOG ON ( NAME = N'_DBAMain_Log', FILENAME = N'C:\Logs\_DBAMain_Log.LDF' , SIZE = 3072KB , MAXSIZE = 2048GB , FILEGROWTH = 10%) GO /* Run Script To Create Stored Procedures In _DBAMain */ sp_configure 'xp_cmdshell', 1 Reconfigure exec xp_cmdshell 'sqlcmd -i C:\Writing\Create_DBAMain_2.sql' -- Schedule Indexing Stored Procedure /* Usage: spxCreateIDXMaintenanceJob 'Owner Name' , 'Operator' , 'Sunday' , 0 */ Create Procedure [dbo].[spxCreateIDXMaintenanceJob] ( @JobOwner nvarchar(75) , @ValidOperator nvarchar(50) , @DayToReindex nvarchar(8) , @NightlyStartTime int --230000 (11pm), 0 (12am), 120000 (12pm) ) As BEGIN TRANSACTION DECLARE @ReturnCode INT , @jobId BINARY(16) , @MyServer nvarchar(75) , @SQL nvarchar(4000) , @CR nvarchar(2) SELECT @ReturnCode = 0 , @CR = char(13) + char(10) IF NOT EXISTS ( SELECT name FROM msdb.dbo.syscategories WHERE name = N'Database Maintenance' AND category_class = 1 ) BEGIN EXEC @ReturnCode = msdb.dbo.sp_add_category @class = N'JOB' , @type = N'LOCAL' , @name = N'Database Maintenance' IF @@ERROR <> 0 OR @ReturnCode <> 0 Begin GOTO QuitWithRollback End END IF EXISTS ( SELECT name FROM msdb.dbo.sysjobs WHERE name = N'IDX Maintenance' AND category_id = ( Select category_id From msdb.dbo.syscategories Where name = 'Database Maintenance' ) ) Begin Exec msdb.dbo.sp_delete_job @job_name = 'IDX Maintenance' End EXEC @ReturnCode = msdb.dbo.sp_add_job @job_name = N'IDX Maintenance' , @enabled = 1 , @notify_level_eventlog = 0 , @notify_level_email = 0 , @notify_level_netsend = 0 , @notify_level_page = 0 , @delete_level = 0 , @description = N'Index Tuning' , @category_name = N'Database Maintenance' , @owner_login_name = @JobOwner , @job_id = @jobId OUTPUT IF @@ERROR <> 0 OR @ReturnCode <> 0 Begin GOTO QuitWithRollback End Select @SQL = 'exec spxIDXMaint ' + char(39) + @DayToReindex + char(39) EXEC @ReturnCode = msdb.dbo.sp_add_jobstep @job_id = @jobId , @step_name = N'Index Maintenance' , @step_id = 1 , @cmdexec_success_code = 0 , @on_success_action = 1 , @on_success_step_id = 0 , @on_fail_action = 2 , @on_fail_step_id = 0 , @retry_attempts = 0 , @retry_interval = 0 , @os_run_priority = 0 , @subsystem = N'TSQL' , @command = @SQL , @database_name = N'_DBAMain' , @flags = 0 IF @@ERROR <> 0 OR @ReturnCode <> 0 Begin GOTO QuitWithRollback End EXEC @ReturnCode = msdb.dbo.sp_update_job @job_id = @jobId , @start_step_id = 1 IF @@ERROR <> 0 OR @ReturnCode <> 0 Begin GOTO QuitWithRollback End EXEC @ReturnCode = msdb.dbo.sp_update_job @job_id = @jobId , @notify_level_email = 2 , @notify_level_netsend = 2 , @notify_level_page = 2 , @notify_email_operator_name = @ValidOperator IF @@ERROR <> 0 OR @ReturnCode <> 0 Begin GOTO QuitWithRollback End EXEC @ReturnCode = msdb.dbo.sp_add_jobschedule @job_id = @jobId , @name = N'Nightly Index Tuning Schedule' , @enabled = 1 , @freq_type = 4 , @freq_interval = 1 , @freq_subday_type = 1 , @freq_subday_interval = 0 , @freq_relative_interval = 0 , @freq_recurrence_factor = 0 , @active_start_date = 20080101 , @active_end_date = 99991231 , @active_start_time = @NightlyStartTime , @active_end_time = 235959 IF @@ERROR <> 0 OR @ReturnCode <> 0 Begin GOTO QuitWithRollback End EXEC @ReturnCode = msdb.dbo.sp_add_jobserver @job_id = @jobId , @server_name = N'(local)' IF @@ERROR <> 0 OR @ReturnCode <> 0 Begin GOTO QuitWithRollback End COMMIT TRANSACTION GOTO EndSave QuitWithRollback: IF @@TRANCOUNT > 0 Begin ROLLBACK TRANSACTION End EndSave: GO --Create Index Maintenance Job EXEC _dbaMain..spxCreateIDXMaintenanceJob 'sa' , 'sqlsupport' , 'Sunday' , 0 --Setup DDL Triggers --Setup Create Database or Drop Database DDL Trigger /****** Object: DdlTrigger [AuditDatabaseDDL] Script Date: 02/05/2009 19:56:33 ******/ SET ANSI_NULLS ON GO SET QUOTED_IDENTIFIER ON GO CREATE TRIGGER [AuditDatabaseDDL] ON ALL SERVER FOR CREATE_DATABASE, DROP_DATABASE AS DECLARE @data XML, @tsqlCommand NVARCHAR(MAX), @eventType NVARCHAR(100), @serverName NVARCHAR(100), @loginName NVARCHAR(100), @username NVARCHAR(100), @databaseName NVARCHAR(100), @objectName NVARCHAR(100), @objectType NVARCHAR(100), @emailBody NVARCHAR(MAX) SET @data = EVENTDATA() SET @tsqlCommand = EVENTDATA().value('(/EVENT_INSTANCE/TSQLCommand/CommandText)[1]','nvarchar(max)') SET @eventType = EVENTDATA().value('(/EVENT_INSTANCE/EventType)[1]','nvarchar(max)') SET @serverName = EVENTDATA().value('(/EVENT_INSTANCE/ServerName)[1]','nvarchar(max)') SET @loginName = EVENTDATA().value('(/EVENT_INSTANCE/LoginName)[1]','nvarchar(max)') SET @userName = EVENTDATA().value('(/EVENT_INSTANCE/UserName)[1]','nvarchar(max)') SET @databaseName = EVENTDATA().value('(/EVENT_INSTANCE/DatabaseName)[1]','nvarchar(max)') SET @objectName = EVENTDATA().value('(/EVENT_INSTANCE/ObjectName)[1]','nvarchar(max)') SET @objectType = EVENTDATA().value('(/EVENT_INSTANCE/ObjectType)[1]','nvarchar(max)') SET @emailBody = + '--------------------------------' + CHAR(13) + '- DDL Trigger Activation Report -' + CHAR(13) + '--------------------------------------' + CHAR(13) + 'Sql Command: ' + ISNULL(@tsqlCommand, 'No Command Given') + CHAR(13) + 'Event Type: ' + ISNULL(@eventType, 'No Event Type Given') + CHAR(13) + 'Server Name: ' + ISNULL(@serverName, 'No Server Given') + CHAR(13) + 'Login Name: ' + ISNULL(@loginName, 'No LOGIN Given') + CHAR(13) + 'User Name: ' + ISNULL(@username, 'No User Name Given') + CHAR(13) + 'DB Name: ' + ISNULL(@databaseName, 'No Database Given') + CHAR(13) + 'Object Name: ' + ISNULL(@objectName, 'No Object Given') + CHAR(13) + 'Object Type: ' + ISNULL(@objectType, 'No Type Given') + CHAR(13) + '-------------------------------------------'; EXEC msdb..sp_send_dbmail @profile_name='Admin Profile', @recipients='<yourmail@yourmail.com>, @subject='DDL Alteration Trigger', @body=@emailBody GO SET ANSI_NULLS OFF GO SET QUOTED_IDENTIFIER OFF GO ENABLE TRIGGER [AuditDatabaseDDL] ON ALL SERVER GO -- Change Model Database Recovery Option from Full to Simple -- This will prevent unmitigated log file growth. ALTER Database Model SET RECOVERY SIMPLE -- Turn configurations back off sp_configure 'xp_cmdshell', 0 reconfigure sp_configure 'Show Advanced Options', 0 Reconfigure -- End Script PRINT 'All Done...Add Server to DBA Repository for further documentation' |
Listing 1.2: The SQL Server automated configuration script.
Using the above script you will, in about 3 seconds, have configured many options that might have taken 30 minutes to do manually. Without such a script it is very easy to miss an important configuration such as setting the model database to “simple” recovery mode.
This script is a mere sampling of what you can control and automate, prior to releasing the server into the wild. As we proceed through the rest of the book, I will demonstrate many more scripts that can be used to make your life easier, freeing up more of your time to write or extend your own scripts and then give them back to me so I can use them. Ha!
Bon Appétit
Just because your server installation is now complete, and is stepping out into the real world to be eaten alive by various applications, it is by no means out of your hands. No, now you have the task of protecting it. Every day. The first step toward that goal is to make sure you monitor, maintain and document the server during the course of its life.
This article is taken from Chapter 1 of his book, SQL Server Tacklebox. You can buy a hard copy of the book from Amazon.com, or download a free e-copy from Simple-Talk
This document contains proprietary information and is protected by copyright law.
Copyright © 2026 Red Gate Software Limited. All rights reserved
Load comments