
Source control is fundamental when dealing with projects and sharing code between multiple developers.
Power BI present some challenges related to source control. But it’s finally providing us with a solution to these challenges. Let’s analyse this piece-by-piece. According to your previous knowledge, you may would like to skip some section of this article. This is the structure I will use:
- Process Planning: The beginning
- The current challenges between source control and Power BI
- GIT 101
- Sample repository
- The new features related to source control and Power BI
- Process Planning: What more we can do
Note: Sections with a prefix of TODO are sections you can execute, in the middle of sections with concept explanations. The steps are numbered consistently throughout the steps.
According to your previous knowledge about GIT, you can choose to skip some of the sections of the article.
Pre-Requisites
- Have GIT Bash installed to follow the sample. You can download from this link
- Visual Studio Code installed to follow some of the samples. You can download from this link.
- A GIT compatible repository, we recommend Azure Devops. You can follow these steps
- A Power BI file, with data and report
Process Planning and possibilities
The development of the BI reports requires a development process, in a similar way as regular software development. The development process requires at least 3 environments:
- Development environment
- Test Environment
- Production Environment
We need a process to coordinate the evolution of the source code produced between the environments: From Development to Test, from Test to Production.
Before source control, Power BI already had the development pipelines for this purpose. The movement of the reports from one environment to the other can be done manually in the portal or automatically using Azure DevOps.
I have a video on YouTube that you can watch if you want to learn more about how to use the deployment pipelines
The challenge we have is to design a new process including the source control features and deciding what is the best option for each scenario.
Let’s consider 3 possibilities:
- Use source control together Deployment Pipelines
- User source control without Deployment Pipelines
- Use source control with a single developer
Below I explain these 3 scenarios. Could you imagine additional ones? Let’s talk about it in the comments.
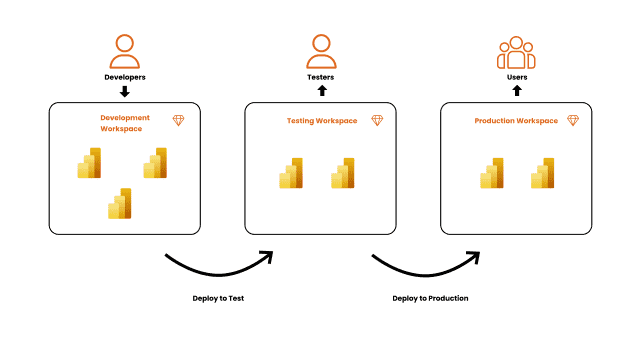
Use source control together Deployment Pipelines
In this scenario, the deployment pipelines are the responsible to move the product between environments.
The Development environment needs to be linked to a repository, but the Test and Production environment have no need of a repository. The movement from Dev to Test and then to Production will be responsibility of the deployment pipelines.
This scenario ends up being like the Data Factory and Azure Synapse source control: only the Development environment requires a repository, the upper environments don’t need one.
Next Steps
Let’s understand the technical features Power BI offers for source control first, so we can analyse deeply the additional architectural options.
Power BI and Source Control: The current challenges
These are the current challenges to using Power BI in a source control scenario:
- Power BI files have binary content
The binary content doesn’t work so well with source control. The main purpose of the source control is to allow developers to work on the files an make it possible to merge the results. Using a binary file, this is not possible. - Power BI files contain data
ThePBIXfile contains the data gathered during the dataset refresh. Usually, we don’t want to send data to source control, we send only text files we can compare to find the differences implemented by the developer.
In fact, the original PBIX file is a .ZIP file with a different extension. If you rename the file as .ZIP and open it, you can see the individual files. However, they don’t have extensions and are not built with source control in mind.
GIT Basic Concepts
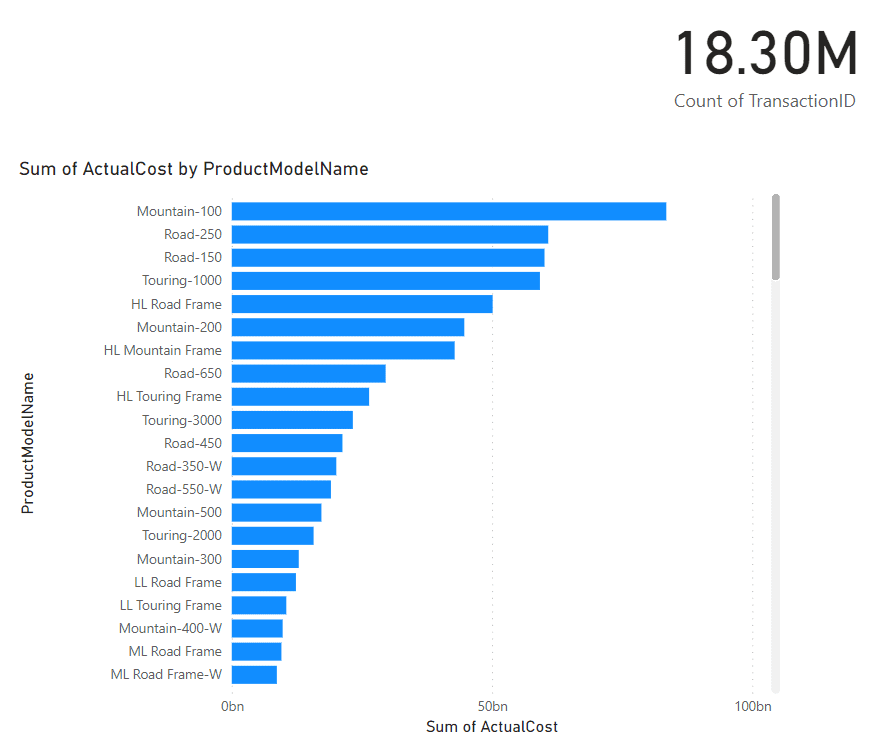
The image below summarizes most GIT concepts you need to know to make a good use of source control in Power BI
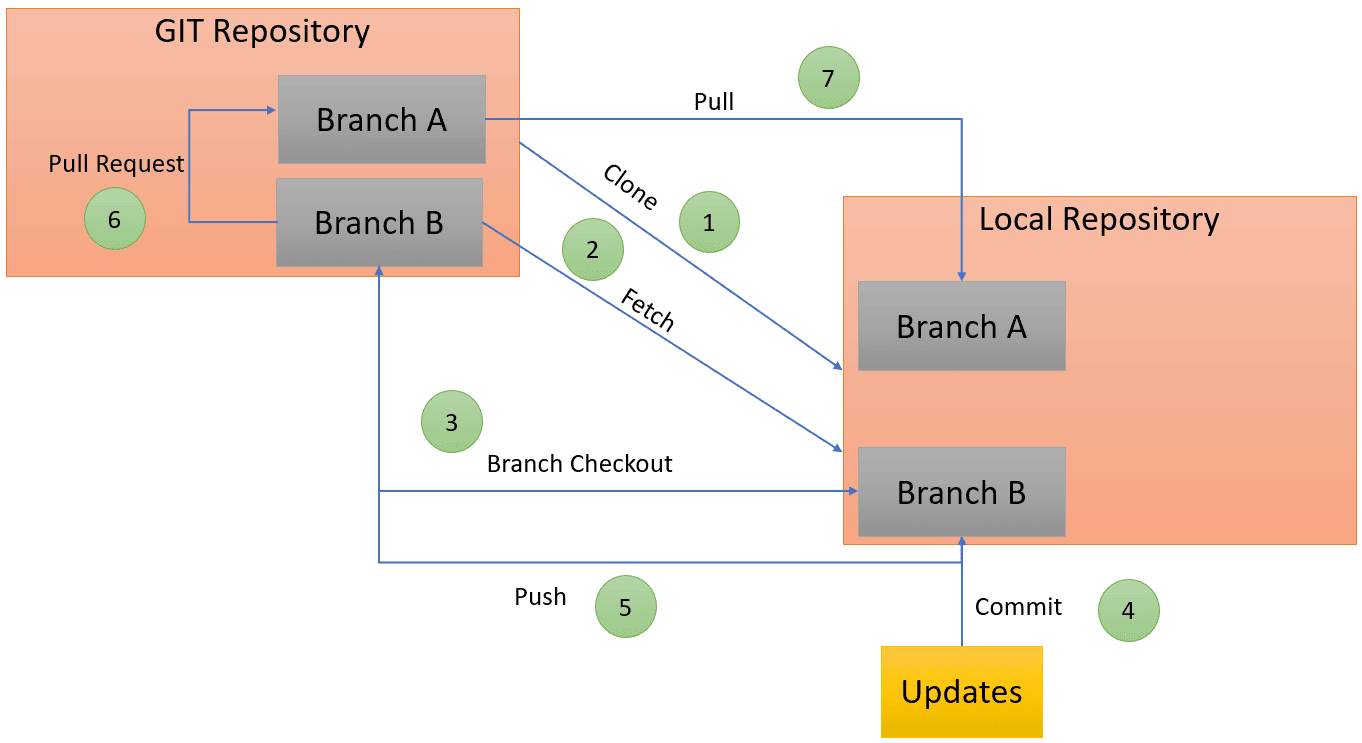
The following list summarizes at a high level, the process to using GIT to source control your files.
- The remote repository is CLONED to the local machine. The clone becomes a folder in the local machine. This folder is configured as a local repository.
All the existing branches in the moment of the CLONE are created in the local repository. If the Branch B is created later, the local repository will not have the Branch B included. - A FETCH operation can be triggered by the local repository. The fetch brings to the local repository the knowledge of existence of new branches on the server.
- A CHECKOUT operation can be done to change the current branch to another one.
Each branch has different versions of the files. A CHECKOUT operation replaces the files in the repository folder by the version contained in the branch. In this way you can work in different versions at any moment. You only need to CHECKOUT the branch you would like to work with.
The CHECKOUT process can generate different results:- Change a local branch by another local branch
- Retrieve a remote branch to the local repository
- Create a new branch
- When you update the files in the local repository, you need to create a COMMIT. Basically, it means packing your changes together to be sent to the remote repository.
- Once the local development is completed, the commits need to be PUSHED to the remote repository, updating the remote branch. On the image above, the Branch B is updated.
- Branch B and Branch A have two different versions of the project in the remote repository. The versions need to be synchronized.
The synchronization process involves a request, which is called
PULL REQUEST. This happens because there are multiple possible scenarios. Here are some of the possible scenarios:- The branches may be created by different developers. One developer may need to approve what the other developer produced
- The target branch may be a test or production environment and the process involves publishing to a new environment. In some cases, may even include CI/CD process.
- The procedure may include a code review. The
PULL REQUESTmay be subject to approval by other developers or the team leader.
- After the
PULL REQUEST, theBranch Aon the server repository is more updated than theBranch Ain the local repository. The developer needs to execute aPULLfrom the server to the local repository to update the local branch.
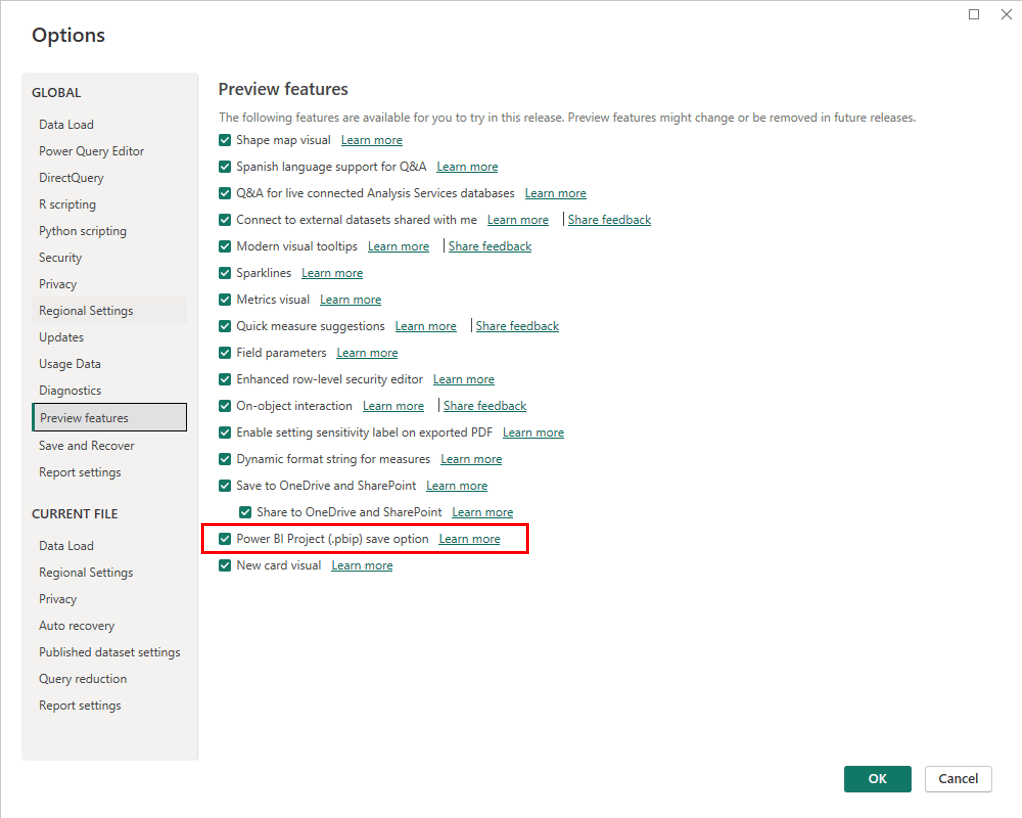
TODO: Save a Power BI Project
The Power BI Project is a preview feature. Before we can use it, we need to enable the feature. Once in Power BI, use File -> Options and Settings -> Options -> Preview Features and enable the Power BI Project (.pbip) save option
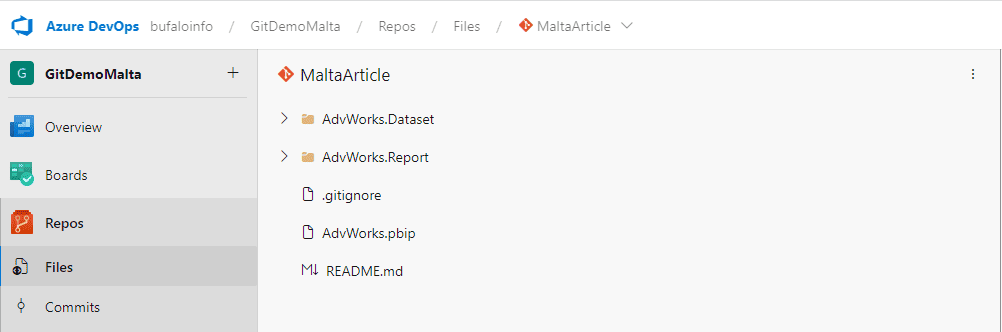
- Create a folder to be your local repository
- Open your sample Power BI file (
PBIX) - Save the project using File-> Save As
- Click Browse this device to choose the correct folder
- Change the file type to
PBIP
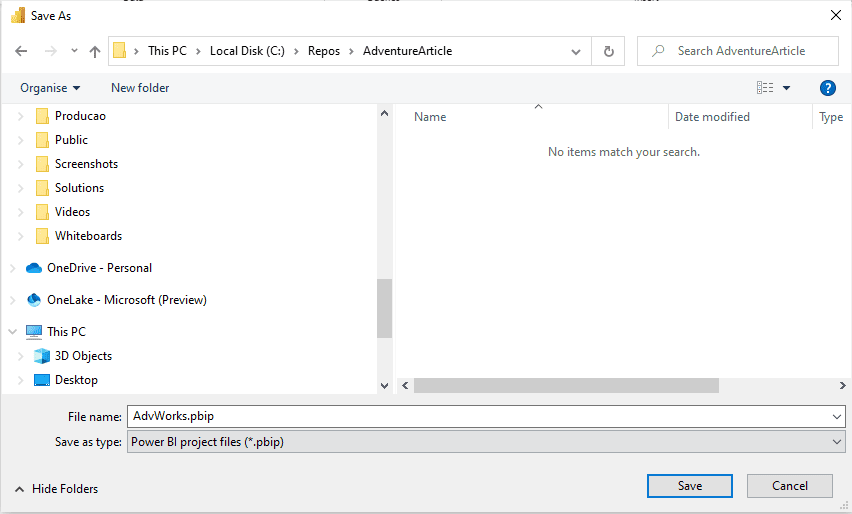
- Save the file
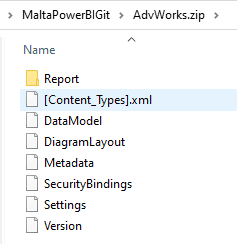
The Power BI Project
The Power BI Project File, PBIP, is not a single file by itself. When we save a PBIP, the content of the Power BI file is broken down in many different files.
The main points related to the files created by the Power BI project are the following:
- The PBIP file is created in the root of the folder
- Two subfolders are created, one for the reports and one for the dataset
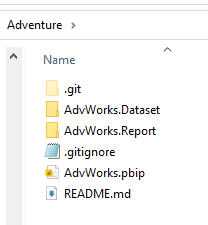
- For each folder, dataset and report, a file
item.config.jsonand a fileitem.metadata.configare created. This file is used by Power BI to identify the content of the folder as a single object (a single dataset or a single report).
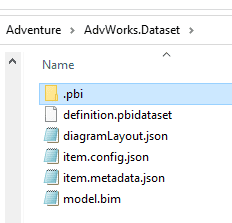
- Both folders contain a subfolder called “
.PBI”. This folder is intended to contain files intended to be local, not included in the remote repository. - The “
.PBI” folder inside the dataset folder contains a file calledcache.abf. This file contains all the data generated by dataset refreshes. In this way, the data is never uploaded to the repository, only the object definitions.
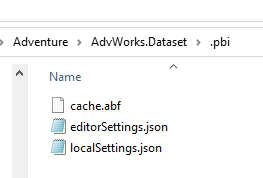
- A
.gitignorefile is created in the root folder. It ignores the “.PBI” folders, which makes them local files (that will not be version controlled). - The report definition is saved in a file called
report.json. As a JSON file, it becomes easier to make merges when two developers work on the same report at the same time. - The dataset definition is stored in a file called
model.bim, also in JSON format to help concurrent work.
It’s also possible to save multiple PBIP files in the same folder. The files keep a reference with each other and the folders, not allowing the objects to be mixed
TODO: Initialize the local Repository and link to the remote one
This step needs to be taken after your remote repository is ready. In this example, I will use GIT BASH, a command line tool. This is GIT 101, you can do this step with different tools and skip this section if you already have this knowledge.
This continues on the steps taken in the previous TODO section.
- Open git bash
Change the current folder to the folder with the
PBIPfiles - Use
CD C:/repos/Adventurefor this (the path is an example, of course). - Use
GIT INIT
This statement initializes the folder as a local repository, creating the special git file on the folder “.GIT” - Use
GIT ADD. GIT ADDincludes files to be tracked by GIT. The “.” Is telling to include everything, including subfolders. The files will be considered new files, not committed yet.- Use
GIT COMMIT –m“First Commit”
We are committing the files we just added to the local repository, including a commit message.
At this point, the local repository is created and has its first commit, but it’s not linked to the remote repository yet. - Use
GIT REMOTE ADD ORIGIN <<your remote repository>>
“ORIGIN” is not a statement, rather it is the name given to the remote repository. It’s very common to use “origin”, because usually we have only one. But you can use any name you would like. - Use
GIT FETCH
The local repository needs to discover what branches exist remotely before we link local branches with remote branches - Use
GIT BRANCH –SET-UPSTREAM-TO=ORIGIN/MAIN
This links the local current branch (usuallyMAIN) to the remoteMAINbranch.
The remote repository usually already has at least aREADMEfile. The local repository has the initial commit with our Power BI project. This means the repositories have a different history. This history needs to be synchronized. We will use the next three commands to synchronize the remote history with the local history. - Use
GIT REBASE - Use
GIT PUSH

The image below is the repository on Azure Devops after the last GIT PUSH
TODO: Link the Power BI Workspace with the repository
Power BI will get the files from the workspace. We need to link a repository to the workspace. It’s interesting how this new process will make the publish from the power bi desktop redundant.
- Create a workspace, if you don’t have one for this purpose yet
- Click Workspace Settings
- On WorkSpace Settings window, click GIT Integration
- On Organization dropdown, select your organization. Your Power BI account needs access to your repository
- On Project dropdown, select the project. Power BI will show the projects you have access to.
- On GIT Repository dropdown, select the name of the repository
- On Branch dropdown, select the name of the branch. The branch is the only setting you can change later without disconnecting from the repository.
- On GIT Folder textbox, type “/” . We will link the workspace with the root folder. Different folders in the repository, including subfolders, will be ignored.
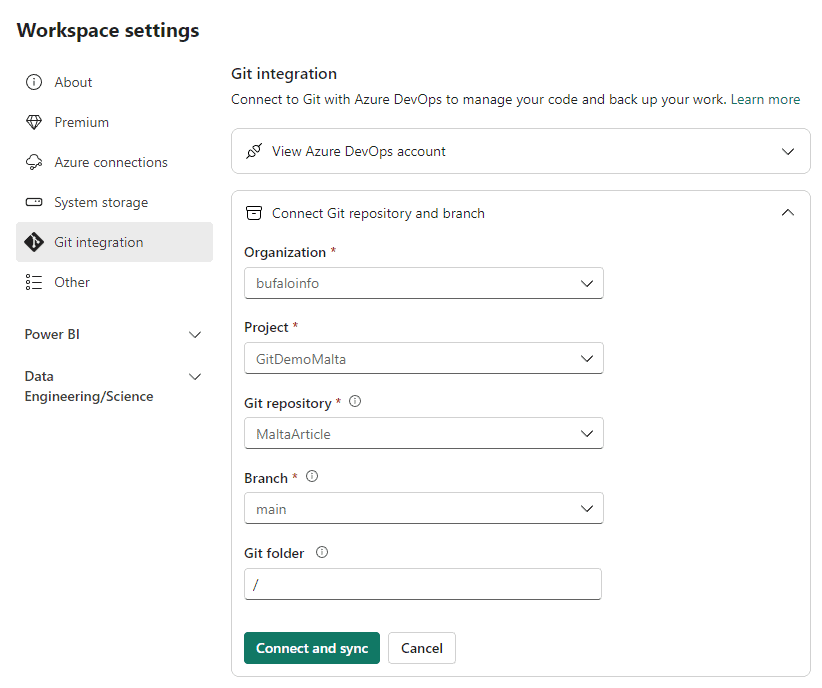
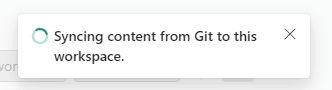
- Click the button Connect & Sync
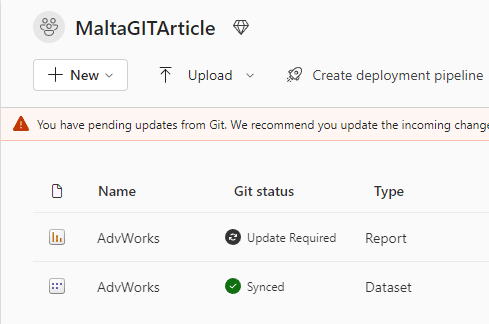
After syncing for a while, you will be able to see the files in the repository. Note that the Power BI Publish command was not used. There is a good potential for the Publish command to become redundant.
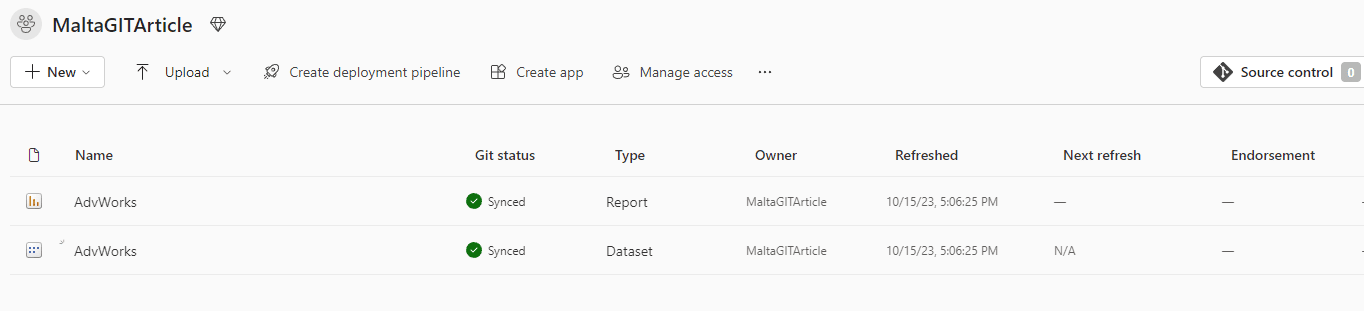
- Open the report
There is no data on the report. This illustrates how the data from the Power BI Desktop is never uploaded to the repository and doesn’t reach the portal.
- On the Dataset, click the Expand button => Settings
- Under Data Source Credential, click Edit Credentials in the image below to fix the dataset credentials. You may notice the error message complaining about the credentials.
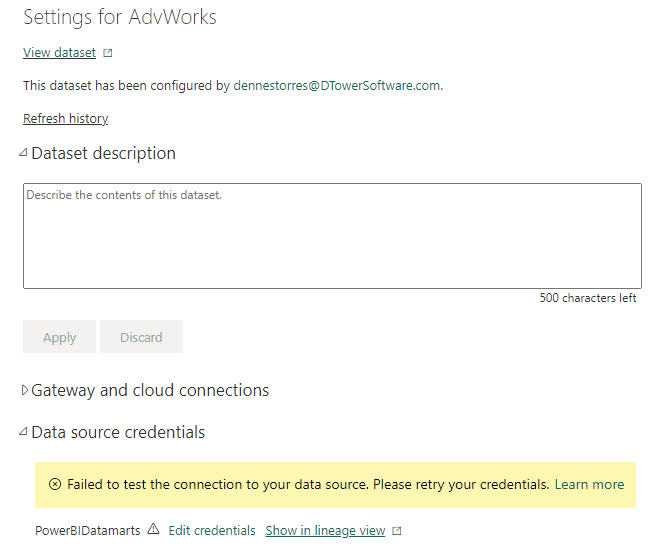
- Back to the workspace, click the Refresh Now button.
- When the refresh is complete, open the report again.

Considerations about the link between the Workspace and the Repository
The folder is one of the key values we need to choose when linking the workspace with the source control. Choosing a folder is a difference between linking the workspace to the entire repository or with one specific folder of the repository. This brings many different process options to be chosen on the correct situation:
- We can have a repository containing a bigger data engineering project, where the power bi workspace is only a piece of the project, contained in one of the folders.
- We can have a single repository containing multiple workspaces, each workspace in a different folder.
- We can have one repository for each workspace, linking the workspace with the root folder
Can you think about more possibilities? Tell me in the comments.
Once we define a process to work with source control, the Publish from Power BI Desktop will not need happen anymore. We will only need to push to a repository and the repository linked to the workspace. The portal will synchronize with the repository.
When you open the report, you will notice it’s completely empty. The data was never published to the repository. In this way, the reports appear empty until we make the first dataset refresh.
Even so, the data will not be published to the repository. You may remind the PBIP generation created a .GitIgnore file which excludes the data. In this way, the dataset refreshes are independent of the source control and branch checkouts. We will see more demonstrations of this further in this article.
Workspace and Source Control: Technical Features
The user can see, use and change the integration with the source control on the following ways:
- Status column in the list of objects
- Source Control button on top of the screen
- Workspace Settings-> Git Configuration
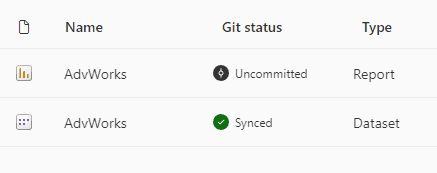
Status column
The status column points how the object is in relation to the source control. There are some examples ahead on the article. The status column can have the following values:
- Synced: The file is in sync, nothing is needed.
- Update: The file is updated on the repository. Someone pushed changes to the repository. A pull is needed on the workspace.
- Uncommitted: The file was updated on the portal. Someone opened a report, for example, and changed it on the portal. A commit is required.
- Conflict: Someone pushed new changes to the repository, but at the same time there were changes on the portal as well, creating a conflict. A merge process is needed when pushing to the repository.
- Item Identical: The item is the same on the workspace and on the repository, but the commits don’t match.
- Unsupported: The item is unsupported. As a result, It’s independent of the link to the source control, doesn’t change together the branches.
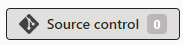
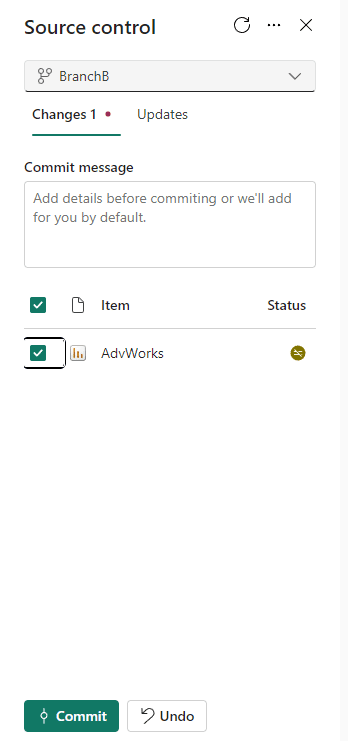
Source Control Button
Using the Source Control button, on the top of the Power BI portal, you can execute the following tasks:
![]()
- Pull: When the files are with “Update” status, you would like to pull them from the repository
- Uncommitted: When the files are on the “Uncommitted” status, you would like to commit them. Usually, the commit is to a local repository, but on the portal, “Commit” means Commit + Push
- Conflict: When the files are in Conflict state, you can make the merge using the Source Control button
- Item Identical: Using the source control button, we can make a pull to fix the commit history
- Branch Checkout: It’s important to notice there is a small name mistake here. Branch checkout usually means any change of branch. But for the Source Control button, it only means the creation of a new branch. This button is not capable to checkout an existing branch.
Workspace Settings-> Git Configuration
After the workspace is linked to the source control, the Git Configuration allow us to make a branch checkout to a different existing branch.
Mind the difference: The source control button makes a branch checkout creating a new branch, while the git configuration makes a branch checkout to an existing branch.
Whether and when you would allow or not the developers to use the git checkout feature is something to be analysed as part of the source control process to be used.
The decision depends on one technical behavior: The workspace branch checkout is global, is not a user configuration. Once a different or new branch is checked out, it is for all users. All the developers need to agree about which branch the workspace will be working with.
It’s also important to notice we can only make checkout of a different branch; we can’t change the folder linked to the repository. The folder could only be changed by breaking the link with the source control and linking again, a process you wouldn’t like to do so often. In this way, you should choose the folder wisely.
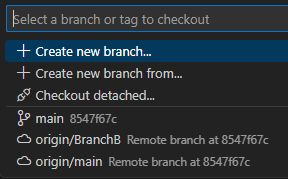
TODO: Creating a new Branch and Fetching on the Client
- Click the Source Control button
- On the Source Control window, open the branch dropdown
On the Source Control window, you can’t change to an existing branch, you can only create a new branch. CHECKOUT has multiple meanings. In this case it means only creating a new branch. - Click the option
Checkout New Branch

- On the Checkout Branch window, type the name of the new branch “Branch B”
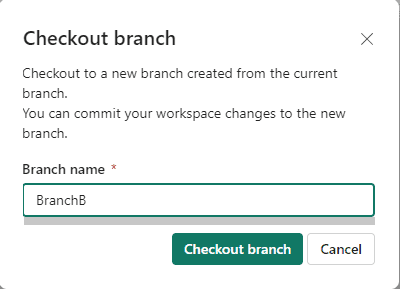
- Click the button Checkout Branch.
- This will create the “Branch B” based on the Main branch
Take a look on the Azure DevOps, the new branch will be on the server repository.

TODO: Use Visual Studio Code to change your new branch
Visual Studio Code is your friend. If you don’t want to manage the repository using command line, visual studio code is a good option.
- Open Visual Studio Code
- Click on File -> Open Folder on the top menu
- Open the local repository folder
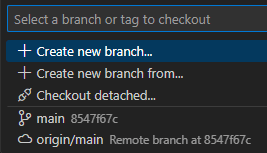
- On the status line, click the “main”, the name of the branch

You will be able to see the main branch, but not Branch B. This happens because the Branch B was created on the server repository. The local repository doesn’t know this branch yet. We need to execute a Fetch.
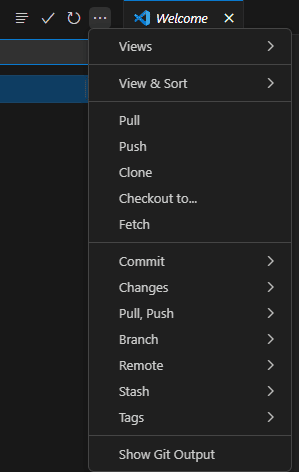
- Click on the Source Control button on the left toolbar

- On the Source Control window, click the expand button “…”
- On the menu, click Fetch
- Click Main on the status bar
The local repository knows the Branch B exists

- Select the Branch B on the pallet above
This will make a branch CHECKOUT, we will be changing the local files from Main to Branch B.
Making a change on Branch B
- Open Power BI
- Open the PBIP file
- From the table
Products, selectProductCategoryNameto create a new visual - From
TransactionHistorytable, selectActualCostfield
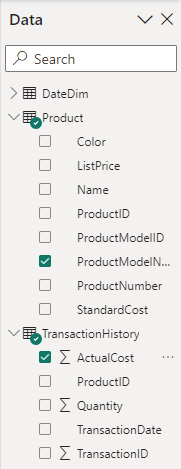
- Resize the visual to cover half of the report page

- Closing Power BI and saving changes
Power BI Desktop doesn’t show any information related to source control yet. In Visual Studio Code, on the source control window, you will be able to see the changed files. They are identified as changed in the local folder, but a commit was not created ye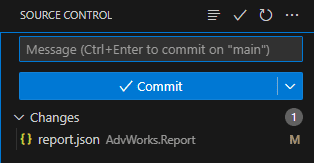
- On Visual Studio Code, on the Source Control window, click the Commit button
- On the new window, type a message to be used as your commit message
- Close the window
The commit button changes its name to Sync Changes
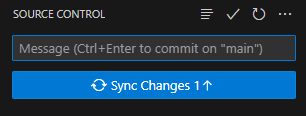
- Click the Sync Changes button
This is the same to make a Push from the local repository to the remote repository
On Azure Devops, if you take a look on the branches, you will notice the Branch B is ahead Main

Testing the changes on the local repository
- Click on Branch B, on Visual Studio Code Status Bar

- Select Main on the pallet, to checkout the Main branch
- Open the PBIP with Power BI
You will notice the report doesn’t contain the count visual now
- Close Power BI
- Click Main on Visual Studio Code Status Bar
- Select Branch B on the pallet, to checkout Branch B
- Open PBIP with Power BI
The count visual is now present.
In this way, you can keep and work in different versions of your Power BI report
TODO: The Power BI Portal and the multiple branches
At this moment, our workspace is linked to the Branch B, which we created. However, the server repository is more updated than Power BI. We need to follow some steps to fix this.
Pulling the repository to Power BI
- On the Power BI portal, click Source Control button
Power BI will automatically compare the files it has with the files on the server, to check if they are updated, and show a status update on the column GIT Status
We can notice the report was updated. - On the Source Control window, click the Updates tab. It will show the file updated.
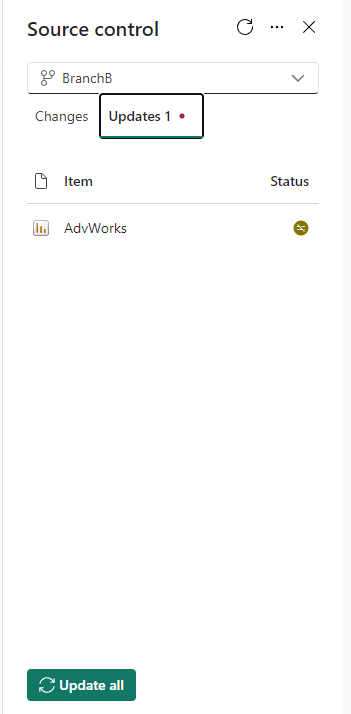
- Click the button Update All
This will be the same as making aPULLfrom the repository - Open the report.
The new visual is already available and with data
This is an important point: When we did the dataset refresh, we did on the branch Main, but the data is also available to Branch B. The Dataset Refreshes are independent of branches.
We already know we can’t change the workspace between existing branches using the Source Control button. We need to use Workspace Settings.
- On Power BI Portal, click Workspace Settings.
- On Workspace Settings window, click Git Integration
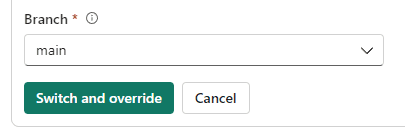
- On the branch dropdown, change the branch to main.
- Click the button Switch and Override
This means the branches will switch and the current Power BI files will be replaced by the files from the new branchChanging the branch on the Workspace Settings is not a User Level setting, it affects all the users of the workspace. This is something to plan very carefully.
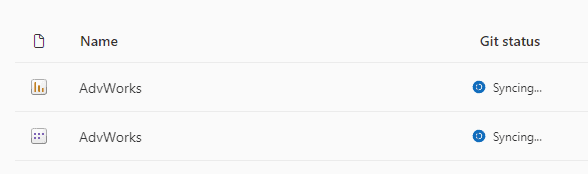
You will notice the Syncing status during the update process.
Changing the report on Power BI Portal
- Open the report again.
You will see only the card, the new visual doesn’t exist in branch Main. - Execute the steps 37-40 again, this time to return to Branch B
- Open the report
- On the top menu, Click the Edit button

- Select the Clustered Bar visual
- On the Visualizations window, click on Format Your Visual
- Click on the General tab
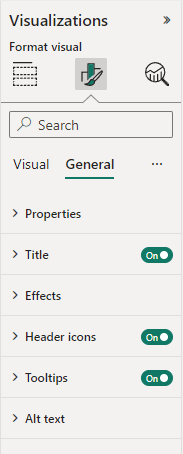
- Open Title item
- On Text, change the title to Cost by Product Model
- On the top of the window, click on the Save button
![]()
- Return to the workspace
- We changed the report on the portal. The GIT Status column now shows Uncommitted
- Click on the Source Control button
This button is marked with “1” because there is one uncommitted file

- Select the changed files to be committed – only the report.
The Source Control window show all the changed files in the portal and allow us to choose which ones we would like to commit:
- Click the Commit Button
Checking the changes in the local repository
Let’s check how the changes in the portal can be seen in the local repository
- Open Power BI Project
The title of the visual is not updated, because the changes are on the server repository - Close Power BI
- On Visual Studio Code, Source Control window, open the extension menu (“…”)
- Click on the Pull menu item
We are getting the changes from the server to the local repository - Open Power BI Project
- This time the title is updated
Process Planning: Additional Possibilities
After understanding the technology, let’s talk about the additional possibilities we have about the architectures to use for the SDLC (Software Development Life Cycle).
Use source control without Deployment Pipelines
If we ignore the usage of the deployment pipelines, we can create 3 independent workspaces and link them with different branches of a repository.
These 3 workspaces will become the Development environment, Test Environment and Production Environment.
The movement from one environment to another and be controlled by the repository. A Pull Request can be made from one branch to another, and the repository can be configured to only proceed once approvers review the Pull Request. In this way, you can have control of the process to move between environments, with approvers involved in the process.
There is one problem: Deployment pipelines automatically control the change of environment variables when moving the product between environments. Without them, you need to make this control manually.
There are advantages in having the Test environment linked to a repository. It’s possible to change the checkout branch and allow the user to test different version of what was produced and provide feedback over different versions, making the process easier.
Branch checkout and Multiple Developers
It’s important to control carefully who will have permission to make a branch checkout in the workspace.
There is no user level branch checkout, as it was highlighted before in this article. When a branch checkout happens in the workspace, it happens for all the developers, everyone is affected. If every developer can change the current branch at any moment, the result will be chaos.
For example, imagine John and Mark working on the same workspace. The workspace is linked to Branch A. John makes a branch checkout of branch B without Mark knowing.
Mark will get many types of the strange behaviors:
- He will make a push and not see the result in the workspace, without realizing he is using Branch A locally, but the workspace was changed to Branch B
- He may make a change on the portal thinking he is changing Branch A while in fact he is changing Branch B.
- He may make a change in the portal, pull the repository and not see the changes locally, because it’s not the same branch and he is not aware about it.
In this way, the permission to make a branch checkout in the workspace needs to be well controlled to avoid the kind of chaos above.
However, we can use different processes on the development environment and on the test environment and get some benefits from it.
- In the Development environment, you need to choose one branch to be the development one and stick to it. In this way, you avoid the chaos exemplified
- In the Test environment, the change of branches gives you the possibility to demonstrate different visuals and approaches for the end user. You can create different versions of the reports and easily change the demonstration from one version to another.
But if the developers can’t change the branch in the workspace, how will they make their individual development before publishing?
There are two possibilities:
- Use Power BI desktop and local workspaces for each individual development.
- Use a custom workspace in the portal dedicated to each developer. The developers can use this workspace to test what they are producing before merging their creations with the central development environment.
Use source control with a single developer
A single developer also needs the source control features to manage the environments correctly. However, because he is only one, some rules above don’t apply to him.
Specially the rule in relation to branch checkout. He can checkout different branches in Development and Test environment anytime he would like because there is no team to be affected. There is no need to limit himself to the local development or to have an additional workspace for this.
Summary
The feature is still in preview, we can expect to see a lot more coming out soon in Power BI Desktop to manage the source control.
The feature makes our lives way easier, but we still have a lot to plan in relation to the development process we will use for Power BI
This document contains proprietary information and is protected by copyright law.
Copyright © 2026 Red Gate Software Limited. All rights reserved


Load comments