
If you show a Sales Manager how their top products or customers are performing, they will probably want to drill down into some detail to examine the root cause.
For example, we might have a list of 1000 Customers and we want to group them by region or state in a report that is sorted by descending sales volume. Generally, on these types of reports, it’s nice to illustrate a ranking next to each row, not just the resulting data. To do so we’ll need a combination of functions to get the result we want
Setting up the Report
In this example, I have used the AdventureWorks database to select some sales data joined with related attributes, such as products and customers, and I have then created a dataset called AW_Sales. The complete select statement is found in Listing 1.
Listing 1SELECT Sales.Customer.CustomerID,
Sales.Customer.CustomerType,
Sales.SalesOrderHeader.SalesOrderNumber,
Production.Product.Name,
Production.Product.ProductNumber,
Production.Product.ProductLine,
Production.Product.Class,
Production.Product.Style,
Sales.SalesOrderHeader.ShipDate,
Sales.Store.Name AS Customer_Name,
Sales.SalesOrderDetail.LineTotal,
Sales.SalesTerritory.Name AS Territory_Name,
Sales.SalesTerritory.[Group] AS Territory_Group,
Person.StateProvince.Name AS State
FROM Sales.SalesOrderDetail
INNER JOIN Sales.SalesOrderHeader
ON Sales.SalesOrderDetail.SalesOrderID = Sales.SalesOrderHeader.SalesOrderID
INNER JOIN Sales.Customer
ON Sales.SalesOrderHeader.CustomerID = Sales.Customer.CustomerID
INNER JOIN Production.Product
ON Sales.SalesOrderDetail.ProductID = Production.Product.ProductID
INNER JOIN Sales.Store
ON Sales.Customer.CustomerID = Sales.Store.CustomerID
INNER JOIN Sales.SalesTerritory
ON Sales.SalesOrderHeader.TerritoryID =
Sales.SalesTerritory.TerritoryID
AND Sales.Customer.TerritoryID = Sales.SalesTerritory.TerritoryID
INNER JOIN Person.Address
ON Sales.SalesOrderHeader.BillToAddressID = Person.Address.AddressID
AND Sales.SalesOrderHeader.ShipToAddressID = Person.Address.AddressID
INNER JOIN Person.StateProvince
ON Person.Address.StateProvinceID =
Person.StateProvince.StateProvinceID
AND Person.Address.StateProvinceID =
Person.StateProvince.StateProvinceID
AND Person.Address.StateProvinceID = Person.StateProvince.StateProvinceID
AND Person.Address.StateProvinceID = Person.StateProvince.StateProvinceID
AND Person.Address.StateProvinceID = Person.StateProvince.StateProvinceID
AND Person.Address.StateProvinceID = Person.StateProvince.StateProvinceID
WHERE (Sales.SalesOrderHeader.ShipDate BETWEEN
@FromShipDate AND @ToShipDate)
For data validation, I have added two date parameters (from and to) that are defaulted to both the earliest and latest sales dates. The dataset ShipDates ensures a more user-friendly reporting parameter selection for end users (Listing 2).
Listing 2SELECT
MIN(ShipDate) AS Min_Ship_Date,
MAX(ShipDate) AS Max_Ship_Date
FROM Sales.SalesOrderHeader;
For this Top Sales report we want to provide the user with two levels of flexibility
- To select from a set of varying attributes on which to group
- To define the Top X as any integer number they want.
The report itself is a simple table control with one level of grouping for the user-selected value, with totals. The detail will display order level information.
The sample report can be downloaded by clicking on the TopGrouping.RDL file at the bottom of the article. You will need to open Business Intelligence Development Studio, create a new Report Designer project called Top Grouping, and add the file to it. Then you will need to change the ‘AdventureWorks’ Data Source to point to your server and its AdventureWorks database
I have named the parameter for the custom grouping ‘Grouper’ (for want of inspiration), and you can see a few items that are populated for the user in Figure 1, which shows the report parameters (report ->report parameters) in ‘Report Designer’.
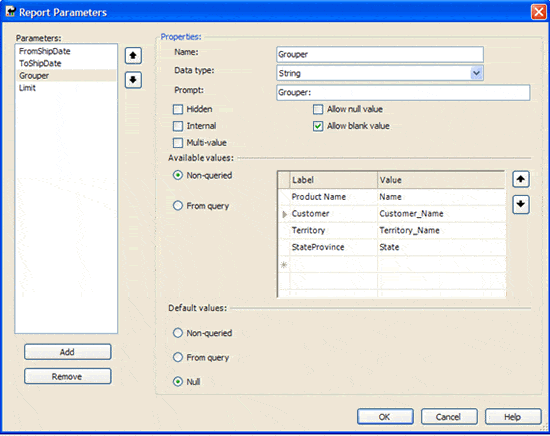
Figure 1
I have allowed a ranking of sales by product, customer, territory or state. It is important to note that the field references made in the Value property for each option is case sensitive and must exactly match any fields you’d like to offer up for optional grouping. Additionally, the fields must be defined in your dataset; we can’t just arbitrarily request a field be grouped if it is not included in the returned dataset to the report.
Before we build the actual guts of the report, let’s take a quick look at the filters we’ll be providing by clicking the Preview tab. Figure 2 shows the final parameters as displayed to end users: date pickers, the grouper selection and a “Limit to Top” option that takes nulls.

Figure 2
The last option makes this report interesting. Leaving the ‘Limit to Top’ value null will allow this report to behave as any standard sales report. When a user enters a value, however, we will limit the output to only the top products or customers, no matter how many lines of detail might fall below in the order history.
Now let’s build the rest of the report! Click the Layout tab and drop a table control onto the Body and set the datasource to our sales dataset, AW_Sales,. Add a new group (by default SSRS names this table1_Group1). Ensure that both group header and group footer are included by marking the checkboxes appropriately, as shown in Figure 3. This will be important for our aggregate workaround later.
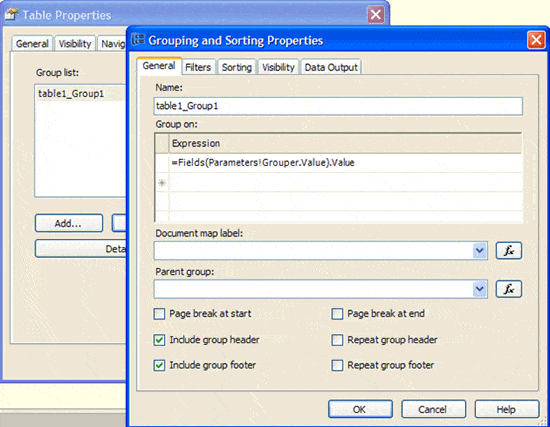
Figure 3
In Figure 3 you’ll see that rather than specifying a field in the Group On Expression, we use the dynamic formula:
|
1 |
=Fields(Parameters!Grouper.Value).Value |
Next, you’ll want to filter the grouping to the Top X values. There is an important difference between a filter of the entire dataset and a filter at the group level. Our calculation requires a test of the top sales (in this case a sum of LineTotal). Reporting Services will not allow an aggregate formula in a filter of the table at this point. Therefore, our test must be at the grouping level. To do this, click the Filters tab for table1_Group1 and create a filter with the following properties:
|
1 2 3 |
Expression: =IIF(Parameters!Limit.Value is Nothing, "", Sum(Fields!LineTotal.Value)) Operator: Top N Value: =IIF(Parameters!Limit.Value is Nothing, 2147483647, Parameters!Limit.Value) |
The first part of the conditional statements will allow the filter to be bypassed if the user displays all records. While you can provide an empty value on the text portion of the example, you’ll notice the default value I’ve entered for the Top N limit. Unfortunately RS is expecting an integer here so a blank, or double quotes, won’t cut it. To ensure that the filter expression won’t fail I have used the upper boundary of an integer. If a user does happen to provide a value, we will dynamically limit the output based on that selection.
Lastly, click the Sorting tab for this group and enter the following properties so that the report shows us the greatest sales volume first:
|
1 2 |
Expression: =Sum(Fields!LineTotal.Value) Direction: Descending |
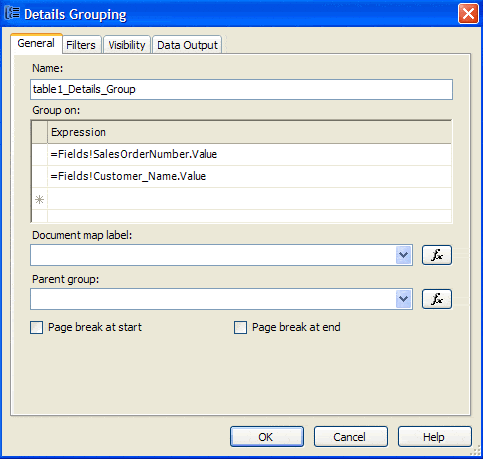
The only final grouping to add is for the detail line. From Table Properties, click Details Grouping. We want to expose some relevant order detail information to users but it will be summarized by Sales Order Number (SalesOrderNumber) and Customer name (Customer_Name). Figure 4 displays the grouping on our detail.
In Figure 5 you’ll see the general layout of the report. In the table header we dynamically provide the grouping level selected with Parameters!Grouper.Label so users can see the user-friendly name we’ve provided, not a geeky database column name. The group header will display the appropriate value with the expression Fields(Parameters!Grouper.Value).Value, exactly the same as the group property. I also appropriately changed the name of this cell to Grouper.
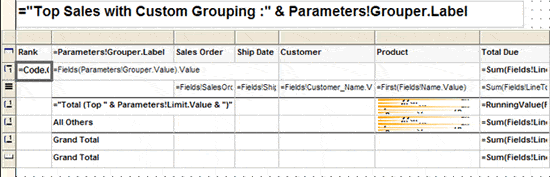
Aside from the summary of LineTotal at the end, you’ll notice a Rank column. This is where we display the ranked number position for the group currently displayed. What good is a Top 50 filter if I can’t easily tell who is 10th and who is ranked 23rd?
The dynamic expression we use to provide the ranking is:
|
1 |
RunningValue(Fields(Parameters!Grouper.Value).Value,CountDistinct,Nothing |
RunningValue is an RS expression that will aggregate values at runtime. Here we want to inspect each Grouper value, get a distinct count (which should be 1, right?) and set the scope of inspection. We could inspect a dataset or table, but for our purposes we want the current scope of this group so the value is set to Nothing. RunningValue will merely increment each grouping so we can display an ordered set of values next to our selection.
Maintaining Order
There’s just one issue with the ranking formula, as provided above. It is based on a simple iterative count, so the first grouped line will be 1, the second will be 2 and so on. Let’s say you add some interactive sorting to the report, so after the display of the Top 20 customers in descending order of sales, you want to view the customers in alphabetical order. Unfortunately, the rank is not preserved and the order displayed would be incorrect. Since this is just a simple counter, it would appear as though the first alphabetically sorted customer had the most sales.
To fix that, we need to add some code to the report to sets the initial ranked values and redisplays them upon resort. First, the code in Listing 3 will need to be added to the code block in the report properties.
Listing 3Private Shared gGrouper As String
Private Shared gTimeCriteria As String
Private Shared gBegTime As String
Private Shared gEndTime As String
Private Shared gLimit As Integer
Function Report_Init(Grouper As String, BegTime As String, EndTime As String, Limit As Integer)
‘If there are no global variables set, set them
If gGrouper = “” Then
GlobalRefresh(Grouper, BegTime, EndTime, Limit)
Else
‘Check the values. The user might have changed optional parameters
If gGrouper <> Grouper Or gBegTime <> BegTime Or gEndTime <> EndTime Or gLimit<> Limit Then
‘This is a parameter change, so refresh the global variables
GlobalRefresh(Grouper, BegTime, EndTime, Limit)
End If
End If
End Function
Function GetSetRankArray(Grouper As String, BegTime As String, EndTime As String, Limit As Integer,i As Integer, Grouper_Value As String)
‘Run the Report Initializer
Report_Init(Grouper, BegTime, EndTime, Limit)
‘i is the rank for this item
If RankArray(i) Is Nothing Or RankArray(i) = “” Then
‘Set the Array, store the Grouper and the rank value
ReDim Preserve RankArray(RankArray.Length + 1)
RankArray(i) = Grouper_Value
GetSetRankArray = i
Else
GetSetRankArray = GetRankArray(Grouper_Value)
End If
End Function
Function GetRankArray(Grouper_Value As String) As Integer
Dim i As Integer
‘Retrieve the rank for the Grouper that is passed in
For i = 1 To RankArray.Length
If RankArray(i) = Grouper_Value Then
GetRankArray = i
Exit For
End If
Next
End Function
Then, our ranking cell will call this function with the following expression:
|
1 |
=Code.GetSetRankArray(Parameters!Grouper.Value, Parameters!FromShipDate.Value , Parameters!ToShipDate.Value , Parameters!Limit.Value, RunningValue(Fields(Parameters!Grouper.Value).Value, CountDistinct,Nothing),Fields(Parameters!Grouper.Value).Value) |
This ensures that on a report refresh due to sort, the ranked values will initialize for the first display. However, each subsequent refresh based upon a column sort will retrieve the stored values based upon the Grouper value. GlobalRefresh() will set global variables to store the parameters of the user selection like dates, grouper values and top limit. GetSetRankArray() will manage the storage of ranked values by Grouper value and store them in an array. They will be retrieved by using the GetRankArray() function if the report is resorted. However, if the user refreshes the parameters and reruns the report, the global variables will reinitialize.
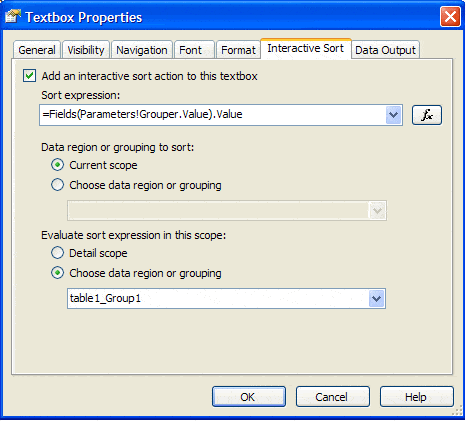
Now we’ll add some interactive sorting to take advantage of this routine. Select the column header that holds the Grouper label. In the textbox properties on the Interactive Sort tab select ‘Add an interactive sort…’ and use the sort expression =Fields(Parameters!Grouper.Value).Value . In the Evaluate sort expression section, be sure to select the radio button to ‘Choose data region or grouping’ and select table1_Group1, our group to resort.
Figure 6 shows the proper setup for the sort on the Grouper column. Add another interactive sort on the column header, above the LineTotal, so we can do the same type of operation on that column as well.
In the detail from Figure 5 you’ll notice that a Sum() has been added to the LineTotal because we happen to be grouping on this level. But you are probably more interested in the seeming redundancy in the 3 grouped footer lines. It’s part workaround and part value-add.
Here’s the challenge: Filter on a group for the top 10 products and drop a sum in the table footer. You’d expect to see a total of the 10 products, right? Unfortunately, SSRS will return the sum of the entire unfiltered set. What’s worse, if you try to hack your report footer you’ll find that certain aggregations and calls to other ReportItems that are storing your value (a common SSRS hack technique), will not be allowed. The workaround here is to provide a running total, similar to the ranking calculation, but we need to trick the report into only displaying the group footer for the very last group in our “Top” selection, so it behaves like a report footer for that last item. The final report footer is left intact in case our end user runs the report without a “top” filter. In that case, we simply leave the group footers hidden on all rows.
Under the Total Due column, a cell that is named TOP_COL1 has the expression for calculating the total as:
|
1 |
=RunningValue(Fields!LineTotal.Value, Sum, Nothing) |
This will sum the value on each footer and keep a running count. Remember, we will only display the last visible group footer (for example the 10th in a Top 10 selection). A row is added underneath to meet another common need when measuring performance. Specifically, managers typically like to see how others performed that aren’t included in the top selection. The expression for “All Others”, which is appropriately named NOTTOP_COL1 (because it holds values not in the Top, get it?) is:
|
1 |
=Sum(Fields!LineTotal.Value,"table1") - ReportItems!TOP_COL1.Value |
Since we cannot reference the grand total in the table footer, we can instead use a total of the scoped set table1, then subtract the top values by referencing it from the ReportItems collection. Finally, we just have a scoped value for the total provided in the Group1 footer:
|
1 |
=Sum(Fields!LineTotal.Value,"table1") |
To complete the process we merely set a few visible properties. The grouping icons are displayed in

Figure 7
Click the detail row icon (the button with 3 dashed lines) on the table and set the visibility properties:
|
1 2 |
Hidden: True ToggleItem: Grouper |
Next select all three Group 1 footers and set their visibility to Hidden using the conditional value in Listing 4.
>=IIF(Parameters!Limit.Value is Nothing,True, IIF(CountDistinct(Fields(Parameters!Grouper.Value).Value, “table1”) < Parameters!Limit.Value, RunningValue(Fields(Parameters!Grouper.Value).Value, CountDistinct,Nothing) <> CountDistinct(Fields(Parameters!Grouper.Value).Value, “table1”), RunningValue(Fields(Parameters!Grouper.Value).Value, CountDistinct,Nothing) <> Parameters!Limit.Value))
The first fragment (Parameters!Limit.Value is Nothing) ensures the rows will always be hidden if the user hasn’t selected a Top limiter. The last fragment…
|
1 |
RunningValue(Fields(Parameters!Grouper.Value).Value,CountDistinct,Nothing) <> Parameters!Limit.Value) |
…keeps the footer hidden until the ranked count is the same as the limit our user selected (the 10th group in a Top 10 selection). The middle fragment is necessary to ensure we show the footer when the number of grouped values returned is fewer than requested:
|
1 |
RunningValue(Fields(Parameters!Grouper.Value).Value, CountDistinct,Nothing) <> CountDistinct(Fields(Parameters!Grouper.Value).Value, "table1") |
For example, a user might request the Top 100 products, but for the range of dates selected only 80 unique products were sold.
Lastly, select the table footer and set the Hidden property to =Not(Parameters!Limit.Value is Nothing) so it will only display when the user requests all values to display.
Jazz it Up
We can add one last visual cue to note the difference between top sellers and all others with a simple inline bar chart that grows relative to the difference. Place one chart in the footer row for the “Top” total and one in the row for “All Others.” Set the datasource to the same as our table, AW_Sales. For the first chart, set it to Simple Bar and add a new Data Value. The Value should be set to =ReportItems!TOP_COL1.Value which is our total for the ranked set. On the Edit Chart Value property page, click Point Labels and enable ‘Show point labels’. Then enter the Data Label:
|
1 |
=IIF(ReportItems!GT_COL1.Value<>0, ReportItems!TOP_COL1.value/IIF(ReportItems!GT_COL1.Value<>0, ReportItems!GT_COL1.Value,0),0) |
Set the “All Others” row chart to Simple Bar as well. Add a value with the expression =ReportItems!NOTTOP_COL1.Value. On the Edit Chart Value property page, click Point Labels and enable ‘Show point labels’. Then enter the Data Label:
|
1 |
=IIF(ReportItems!GT_COL1.Value<>0, ReportItems!NOTTOP_COL1.value/IIF(ReportItems!GT_COL1.Value<>0, ReportItems!GT_COL1.Value,0),0) |
In the Chart Properties for both charts, select the Y axis tab and set the Scale Minimum to 0 and Scale Maximum to =ReportItems!GT_COL1.Value. We need to set the maximum to the total number of sales for the entire set so there is some consistent perspective.
Add a little gradient coloring and you have a visual indicator for the relative difference in sales. When you preview the report you now have a flexible analytic that limits the grouping, while providing end users the flexibility to drill into detail.
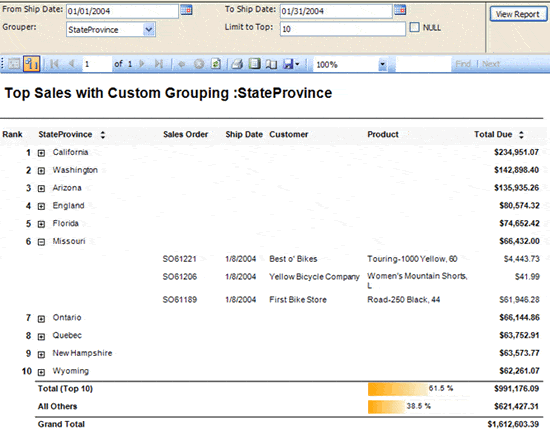
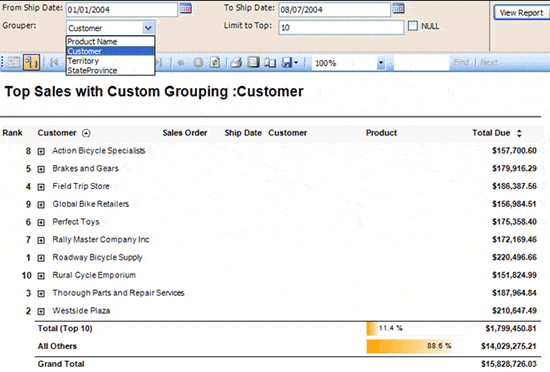
Figures 8 and 9 show some of the options users have in crafting reports and the preservation of ranked values when sorted on a different column
Summary
As a report developer it’s often important to look beyond the immediate needs that users have in order to develop a solution that scales for many requirements. Without much overkill, this is a good example of providing inputs so a wider audience can get value from your reports and is easily scalable when users need a different perspective of their data.
This document contains proprietary information and is protected by copyright law.
Copyright © 2026 Red Gate Software Limited. All rights reserved
Load comments