
The Questions
- “When should I use an Excel connection manager rather than an Excel Source component?”
- “I’ve tried changing the data types that the Excel Source component assigns to the incoming data but have had no luck. How do you control data types in the source component?”
- “My SSIS package retrieves data from an Excel worksheet and inserts the data into a SQL Server table. My data flow shows a warning message indicating that data could be truncated; however, the package runs with no problem and loads the data into the table. Do I need to do anything in response to the warning message?”
- “How do I limit my result set to specific columns when retrieving data from an Excel workbook?”
- “I sometimes receive a warning on my Excel Source component saying that the external columns are out of sync with the data source columns. Any idea what’s going on?”
- “One of the columns in the Excel worksheet I use as a data source contains NULL values for some rows. How do I send those rows to a text file, rather than loading them into the target database table?”
- “I built an SSIS package that retrieves data from an Excel workbook. However, when I try to debug the package I receive an error and a suggestion that I run the package in 32-bit mode. How do I do that?”
- “How do you import a range of cells from an Excel worksheet, rather than all the data on the worksheet?”
- “My SSIS package includes a Data Conversion transformation for reducing the size of the Unicode string columns that are retrieved from an Excel spreadsheet. Is there a way to redirect rows that contain values too large for the new column size?”
- “How do I join data from multiple worksheets within a single Excel file?”
- “I’m using SSIS to retrieve data from an Excel worksheet and inserting the data into a SQL Server table. The table includes several VARCHAR columns. I’m receiving an error message saying that I cannot convert Unicode data to non-Unicode data. What steps do I have to take to transform the data?”
- “In my data flow, I’m converting data I retrieve from an Excel spreadsheet to the VARCHAR data type. How do I handle errors for the data that will not convert?”
- “How do I retrieve data from multiple Excel workbook files?”
“When should I use an Excel connection manager rather than an Excel Source component?”
It’s not a question of one over the other. If your SSIS package retrieves data from an Excel workbook, you need both the connection manager and the source component. The connection manager serves as the interface between the package and the Excel file, or more precisely, the source component uses the connection manager to access the data in the Excel file.
When setting up the connection manager, you need only provide the path and file name for the Excel workbook, select the Excel version, and specify whether the first row should be treated as column names, as shown in Figure 1.
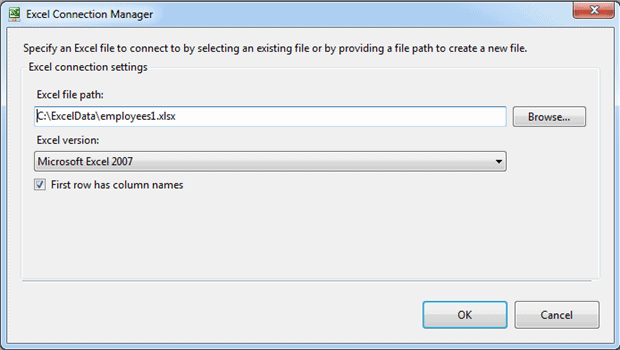
Figure 1: Configuring an Excel connection manager to point to an Excel workbook
You then need to configure the Excel Source component to use the connection manager to access data in the Excel file. You cannot configure any other settings in the source component without first specifying the applicable Excel connection manager. Figure 2 shows the Connection Manager page of the Excel Source Editor. As you can see, the first option listed is for the connection manager. From there, you select the data access mode and any relevant information specific to the selected mode.
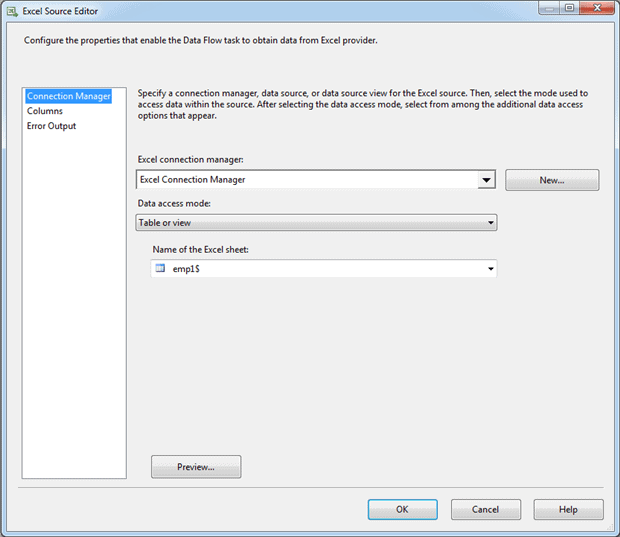
Figure 2: The Connection Manager page of the Excel Source Editor dialog box
The Excel Source component supports four types of data access modes:
- Table or view: Specifies that an Excel worksheet be used for the source data. You must also select the applicable worksheet.
- Variable name: References a variable that contains the name of the worksheet or a named range. You must also select the applicable variable.
- SQL command text: Specifies that an SQL statement be used to access data from the target Excel worksheet. You must also provide the actual statement. You can also parameterize the query, use a GUI to build the query, browse for a file that contains the query, and parse the query after you enter it.
- SQL command from variable: References a variable that contains an SQL statement.
All references to worksheet names in the Excel Source component include a trailing dollar sign ($). In addition, whenever referencing a worksheet in a SQL statement, you must delimit the worksheet name, usually by enclosing the name in brackets.
Another useful option on the Connection Manager page is Preview, which lets you view all or some of the data returned from your spreadsheet, based on the selected data access mode. This option provides a handy way to spot-check the data to help confirm that you’re retrieving the correct type of information.
The Columns page of the Excel Source Editor determines which columns should be imported from the Excel spreadsheet and what to name the output columns, if you want those names to be different from the column names returned from the spreadsheet. Figure 3 shows a Columns page configured to use the same column names as those retrieved from the spreadsheet.
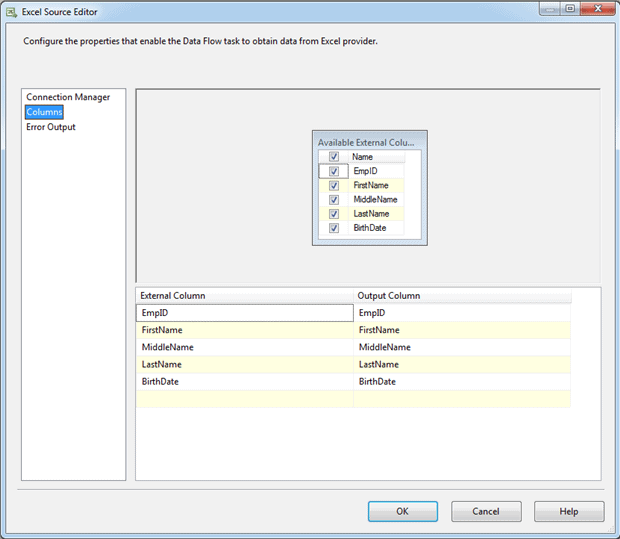
Figure 3: The Columns page of the Excel Source Editor dialog box
The column names retrieved from the spreadsheet are considered the external columns. If you had selected the First row has column names option in your Excel connection manager, the names will come directly from the first row of the returned data; otherwise, generic worksheet names will be used, such as F6, F7, F8, and so on.
The final page in the Excel Source Editor is Error Output, which lets you configure how errors or truncations are handled should any occur. Figure 4 shows the default settings for each column when you first set up an Excel Source component.
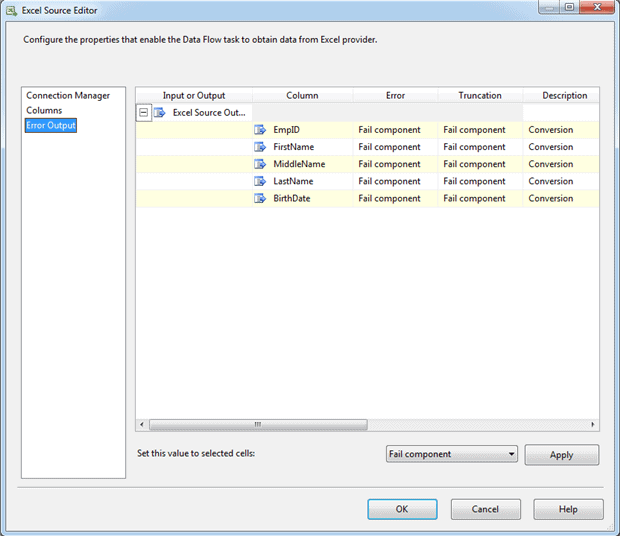
Figure 4: The Error Output page of the Excel Source Editor dialog box
By default, any errors or truncations result in component failure. However, you can instead choose to ignore errors or truncations or to output the rows that contain errors or truncations to a specific destination, such as a flat file, where you can then examine the outputted data.
As pointed out earlier, however, before you can configure any options in the Excel Source component, you must create your connection manager to the Excel workbook. Only then can you configure the access mode, column setup, and error handling.
“I’ve tried changing the data types that the Excel Source component assigns to the incoming data but have had no luck. How do you control data types in the source component?”
The driver used to retrieve Excel data provides little in the way of control, when it comes to assigning the initial data types. By default, the driver samples the first eight rows of data and determines the data type from there. The incoming data is limited to one of the following SSIS types:
- Double-precision float (DT_R8)
- Currency (DT_CY)
- Boolean (DT_BOOL)
- Date and time (DT_DATE)
- Unicode string with a length of 255 (DT_WSTR)
- Unicode text stream (DT_NTEXT)
Figure 5 shows the Advanced Editor for an Excel Source component. The component is retrieving data from a simple spreadsheet that contains five columns. The first column (EmpID) contains all integers, so the DataType property is automatically configured with the value double-precision float [DT_R8]. Although you can change the property setting, the change won’t stick. SSIS always generates the data type for you when it validates the data based on the first eight rows.
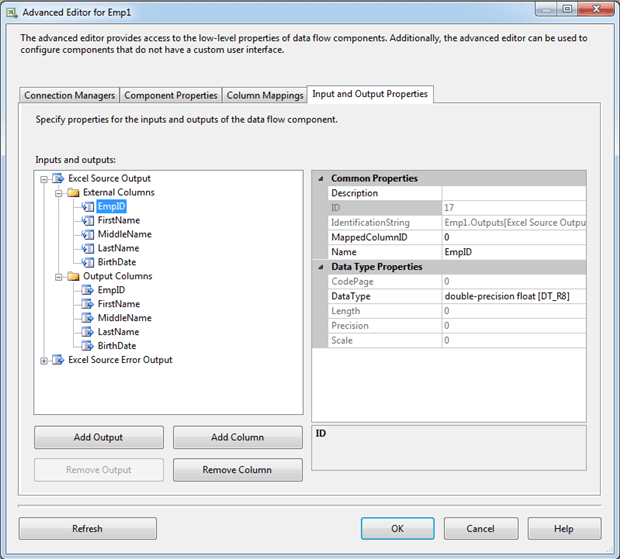
Figure 5: Verifying the data types in the source component’s advanced editor
If a column contains mixed data types, SSIS often takes a “majority rules” approach when assigning the type. For example, if the column contains five integers and three text values, SSIS will again assign the DT_R8 data type to that column. SSIS will also assign the numerical type to a tie, which means a four/four split will also result in DT_R8. As a consequence of this approach, all non-numerical values are returned as NULL values.
It gets worse. Imagine you have a column that’s a mix of numbers and text, and you want the DT_WSTR data type to be used, but if the first eight rows contain four or more numerical values, you’ll get DT_R8 whether you like it or not.
One way to address this issue is to update the column in the worksheet so that it is configured as Text. That way, even if all eight values are numerical, SSIS will assign the DT_WSTR data type to that column. The challenge with this approach is that it works only if you have access to the file or a say in how the file is generated. If you’re working with an automated system, such an approach could be very difficult, unless you control how the files are created.
Another option is to add the IMEX=1 option to the connection string used by the connection manager to access the Excel file. The option tells the driver to use Import mode, which takes into account the registry setting ImportMixedTypes=Text. This forces mixed data to be converted to text. Be aware, however, that using IMEX=1 can lead to unpredictable results if you try to update the data.
You can also manipulate how SSIS assigns data types by modifying the registry setting TypeGuessRows, which by default is set to 8. This is the setting that determines that only the first eight rows be sampled. You might consider setting TypeGuessRows to 1 to help narrow the focus of how types are determines. However, that means you’d have to ensure that your Excel files contains the correct type of data in the first row. This approach also assumes you have access to the registry.
Even if you can access to the registry, be sure to take into account all relevant operations before changing the TypeGuessRows setting. Other SSIS components and packages, as well as other systems, might be relying on the current setting. For example, if you change the setting to 1 and the column’s first value is under 255 characters, SSIS assigns the DT_WSTR(255) type to the imported column. Then, if a subsequent value in that column is over 255 characters, that value could be truncated if inserting the data into a SQL Server table. In fact, depending on the nature of your data, you might actually want to configure the TypeGuessRows setting with a larger value rather than a smaller one.
Clearly, there is no easy solution when it comes to data types and Excel data. Your best bet is to make sure your Excel workbooks are formatted to meet your needs. The more you can work within the constraints of how data types are assigned by default in SSIS, the easier your life will be.
“My SSIS package retrieves data from an Excel worksheet and inserts the data into a SQL Server table. My data flow shows a warning message indicating that data could be truncated; however, the package runs with no problem and loads the data into the table. Do I need to do anything in response to the warning message?”
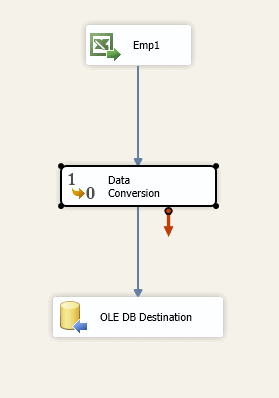
Figure 6: Converting data to avoid truncation
When SSIS retrieves data from an Excel workbook, it assigns one of two character data types to each text-based column: DT_WSTR or DT_NTEXT. By default, if at least one of the column’s first eight values is over 255 characters, SSIS assigns the DT_NTEXT data type to the column; otherwise, SSIS assigns DT_WSTR.
In many cases, SSIS assigns the DT_WSTR data type to a column whose values are much smaller than 255. Not surprisingly, you might be inserting that data into a destination column with a smaller length. For example, suppose you’re inserting DT_WSTR(255) data into a SQL Server column configured with the NVARCHAR(50) data type. If you were to create a simple data flow that contained an Excel Source component and an OLE DB Destination component, the SSIS package would run just fine, although you would receive a warning message on the destination component indicating that values could be truncated. In other words, any value with a length greater than 50 could be truncated when inserting that value into the database.
If data is being truncated, it might point to issues with your source data that need to be resolved. You can avoid any silent truncation by adding a Data Conversion transformation to your data flow, as shown in Figure 6. In this way, the package will at least fail, rather than data being inadvertently truncated.
Essentially, the transformation component converts each DT_WSTR(255) value to a DT_WSTR(50) value. Figure 7 shows what this conversion setup would look like for the three columns in Data Conversion Transformation Editor.
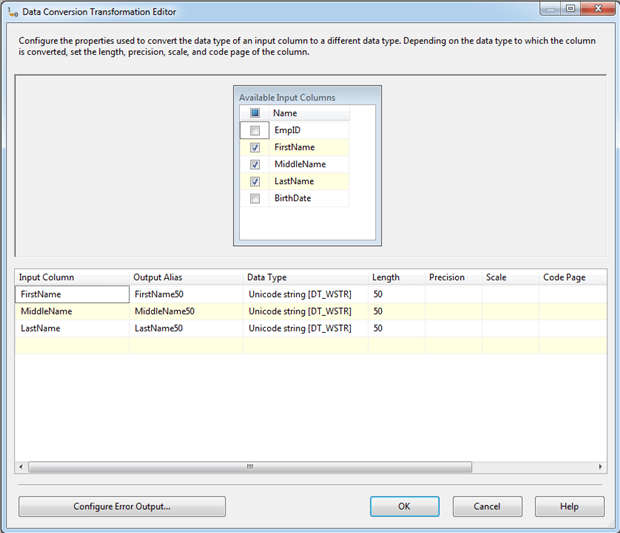
Figure 7: Configuring data conversions in the Data Conversion Transformation Editor
In this case, we’re simply specifying a different length and assigning an output alias to each column. We would then use these aliases when referencing the columns in subsequent data flow components. This eliminates the truncation warnings and ensure that no values with a length greater than 50 gets inadvertently truncated. Instead, the package will fail until you fix the data. Chances are, you might also want to include the logic to handle the offending data, rather than simply failing the package, but that’s a different topic altogether.
“How do I limit my result set to specific columns when retrieving data from an Excel workbook?”
The easiest way to limit the columns you retrieve from an Excel worksheet is to specify which columns to include or not to include in the Excel Source component.
By default, when you first set up the component, all columns in the worksheet are selected, but if you go to the Columns page of the Excel Source Editor, you’ll find you can deselect any of the columns in the Available External Columns box, as shown in Figure 8

Figure 8: Selecting which columns to include in your data flow
In this case, the EmpID column has been deselected. The column is then automatically removed from the lower grid on the Columns page.
If you remove a column from the Excel Source component after you’ve already defined other components in your data flow, you must update those components as necessary. For example, your data path might include a Data Conversion transformation that specifically references a removed column. The component will have to be updated. Same goes for any destinations that map the removed column to an external column.
“I sometimes receive a warning on my Excel Source component saying that the external columns are out of sync with the data source columns. Any idea what’s going on?”
Sometimes when you open an SSIS package, you might receive a warning on your Excel Source component saying that the external columns are out of sync with the data source columns. This confusing message is essentially saying that the columns coming into the component are not in sync with those going out. If you run the package without making any changes, you’ll likely receive the same message in your execution results.
If you instead open the Excel Source Editor, you’ll either be prompted to have the columns synced automatically or the syncing will occur without prompting. In either case, the problem will appear to have been resolved. If you then run the package, however, you might receive one or more warning messaging about output columns not being used in the data flow.
What all this boils down to is that your source Excel worksheet has likely changed since you first set up your Excel Source component. For example, suppose you set up your component based on a simple worksheet that contains the EmpID, FirstName, MiddleName, LastName, and BirthDate columns. After creating the SSIS package, someone (or something) inadvertently adds the value xxx to one of the unused columns in the spreadsheet, as shown in Figure 9.

Figure 9: An Excel worksheet containing erroneous data
By default, when you open an SSIS package, the external data sources are validated against your currently configured components. If everything doesn’t sync up as it should, you’ll receive a warning or error message telling you there’s a problem. If the message you receive warns you that your external columns are out of sync with the data source columns, you should take a closer look at the source component via the Excel Source Editor, where you might discover that new columns have been added to your data flow. Figure 10 shows the Columns page of the Excel Source Editor, complete with the F6 and F7 columns.
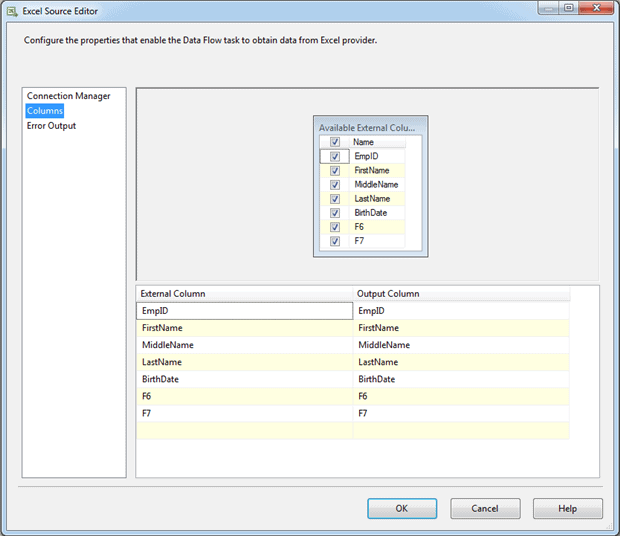
Figure 10: Extra columns from the Excel worksheet showing up in the data flow
Notice that the source component adds a column to accommodate the xxx value and a column that matches the one preceding the value. Your package will still run, but you’ll receive the warning message about unused output columns. You can fix this either by updating the Excel worksheet itself or by deselecting the columns on the Columns page of the Excel Source Editor. Whether you take either of these steps or simply do nothing, this situation might point to something else going on with your source file. The erroneous data might be the result of a simple human error or of a problem in your automation process, in which case, you might have bigger issues to contend with than a simple warning message.
“One of the columns in the Excel worksheet I use as a data source contains NULL values for some rows. How do I send those rows to a text file, rather than loading them into the target database table?”
An easy way to redirect rows that contain NULL values is to add a Conditional Split transformation to your data flow that defines how to process these rows. For example, suppose we retrieve employee data from an Excel spreadsheet and send that data to a SQL Server database. The spreadsheet includes a MiddleName column that can contain NULL values. For any rows whose MiddleName value is NULL, we want to redirect the rows to a text file so that our data flow looks something like the one shown in Figure 11.
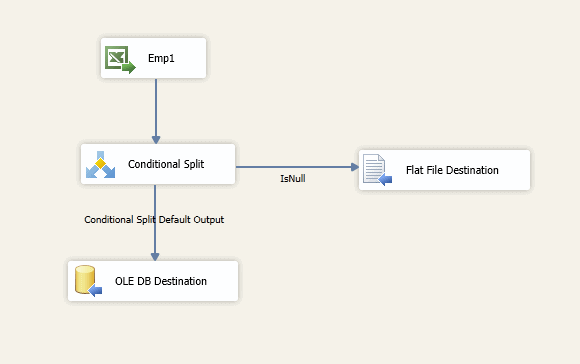
Figure 11: Adding a Conditional Split transformation to the data flow
The key to this configuration is to define a condition in our Conditional Split transformation that redirects the rows. This is easily done by using the ISNULL function to check the MiddleName value for each row. If the value is NULL, the row is sent to the IsNull output. Figure 12 shows the Conditional Split Transformation Editor with the ISNULL expression defined for the IsNull output.
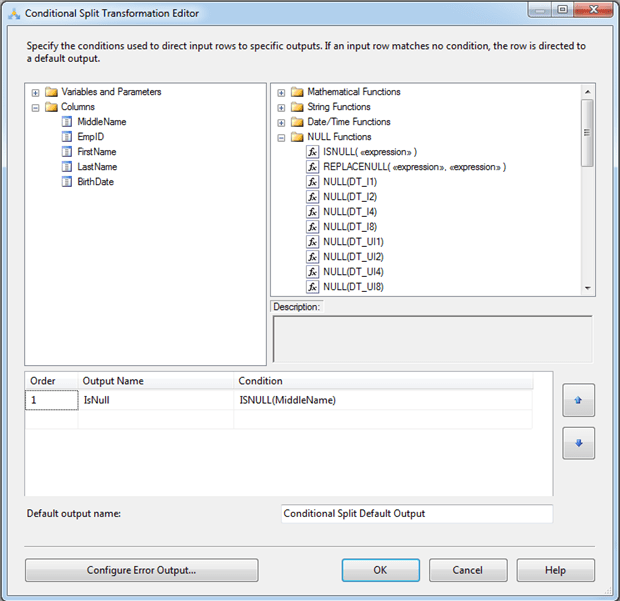
Figure 12: Using the Conditional Split transformation to redirect rows
Notice that the condition’s expression is merely the ISNULL function with the column passed in as an argument. Whenever the expression evaluates to True, that is, the value is NULL, the row is sent to the IsNull output, which is connected to the Flat File destination. That means every row with a MiddleName value of NULL is saved to the flat file, rather than being sent on to the OLE DB Destination component.
If we wanted to test other columns for NULL values as well, we could have written a more complex expression that covers other scenarios. But in this case, the simple ISNULL expression is enough to handle one column.
“I built an SSIS package that retrieves data from an Excel workbook. However, when I try to debug the package I receive an error and a suggestion that I run the package in 32-bit mode. How do I do that?”
If the 64-bit version of SQL Server is installed on your system, SSIS will automatically run in 64-bit mode. However, SSIS might be using a 32-bit provider (either the Jet 4.0 provider or the ACE OLEDB provider) to connect to an Excel file. When this happens, you’ll receive an error message when you try to run the package saying that the AcquireConnection method call to the connection manager failed. You’ll likely receive several other error messages as well, with one stating that the provider is not registered and that the package should be run in 32-bit mode.
To run the package in 32-bit mode, access the package properties through Solution Explorer and go to the Debugging tab. There you set the Run64BitRuntime to False, as shown in Figure 13.
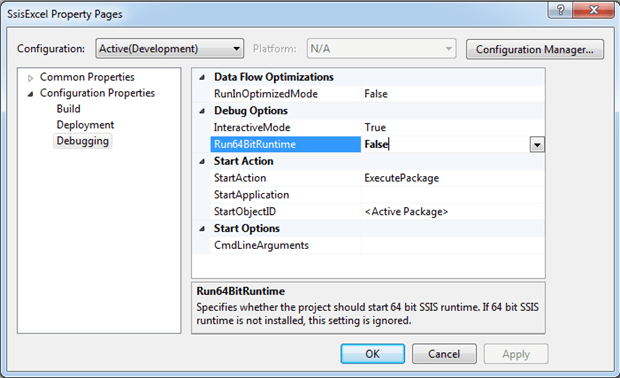
Figure 13: Setting the Run64BitRuntime property to False
Once you’ve reconfigured the Run64BitRuntime property, you should have no problem executing your package, at least not when running the package in Business Intelligence Development Studio (BIDS) or SQL Server Data Tools (SSDT). If you run the package outside of these development environments, you’ll need to make sure you’re doing so in 32-bit mode. For example, if you run the package from the command line, use the 32-bit version of the dtexec utility, or if you create a SQL Server Agent job to run the package, enable the 32-bit runtime option when configuring the job.
“How do you import a range of cells from an Excel worksheet, rather than all the data on the worksheet?”
Importing a range of cells is basically a matter of defining an SQL SELECT statement within the Excel Source component. The SELECT statement should include a FROM clause that specifies the spreadsheet name and range of cells. For example, the following SELECT statement retrieves that range A10 through E50 from the Emp1 worksheet:
|
1 |
SELECT * FROM [Emp1$A10:E50] |
Notice that the worksheet name includes the trailing dollar sign and that the range is separated by a colon. Also notice that brackets are used to delimit the entire expression. However, the SELECT statement is not limited to the SELECT and FROM clauses and can include some of the elements you find in other SELECT statements. For example, the following SELECT statement adds a WHERE clause to our basic statement:
|
1 2 |
SELECT * FROM [Emp1$A10:E50] WHERE N IS NOT NULL |
The WHERE clause is specifying that the N column should not be NULL in order for the row to be returned. In other words, all rows that contain an actual value in the N column will be included in the data flow.
Column names can be a bit tricky when using a SELECT statement to retrieve a range of cells from a spreadsheet. The column names will depend on where the range starts and whether the First row has column names option is selected in the Excel connection manager. In some cases, the column names will be based on a regular row of data. For example, if the spreadsheet contains employee information, such as their IDs, names, and date of birth, your column names might look something like 9, Gigi, N, Mathew, and 1973-02-21, even though the original columns names at the top of the spreadsheet are EmpID, FirstName, MiddleName, LastName, and BirthDate, respectively. (This should become clearer in a moment.)
To use a SELECT statement to retrieve data from a spreadsheet, open the Excel Source Editor, select SQL command from the Data access mode drop-down list, and enter the statement in the SQL command text box, as shown in Figure 14.
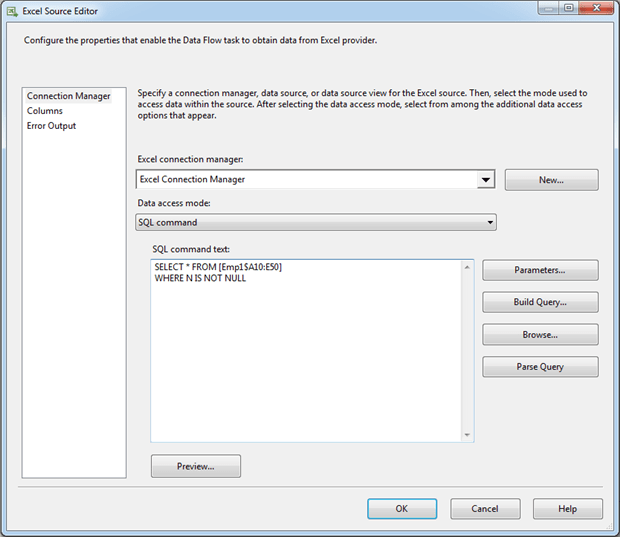
Figure 14: Importing a range of cells from an Excel worksheet
Once you’ve entered your statement, you can click the Preview button to display the data (or part of the data). Figure 15 shows the Preview Query Results window. As you can see, the columns names are made up of a row of data, starting with the value 9. The N in this case turns out to be someone’s middle initial. The actual data then follows.
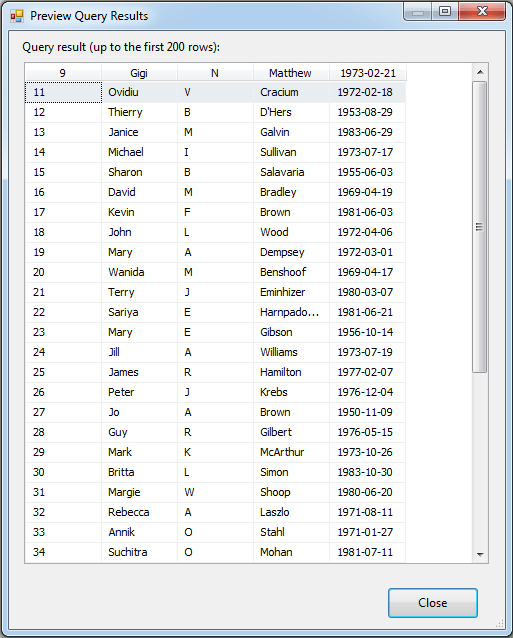
Figure 15: Previewing data retrieved from an Excel spreadsheet
Because the column names can often be simply a row of data, you’ll likely want to assign more useful names to the output columns, which you can do on the Columns page of the Excel Source Editor, as shown in Figure 16.
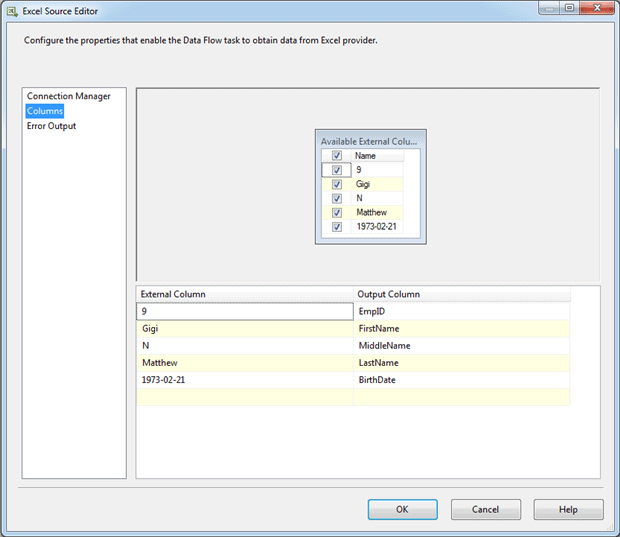
Figure 16: Assigning user-friendly column names to the output columns
Notice that the external column names are simply the first row of data, but we’ve modified the output column names to make it easier to understand the type of data we’re working with and to distinguish one column from the other. We will use these new column names in any subsequent components in the data flow.
“My SSIS package includes a Data Conversion transformation for reducing the size of the Unicode string columns that are retrieved from an Excel spreadsheet. Is there a way to redirect rows that contain values too large for the new column size?”
The easiest way to redirect the rows in this case is to add a Conditional Split transformation to your data flow. For example, suppose your data flow currently includes an Excel Source component to retrieve data form a spreadsheet, a Data Conversion transformation to convert the DT_WSTR(255) columns to DT_WSTR(50) columns, and an OLE DB Destination component that connects to a SQL Server database. You can add a Conditional Split transformation after the source component to handle any values with a length greater than 50 before you try to pass them through the Data Conversion transformation, as shown in Figure 17.
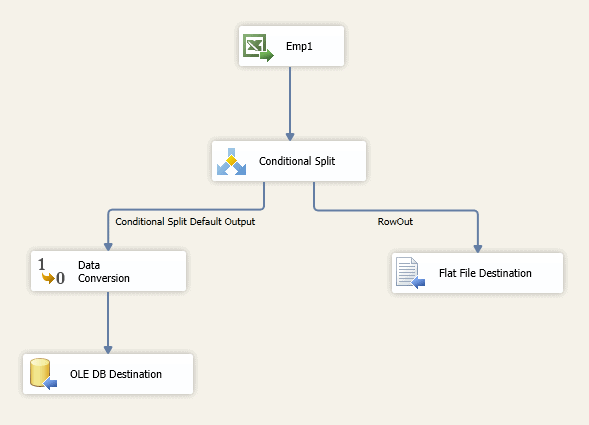
Figure 17: Adding a Conditional Split transformation to the data flow
In this case, the Conditional Split transformation sends the rows with the oversized values to a flat file; however, you can send the data to any appropriate destination. The trick is to make sure you get your expression right when you define the condition in the transformation. This expression is what determines which rows to redirect to the flat file. Figure 18 shows a single condition, but the expression associated with that condition handles all three string columns: FirstName, MiddleName, and LastName.
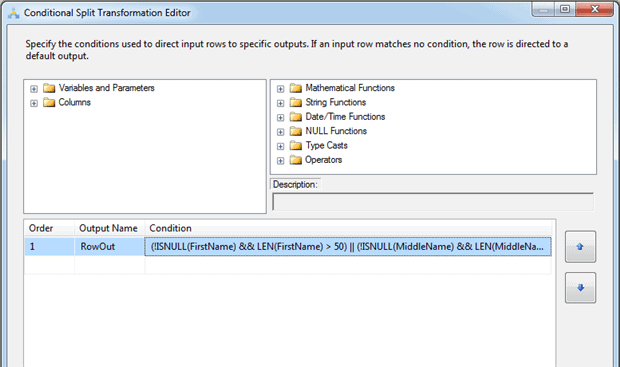
Figure 18: Defining the condition that determines which rows are redirected
The expression actually consists of three parts, one for each column, connected by the or (||) conditional operator. The expression is included here so you can better view it in its entirety:
|
1 |
(!ISNULL(FirstName) && LEN(FirstName) > 50) || (!ISNULL(MiddleName) && LEN(MiddleName) > 50) || (!ISNULL(LastName) && LEN(LastName) > 50) |
Essentially, the expression tests each column to verify that it is not NULL and that its length is greater then 50. If both of these conditions are True for any one column, then the row is redirected to the RowOut output, which connects to the Flat File Destination component. If none of the string columns meets these conditions, then the row follows the regular data path and is sent on to the Data Conversion transformation. By redirecting rows in this way, you can examine any of those unexpectedly large values in order to determine what might be going on with your source data.
“How do I join data from multiple worksheets within a single Excel file?”
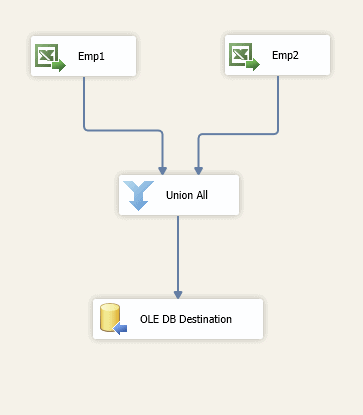
Figure 19: Retrieving data from multiple worksheets
SSIS makes it easy to join data from multiple worksheets as long as you know how many worksheets and what they’ll be named and are confident the data structure is similar among them. For example, suppose we’re working with an Excel workbook that contains employee data. The workbook includes two worksheets (Emp1 and Emp2), the worksheets contain the same columns (EmpID, FirstName, MiddleName, LastName, and BirthDate), and each worksheet contains it own subset of data. You can create a data flow that includes two Excel Source components and a Union All component to join the data together, as shown in Figure 19.
The two Excel Source components use the same connection manager to access the workbook file. However, each source component points to a different worksheet within that file. Figure 20 shows the Connection Manager page in the Excel Source Editor for the second worksheet (emp2). Notice that you select the worksheet name from the Name of the Excel sheet drop-down list, unless you include the name as part of an SQL statement.
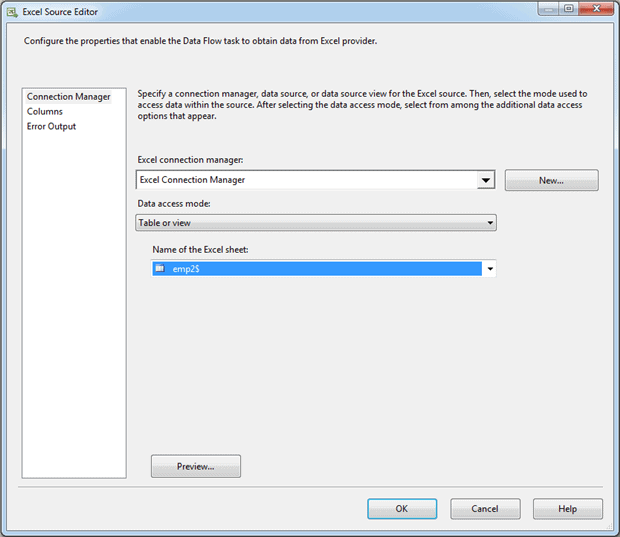
Figure 20: Specifying an Excel worksheet in the Excel Source Editor
In some cases, the worksheets won’t be structured identically, but will be structured similarly enough to work with them together. If this occurs, you might have to use a SQL statement to retrieve only a range of cells, select specific columns from the Columns page, or a combination of both. The goal is to end up with similar data paths coming from both source components. In this sense, it doesn’t matter whether the worksheets come from the same workbook or from different workbooks. What matters are those data paths. You can then use the Union All transformation to join them together. Figure 21 shows the Union All Transformation Editor, with the two sets of input columns and the single set of output columns.
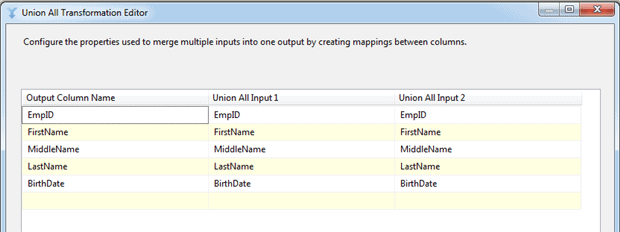
Figure 21: Configuring the Union All transformation to join the two data sources
After you’ve joined the two data paths into a single path, you can send the data to your destination or make any other necessary transformations. One way this approach can get a bit complicated, however, is if you don’t know the names of all your spreadsheets. In such cases, you’ll likely need to add a Script component that retrieves the spreadsheet names and then use a Foreach Loop container to iterate through the list of names. In addition, if your spreadsheets are set up too differently from each other to easily join data flows together gate, you might have to first transform the data before joining data paths or handle the operations as separate data flows.
“I’m using SSIS to retrieve data from an Excel worksheet and inserting the data into a SQL Server table. The table includes several VARCHAR columns. I’m receiving an error message saying that I cannot convert Unicode data to non-Unicode data. What steps do I have to take to transform the data?”
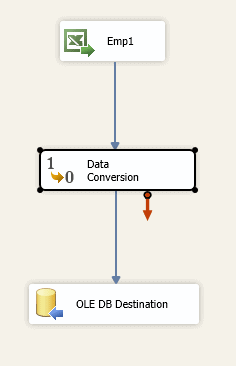
Figure 22: Adding a Data Conversion
transformation to your data flow
You can add a Data Conversion transformation to your data flow to convert the string columns from the DT_WSTR data type to the DT_STR data type. For example, you might have a simple data flow that consists only of an Excel Source component and an OLE DB Destination component. You can add the Data Conversion transformation after the source component to convert the data from Unicode to non-Unicode, as shown in Figure 22.
When configuring the Data Conversion transformation, you simply specify the target data type and provide alias names for the output columns. You can also take advantage of this conversion to reduce the size of the columns. Figure 23 shows the Data Conversion Transformation Editor configured to convert three string columns from DT_WSTR(255) to DT_STR(50).
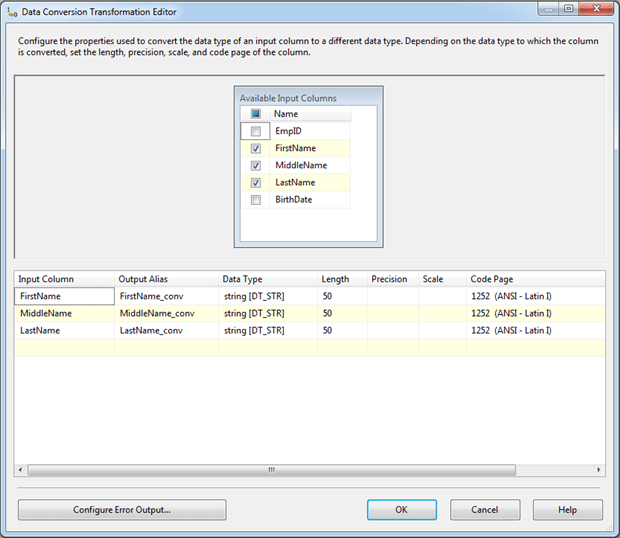
Figure 23: Converting the Unicode data to non-Unicode data
Notice that an output alias is assigned to each column. We will then use the output aliases in any subsequent components. For example, in this case, we would update our OLE DB Destination component to map the destination columns to the alias names, as shown in Figure 24.
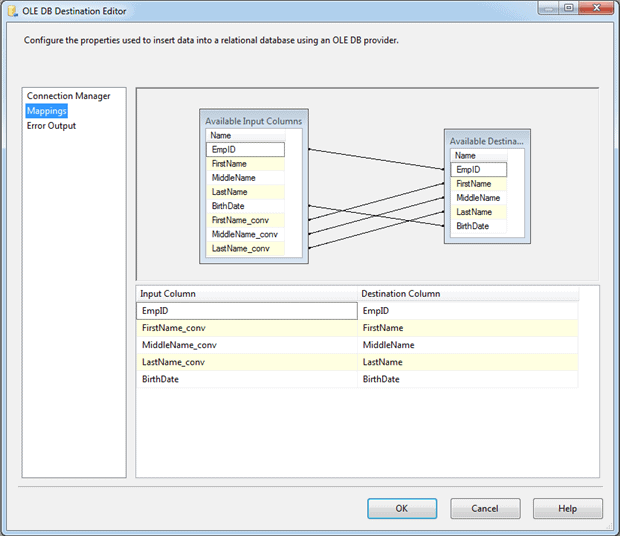
Figure 24: Mapping the converted data to the target data in the OLE DB Destination Editor
SSIS should now be able to load the data into the target table with no problem, unless someone slips a value into the spreadsheet that cannot be converted to a non-Unicode value or a value over 50 characters long. That’s why, if you plan to convert data in this way, you’ll likely want to add error handling to your package, which happens to be the topic of the next question.
“In my data flow, I’m converting data I retrieve from an Excel spreadsheet to the VARCHAR data type. How do I handle errors for the data that will not convert?”
It’s not uncommon when retrieving data from an Excel spreadsheet to have to convert Unicode columns to non-Unicode ones. For example, you might be trying to accommodate legacy database whose schema cannot be updated. In SSIS, that translates to converting one or more columns from the DT_WSTR data type to the DT_STR data type. As long as your string data is made up of basic Latin characters, you should have no problems. But if you find yourself faced with an occasional value written in a language such as Chinese, Japanese, or Arabic, you’ll need to handle the rows that contain these values; otherwise, your SSIS package will generate an error.
The path of least resistance in this case is to add error handling to your Data Conversion component, in which case, you would output any potential errors and truncations to a text file or other type of destination, as shown in Figure 25.
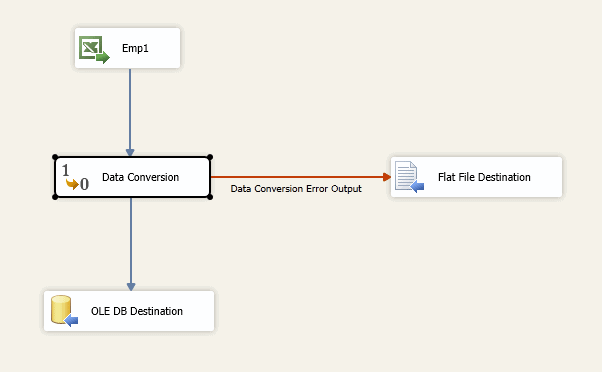
Figure 25: Outputting rows that generate errors to a text file
Notice that the data path that connects the Data Conversion transformation to the Flat File Destination component is red and includes a note stating that this is error output. To configure the transformation’s error output, open the Data Conversion Transformation Editor and click the button Configure Error Output. This opens the Configure Error Output dialog box, which is shown in Figure 26.
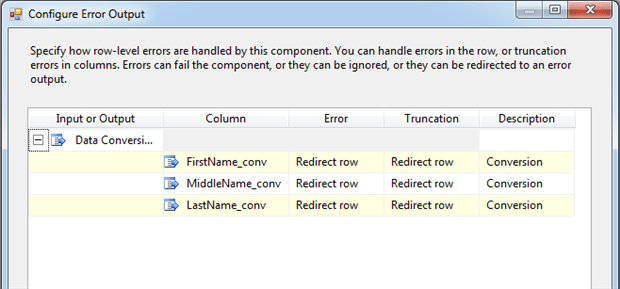
Figure 26: Configuring error handling in the Data Conversion transformation
For each column being converted, select the Redirect Row option for both errors and truncations to ensure you catch all possible scenarios. Then close the dialog box and make sure the error output path is connected to the Flat File Destination component. That way, whenever an error or truncation occurs, such as a language element that requires a Unicode column, you’ll be able to examine the error in the flat file.
“How do I retrieve data from multiple Excel workbook files?”
Figure 27: Setting up a Foreach Loop container
SSIS includes the Foreach Loop container to support operations such as iterating through multiple files. You can use the container to run a Data Flow task for each Excel file. To do so, start by adding a Foreach Loop container to your control flow and then adding a Data Flow task to the container, as shown in Figure 27.
To support this operation, you’ll also need to add a user-defined variable to your package. The variable will hold the current path and file name of each Excel file every time the package loops through the container. For our example here, we’ve created a string variable called filename and set it’s initial value to the fully qualified name of the first Excel file in our target directory.
Once we’ve created our variable, we can edit the Foreach Loop container. Double-click the container and then go to the Collection page, where we set the target folder and the file type, as shown in Figure 28.
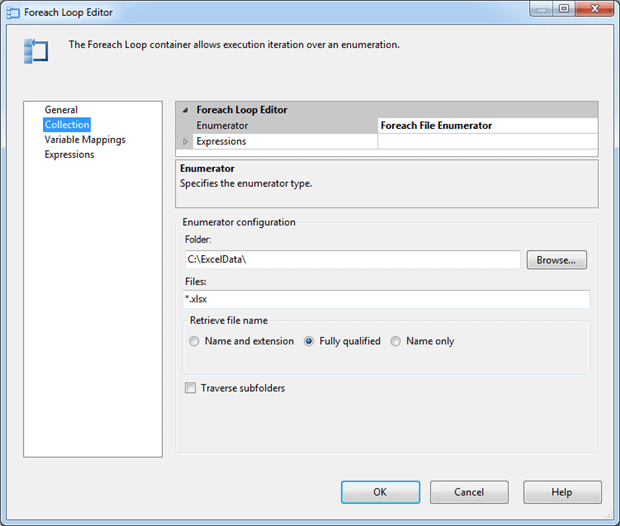
Figure 28: Configuring the Collection page of the Foreach Loop Editor
In this case, we’re using C:\ExcelData\ as the target folder and *.xlsx as the files as our source data. As a result, our Foreach Loop container will run once for each .xlsx file in the target folder. We’ve left all other options with their default settings.
Next we jump to the Variable Mappings page. Here we select the filename variable in the grid, and ensure that 0 is specified for the index value. Figure 29 shows how we’ve added the variable to the Variable Mappings page. Now that variable will store the qualified name for each file as we loop through the collection.
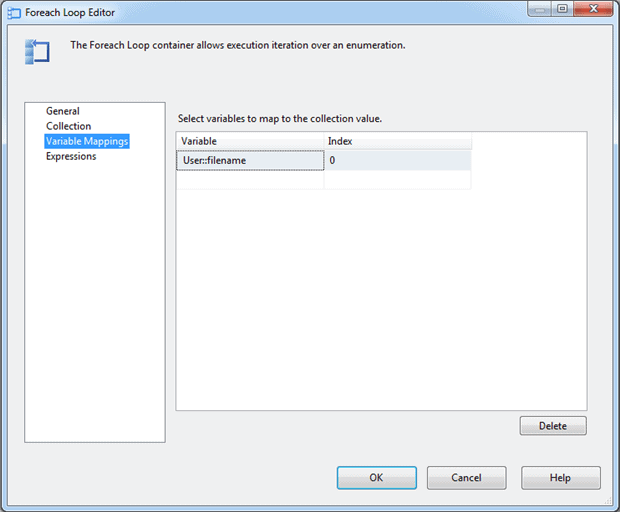
Figure 29: Configuring the Variable Mappings page of the Foreach Loop Editor
There’s one other step we must take to set up our SSIS package to loop through a set of files. We must update one of the properties in our Excel connection manager. In this case, we want to assign an expression to the ConnectionString property. The property expression uses the filename variable to insert the correct file path and name into the connection string. Figure 30 shows the Expression Builder dialog box for the ConnectionString property. In this case, we’re using the ACE OLEDB provider to connect to the Excel files.
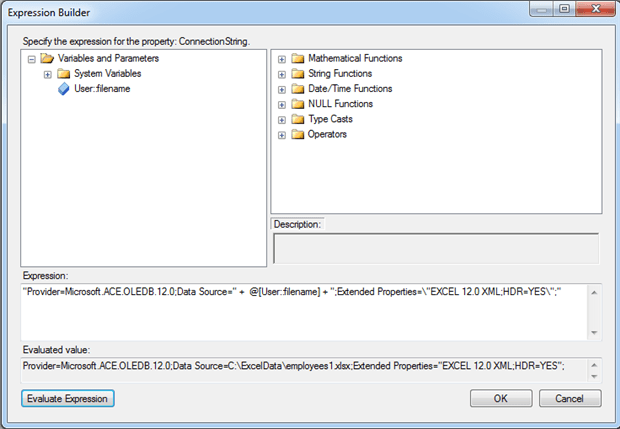
Figure 30: Building an expression for the ConnectionString property
Because we’ve created a property expression, the connection manager will now point to the most current file whenever the Foreach Loop container iterates through the files and subsequently runs the Data Flow task. The Data Flow task will contain an Excel Source component and any other necessary components. The source component itself is configured just like normal. The Foreach Loop container in combination with the property expression in the Excel connection manager is what makes this operation dynamic. The Excel Source component is business as usual.
All this is, of course, a basic overview of how to use the Foreach Loop container and a property expression. Be sure to refer to Microsoft documentation for more specifics about how all these components work. Keep in mind, however, the configuration we covered here assumes that you know the names of the individual spreadsheets and that they’re configured identically. If that’s not the case, you’ll have to incorporate more logic into your package to cover whatever scenarios apply.
This document contains proprietary information and is protected by copyright law.
Copyright © 2026 Red Gate Software Limited. All rights reserved


Load comments