
There might be times when developing a SQL Server Integration Services (SSIS) package that you want to perform a lookup in order to supplement or validate the data in your data flow. A lookup lets you access data related to your current dataset without having to create a special structure to support that access.
To facilitate the ability to perform lookups, SSIS includes the Lookup transformation, which provides the mechanism necessary to access and retrieve data from a secondary dataset. The transformation works by joining the primary dataset (the input data) to the secondary dataset (the referenced data). SSIS attempts to perform an equi-join based on one or more matching columns in the input and referenced datasets, just like you would join two tables in in a SQL Server database.
Because SSIS uses an equi-join, each row of the input dataset must match at least one row in the referenced dataset. The rows are considered matching if the values in the joined columns are equal. By default, if an input row cannot be joined to a referenced row, the Lookup transformation treats the row as an error. However, you can override the default behavior by configuring the transformation to instead redirect any rows without a match to a specific output. If an input row matches multiple rows in the referenced dataset, the transformation uses only the first row. The way in which the other rows are treated depends on how the transformation is configured.
The Lookup transformation lets you access a referenced dataset either through an OLE DB connection manager or through a Cache connection manager. The Cache connection manager accesses the dataset held in an in-memory cache store throughout the duration of the package execution. You can also persist the cache to a cache file (.caw) so it can be available to multiple packages or be deployed to several computers.
The best way to understand how the Lookup transformation works is to see it in action. In this article, we’ll work through an example that retrieves employee data from the AdventureWorks2008R2 sample database and loads it into two comma-delimited text files. The database is located on a local instance of SQL Server 2008 R2. The referenced dataset that will be used by the Lookup transformation is also based on data from that database, but stored in a cache file at the onset of the package execution.
The first step, then, in getting this example underway is to set up a new SSIS package in Business Intelligence Development Studio (BIDS), add two Data Flow tasks to the control flow, and connect the precedence constraint from the first Data Flow task to the second Data Flow task, as I’ve done in Figure 1.
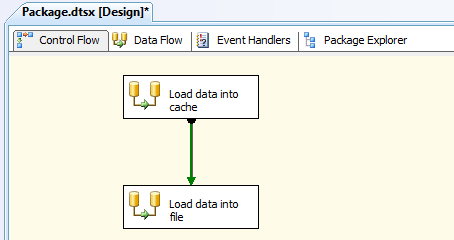
Figure 1: Adding data flow components to your SSIS package
Notice that I’ve named the fist Data Flow task Load data into cache and the second one Load data into file. These names should make it clear what purpose each task serves. The Data Flow tasks are also the only two control flow components we need to add to our package. Everything else is at the data flow level. So let’s get started.
Writing Data to a Cache
Because we’re creating a lookup based on cached data, our initial step is to configure the first data flow to retrieve the data we need from the AdventureWorks2008R2 database and save it to a cache file. Figure 2 shows what the data flow should look like after the data flow has been configured to cache the data. As you can see, you need to include only an OLE DB source and a Cache transformation.
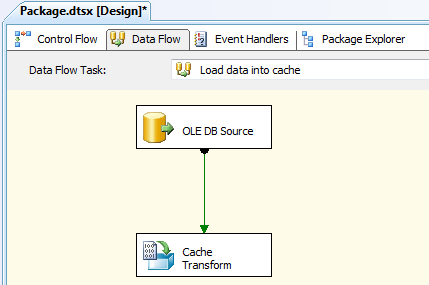
Figure 2: Configuring the data flow that loads data into a cache
Before I configured the OLE DB source, I created an OLE DB connection manager to connect to the AdventureWorks2008R2 database on my local instance of SQL Server. I named the connection manager AdventureWorks2008R2.
I then configured the OLE DB source to connect to the AdventureWorks2008R2 connection manager and to use the following T-SQL statement to retrieve the data to be cached:
|
1 2 3 4 5 6 7 8 9 10 |
USE AdventureWorks2008R2; GO SELECT BusinessEntityID, NationalIDNumber FROM HumanResources.Employee WHERE BusinessEntityID < 250; |
Notice that I’m retrieving a subset of data from the HumanResources.Employee table. The returned dataset includes two columns: BusinessEntityID and NationalIDNumber. We will use the BusinessEntityID column to match rows with the input dataset in order to return a NationalIDNumber value for each employee. Figure 3 shows what your OLE DB Source editor should look like after you’ve configured it with the connection manager and T-SQL statement.
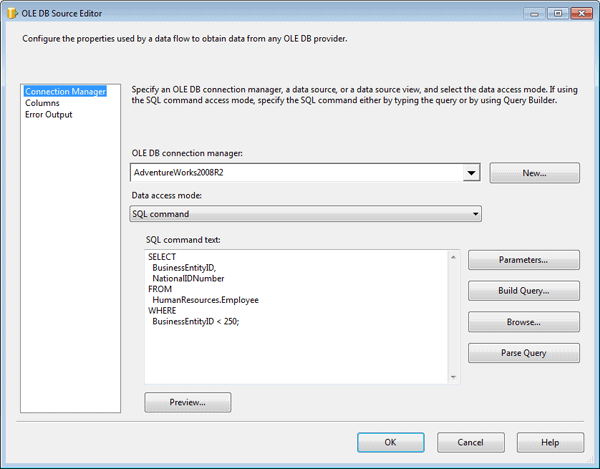
Figure 3: Using an OLE DB source to retrieve data from the AdventureWorks2008R2 database
You can view a sample of the data that will be cached by clicking the Preview button in the OLE DB Source editor. This launches the Preview Query Results dialog box, shown in Figure 4, which will display up to 200 rows of your dataset. Notice that a NationalIDNumber value is associated with each BusinessEntityID value. The two values combined will provide the cached data necessary to create a lookup in your data flow.
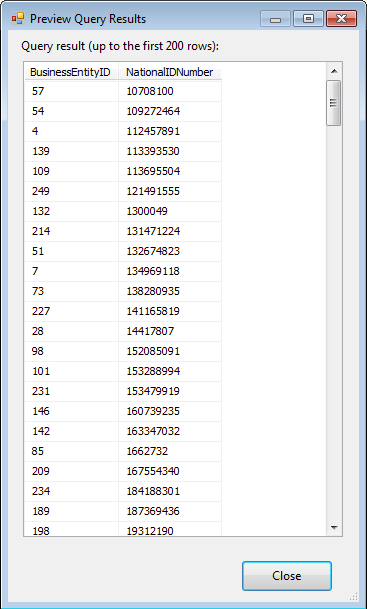
Figure 4: Previewing the data to be saved to a cache
After I configured the OLE DB source, I moved on to the Cache transformation. As part of the process of setting up the transformation, I first configured a Cache connection manager. To do so, I opened the Cache Transformation editor and clicked the New button next to the Cacheconnection manager drop-down list. This launched the Cache Connection Manager editor, shown in Figure 5.

Figure 5: Adding a Cache connection manager to your SSIS package
I named the Cache connection manager NationalIdCache, provided a description, and selected the Use File Cache checkbox so my cache would be saved to a file. This, of course, isn’t necessary for a simple example like this, but having the ability to save the cache to a file is an important feature of the SSIS lookup operation, so that’s why I’ve decided to demonstrate it here.
Next, I provided and path and file name for the .caw file, and then selected the Columns tab in the Cache Connection Manager editor, which is shown in Figure 6.
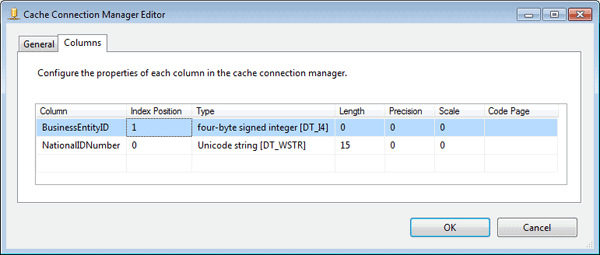
Figure 6: Configuring the column properties in your Cache connection manager
Because I created my Cache connection manager from within the Cache transformation, the column information was already configured on the Columns tab. However, I had to change the Index Position value for the BusinessEntityID column from 0 to 1. This column is an index column, which means it must be assigned a positive integer. If there are more than one index columns, those integers should be sequential, with the column having the most unique values being the lowest. In this case, there is only one index column, so I need only assign one value. The NationalIDNumber is a non-index column and as such should be configured with an Index Position value of 0, the default value.
When a Cache connection manager is used in conjunction with a Lookup transformation, as we’ll be doing later in this example, the index column (or columns) is the one that is mapped to the corresponding column in the input dataset. Only index columns in the referenced dataset can be mapped to columns in the input dataset.
After I set up the Cache connection manager, I configured the Cache transformation. First, I confirmed that the Cache connection manager I just created is the one specified in the Cache connection manager drop-down list on the Connection Manager page of the Cache Transformation editor, as shown in Figure 7.
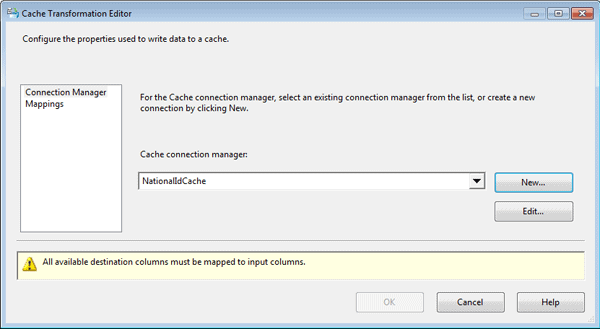
Figure 7: Setting up the Cache transformation in your data flow
Next, I confirmed the column mappings on the Mappings page of the Cache Transformation editor. Given that I hadn’t changed any column names along with way, these mappings should have been done automatically and appear as they do in Figure 8.
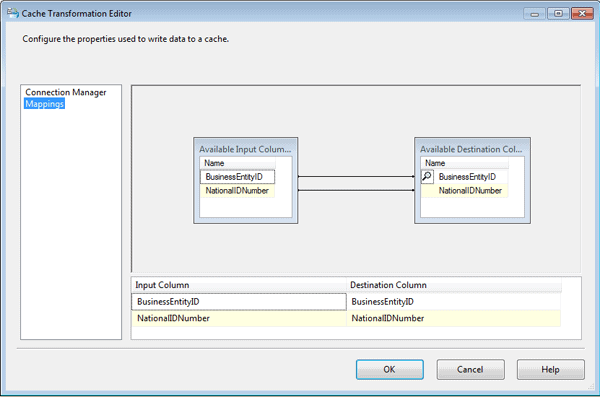
Figure 8: Mapping columns in the Cache transformation
That’s all there is to configuring the first data flow to cache the referenced data. I confirmed that everything was running properly by executing only this data flow and then confirming that the .caw file had been created in its designated folder. We can now move on to the second data flow.
Performing Lookups from Cached Data
The second data flow is the one in which we perform the actual lookup. We will once again retrieve employee data from the AdventureWorks2008R2 database, look up the national ID for each employee (and adding it to the data flow), and save the data to one of two files: the first for employees who have an associated national ID and the second file for those who don’t. Figure 9 shows you what your data flow should look like once you’ve added all the components.
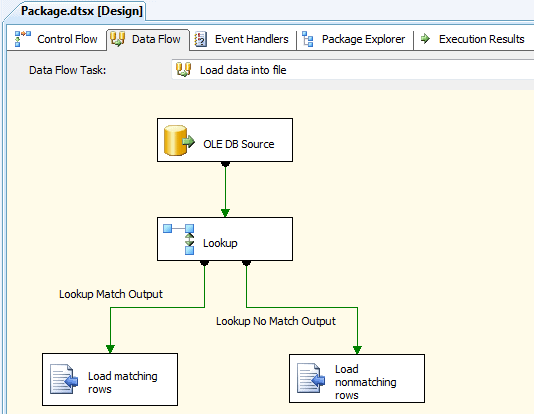
Figure 9: Configuring the data flow to load data into text files
The first step I took in setting up this data flow was to add an OLE DB source and configure it to connect to the AdventureWorks2008R2 database via to the AdventureWorks2008R2 connection manager. I then specified that the source component run the following T-SQL statement in order to retrieve the necessary employee data:
|
1 2 3 4 5 6 7 |
SELECT BusinessEntityID, FirstName, LastName, JobTitle FROM HumanResources.vEmployee; |
The data returned by this statement represents the input dataset that will be used for our lookup operation. Notice that the dataset includes the BusinessEntityID column, which will be used to map this dataset to the referenced dataset. Figure 10 shows you what the Connection Manager page of the OLE DB Source editor should look like after you’ve configured that connection manager and query.
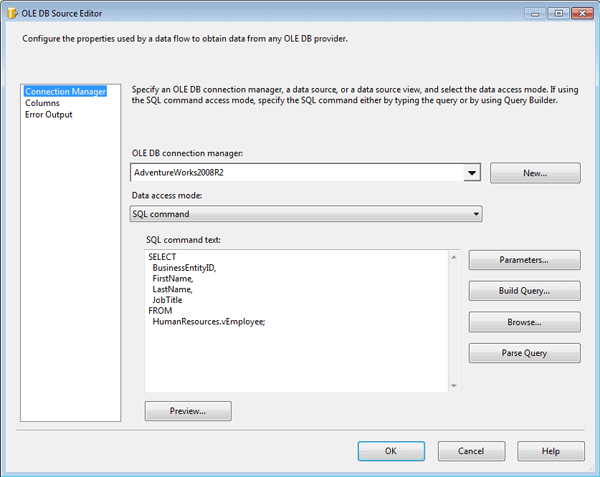
Figure 10: Configuring an OLE DB source to retrieve employee data
As you did with the OLE DB source in the first data flow, you can preview the data returned by the SELECT statement by clicking the Preview button. Your results should look similar to those shown in Figure 11.
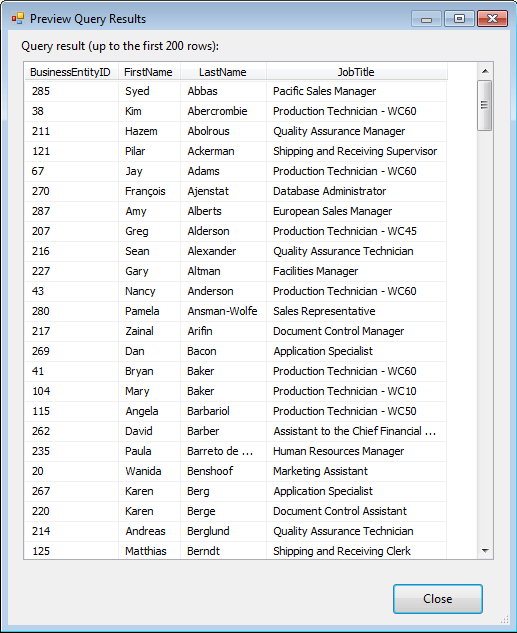
Figure 11: Previewing the employee data returned by the OLE DB source
My next step was to add a Lookup transformation to the data flow. The transformation will attempt to match the input data to the referenced data saved to cache. When you configure the transformation you can choose the cache mode and connection type. You have three options for configuring the cache mode:
- Full cache: The referenced dataset is generated and loaded into cache before the Lookup transformation is executed.
- Partial cache: The referenced dataset is generated when the Lookup transformation is executed, and the dataset is loaded into cache.
- No cache: The referenced dataset is generated when the Lookup transformation is executed, but no data is loaded into cache.
For this exercise, I selected the first option because I am generating and loading the data into cache before I run the Lookup transformation. Figure 12 shows the General page of the Lookup Transformation editor, with the Full Cache option selected.
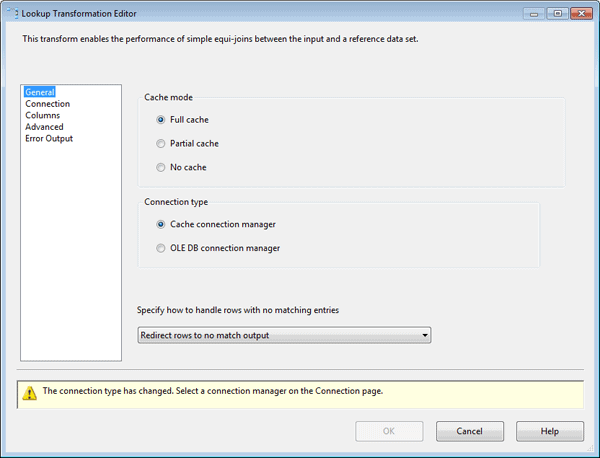
Figure 12: Configuring the General page of the Lookup Transformation editor
Notice that the editor also includes the Connection type section, which supports two options: Cache Connection Manager and OLE DB Connection Manager. In this case, I selected the Cache Connection Manager option because I will be retrieving data from a cache file, and this connection manager type is required to access the data in that file.
As you can see in Figure 12, you can also choose an option from the drop-down list Specify how to handle rows with no matching entries. This option determines how rows in the input dataset are treated if there are no matching rows in the referenced database. By default, the unmatched rows are treated as errors. However, I selected the Redirect rows to no match output option so I could better control the unmatched rows, as you’ll see in a bit.
After I configured the General page of the Lookup Transformation editor, I moved on to the Connection page and ensured that the Cache connection manager named NationalIdCache was selected in the Cache Connection Manager drop-down list. This is the same connection manager I used in the first data flow to save the dataset to a cache file. Figure 13 shows the Connection page of the Lookup Transformation editor with the specified Cache connection manager.
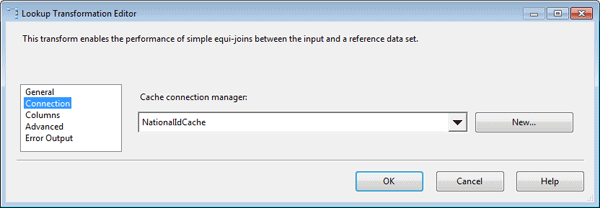
Figure 13: Configuring the Connection page of the Lookup Transformation editor
Next, I configured the Columns page of the Lookup Transformation editor, shown in Figure 14. I first mapped the BusinessEntityID input column to the BusinessEntityID lookup column by dragging the input column to the lookup column. This process created the black arrow between the tables that you see in the figure. As a result, the BusinessEntityID columns will be the ones used to form the join between the input and referenced datasets.
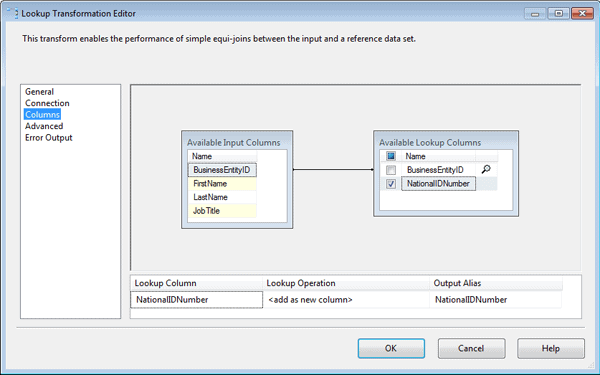
Figure 14: Configuring the Columns page of the Lookup Transformation editor
Next, I selected the checkbox next to the NationalIDNumber column in the lookup table to indicate that this was the column that contained the lookup values I wanted to add to the data flow. I then ensured that the lookup operation defined near the bottom of the Columns page indicated that a new column would be added as a result of the lookup operation. The Columns page of your Lookup Transformation editor should end up looking similar to Figure 14.
My next step was to add a Flat File destination to the data flow. When I connected the data path from the Lookup transformation to the Flat File destination, the Input Output Selection dialog box appeared, as shown in Figure 15. The dialog box let’s you chose which data flow output to send to the flat file-the matched rows or the unmatched rows. In this case, I went with the default, Lookup Match Output, which refers to the matched rows.
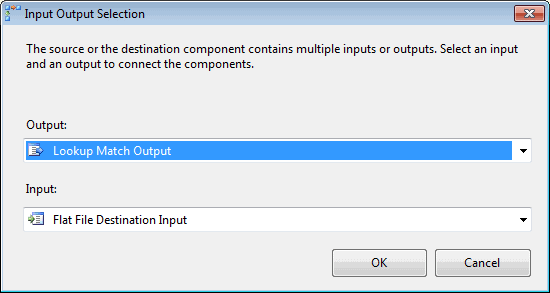
Figure 15: Selecting an output for the Lookup transformation
Next, I opened the Flat File Destination editor and clicked the New button next to the Flat File Connection Manager drop-down list. This launched the Flat File Connection Manager editor, shown in Figure 16. I typed the name MatchingRows in the Connection manager name text box, typed the file name C:\DataFiles\MatchingRows.txt in the File name text box, and left all other setting with their default values.
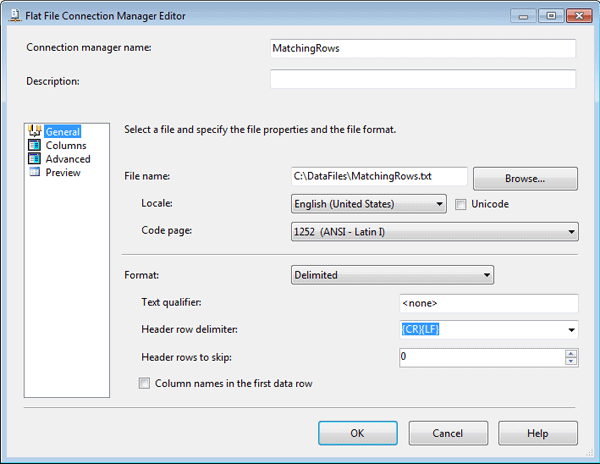
Figure 16: Setting up a Flat File connection manager
After I saved my connection manager settings, I was returned to the Connection Manager page of the Flat File Destination editor. The MatchingRows connection manager was now displayed in the Flat File Connection Manager drop-down list, as shown in Figure 17.
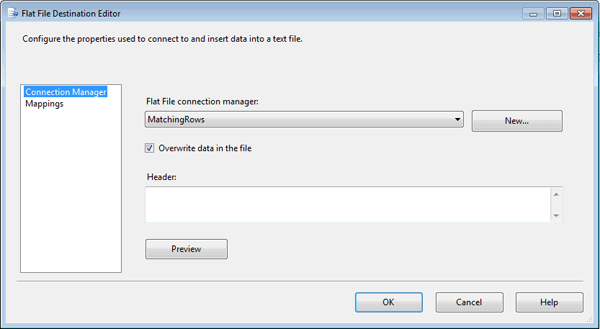
Figure 17: Configuring a Flat File destination in your data flow
I then selected the Mappings page (shown in Figure 18) to verify that the columns were properly mapped between the data flow and the file destination. One thing you’ll notice at this point is that the data flow now includes the NationalIDNumber column, which was added to the data flow by the Lookup transformation.

Figure 18: Verifying column mappings in your Flat File destination
The next step I took in configuring the data flow was to add a second Flat File destination and connect the second data path from the Lookup transformation to the new destination. I then configured a second connection manager with the name NonMatchingRows and the file name C:\DataFiles\NonMatchingRows.txt. All rows in the input data that do not match rows in the referenced data will be directed to this file. Refer back to Figure 9 to see what your data flow should look like at this point.
Running Your SSIS Package
The final step, of course, is to run the SSIS package in BIDS. When I ran the package, I watched the second data flow so I could monitor how many rows matched the lookup dataset and how many did not. Figure 19 shows the data flow right after I ran the package.
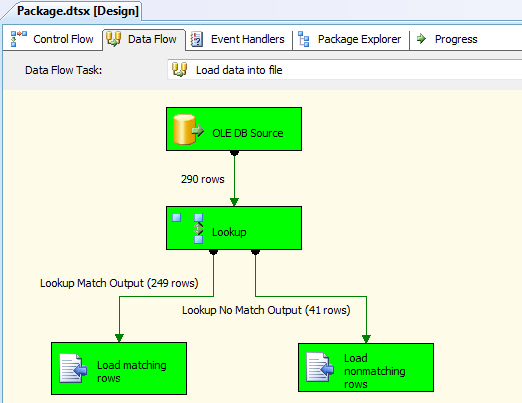
Figure 19: Running your SSIS package
In this case, 249 rows in the input dataset matched rows in the referenced dataset, and 41 rows did not. These are the numbers I would have expected based on my source data. I also confirmed that both text files had been created and that they contained the expected data.
As you can see, the Lookup transformation makes it relatively easy to access referenced data in order to supplement the data flow. For this example, I retrieved my referenced data from the same database as I retrieved the input data. However, that referenced data could have come from any source whose data could be saved to cache, or it could have come directly from another database through an OLE DB connection. Once you understand the principles behind the Lookup transformation, you can apply them to your particular situation in order to create an effective lookup operation.
This document contains proprietary information and is protected by copyright law.
Copyright © 2026 Red Gate Software Limited. All rights reserved


Load comments