
MySQL’s SELECT…INTO OUTFILE clause exports query results directly to a text file on the server. Add INTO OUTFILE ‘/path/to/file.csv’ to any SELECT statement to write the result set to a file. You can control the output format with FIELDS TERMINATED BY (column delimiter, default tab), FIELDS ENCLOSED BY (value quoting), and LINES TERMINATED BY (row delimiter, default newline). The file must not already exist, the MySQL user must have the FILE privilege, and the output path must comply with the secure-file-priv setting. This guide demonstrates the full syntax with working examples for CSV, TSV, and custom-delimited exports.
This article is part of Robert Sheldon's continuing series on Learning MySQL. To see all of the items in the series, click here.
In the previous article in this series, I introduced you to the MySQL LOAD DATA statement, which lets you retrieve data from a plain text file and insert it into a table. In this article, I cover the SELECT…INTO OUTFILE statement, a type of SELECT statement that includes the INTO OUTFILE clause. The clause lets you export data from one or more MySQL tables into a plain text file, providing a counterpart to the LOAD DATA statement.
Building a SELECT…INTO OUTFILE statement is relatively straightforward. The main part of the SELECT statement (without the INTO OUTFILE clause) is like any other SELECT statements, except for a couple minor considerations. And the INTO OUTFILE clause itself is fairly easy to construct. Perhaps the biggest issue you’ll run into is not having the permissions necessary to save a file to the target folder, which I discuss later in the article. Otherwise, you should have little problem getting started with the INTO OUTFILE clause.
In this article, I show you multiple examples that demonstrate how the clause works so you have a foundation in how to use it to export data. Most of the examples are built with basic SELECT statements, so they should be fairly easy for you to try out. If you have any questions about the SELECT statement itself (other than the INTO OUTFILE clause), refer to an earlier article in this series that introduces you to the statement.
Note: The examples in this article are based on a local instance of MySQL that hosts a very simple database and tables. The last section of the article—“Appendix: Preparing your MySQL environment”—provides information about how I set up my system and includes the SQL script for creating the database and tables on which the examples are based.
Introducing the SELECT…INTO OUTFILE statement
Before we jump into the examples, you should have a basic understanding of the INTO OUTFILE clause and how it fits into a SELECT statement. The following syntax shows the elements that make up the clause:
|
1 2 3 4 5 6 7 8 9 |
SELECT <em>statement_elements</em> INTO OUTFILE '<em>file_name</em>' [FIELDS [TERMINATED BY '<em>string</em>'] [[OPTIONALLY] ENCLOSED BY '<em>char</em>'] [ESCAPED BY '<em>char</em>']] [LINES [STARTING BY '<em>string</em>'] [TERMINATED BY '<em>string</em>']]; |
The SELECT statement itself is shown only with statement_elements placeholder, which represents all the elements that can potentially be included in a SELECT statement, other than the INTO OUTFILE clause. For the most part, you can create just about any type of SELECT statement. The main caveat is that you should not use an INTO OUTFILE clause in a nested SELECT statement because that statement must return its results to the outer statement.
The MySQL documentation also states that MySQL places “constraints on the use of INTO within UNION statements.” Unfortunately, the documentation does not state what those constraints might be. I was able to run a UNION statement that included an INTO OUTFILE clause tagged onto the end of the statement, and it created the file just fine. However, when I placed the clause just before the first FROM clause, I received an error stating that the INTO clause must be placed at the end of the UNION statement, so perhaps “constraints” applies primarily to the clause’s placement.
In the syntax above, the INTO OUTFILE clause is placed after all the other SELECT statement elements. Strictly speaking, you don’t have to place the clause at the end of the statement (except for a UNION statement or other set operators like INTERSECT and EXCEPT). For example, you can place the clause before the FROM clause or before a locking clause such as FOR UPDATE. According to MySQL documentation, however, the end of the statement is the preferred position. In fact, placing the clause before a locking clause is deprecated as of MySQL 8.0.20, and if you try to do this, you’ll receive a warning message. I recommend that you place the clause at the end of your SELECT statements, as the documentation advises.
Now let’s return to the INTO OUTFILE clause itself. The clause starts by specifying the name of the target file that will hold the result set returned by the SELECT statement. In most cases, this will be a full pathname that points to a location on the MySQL host. If the path is not included, the file will be saved to the folder that holds the database data.
When specifying the INTO OUTFILE clause, you can also include one or more export options, which you define in the optional FIELDS clause and LINES clause. The two clauses are syntactically identical to the ones used for the LOAD DATA statement and work much the same way. The FIELDS clause supports one or more of the following three options:
- The
TERMINATEDBYoption specifies the string used in the text file to terminate each field. The string can be one or more characters. The default value is\tfor tab, which means that tabs are used to separate field values. - The
ENCLOSEDBYoption specifies the character used in the text file to enclose all or some values in the text file. If you include theOPTIONALLYkeyword, theENCLOSEDBYcharacter applies only to values with a string data type, such asCHAR,BINARY,TEXT, orENUM. The default value for theENCLOSEDBYoption is an empty string, indicating that no fields are enclosed by anENCLOSEDBYcharacter. - The
ESCAPEDBYoption specifies the character used in the text file to escape special characters. The default value is a backslash (\), which is used in MySQL to escape special characters, including the backslash itself. Many programming languages also use the backslash to escape characters.
The FIELDS clause is itself optional. If you include it, you must specify at least one of the three options. The LINES clause is also optional. It supports either one or both of the following two options:
- The
STARTINGBYoption specifies the common prefix used at the beginning of each line in the text file. The default value is an empty string, indicating that no specific prefix is used. - The
TERMINATEDBYoption specifies the string used in the text file to terminate each line. The string can be one or more characters. The default value is\n, which refers to a newline character (linefeed). The system on which you’re working might require a different setting. For example,\nworks fine on Mac computers, but you might need to use\r\non Windows system.
If you include both the FIELDS clause and LINES clause, the FIELDS clause must come first. I recommend that you review the MySQL topic LOAD DATA Statement to learn more about the various elements that go into the INTO OUTFILE clause.
Outputting MySQL data to a file
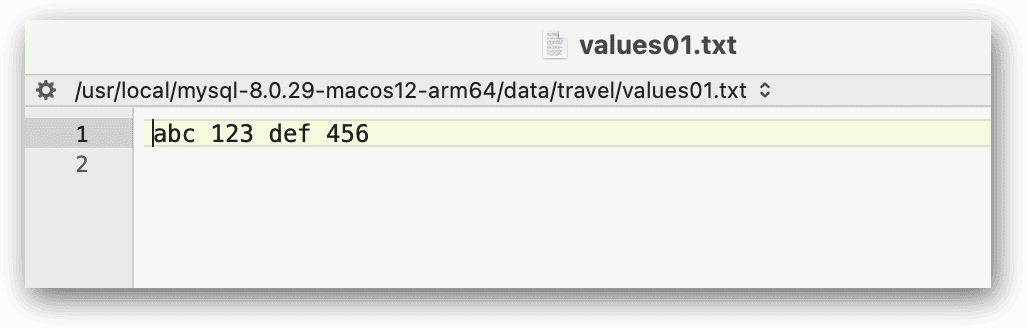
Now that you have a basic understanding of the INTO OUTFILE syntax, let’s start into the examples, which should help you better understand the information above. The most basic SELECT…INTO OUTFILE statement is one that includes only a SELECT clause and an INTO OUTFILE clause, without any export options. The following SELECT statement saves four values (two strings and two integers) to the values01.txt file:
|
1 2 |
SELECT 'abc', 123, 'def', 456 INTO OUTFILE 'values01.txt'; |
The SELECT clause defines the four values, and the INTO OUTFILE clause specifies that name of the new file. The file cannot already exist when you run this statement. It if does, you will receive an error. If it does not exist, MySQL creates the file and inserts the values returned by the SELECT statement. The following figure shows the file opened in BBEdit.
Note: depending on your configuration, you may receive an error such as:
INTO OUTFILE 'values01.txt'
Error Code: 1290. The MySQL server is running with the --secure-file-priv option so it cannot execute this statement
when you execute this statement. You can see this security setting using:
|
1 |
SHOW VARIABLES LIKE "secure_file_priv"; |
This will show you a path that has been set up for you to securely use from the server. You may need to prefix your .txt file names with the path that is returned. Or you can change the setting in your config file to be "" and your file will be output to any location on the server where it has rights to.
When you use the INTO OUTFILE clause, MySQL creates the file on the computer where MySQL is running. There is no way to save the file to another computer unless the remote computer can be accessed via a network-mapped path on the host system.
You might have noticed in the preceding example that the filename is specified without the full pathname. When you don’t specify a pathname, MySQL creates the file in the database directory, which in this case, is the travel directory because you’re working in the travel database. The travel directory stores the data files for the airplanes and manufacturers tables. (Note: on the editor’s Windows machine the file was located in: C:\ProgramData\MySQL\MySQL Server 8.0\Data\travel).
If you’re using a MySQL instance that is not under your control, you might find that database administrators or other stakeholders do not want you to save files to the database directory, in which case, you’ll need to use a different folder. To save the output file elsewhere, you must specify the full pathname in the INTO OUTFILE clause. In addition, the target directory must be configured with the proper write permissions. If you receive an “OS errno 13 – Permission denied” error message when you try to run your statement, you’ll know that something is wrong with the directory permissions.
Another issue that you might have to contend with is that the account you use to log into MySQL must be granted the FILE privilege in order to read and write files on the MySQL host. Without this privilege, you’ll receive an access denied error message when attempting to run your statements. If you’re trying out the examples in this article, chances are you’re running them against a MySQL host that you control, so you can set up the necessary permissions yourself. If you don’t control the host, you’ll need to work with a database or system administrator to get you set up.
With all that in mind, the rest of examples assume that you’ll be targeting a location other than the database directory when defining your INTO OUTFILE clause and that you have all the necessary permissions in place. The next example is similar to the previous one, but it now specifies the full directory path:
|
1 2 |
SELECT 'abc', 123, 'def', 456 INTO OUTFILE '/Users/user1/data/values02.txt'; |
The INTO OUTFILE clause now points the /Users/user1/data/ directory instead of the database folder. However, you can specify whatever directory works for you. (You can also use whatever filename you like.) If you’re working on a Windows system, you should specify pathname backslashes as either forward slashes or double backslashes.
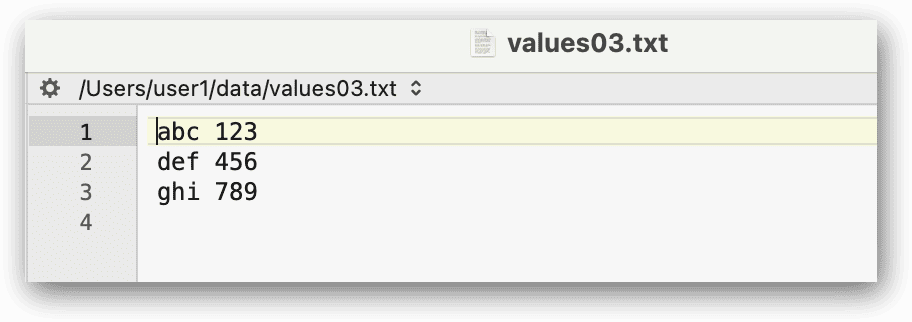
Most SELECT statements include a FROM clause that retrieves data from a table or another type of table structure, such as a VALUES clause or table subquery. For example, the FROM clause in following SELECT statement include a VALUES clause that creates a table with two columns and three rows, which are outputted to the values03.txt file:
|
1 2 3 4 5 6 |
SELECT * FROM (VALUES ROW('abc', 123), ROW('def', 456), ROW('ghi', 789)) AS tbl INTO OUTFILE '/Users/user1/data/values03.txt'; |
When you run the statement, MySQL creates the file and populates it with the returned values, as shown in the following figure:
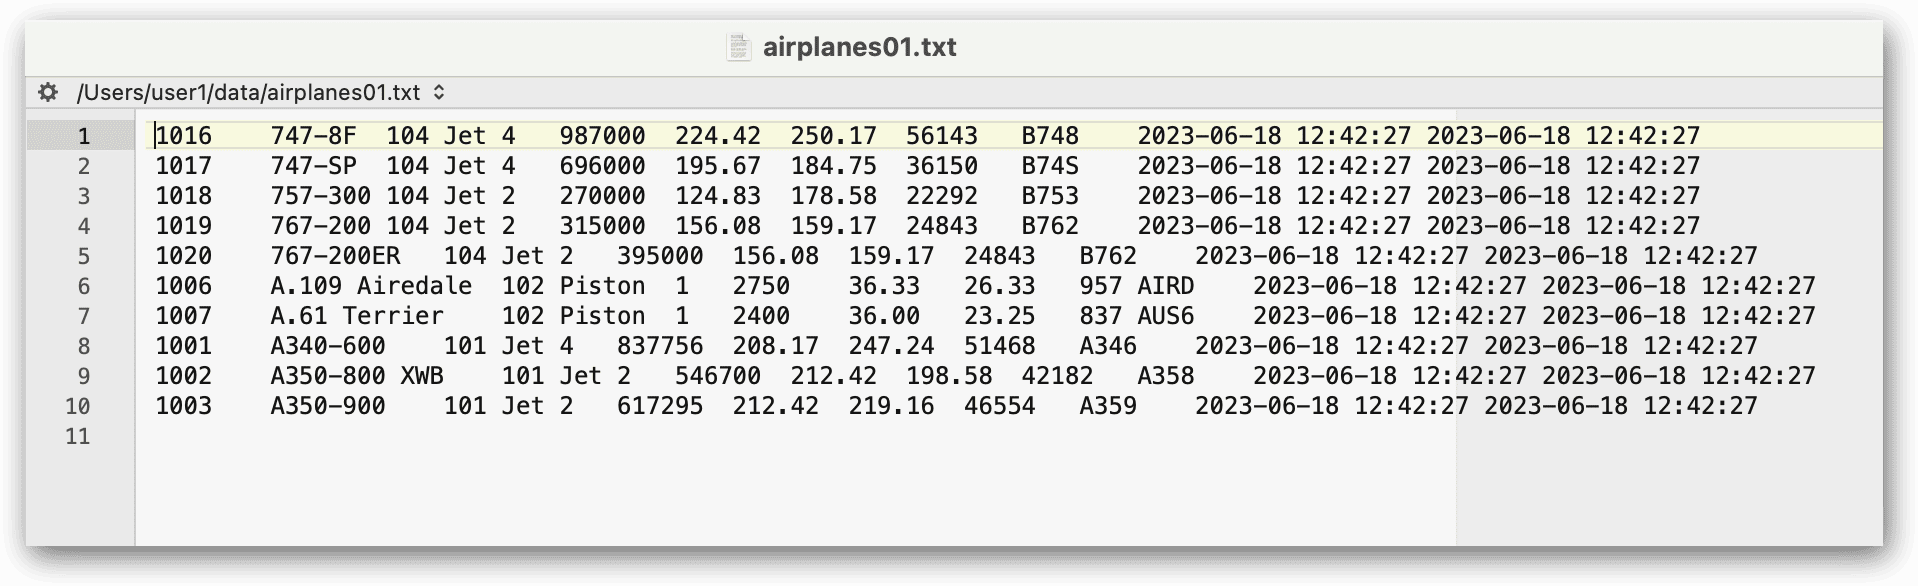
Of course, you can also retrieve data from a regular table and output it to a text file, which is how you’ll most likely be using the INTO OUTFILE clause. For example, the following SELECT statement retrieves data from the airplanes table and outputs those results to the airplanes01.txt file:
|
1 2 3 4 |
SELECT * FROM airplanes ORDER BY plane LIMIT 10 INTO OUTFILE '/Users/user1/data/airplanes01.txt'; |
The SELECT statement sorts the data by the plane column and limits the results to the first 10 rows. Because the SELECT clause includes only an asterisk (*), the statement returns all of the table’s columns and saves them to the airplanes01.txt file, as shown in the following figure.
The MySQL TABLE statement also supports the INTO OUTFILE clause. Because of this, you can recast the preceding SELECT statement as the following TABLE statement, which returns that same results as the previous example but saves them to the airplanes02.txt file:
|
1 2 3 4 |
TABLE airplanes ORDER BY plane LIMIT 10 INTO OUTFILE '/Users/user1/data/airplanes02.txt'; |
The TABLE statement is fairly limited in scope and supports only a few clauses, including ORDER BY and LIMIT. The statement can be useful when you want to return all columns and either all rows or a certain number of rows. That said, you’ll usually want more control over your queries, which is why you’ll likely be using the SELECT statement. The statement lets you specify which columns to return, and it provides additional clauses, such as WHERE and GROUP BY. For example, the following SELECT statement limits the results to specific columns and types of planes:
|
1 2 3 4 5 |
SELECT plane, engine_type, engine_count, max_weight, plane_length FROM airplanes WHERE engine_type = 'jet' ORDER BY plane INTO OUTFILE '/Users/user1/data/jets01.txt'; |
Now the results are much more targeted, as reflected in the jets01.txt file, which is shown in the following figure.
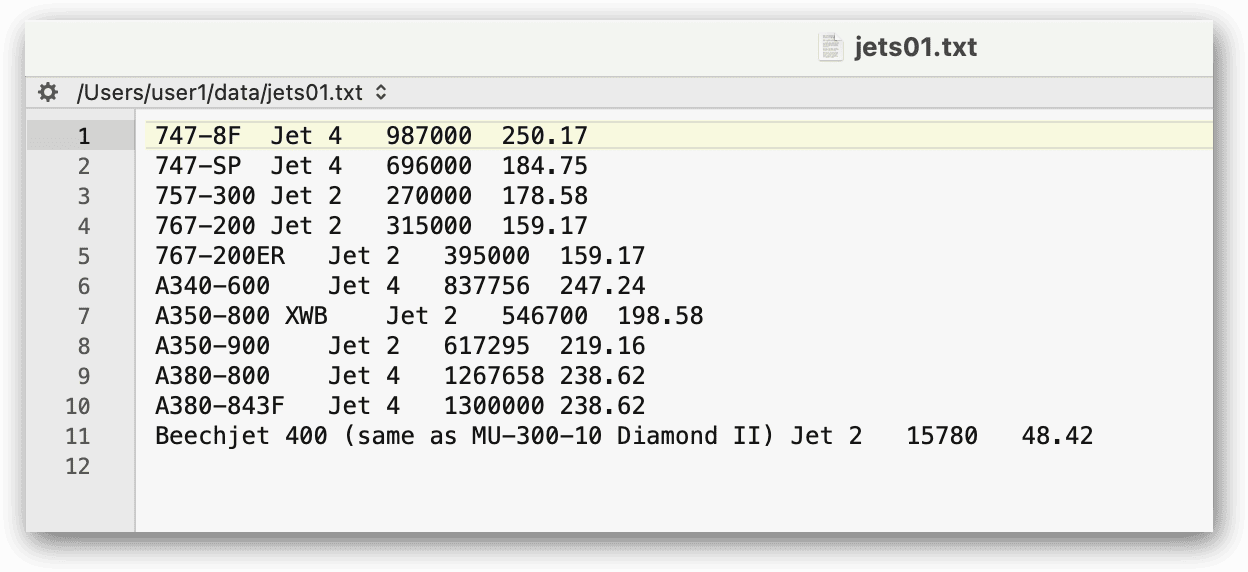
As expected, the file contains only those rows whose engine_type value equals jet. The data is also limited to the five specified columns: plane, engine_type, engine_count, max_weight and plane_length.
Working with the INTO OUTFILE export options
As mentioned earlier, the INTO OUTFILE clause supports multiple export options. The options let you better control how the returned data is saved to the output file. If you don’t specify any export options, MySQL uses the default options, such as using tabs to separate values and not enclosing the values in quotes or other characters.
If the previous statement were redefined to include the export options and their default values, it would look like the following SELECT statement:
|
1 2 3 4 5 6 7 |
SELECT plane, engine_type, engine_count, max_weight, plane_length FROM airplanes WHERE engine_type = 'jet' ORDER BY plane INTO OUTFILE '/Users/user1/data/jets02.txt' FIELDS TERMINATED BY '\t' ENCLOSED BY '' ESCAPED BY '\\' LINES TERMINATED BY '\n' STARTING BY ''; |
The statement returns the same results as the previous one. The only difference is that the INTO OUTFILE clause explicitly defines the export options, using their default values. However, suppose you want to use a comma instead of a tab as the field terminator, and you want to enclose string values in double quotes. To do this, you can modify the export options as follows:
|
1 2 3 4 5 6 7 |
SELECT plane, engine_type, engine_count, max_weight, plane_length FROM airplanes WHERE engine_type = 'jet' ORDER BY plane INTO OUTFILE '/Users/user1/data/jets03.txt' FIELDS TERMINATED BY ',' OPTIONALLY ENCLOSED BY '"' ESCAPED BY '\\' LINES TERMINATED BY '\n' STARTING BY ''; |
The FIELDS TERMINATED BY option now specifies a comma as its value, and the ENCLOSED BY option specifies a double quote as it value. The clause also includes the OPTIONALLY keyword, which limits its application to string values. Although this SELECT statement and the preceding one return the same data, the output file now looks much different, as shown in the following figure.

Each string value is enclosed in double quotes, and the fields are separated by commas. If you want, you can use the .csv extension for the file, rather than .txt. The results would be the same. You should use whichever file extension best supports your requirements.
Now suppose you want to add a prefix to the beginning of each row. You can easily do this by changing the value of the STARTING BY option. For example, the following SELECT statement replaces the empty string with xxx : (including the trailing space):
|
1 2 3 4 5 6 7 |
SELECT plane, engine_type, engine_count, max_weight, plane_length FROM airplanes WHERE engine_type = 'jet' ORDER BY plane INTO OUTFILE '/Users/user1/data/jets04.txt' FIELDS TERMINATED BY ',' OPTIONALLY ENCLOSED BY '"' ESCAPED BY '\\' LINES TERMINATED BY '\n' STARTING BY 'xxx : '; |
Now each line in the file starts with the specified prefix, even though the result set itself is still the same, as shown in the following figure.
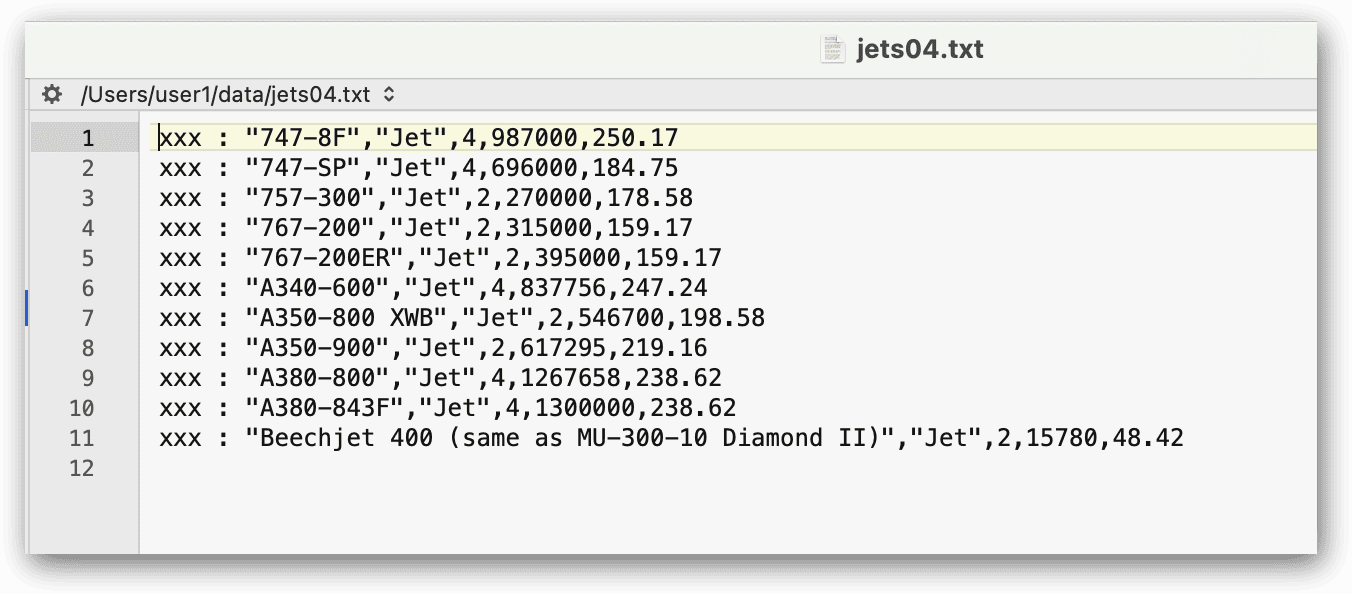
A prefix can be useful if you’re working with an application or system that needs to be able to clearly delineate the beginning of each row. It’s also useful if you want to add information before the prefix but want it clearly distinguished from the core data so the data can be imported without issue. For example, someone might need to add a comment to the text file after it has been generated:
|
1 2 3 4 5 6 7 |
xxx : "747-8F","Jet",4,987000,250.17 xxx : "747-SP","Jet",4,696000,184.75 xxx : "757-300","Jet",2,270000,178.58 verify listing xxx : "767-200","Jet",2,315000,159.17 xxx : "767-200ER","Jet",2,395000,159.17 xxx : "A340-600","Jet",4,837756,247.24 xxx : "A350-800 XWB","Jet",2,546700,198.58 |
An application or process that reads that file, such as the MySQL LOAD DATA statement, can ignore everything up to and including the xxx : prefix, importing only the actual data.
Read also:
Retrieving MySQL data with Python
Oracle INSERT, UPDATE, and DELETE operations
Creating CSV files using BCP
Mixing things up
The examples up to this point used the default LINES TERMINATED BY value (\n), which meant that each row started on a new line, making it easy to distinguish one row from the next. There might be times, however, when you want to terminate each row in some other way. For example, the following SELECT statement uses a semi-colon (;) as the LINES TERMINATED BY value:
|
1 2 3 4 5 6 7 |
SELECT plane, engine_count, max_weight, wingspan, plane_length FROM airplanes WHERE engine_type = 'jet' ORDER BY plane INTO OUTFILE '/Users/user1/data/jets05.txt' FIELDS TERMINATED BY ',' OPTIONALLY ENCLOSED BY '"' ESCAPED BY '\\' LINES TERMINATED BY ';'; |
Because a semi-colon is used to terminate each row, the data is saved to the file as a single row. The following figure shows part of the results as they’re saved to the jets05.txt file. Even though the data is in a single row, the values are still distinguishable from each other, with commas separating the values and semi-colons separating the rows.

The SELECT and TABLE statements also support the INTO DUMPFILE clause. The clause can be used in place of the INTO OUTFILE clause, but only if the query returns a single row. For example, the following SELECT statement returns one row from the airplanes table and saves it to the jets06.txt file:
|
1 2 3 4 |
SELECT plane, engine_count, max_weight, wingspan, plane_length FROM airplanes WHERE plane_id = 1001 INTO DUMPFILE '/Users/user1/data/jets06.txt'; |
The challenge with the INTO DUMPFILE clause is that it writes the data without any field or row terminators and without escaping any characters, running all the values together in a single row, as shown in the following figure. For this reason, the clause is usually best suited to retrieving a single BLOB value and storing it into a file.

The INTO OUTFILE clause is much more flexible, and you can use it with a wide range of SELECT statements. For example, the following SELECT statement joins the manufacturers and airplanes tables, groups the data based on the manufacturer_id values, and then aggregates the values from several columns:
|
1 2 3 4 5 6 7 8 9 10 |
SELECT a.manufacturer_id, m.manufacturer, COUNT(*) AS plane_count, ROUND(AVG(a.wingspan), 2) AS avg_span, ROUND(AVG(a.plane_length), 2) AS avg_length FROM airplanes a INNER JOIN manufacturers m ON a.manufacturer_id = m.manufacturer_id GROUP BY a.manufacturer_id ORDER BY m.manufacturer INTO OUTFILE '/Users/user1/data/manufacturers01.txt' FIELDS TERMINATED BY ',' OPTIONALLY ENCLOSED BY '"'; |
The INTO OUTFILE clause saves the data to the manufacturers01.txt file, as shown in the following figure:
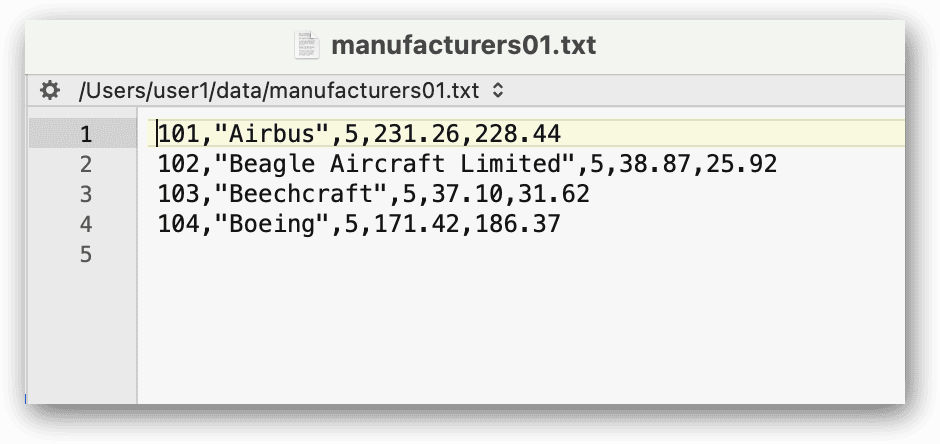
Although the data has been grouped and aggregated, the INTO OUTFILE clause still treats the results like it did the early examples: commas separate the field values, each row starts on a new line, and string values are enclosed in double quotes. As you can see, you can just as easily export the results from a more complex query as you can a simply query.
Getting started with exporting data in MySQL
The INTO OUTFILE clause can provide you with an extremely useful tool for exporting data. Because you can include it in your SELECT and TABLE statements, you can easily export data wherever you normally run SQL queries, which means you can also automate and schedule export operations.
You should be aware, however, that there are other ways to export data. One approach is to run a mysql or mysqldump command at a command prompt and direct the results to a file. You can also use the features built into a MySQL client to export data. For example, MySQL Workbench lets you export data directly from the search results and save them as JSON, CSV, XML, HTML, or other formats. Workbench also includes an Export and Import wizard that steps you though the process of exporting data.
Although you have plenty of options for exporting MySQL data, the INTO OUTFILE clause can still be very useful. You can easily tag it onto your existing SELECT statements, making it possible to use it repeatedly (keeping in mind that it will not overwrite an existing file). You can also set up your output files so the LOAD DATA statement can later be used to import the data. The better you understand how the INTO OUTFILE clause works, the better you can take advantage of this simple yet effective tool.
Appendix: Preparing your MySQL environment
When creating the examples for this article, I used a Mac computer that was set up with a local instance of MySQL 8.0.29 (Community Server edition). I also used MySQL Workbench to interface with MySQL.
The examples in this article retrieve data from the travel database and export the data to individual text files on that computer. The database contains manufacturers table and the airplanes table, which includes a foreign key that references the manufacturers table. This is the same database and tables you saw in previous articles in this series. If you plan to try out the examples, start by running the following script against your MySQL instance:
|
1 2 3 4 5 6 7 8 9 10 11 12 13 14 15 16 17 18 19 20 21 22 23 24 25 26 27 28 |
DROP DATABASE IF EXISTS travel; CREATE DATABASE travel; USE travel; CREATE TABLE manufacturers ( manufacturer_id INT UNSIGNED NOT NULL, manufacturer VARCHAR(50) NOT NULL, create_date TIMESTAMP NOT NULL DEFAULT CURRENT_TIMESTAMP, last_update TIMESTAMP NOT NULL DEFAULT CURRENT_TIMESTAMP ON UPDATE CURRENT_TIMESTAMP, PRIMARY KEY (manufacturer_id) ); CREATE TABLE airplanes ( plane_id INT UNSIGNED NOT NULL, plane VARCHAR(50) NOT NULL, manufacturer_id INT UNSIGNED NOT NULL, engine_type VARCHAR(50) NOT NULL, engine_count TINYINT NOT NULL, max_weight MEDIUMINT UNSIGNED NOT NULL, wingspan DECIMAL(5,2) NOT NULL, plane_length DECIMAL(5,2) NOT NULL, parking_area INT GENERATED ALWAYS AS ((wingspan * plane_length)) STORED, icao_code CHAR(4) NOT NULL, create_date TIMESTAMP NOT NULL DEFAULT CURRENT_TIMESTAMP, last_update TIMESTAMP NOT NULL DEFAULT CURRENT_TIMESTAMP ON UPDATE CURRENT_TIMESTAMP, PRIMARY KEY (plane_id), CONSTRAINT fk_manufacturer_id FOREIGN KEY (manufacturer_id) REFERENCES manufacturers (manufacturer_id) ); |
The script will create the travel database and add the manufacturers and airplanes tables in the proper order to accommodate the foreign key defined in the airplanes table. After you the create the tables, you can then run the following INSERT statements:
|
1 2 3 4 5 6 7 8 9 10 11 12 13 14 15 16 17 18 19 20 21 22 23 24 25 26 27 |
INSERT INTO manufacturers (manufacturer_id, manufacturer) VALUES (101,'Airbus'), (102,'Beagle Aircraft Limited'), (103,'Beechcraft'), (104,'Boeing'); INSERT INTO airplanes (plane_id, plane, manufacturer_id, engine_type, engine_count, wingspan, plane_length, max_weight, icao_code) VALUES (1001,'A340-600',101,'Jet',4,208.17,247.24,837756,'A346'), (1002,'A350-800 XWB',101,'Jet',2,212.42,198.58,546700,'A358'), (1003,'A350-900',101,'Jet',2,212.42,219.16,617295,'A359'), (1004,'A380-800',101,'Jet',4,261.65,238.62,1267658,'A388'), (1005,'A380-843F',101,'Jet',4,261.65,238.62,1300000,'A38F'), (1006,'A.109 Airedale',102,'Piston',1,36.33,26.33,2750,'AIRD'), (1007,'A.61 Terrier',102,'Piston',1,36,23.25,2400,'AUS6'), (1008,'B.121 Pup',102,'Piston',1,31,23.17,1600,'PUP'), (1009,'B.206',102,'Piston',2,55,33.67,7500,'BASS'), (1010,'D.5-108 Husky',102,'Piston',1,36,23.17,2400,'D5'), (1011,'Baron 56 TC Turbo Baron',103,'Piston',2,37.83,28,5990,'BE56'), (1012,'Baron 58 (and current G58)',103,'Piston',2,37.83,29.83,5500,'BE58'), (1013,'Beechjet 400 (same as MU-300-10 Diamond II)',103,'Jet',2,43.5,48.42,15780,'BE40'), (1014,'Bonanza 33 (F33A)',103,'Piston',1,33.5,26.67,3500,'BE33'), (1015,'Bonanza 35 (G35)',103,'Piston',1,32.83,25.17,3125,'BE35'), (1016,'747-8F',104,'Jet',4,224.42,250.17,987000,'B748'), (1017,'747-SP',104,'Jet',4,195.67,184.75,696000,'B74S'), (1018,'757-300',104,'Jet',2,124.83,178.58,270000,'B753'), (1019,'767-200',104,'Jet',2,156.08,159.17,315000,'B762'), (1020,'767-200ER',104,'Jet',2,156.08,159.17,395000,'B762'); |
The INSERT statements first populate the manufacturers table and then the airplanes table. Be sure to run the statements in the order shown here because of the foreign key constraint.
Frequently Asked Questions (FAQs)
1. How do you export MySQL query results to a CSV file?
Use SELECT INTO OUTFILE with FIELDS TERMINATED BY ‘,’ to create a CSV file: SELECT * FROM table_name INTO OUTFILE ‘/path/to/output.csv’ FIELDS TERMINATED BY ‘,’ ENCLOSED BY ‘”’ LINES TERMINATED BY ‘n’. The ENCLOSED BY clause wraps values in quotes (use OPTIONALLY ENCLOSED BY to quote only string columns). The file is created on the MySQL server, not your local machine.
2. What does the secure-file-priv error mean in MySQL?
Error 1290 (“The MySQL server is running with the –secure-file-priv option”) means MySQL restricts file operations to a specific directory. Run SHOW VARIABLES LIKE ‘secure_file_priv’ to see the allowed path, then use that directory in your INTO OUTFILE clause. If the variable is empty, file operations are unrestricted. If it’s NULL, file operations are completely disabled and require a MySQL configuration change.
3. Can SELECT INTO OUTFILE export to a remote machine?
No. SELECT INTO OUTFILE creates the file on the MySQL server’s filesystem only. To export to a remote machine, you need to either mount a remote filesystem on the server (e.g., NFS or SMB), use mysqldump with the –tab option, or use a client-side approach like mysql -e “SELECT…” > file.csv from a remote terminal.
This document contains proprietary information and is protected by copyright law.
Copyright © 2026 Red Gate Software Limited. All rights reserved


Load comments