
The Elastic Block Store (EBS) is AWS permanent virtual disk that stores our operating system, our applications and our data. It is versatile, relatively fast and to all intents and purposes – it acts like a regular internal disk. When the virtual machine is switched off, the resources for the machine is pulled back into a common pool. The data is still stored on the EBS, ready for the instance is switched back on. However, our work requirements dictate that our instances require large amounts of disk space as well as frequently changing applications.
To our initial disappointment we found that the current AWS tools (as we knew it) had a number of issues. So through a series of experiments, trial and error we’ve managed to figure out a few things and I want to share them with you all: how best to handle the EBS, snapshotting methodologies, disk limitations we’ve discovered, and optimising disk usage.
Creating AMIs as a snapshot
Anyone using Amazon Web Services EC2 resources will eventually encounter some issues with creating a large Amazon Machine Images (AMIs) as a snapshot of a running instance. We had a virtual machine with three disk volumes of 500 GB, 500 GB, and 1TB in size. They are the ‘C’, ‘D’ and ‘E’ drives respectively. Now, we have found that on many occasions, it is wise to create a new snapshot of an instance you have running. This way you can spin up a new copy as part of a recovery process or for high-availability purposes.
The process is as simple as right-clicking on the instance in question through the AWS dashboard and selecting ‘create AMI’.
However, we have found with large volumes usually over 1 TB, the snapshot can take a while. In the screenshot below, the progress was 29%….for two days!

So what is going on?
Snapshotting a relatively full 1 TB volume for the first time will mean copying all the data, and catching up with any write activity, so it can take a few hours (or even days for busy volumes) to complete. The record was 3.5 days for a 900 GB volume!
To get around this we have discovered that snapshotting often is the most economical method. Each snapshot has less data to take to write as it is only copying the blocks that have changed since the last snapshot. Of course, the first snapshot will always be problematic. Thus frequent snapshotting incurs minimal cost, depending on data churn, the snapshots are incremental and data is compressed.
Additionally, rather than using the GUI to check on progress, I would recommend using the EC2 command line tools to check: ec2-describe-snapshots' & 'ec2-describe-images
For example:
|
1 |
ec2-describe-snapshots snap-b443f9dg -v |
Will show progress from the API.
The above describes snap-b443f9dg progress and the -v means ‘verbose’, showing the progress in the XML response as below:
|
1 2 3 4 5 6 7 8 9 10 11 12 13 14 15 |
<DescribeSnapshotsResponse xmlns="http://ec2.amazonaws.com/doc/2010-08-31/"> <requestId>157b6aac-f114-45da-ade6-a885f5466668</requestId> <snapshotSet> <item> <snapshotId>snap-b443f9dg</snapshotId> <volumeId>vol-2aa06a43</volumeId> <status>pending</status> <startTime>2012-04-27T15:37:01.000Z</startTime> <progress>46%</progress> <ownerId>907120575700</ownerId> <volumeSize>35</volumeSize> <description/> </item> </snapshotSet> </DescribeSnapshotsResponse> |
Understanding that speed of completing a snapshot of an EBS volumes is dependent on the number of changes since the last snapshot; our inability to include 1TB drives in an AMI snapshot is down to number of changes in the volume, rather than the actual size of the volume. So it would seem worth experimenting with taking regular “throwaway” snapshots to keep a large or busy volume optimized.
A few points we’ve discovered:
- “Throwaway” volume snapshots can be taken without shutting down or detaching; Amazon answers a lot of questions related to snapshots (and other topics) here. Once an AMI snapshot of a stopped instance and its attached volumes has started, the machine can be restarted and use resumed without affecting the snapshot integrity.
- AMI snapshots can actually be taken of running instances, which causes the instance to reboot (or possibly shut down/restart) so that clean EBS snapshots can be started, but as above, use can resume after the auto-reboot.
- If using Linux it’s possible to script a freeze of the file system so a clean AMI snapshot can be started without restarting the instance, which AWS can be instructed to do via command line only.
- The first paragraph of the “Amazon EBS Snapshots” at http://aws.amazon.com/ebs/ makes for a good read and explains why taking a second snapshot of a volume is so fast.
Disk limit?
We realized that there was a size limitation of 1TB per EBS volume quite early on. Certainly we had some requirements where a multiple TB sized volume was required and having this 1TB limit meant that we had to look at extending the volumes.
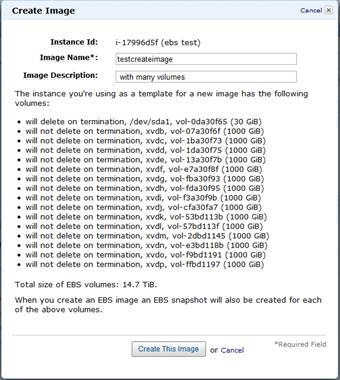
We asked ourselves “is there a limit to the number of disks an instance can have attached?” – after all, we might need to have a several volumes chained together.
So we experimented and discovered that an instance can have as many as you can actually attach. Here’s an example of an instance with 15 (empty) volumes.
Strategies to improve your disk usage
We’ve been investigating various methods of better managing our disks, and I’ve put together a couple of easy tasks which should help.
1. Striping of your disks
2. Splitting your disk volumes and applications that access them
3. Growing your EBS volume
Disk striping
Disk striping is an old and established technique for improving the performance of a disk drive and/or adding some form of resilience to a system. While single EBS volumes are quick in terms of disk I/O – striping multiple EBS volumes allows the instance to perform multiple input/output operations yet still present a single volume to the user. Striping is also known as RAID 0.
Under AWS, we have seen an approximate increase in disk I/O of 150% when we striped 3 to 4 EBS volumes. This is based on how quickly we’ve been able to read and write a known number of features to and from a disk volume. We then started to increase this stripe store to 6 EBS volumes and the performance increased even more – but we’ve realized that we reached the point where the overhead of increased cost and management wasn’t worth the performance gains.
Splitting applications across different volumes
Splitting applications between different disk volumes is another technique we routinely use. This includes fixing the size of the paging file and locking it to one volume. Our application generates a lot of log files and rather than have them cluttering up our system or application volumes; logs are written to a dedicated disk volume. This keeps everything neat and tidy.
For our standard machines, we use the C drive for the operating system, the D drive for applications, the E drive for the pagefile, and the F drive for log files.
Growing your disk volume
Getting the right volume straight away can be tricky. By default, the AWS Large (standard) instance comes with 35GB for the ‘C’ drive. To me, this amount is a touch too low as after a round of windows updates and a few log files and the amount of free space gets gobbled up very quickly. Now, under AWS – you can’t just pop up the cover of your server and put in a new hard drive. It just doesn’t work that way! So, with the standard instance giving a user only 35GB how can one increase the size of disk without the need to reinstall everything from scratch? The key is to use the EBS snapshot.
The process assumes that we want to increase the existing C drive (currently 35GB) to 50GB on a Windows 2008 Server operating system:
1. Make a note of the instance id (e.g. i887abd0a) that you want to increase the disk volume.
2. Make a note of the device name of this volume (/dev/sda1)
3. Shutdown the instance.
4. Find the 35GB EBS volume and unmount it. If you have only a C drive, you should have only one volume.
5. Create an EBS snapshot of the above volume.
6. Create a new volume (50GB) but base it on the EBS snapshot created in the above step.
7. Detach the existing EBS volume (the smaller 35GB one)
8. Attach the new (50GB) EBS volume to the instance (e.g. i887abd0a) – attach it to the same device, e.g. /dev/sda1
9. Start the instance, it should work. You might have to go into Disk Administrator to write new signatures to the disk.
Final thoughts
So that’s a quick whip-through of how we manage our EBS volumes as efficiently as possible. Our work requires fast disk access and without being able to stick in some nice new Solid State Disks (SSDs) we had to come up with new ideas. Also, just investigating the slow performance of the some of our backups revealed a need adjust our backup strategy. I know that there are now special EBS volumes with a much higher I/O rates as well as EBS-Optimized instances available and we will no doubt take some time and have a look.
This document contains proprietary information and is protected by copyright law.
Copyright © 2026 Red Gate Software Limited. All rights reserved
Load comments