
Azure Data Lake allows you to rapidly store and ingest data simply whatever its form, and do any type of processing and analysis on it across platforms and languages. It is ideal for batch, streaming and interactive analytics because it provides a unified repository for diverse enterprise data requirements.
There are many ways of uploading the files to Data Lake store, using Azure Data Factory Services, using Azure Data Lake Store .NET SDK, Java SDK, Node, REST API and so on. In this article, we will look into how to use the Azure Data Lake Store .NET SDK for uploading files from local system to Azure Data Lake store. To do this, you will need Visual studio 2015/2017 and an Azure Subscription
If you haven’t already done so, the first step is to create a Data Lake Store in Azure to get started.
Register Azure App
All external application interactions are controlled or secured using an Azure Active Directory App. We will start off by creating a Azure Active Directory App for our Data Lake solution. Go to https://portal.azure.com and select ‘Azure Active Directory’ from the left-side navigation bar.
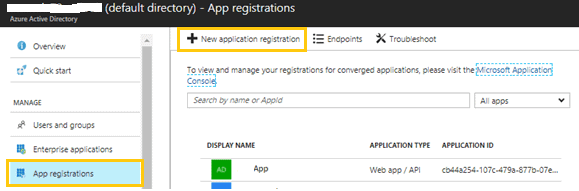
Select the ‘App registration’ option from the Azure Active Directory blade. This will open a blade with list of registered apps and the option to register a new application. Select New application registration button on top of the blade.
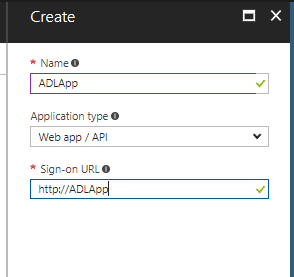
This will open the ‘Create’ blade to create a new app. Specify the name and Sign-on URL. Select the application type as ‘Web App/API’ or ‘Native’.The ‘Native’ term indicates that the application will be installed in the user device or computer. ‘Web App/API’ means the authentication is from a web-based application.
Because we are planning to use a console application for uploading the files, we will add a dummy Sign-on URL such as http://appname.
Grant Permission in Data Lake Store
This AD app will be used to authenticate the users to upload files from local system to Azure Data Lake store. This application will need appropriate permission to perform activities in the target resource, that is, the Data Lake store. We can provide the necessary permission to the App by adding the app under Access section of Data Lake Store.
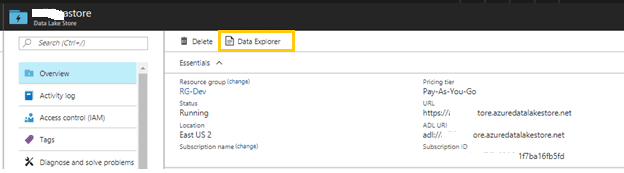
Navigate to the Data Lake Store and select the ‘Data Explorer’ option.
Select the ‘Access’ option from the Data Lake Store blade. You can select the specific folder and specify access at the folder level, if required. In case you receive a “Forbidden” exception at the time of file copy, that indicates that your app don’t have enough permission to do the operation. Verify the app permissions at root level to fix the exception.
Note the Examples folder in the Store list. We will be using this folder for uploading files from .NET code.
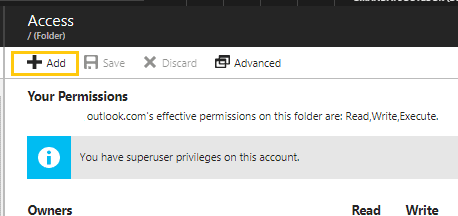
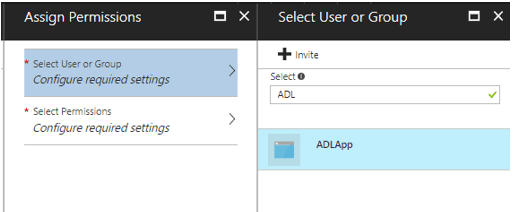
The ‘Access’ blade will display the allowed users and apps list along with the type of permission that each of the users or apps have for this particular folder. Click on the ‘Add’ option at the top to grant permission for a new user or app.
Select the previously created app name from the ‘Select User or Group’ blade and click ’OK’. You can search for a particular user or app by entering a few characters in the ‘Select’ box; a filtered list of users or apps will be listed down.
Select the required permissions for specific apps from the Permissions list. Also, we can restrict the apps’ access to a specific folder or sub folders. Access permission entry is for files and folders that control the access to that object. Default permission entry is for a folder that controls the access permissions associated with the child elements.

File Upload Solution
Now we can create the solution to upload files from local system to Azure Data Lake Store. Open VS 2015/2017 and create a new console application.
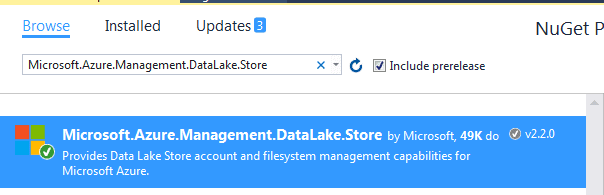
Add the following two Nuget packages to the project.
- Microsoft.Azure.Management.DataLake.Store
- Microsoft.Rest.ClientRuntime.Azure.Authentication
Right-click on the project and select ‘Manage Nuget Packages…’ to add the required packages
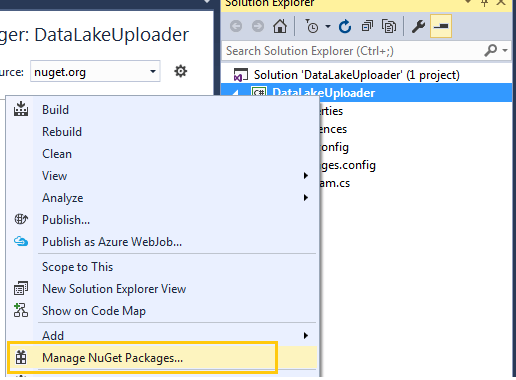
Navigate to ‘Browse’ and enter the Nuget package name in the search box to find the latest version of the Nuget package. Install the selected package by clicking ‘Install’.
I have used
- Microsoft.Azure.Management.DataLake.Store v2.2.0
- Microsoft.Rest.ClientRuntime.Azure.Authentication v2.3.1
for this walk-through.
Before we start coding, we should collect the required data from Azure resources. We need details from the Azure Active Directory App for authentication. Navigate to the previously created AD App blade.
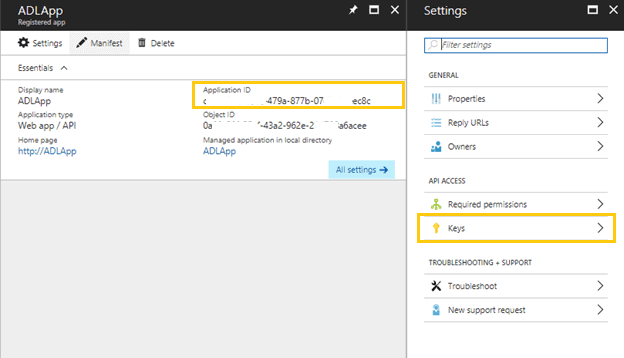
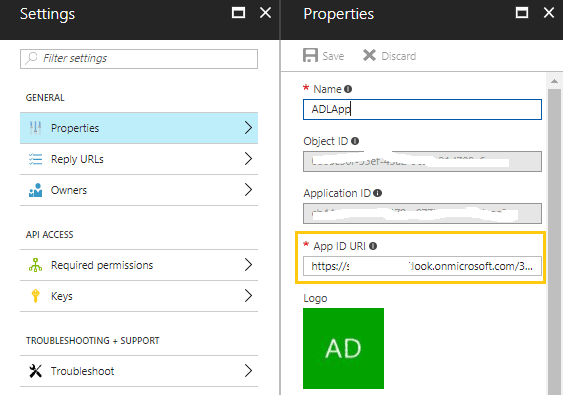
Copy the Application ID mentioned in the App blade, which will be used as Client Id in the .NET application. Click on ‘Keys’ to generate a new key or client secret.
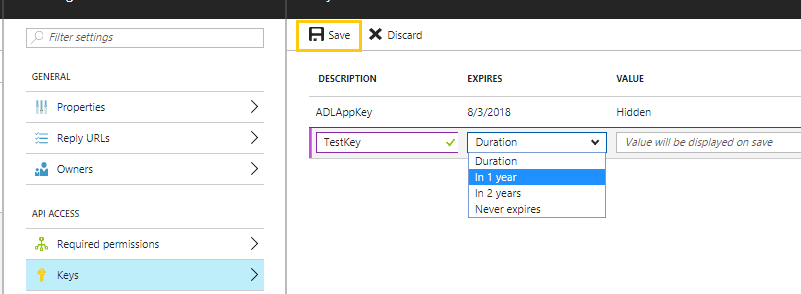
Enter a key name as ‘Description’ and select the expiry duration from the drop-down. Click on the ‘Save’ icon on top to generate the Key.
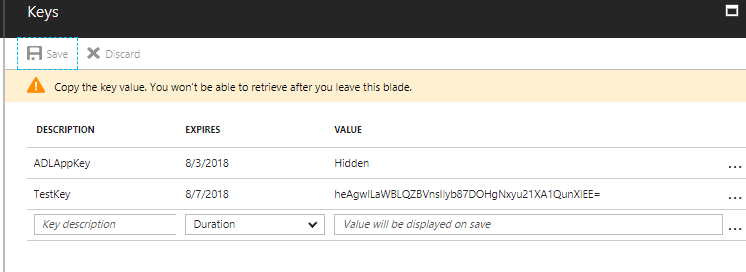
Copy the Key, which will be hidden after you leave this blade. This key will be used as a client secret in the .NET application.
Now, go back to our .NET Console application and start coding. Declare the Data Lake Store Account Management Client and Data Lake Store File System Management Client objects.
|
1 2 |
private static DataLakeStoreAccountManagementClient adlsClient; private static DataLakeStoreFileSystemManagementClient adlsFileSystemClient; |
Declare the corresponding assembly
|
1 |
using Microsoft.Azure.Management.DataLake.Store; |
Next, define the Data Lake Store property values. Select the newly created Data Lake store from the list of all resources and navigate to the Data Lake Store blade
|
1 2 3 |
<img class="wp-image-72199" src="https://www.red-gate.com/simple-talk/wp-content/uploads/2017/08/word-image-72.png" /> adlsAccountName = "adldatastore"; subscriptionId = "73d233254634e-6a55-22f2-xxxx-1f7baaaaab5fd"; |
Create the authentication token using the Azure Active Directory App details. Open the Azure Activity Directory blade and select Domain names to capture the domain name.
|
1 |
<img class="wp-image-72200" src="https://www.red-gate.com/simple-talk/wp-content/uploads/2017/08/word-image-73.png" /> |
You can get the domain name associated with the app from the App ID Uri mentioned under the App properties. App ID Uris start with the domain name only.
|
1 2 3 4 5 6 |
SynchronizationContext.SetSynchronizationContext(new SynchronizationContext()); var domain = "xxxxxxxxxxxlook.onmicrosoft.com"; var clientId = "cb44a3434-xx07c-4yyy-8aaab-ffffffdeec8c"; var clientSecret = "3TnHk86Jmk8fTMKnpt75s8KZnpbbpBQ1H30="; var clientCredential = new ClientCredential(clientId, clientSecret); var creds = ApplicationTokenProvider.LoginSilentAsync(domain, clientCredential).Result; |
Include the required assembly references
|
1 2 3 |
using Microsoft.IdentityModel.Clients.ActiveDirectory; using Microsoft.Rest.Azure.Authentication; using System.Threading; |
Now we can create the objects of Data Lake Store Account Management Client and Data Lake Store File System Management Client and assign a subscription id.
|
1 2 3 |
adlsClient = new DataLakeStoreAccountManagementClient(creds); adlsFileSystemClient = new DataLakeStoreFileSystemManagementClient(creds); adlsClient.SubscriptionId = subscriptionId; |
Define the source and destination file paths. The source file path will be the physical file location in the server or local system. The Destination will be the Azure Data Lake Store folder with the target file name. It is not mandatory to upload the file with the same name. You can upload a file by specifying a new name.
|
1 2 3 4 |
string sourceFolderPath = @"D:\Agile"; string sourceFilePath = Path.Combine(sourceFolderPath, "Hello.txt"); string dataLakeStoreFolderPath = "/Examples/"; string dataLakeStoreFilePath = Path.Combine(dataLakeStoreFolderPath, "file.txt"); |
This code will copy the Hello.txt file from D:\Agile with a new name file.txt into the Azure Data Lake Store folder /Example.
We can copy the file to Data Lake Store using the UploadFile method.
|
1 |
adlsFileSystemClient.FileSystem.UploadFile(adlsAccountName, sourceFilePath, dataLakeStoreFilePath,1,false,true); |
Parameters are:
- adlsAccountName – account name or the Data Lake Store name
- sourceFilePath – source file path
- dataLakeStoreFilePath – destination file path
- 1 – how many threads needs to be used for upload. By default, it calculates based on file size
- False – indicate this upload process is a new one, not a continuation from previously paused upload
- True – Overwrite the file or not
Here is the complete application code for uploading a file from the local system to the Azure Data Lake Store folder. You can customize this by adding Foreach or Parallel Foreach to upload multiple files at a time.
|
1 2 3 4 5 6 7 8 9 10 11 12 13 14 15 16 17 18 19 20 21 22 23 24 25 26 27 28 29 |
class Program { private static DataLakeStoreAccountManagementClient adlsClient; private static DataLakeStoreFileSystemManagementClient adlsFileSystemClient; private static string adlsAccountName; private static string subscriptionId; static void Main(string[] args) { adlsAccountName = "adlsdatastore"; subscriptionId = "73d233254634e-6a55-22f2-xxxx-1f7baaaaab5fd"; SynchronizationContext.SetSynchronizationContext(new SynchronizationContext()); var domain = "yyyyyyyyylook.onmicrosoft.com"; var clientId = "cb88888254-xxxx-mmm-yyyy-07e3e986jh68c"; var clientSecret = "3Ts4z+jkHfyhiMKJKiUi+85bhhbKZnpbbpBQ1H30="; var clientCredential = new ClientCredential(clientId, clientSecret); var creds = ApplicationTokenProvider.LoginSilentAsync(domain, clientCredential).Result; adlsClient = new DataLakeStoreAccountManagementClient(creds); adlsFileSystemClient = new DataLakeStoreFileSystemManagementClient(creds); adlsClient.SubscriptionId = subscriptionId; string sourceFolderPath = @"D:\Agile"; string sourceFilePath = Path.Combine(sourceFolderPath, "Hello.txt"); string dataLakeStoreFolderPath = "/Examples/"; string dataLakeStoreFilePath = Path.Combine(dataLakeStoreFolderPath, "file.txt"); adlsFileSystemClient.FileSystem.UploadFile(adlsAccountName, sourceFilePath, dataLakeStoreFilePath,1,false,true); Console.Read(); } } |
Reference
https://docs.microsoft.com/en-us/azure/data-lake-store/data-lake-store-get-started-net-sdk
Conclusion
Azure SDKs support the automation of various redundant operations in Azure. One of the common requirements is to upload files from on-premise or local servers to Azure Data Lake Store at regular intervals. This will allow the enterprise analytics applications to derive meaningful insights from various enterprise data available in various formats, using Data Lake Analytics, and Azure HDInsight.
Load comments