
Are you building and deploying Azure ARM resources, click by click, in the portal? If you haven’t learned how to deploy with JSON template files yet, then you should. And I hope that this article will help.
Using JSON documents to define and deploy Azure resources, can save you lots of time by avoiding a step-by-step mouse clicking through a web GUI, waiting for each page to load, so you can define your resources. There are many rinse and repeat steps when building out a network. You can also use these JSON templates to improve consistency of standard naming conventions and adherence to configuration details of commonly used Azure resources, while parameterizing for things that change almost every time, i.e. resource names, IP addresses, usernames, passwords, etc.
In this article, I’ll teach you a little about JSON, then walk you through the process of building a JSON document that will define
- a resource group
- a virtual network
- two subnets
- network security groups
- a VPN gateway
- a VPN connection
- a managed disk VM
- an unmanaged disk VM
- public IP addresses
It takes about 30 minutes to execute that whole build out, and 25 minutes of it is just waiting for the VPN gateway to spin up. It builds the two servers in about five minutes!
I like to deploy using the Templates blade in Azure, because there are fewer authentication prompts to deal with, and it enables me to test the process for less technical users who would prefer to not look at PowerShell scripts or .NET code. Figure 1 shows the first page of a template.
To get to the Templates blade, click All services and search for Templates. If you want to add it to your side menu, click the star. Once there, click the Add button. Here you can define a template. You can also copy and paste in my final JSON document and try it out. Figure 1 shows a template.
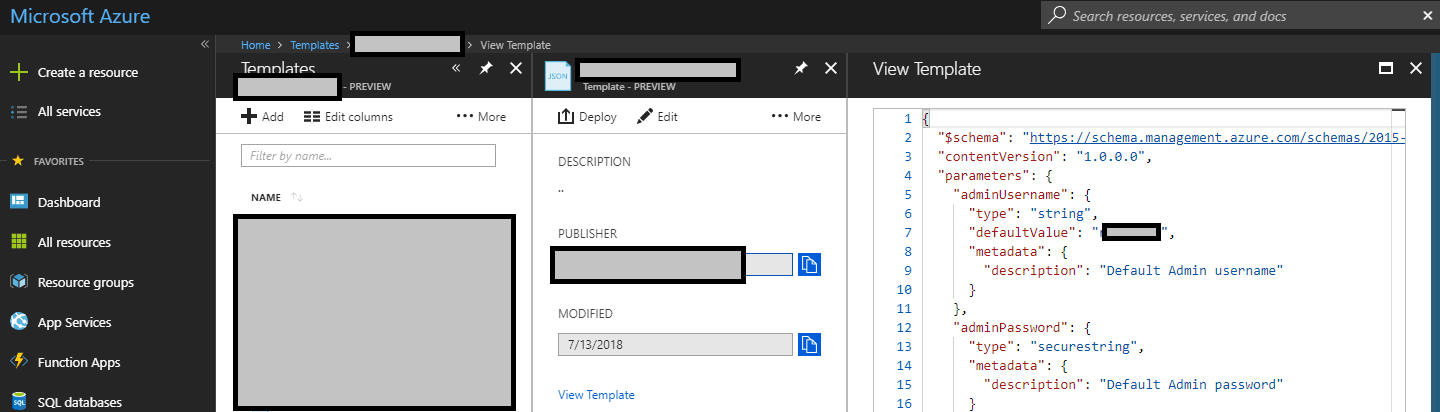
Figure 1: The template edtior
Once you click Deploy, you’ll see a screen where settings can be modified before your resources are created as shown in Figure 2.
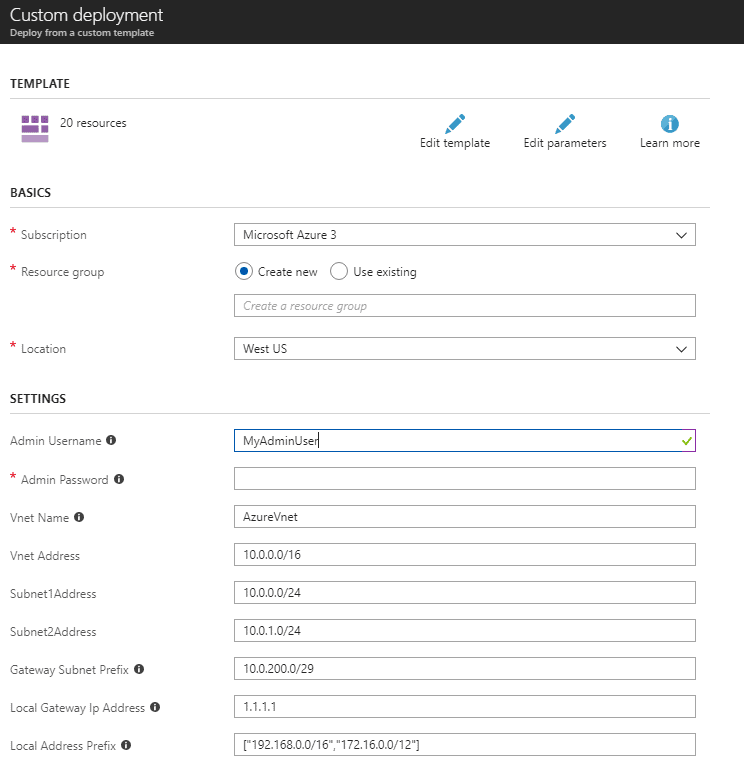
Figure 2: Deploying the Azure template
When you use the portal to define and deploy resources such as VMs, behind the scenes, it is building a JSON document for each that it will process to deploy your defined resources. You can download all of these JSON documents! To see JSON documents for your existing resources, open any resource, then click Automation Script. There, you will see a script that defines everything in your subscription as shown in Figure 3.

Figure 3: The resource automation script
Another option is to define a new resource, then click the Download template and parameters link instead of the Create button. Figure 4 shows this option.
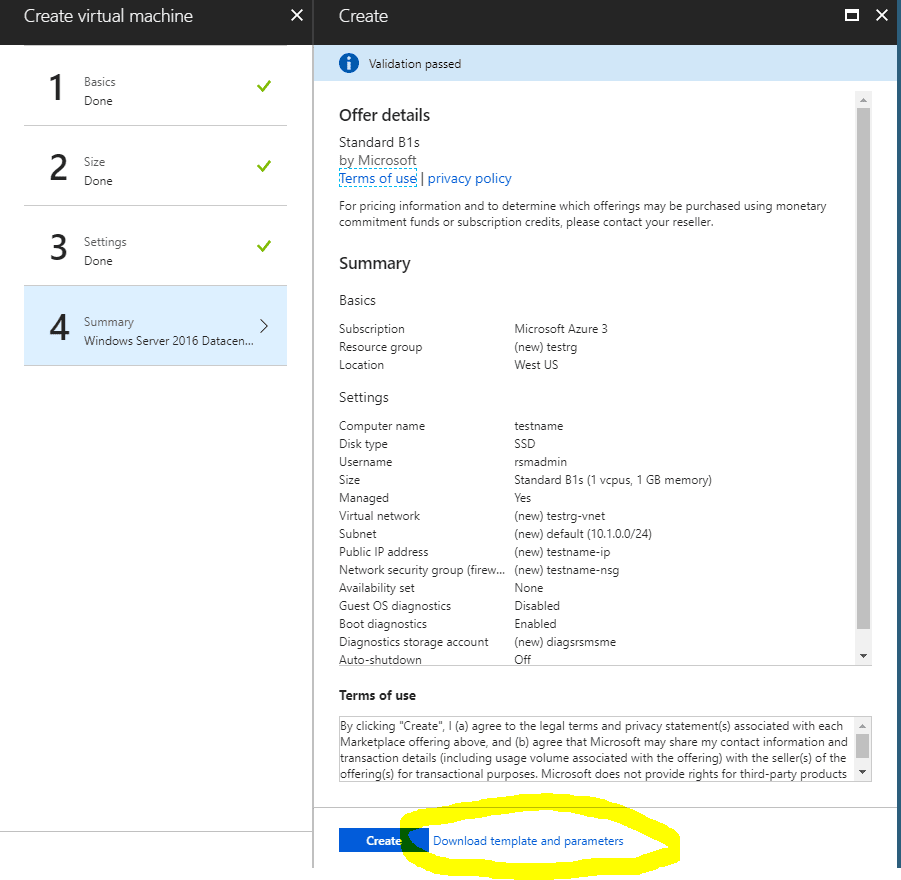
Figure 4: Download instead of creating
Downloading the template for resources is a great shortcut for learning how to create new JSON templates for future deployments!
JSON Basics
Let’s start by looking at the basics of JSON documents. JSON documents are text documents that convey structured data, such as name-value pairs of strings, integers, and Booleans. The documents are organized into arrays and documents, where documents are also collections of strings, integers, Booleans, and arrays of them, too. Name-value pairs are quoted strings, separated by colons. When defining integers or Booleans only the name needs to be quoted. Arrays are defined with square brackets [ and ], and the array elements are separated by commas. Data that defines objects is often defined in JSON ‘documents,’ which are collections of name value pairs of any data type. In JSON, documents are defined with curly brackets { and }.
An empty JSON document would contain only {}. Here is a simple Hello World JSON document that is like a contact card. I’ve demonstrated basic strings and an object. But no arrays, here. There will be plenty of array examples below.
|
1 2 3 4 5 6 7 8 9 10 |
{ "FirstName": "Brian", "LastName": "Flynn", "Status": "Hello World!", "Address": { "Address": "123 My Street", "City": "Boulder", "State": "CO" } } |
Understanding the Azure Deployment Template
The JSON document for deploying resources in Azure uses all the features of JSON to describe everything needed to create virtual machines and more. It may seem daunting at first, but once you have reusable templates in place, you will save lot of time.
The entire Azure Deployment Template JSON document is wrapped in curly brackets, with a header comprised of two strings that specify the schema and content version.
There are three sections to the Azure deployment template that I will discuss. I’m not going to talk about the outputs section.
Parameters – You don’t have to use this section, at all, but it can be very useful. This section defines parameters which the Azure web portal will prompt users to define when they use this template to deploy resources. If you deploy using PowerShell, a parameters JSON document is used to pass in the parameters, which also must be defined in the deployment script. In the web form, you can define drop down menus, where you wish to limit, and/or display options.
Variables – You don’t have to use this section, at all, but it can be very useful. This section gives you some ability to build variables that can be used, and re-used, in the resources section. Variables defined above, are also in scope lower in the variables section.
Resources – You must use this section. This is where you define the actual resources.
|
1 2 3 4 5 6 7 8 9 10 11 12 13 14 |
{ "$schema": "https://schema.management.azure.com/schemas/2015-01-01/deploymentTemplate.json#", "contentVersion": "1.0.0.0", "parameters": { … DEFINE YOUR PARAMETERS HERE … }, "variables": { … DEFINE YOUR VARIABLES HERE … }, "resources": [ … DEFINE YOUR RESOURCES HERE … ], "outputs": {} } |
When you define a parameter, it is accessible in the variables and resources sections. It is useful for retrieving specific string values from the end user, which will then be used in the deployment.
When you define a variable, it is accessible in the variables and resources section. You can store strings, integers, Booleans, documents, and arrays in variables. It is useful for applying formulaic patterns, like naming conventions where a name is based off one or more inputs.
The format for accessing parameters and variables, is as follows…
“MyElementFromAParameter”: “[parameters(‘MyParameter’)]”,
“MyElementFromAVariable”: “[variables(‘MyVariable’)”
Notice how the resources section is delimited with square brackets ([]) rather than curly braces ({}). That is because the resources section defines an array of resources. Arrays are delimited with square brackets, while the parameters and variables sections are defined as two documents, delimited by curly braces. And documents can be nested inside other documents, as well as contain arrays.
So, you’ve got it now! Right!? OK, maybe you’d like a few focused examples to look at. Let’s take it from the top, aka the parameters section. Here is an example snippet from the parameters section of my JSON document. It defines an admin name and password as well as the name of the VNET. It defines default values, since I can anticipate some likely values. Tool tips can be specified by setting the metadata description. These tool tips put those little (i) icons next to the field names in the Azure portal web form.
|
1 2 3 4 5 6 7 8 9 10 11 12 13 14 15 16 17 18 19 20 21 22 23 24 25 |
"adminUsername": { "type": "string", "defaultValue": "MyAdminUser", "metadata": { "description": "Default Admin username" } }, "adminPassword": { "type": "securestring", "metadata": { "description": "Default Admin password" } }, "VnetName": { "type": "string", "defaultValue": "AzureVnet", "metadata": { "description": "Used in name prefixes." } }, "VnetAddress": { "type": "string", "defaultValue": "10.0.0.0/16" } |
Here is an example snippet from the variables section of my JSON document, and it defines a handful of variables that are used to define the networking. The first variable defined, virtualNetworkPrefix, is set directly to the value from the parameters section. I’m using a concatenation function to dynamically define the subnet names by appending _Subnet1 and _Subnet2 to the VNET name. To define the NSG rules for subnet 1, I’m defining an array of documents, where each document represents a single NSG rule. Within the document defining the NSG, is a document defining the properties of the NSG.
|
1 2 3 4 5 6 7 8 9 10 11 12 13 14 15 16 17 18 19 20 21 22 23 24 25 26 27 28 29 30 31 32 33 34 35 36 |
"virtualNetworkName": "[parameters('VnetName')]", "virtualNetworkPrefix": "[parameters('VnetAddress')]", "subnet1Name": "[concat(parameters('VnetName'), '_Subnet1')]", "subnet1Prefix": "[parameters('Subnet1Address')]", "subnet2Name": "[concat(parameters('VnetName'), '_Subnet2')]", "subnet2Prefix": "[parameters('Subnet2Address')]", "DemoVnetSubnet1NetworkSecurityGroupName": "[concat(parameters('VnetName'), '_Subnet1_NSG')]", "DemoVnetSubnet1NetworkSecurityGroupSecurityRules": [ { "name": "RDP_Location1", "properties": { "priority": 1000, "sourceAddressPrefix": "1.2.3.4/20", "protocol": "Tcp", "destinationPortRange": "3389", "access": "Allow", "direction": "Inbound", "sourcePortRange": "*", "destinationAddressPrefix": "*" } }, { "name": "RDP_Location2", "properties": { "priority": 1001, "sourceAddressPrefix": "5.6.7.8/32", "protocol": "Tcp", "destinationPortRange": "3389", "access": "Allow", "direction": "Inbound", "sourcePortRange": "*", "destinationAddressPrefix": "*" } } ] |
Here are some simple examples of resources, from the resources section of my Azure JSON document, and in it, you can see where I am using the variables function to call for variables defined up above, in the variables section. You can also see how I am setting the location to be the location of the current resource group, in scope, which was set by either a prompt in the PowerShell script that processes the JSON document, or the Azure portal web form. I also want to particularly point out where I set the NSG rules using the variable, DemoVnetSubnet1NetworkSecurityGroupSecurityRules, I defined above, in the variables section. See how you can pass strings, documents and arrays inside variables?
|
1 2 3 4 5 6 7 8 9 10 11 12 13 14 15 16 17 18 19 20 21 22 23 24 25 26 27 28 29 30 31 32 33 34 35 36 37 38 39 40 41 42 43 44 |
{ "type": "Microsoft.Storage/storageAccounts", "name": "[variables('diagStorageAccountName')]", "apiVersion": "2017-06-01", "location": "[resourceGroup().location]", "sku": { "name": "[variables('diagStorageAccountType')]" }, "kind": "Storage", "properties": {} }, { "type": "Microsoft.Storage/storageAccounts", "name": "[variables('premStorageAccountName')]", "apiVersion": "2017-06-01", "location": "[resourceGroup().location]", "sku": { "name": "[variables('premStorageAccountType')]" }, "kind": "Storage", "properties": {} }, { "type": "Microsoft.Storage/storageAccounts", "name": "[variables('stdStorageAccountName')]", "apiVersion": "2017-06-01", "location": "[resourceGroup().location]", "sku": { "name": "[variables('stdStorageAccountType')]" }, "kind": "Storage", "properties": {} }, { "name": "[variables('DemoVnetSubnet1NetworkSecurityGroupName')]", "type": "Microsoft.Network/networkSecurityGroups", "apiVersion": "2016-09-01", "location": "[resourceGroup().location]", "comments": "Network Security Group (NSG) for your network", "properties": { "securityRules": "[variables('DemoVnetSubnet1NetworkSecurityGroupSecurityRules')]" } } |
So far, this is simple, as long as you have all of the formats to follow. And you can find lots of examples on GitHub, as well as finding your way to the formats, by defining resources via the Azure web portal, then downloading the JSON document, instead of deploying it. Or, by going to look at the JSON for already deployed resources.
The next thing you need to learn, is how to chain resource definitions, by defining which resources depend on the others. Here is a more complicated resource definition which demonstrates defining dependencies. Notice how an element of the resource is named dependsOn, and how it is an array of resource names, which I am passing in via variables defined in my variables section. The resource I am defining is the VNET, and it depends on two NSGs, so the two NSGs have to be deployed first. By defining the resource with these dependencies, Azure knows how to walk through my document deploying everything in the right order, regardless of what order they are defined in my JSON document.
|
1 2 3 4 5 6 7 8 9 10 11 12 13 14 15 16 17 18 19 20 21 22 23 24 25 26 27 28 29 30 31 32 33 34 35 36 37 38 39 40 41 42 43 44 45 |
{ "type": "Microsoft.Network/virtualNetworks", "name": "[variables('virtualNetworkName')]", "apiVersion": "2017-06-01", "location": "[resourceGroup().location]", "comments": "This will build a Virtual Network.", "dependsOn": [ "[variables('DemoVnetSubnet1NetworkSecurityGroupName')]", "[variables('DemoVnetSubnet2NetworkSecurityGroupName')]" ], "properties": { "addressSpace": { "addressPrefixes": [ "[variables('virtualNetworkPrefix')]" ] }, "subnets": [ { "name": "[variables('subnet1Name')]", "properties": { "addressPrefix": "[variables('subnet1Prefix')]", "networkSecurityGroup": { "id": "[resourceId('Microsoft.Network/networkSecurityGroups', variables('DemoVnetSubnet1NetworkSecurityGroupName'))]" } } }, { "name": "[variables('subnet2Name')]", "properties": { "addressPrefix": "[variables('subnet2Prefix')]", "networkSecurityGroup": { "id": "[resourceId('Microsoft.Network/networkSecurityGroups', variables('DemoVnetSubnet2NetworkSecurityGroupName'))]" } } }, { "name": "GatewaySubnet", "properties": { "addressPrefix": "[parameters('gatewaySubnetPrefix')]" } } ] } } |
The JSON Document
To build the final JSON document that you can download at the bottom of the article, I started by building out JSON templates for a small handful of resources, bit by bit, testing a deployment, then deleting the resource group it went into. Then I started adding a few more resources, testing a deployment then deleting the resource group… Putting dependencies in where needed… There were several rinse and repeat cycles. Each time, it either successfully deployed, or it didn’t. And when it didn’t, I examined errors, adjusted my JSON, and tried again. Eventually, it all culminated in the document, which you could paste into the template editor in Azure, save, and deploy.
As you read through it, notice how some variables are defined as simple strings, delimited with quotes. Some variables are defined as documents, delimited with curly brackets. And other variables are defined as arrays, delimited with square brackets. Sometimes documents are nested inside of documents, arrays inside of documents, or documents inside of arrays. You may wish to change something that can’t be changed from the template blade web form. You may wish to add another server. To do that, you would need to copy and paste some server resources that are already defined, make any necessary changes like the variable names used in it. Then copy the set of variables for those set of resources, make necessary changes to the variable names and values. Repeat for the parameters section. After a little bit of trial and error, you should be good to go.
Conclusion
Hopefully, this write-up gives you a quick boot up on deploying Azure resources with JSON. For anything you do often, this can save you a lot of time. It can also help you maintain standard naming conventions and configuration details. And if you want a document that details what you have defined, it’s a great way to version control your environment. I expect that the cloud is going to bring our infrastructure teams into source control in ways they never thought possible.
This document contains proprietary information and is protected by copyright law.
Copyright © 2026 Red Gate Software Limited. All rights reserved
Load comments