
Database continuous integration (CI) means treating database schema and code (stored procedures, functions, views, migrations) the same way you treat application code: source control, automated builds on every commit, automated tests, and fast feedback when something breaks. This article walks through a complete database CI pipeline using AppVeyor (cloud-based Windows CI service) and Redgate tools – linking a SQL Server database to a Git repository via SQL Source Control, running automated builds via SQL CI, and executing tSQLt unit tests on every commit with results imported into the AppVeyor dashboard. PRODUCT CONTEXT: the specific Redgate products referenced in this article (SQL Source Control as the IDE plugin, SQL CI as the build tool) have evolved – modern Redgate database DevOps uses Redgate Deploy, SQL Change Automation, and Flyway Enterprise for equivalent workflows. The conceptual steps transfer directly: link database to source control, trigger build on commit, run unit tests, report results to CI service. AppVeyor itself remains a current CI service, though Azure DevOps and GitHub Actions have become more common for Windows-centric builds. For current projects, evaluate Redgate’s current tooling and your existing CI platform; the patterns in this article remain valid as the foundational database CI approach.
In this post I’ll walk through setting up a hosted continuous integration (CI) system for your SQL Server database. We’ll be using AppVeyor, a cloud hosted CI system with a focus on easy setup for .NET development. On AppVeyor we’ll use Redgate’s SQL CI utility (part of DLM Automation) which makes it easy to build and test your database on every change.
AppVeyor is free to try for 30 days, and free for open source projects with public repositories.
Redgate SQL CI is free to try for 28 days, and if you’re an open source project who wants to use it please contact me.
What is database CI?
The benefits of running a continuous integration system for your application are widely published, it’s a core tool in enabling agile delivery.
By getting fast feedback on small iterative changes to your code you can quickly spot problems and fix them. Risk is reduced as code does not spend time unintegrated on local development machines, only to surface as a problem last minute when you try to integrate and deploy.
The additional of unit tests and integration tests add increasing confidence that a build that passes the CI stage is good enough to release. The logical climax of this is the practise of Continuous Delivery, where every commit could in theory be pushed into production, using an automated pipeline of deployments, tests and monitoring.
However it is very common for the database to be completely neglected within this process, or for it to be treated as a second class citizen. Historically it has been hard to include the databases within these processes, but with the range of tooling available for database CI today it’s a relatively easy to implement.
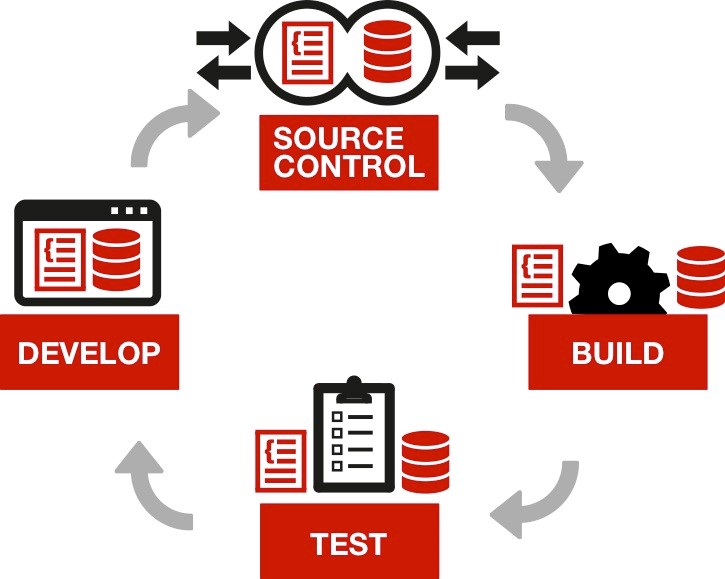
The database CI process is completely analogous to the application CI process:
Version control and small iterations. By ensuring your database schema and static configuration data are under source control you can make changes and share them with your team and other environments. The source control repository is the single source of truth of the schema of your database.
Automated fast feedback. Using a CI server you can build and test the database with every change, and delivery feedback as soon as the database is broken.
Build and compilation. Ensuring that your database does not contain invalid objects and could be deployed to a database instance is the equivalent of checking your code compiles. This is a rapid test that finds problems that otherwise might not be caught without extensive testing.
Automated testing. Running unit tests on the database, or integration tests across the application and the database builds confidence that the changes have not caused a regression, and do act as intended. You may need to load specific test data at this stage, or check out the build operates on a large dataset.
Packaging an artifact. Once tested and built your database should be archived as an immutable artifact, which can be deployed again and again into other environments in a reliable and repeatable fashion.
Deployment. It’s good practise to test a database deployment as part of your CI process to a representative environment. This should be performed using a mechanism as close as possible to your actual deployment method to try and catch any issues that may occur in a production deployment.
This demo will use the Redgate SQL CI utility, which makes it easy to perform the tasks above in conjunction with a CI server.
What makes AppVeyor great for database CI?
AppVeyor is a hosted CI server, meaning that it’s run for you in the cloud without needing your own infrastructure. You may have heard of similar services such as Travis, circleci or Visual Studio Online Cloud Build.
However for database CI AppVeyor has the major advantage that it comes with a SQL Server database on the build agents by default. This significantly simplifies the setup and avoids the need to provision, setup and teardown database virtual machines on each build.
The way AppVeyor works is that you are given a brand new clean virtual machine as a build agent at the start of each build. During the build process you configure that build agent, build and test your code, then the build agent is thrown away. On you next build you get a clean build agent and repeat the process. AppVeyor gives you full administrative rights to the build agent while it’s running, so you can install or change anything you want. There are a number of convenient hooks and APIs where the AppVeyor configuration GUI allows you to run command line or PowerShell scripts to add these custom configurations.
This is significant for a couple of reasons. Firstly it lets you install and run additional software, such as the SQL CI utilities. Perhaps more importantly this clean agent approach enforces really good practise, you know that your database can build on a default instances from scratch every time. It’s a bit like having an ‘immutable architecture’. It’s effortless to scale the build process to multiple agents, as we know that there is no ‘one off’ configuration that you might forget to do when you need more agents. We’ll touch on an example of this later when we enable CLR objects on the database server.
What I have and what we’ll set up
I currently have a SQL Server database, which I have linked to a source control repository. I’m using Redgate SQL Source Control but you could be using Visual Studio database projects. I’m using GitHub for a repository, but AppVeyor also supports BitBucket.
I want to set up a CI process that runs on every commit to my version control system. It needs to:
- Check the database is in a valid state so that I could deploy it (e.g. find any invalid objects)
- Run tSQLt unit tests that I have in my database and tell me the results
- Save a build artifact representing the database I have just tested
- Push or host that build artifact so I can pick it up in my deployment tool
Each of those steps above individually makes the database CI process more and more useful. However there’s great value in each individual step. So if (like most people setting up a CI process) you’re feeling slightly daunted by the number of steps below don’t panic! You can stop after the first step and will already have a database CI process that is catching errors and making your builds safer.
If you want to set up a similar example project up for yourself you can fork the repository used in this demo from GitHub. We’ll make changes to the code in the repository as we go through the walk through, meaning you’ll need to push changes to GitHub so do fork the repository rather than cloning.
Note. I don’t cover it in this post, but I could also have configured AppVeyor to build, test and deploy a .NET application. Scott Hanselman recently posted a detailed walkthrough of using AppVeyor for application build, test and deployment if you’re looking to set that up too. AppVeyor’s own getting started guide is also excellent.
Getting the tools and accounts
First we’ll get setup with a repository GitHub and install the tools we will use.
- Create a new repository on GitHub. You can fork the example I use in this article if you want to save some typing.
- Clone this repository to your local machine. Throughout this guide I will assume the repository is called ‘AppVeyorDemo’, and checked out into c:\AppVeyorDemo
- $ cd c:\
- $ git clone git@github.com:your-username/AppVeyorDemo.git
- Download DLM Automation from Redgate.
- Install DLM Automation on your local machine. The automation pack contains the SQL CI utility and MSBuild scripts that we’ll set up on AppVeyor.
We’ll copy these SQL CI utilities into our project later in order to use them on AppVeyor.
Link your database to the repository
We need to have a database under source control, which we’ll use SQL Source Control to create from a database on our local machine.
- Create a new folder in your repository called ‘database’, and create a sub folder called ‘scriptsfolder’
- In SSMS create a new database called AppVeyorDemo
- Link this database to your working folder “c:\AppVeyorDemo\database\scriptsfolder” using the git mode in SQL Source Control. If you’re not familiar with SQL Source Control please see the documentation or the training academy for tutorials. There is a 30 day free trial available.
- Create some objects within your database. For now let’s make sure they are valid objects, say a table and a view that references that table.
- Go to the commit tab and save your changes. NB. In git mode SQL Source Control will have saved your changes to your working folder, but will not yet have committed them to your repository.
- Add these files to your git repository,
- $ cd c:\AppVeyorDemo\database\scriptsfolder
- $ git add .
- $ git commit . -m ‘Created initial database’
We’ll stop short of pushing our changes to GitHub for the minute while we set up SQL CI and AppVeyor.
Setting up SQL CI – Building the database
SQL CI is a command line utility that performs the build, test and validation of my database on every commit. The key features of SQL CI we want to use are:
– Validating the database and creating a NuGet package. This will satisfy our first and third requirements for database CI in this example. In the language of SQL CI this is called a build.
– Creating a temporary database, deploying our schema into it and running unit tests. This is a SQL CI test action.
SQL CI comes with a set of MSBuild scripts that make it easy to configure on AppVeyor. We’ll save these scripts and the command line utility into our source control repository and configure them. AppVeyor will then be able to call these utilities to perform the database CI tasks.
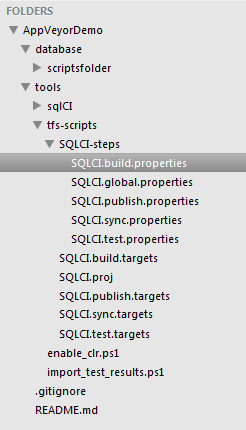
- Create a new folder in the root of your repository called “tools”
- Open the new tools folder and copy the Redgate “sqlCI” folder into the tools folder.
- You’ll find this folder at C:\Program Files (x86)\Redgate\SQL Automation Pack 1\sqlCI.
- You should have an executable now at the path c:\AppVeyorDemo\tools\sqlCI\sqlCI.exe along with four sub-folders of dependencies.
- Open the tools folder and copy the Redgate “tfs-scripts” folder into the tools folder.
- You’ll find this folder at C:\Program Files (x86)\Redgate\SQL Automation Pack 1\tfs-scripts.
- You should have a .proj file at c:\AppVeyorDemo\tools\tfs-scripts\SQLCI.proj along a set of targets files and a subfolder called SQLCI-steps containing properties files.
Initially we’ll configure SQL CI just build the database, we’ll enable testing later. To do this we’ll need to edit two of these properties files, a global configuration file and the configuration specific to the build step within SQL CI.
- Open c:\AppVeyorDemo\tools\tfs-scripts\SQLCI-steps\SQLCI.global.properties and edit the highlighted areas so that it matches the below:
12345678910111213<?xml version="1.0" encoding="UTF-8"?><Project xmlns="http://schemas.microsoft.com/developer/msbuild/2003"><PropertyGroup><packageId>AppVeyorDemo.database</packageId><buildNumber>$(APPVEYOR_BUILD_VERSION)</buildNumber><sqlCIFolder>$(APPVEYOR_BUILD_FOLDER)\tools\sqlCI</sqlCIFolder><licenseSerialKey></licenseSerialKey><additionalCompareArgs></additionalCompareArgs><sendErrorReports>True</sendErrorReports><outputFolder>$(APPVEYOR_BUILD_FOLDER)</outputFolder><package>$(outputFolder)\$(packageId).$(buildNumber).nupkg</package></PropertyGroup></Project>
- Open c:\AppVeyorDemo\tools\tfs-scripts\SQLCI-steps\SQLCI.build.properties and edit the highlighted areas so that it matches the below:
123456789<?xml version="1.0" encoding="UTF-8"?><Project xmlns="http://schemas.microsoft.com/developer/msbuild/2003"><PropertyGroup><scriptsFolder>$(APPVEYOR_BUILD_FOLDER)\database\scriptsfolder</scriptsFolder><temporaryDatabaseServer>(local)\SQL2012SP1</temporaryDatabaseServer><temporaryDatabaseUserName>sa</temporaryDatabaseUserName><temporaryDatabasePassword><![CDATA[Password12!]]></temporaryDatabasePassword></PropertyGroup></Project>
So what have we just done?
The most important ones are:
– packageID. This sets the name of the NuGet package (the artifact) that will contain our database schema. It will be created after a successful build. If you do change it from the example name here, please note that it needs to follow NuGet package conventions.
– Temporary[DatabaseServer/UserName/Password]. This is the SQL Server, and associated connection details, that we can use on our AppVeyor build agent. The username and password are the AppVeyor defaults. We’ll set this up in AppVeyor later.
The remaining options: paths to SQL CI, paths to scripts folders, build numbers, etc. are just plumbing. Handily AppVeyor sets a number of useful environment variables, which we’ve used here to set paths to the places we’ve saved items relative to our repository root. NB. If you’ve changed any of those paths in your setup you’ll need to adapt them accordingly.
Setting up AppVeyor – building the database
Now it’s time to set up AppVeyor. We’ll just be pointing AppVeyor to the MSBuild project file we’re configured above. This in turn will build the database using SQL CI, check for any invalid objects and create a NuGet package. AppVeyor will save this NuGet package to the projects internal feed.
Note. AppVeyor has two methods for configuration, using its web interface or a YAML config file. We’ll use the web interface in this example.
- Sign up for AppVeyor on their site. I used my GitHub credentials.
- Create a new project
- Follow the steps in AppVeyor to select the GitHub repository you want to use
- Select settings (cog icon) to configure the project
- In General:
- Set the “Build version format” to “1.0.{build}”.
- In Environment:
- Click “Add a service”
- Add “SQL Server 2012 SP1 Express
- In Build:
- Set “Visual Studio solution or project file” to “tools\tfs-scripts\SQLCI.proj”
- In Artifacts:
- Click “Add artifact”
- Set the “Path to artifact” to be “*.nupkg” and give it the “deployment name” “database”
- Optionally you may wish to configure some notifications under the Notifications tab, but that is totally optional.
At this stage we’re done and ready to run a build by pushing to GitHub
- On your local machine:
- $ cd c:\AppVeyorDemo
- $ git push origin master
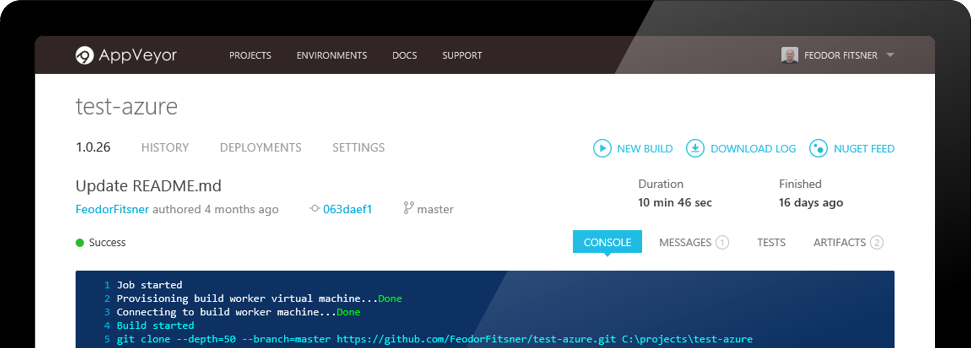
In AppVeyor if you click “Latest Build” you should see your first build get queued, and after a few seconds a console log will start appearing. You should see it wait for the database to start, then MSBuild will be run. That in turn will start SQL CI, and after a minute or so you’ll see AppVeyor pick up the artifacts that have been created. Clicking the “Artifacts” tab will show you the NuGet package that has been created.
If you get a build error double check the settings you’ve made, or drop me a note for any pointers.
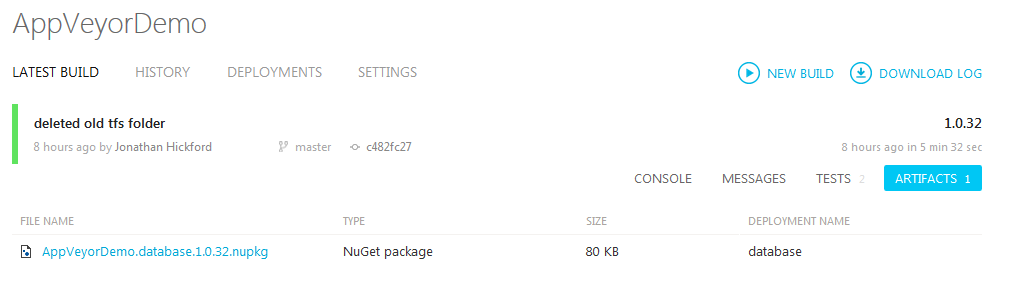
This artifact will have been added to the AppVeyor Nuget Feed too, which you can find the URL of under the AppVeyor projects settings under NuGet. If you wish to push your artifacts to another NuGet feed, say a deployment tool, you can do this under the Deployment section of the AppVeyor settings. See the AppVeyor documentation if you want to do this
Congratulations if you’ve made it here! You have a database CI process which is validating the database, creating an artifact and saving it to a NuGet feed.
Adding tSQLt unit tests to our database
From our list of database CI tasks our next step is setting up database unit testing. SQL CI supports the open source tSQLt unit testing framework, which is what we’ll be using. This is a good example of how to configure AppVeyor to perform custom tasks.
First let’s add tSQLt to our local database and create a unit test. If you have the Redgate tools installed you can use SQL Test within SSMS to add the tSQLt framework to your database.
Note. These instructions are for SQL Test, but the quick start guide from tSQLt is easy to follow if you don’t have the Redgate tool.
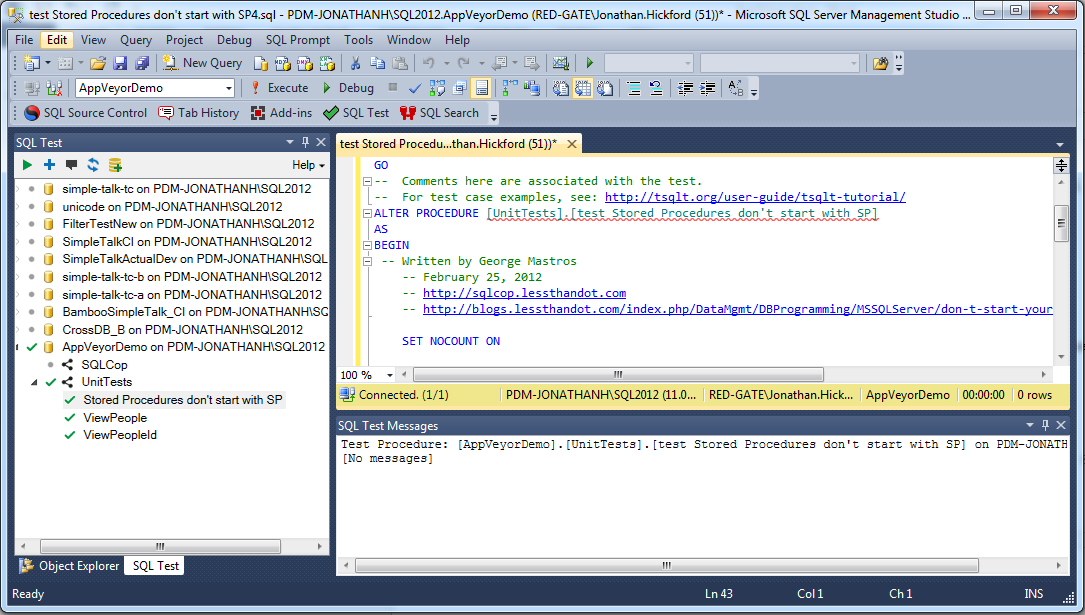
- Right click on your AppVeyor database in SSMS. Click “New Test…”.
- This will offer to install the tSQLt framework and enable trustworthy on the database. You have the choice to add the static analysis tests from SQLCop, but for this demo I’d suggest not adding all of these additional tests, as the test tables/views/sprocs we have created may not pass these tests. Instead we’ll manually add one of these tests.
- Give the new test a name, and pick a test class for it to live in. In this example we’ll use a test that checks that no stored procedures start with “sp_”.
- Between the BEGIN and END of the skeleton stored procedure replace the skeleton with the text below:
1234567891011121314151617181920212223242526-- Written by George Mastros-- February 25, 2012-- http://sqlcop.lessthandot.com-- http://blogs.lessthandot.com/index.php/DataMgmt/DBProgramming/MSSQLServer/don-t-start-your-procedures-with-sp_SET NOCOUNT ONDeclare @Output VarChar(max)Set @Output = ''SELECT @Output = @Output + SPECIFIC_SCHEMA + '.' + SPECIFIC_NAME + Char(13) + Char(10)From INFORMATION_SCHEMA.ROUTINESWhere SPECIFIC_NAME COLLATE SQL_LATIN1_GENERAL_CP1_CI_AI LIKE 'sp[_]%'And SPECIFIC_NAME COLLATE SQL_LATIN1_GENERAL_CP1_CI_AI NOT LIKE '%diagram%'AND ROUTINE_SCHEMA <> 'tSQLt'Order By SPECIFIC_SCHEMA,SPECIFIC_NAMEIf @Output > ''BeginSet @Output = Char(13) + Char(10)+ 'For more information: '+ 'http://blogs.lessthandot.com/index.php/DataMgmt/DBProgramming/MSSQLServer/don-t-start-your-procedures-with-sp_'+ Char(13) + Char(10)+ Char(13) + Char(10)+ @OutputEXEC tSQLt.Fail @OutputEnd
- Execute the query to save the test
- Run the test locally by right clicking on the test in the SQL Test window and selecting “Run Test”. This test should pass.
We’ll also need to enable the test stage of SQL CI, which will run the unit tests after a successful build.
- Open the steps folder in the project, and open the SQLCI.test.properties file. If you’re following the example it will be located at c:\AppVeyorDemo\tools\tfs-scripts\SQLCI-steps\ SQLCI.test.properties
- Edit that file to match the below:
|
1 2 3 4 5 6 7 8 9 10 11 |
<?xml version="1.0" encoding="UTF-8"?> <Project xmlns="http://schemas.microsoft.com/developer/msbuild/2003"> <PropertyGroup> <disabled>False</disabled> <temporaryDatabaseServer>(local)\SQL2012SP1</temporaryDatabaseServer> <temporaryDatabaseUserName>sa</temporaryDatabaseUserName> <temporaryDatabasePassword><![CDATA[Password12!]]></temporaryDatabasePassword> <generateTestData>False</generateTestData> <dataGeneratorProjectFile></dataGeneratorProjectFile> </PropertyGroup> </Project> |
We’ve simply enabled the test phase of SQL CI, and specified the connection details again for the SQL Server Express instance on AppVeyor.
Note. If you are using the sample repository on GitHub, that repository is in a state where the test phase is disabled. You’ll just need to change the contents of the <disabled> node to “False”, as all other changes have already been made.
- We can commit these changes to git. However we need to configure AppVeyor before these tests can be run, so we’ll hold off pushing to GitHub.
- $ git add .
- $ git commit . -m ‘Added tSQLt framework and a unit test’
Running tests on AppVeyor and importing the results
AppVeyor will automatically run test assemblies in .NET, and import results that are in MSTest, NUnit or xUnit formats. However as the tSQLt tests are not being called from an assembly this won’t happen automatically, so we’ll use a custom hook and the AppVeyor API to import these results into the AppVeyor UI.
There is one other pre-requisite that we need to setup on AppVeyot. tSQLt requires that the database that the tests are run in has CLR enabled. We’ll use one of the custom hooks in AppVeyor to run PowerShell to configure the new SQL Express instance to enable CLR.
- In AppVeyor open the settings for the project
- On the Build tab copy the script below into the “Before build script” field. Note – This script is also in the demo repository under “tools/enable_clr.ps1”
|
1 2 3 4 5 6 7 8 9 10 11 12 13 14 15 16 17 18 19 20 21 22 23 24 25 26 27 |
$tries = 5; $pause = 10; # Seconds to wait between tries While ($tries -gt 0) { try { $ServerConnectionString = "Data Source=(local)\SQL2012SP1;Initial Catalog=master;User id="sa;PWD=Password12!""; $ServerConnection = new-object system.data.SqlClient.SqlConnection($ServerConnectionString); $query = "exec sp_configure 'clr enabled', 1;`n" $query = $query + "RECONFIGURE;`n" $cmd = new-object system.data.sqlclient.sqlcommand($query, $ServerConnection); $ServerConnection.Open(); "Running:" $query if ($cmd.ExecuteNonQuery() -ne -1) { "SQL Error"; } else { "Success" } $ServerConnection.Close(); $tries = 0; } catch { "Error:" $_.Exception.Message "Retry in $pause seconds. Attempts left: $tries"; Start-Sleep -s $pause; } $tries = $tries -1; } |
This script is running the SQL statement to enable CLR, but is wrapped in some logic to repeat this five times at ten second intervals until successful. This is due to the database in AppVeyor not being quite ready to run as soon as it’s started.
[I have a ticket open with AppVeyor so this might well be resolved soon]
- On the General tab of the AppVeyor settings add the script below to both the “On build success scripts” and “On build error script”:
1234567891011121314if (Test-Path "$($env:APPVEYOR_BUILD_FOLDER)\*.junit.xml") {[xml]$testResults = Get-Content "$($env:APPVEYOR_BUILD_FOLDER)\*.junit.xml"foreach ($testCase in $testResults.testsuites.testsuite.testcase) {echo $testCase.classnameecho $testCase.name$status = "Passed"if ($testCase.failure) {echo $testCase.failure.message$status = "Failed"}Add-AppveyorTest -Name "$($testCase.classname).$($testCase.name)" -Framework "tSQLt" -Outcome $status -ErrorMessage $testCase.failure.message}}
This script opens the test results that are saved to an XML file after being run by SQL CI. It then talks to the AppVeyor Build Agent API and adds these test results to the UI of AppVeyor. We need to run the script on both build success or build failure so that tests are imported in all cases.
Note. Both these scripts are in the demo repository in the tools folder. They are named respectively ‘enable_clr.ps1‘ and ‘import_test_results.ps1‘.
- Finally let’s push the changes to GitHub to trigger a build.
- $ git push origin master
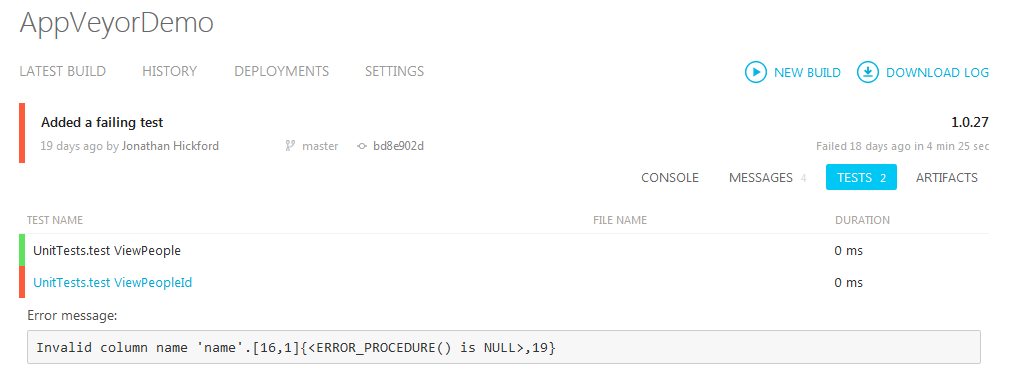
That build should pass on AppVeyor, and selecting the Tests tab should show the unit test passing successfully. If the test fails the error message from tSQLt will be imported into the AppVeyor console and the build marked as failed.
If you have used the example in this walkthrough it is easy to simulate a failing test by adding a stored procedure that does start with “sp_”.
Summary
We’ve successfully set up AppVeyor to run continuous integration process on our SQL Server database. On every change to the database that we check into source control AppVeyor will use Redgate SQL CI to
- Check the database is in a valid state
- Run tSQLt unit tests in the database and display the results
- Save a build artifact as a NuGet package.
- Push or host that build artifact so I can pick it up in my deployment tool
This database CI process will help to reduce risk during database development, by ensuring that small changes are regularly integrated and tested.
This process is also the doorway to more advanced database delivery techniques. For example automating the process to deploy the package up the chain to test, staging and live environments, creating a continuous delivery pipeline. For more details on what to do next see the Redgate’s Database Lifecycle Management.
Load comments