


When I first started with Power Query, it was in Excel, through the Power Pivot feature. I was amazed at how I could transform data with just a few clicks and quickly create PivotTables. Then, when Power Query appeared in Power BI, I began working with larger data sources and more complex projects.
Through many trials and tribulations, I learned the capabilities of Power Query and the M language (the functional language that actually transforms our data), as well as its idiosyncrasies. Unsurprisingly, with Power BI adoption and rapid growth, many newcomers are learning the same lessons I did.
Some consider this a rite of passage, and I admit I had that view for years. But after managing projects and teams, I realized I was doing a disservice to both my colleagues and our customers by not sharing these learnings earlier. The strength of our society lies in shared learning.
With that in mind, here are the top lessons I give Power Query newcomers to help them avoid the mistakes of my past.
1. Power Query is Case Sensitive
This one will catch you off guard. Whether you’re merging two text columns, using Text.Contains, or performing a Find and Replace, case sensitivity matters. If you don’t account for lowercase versus uppercase, you’ll likely introduce errors into your model.
For example, replacing “hello” with “Good Morning” in Figure 1 below doesn’t replace the text in the second row as anticipated.

Figure 1 – Default Find & Replace that doesn’t account for case sensitivity
The low-code UI doesn’t give you the option on case insensitivity, so it creates this M code:
|
1 |
Table.ReplaceValue(#"Added Custom","hello","Good Morning",Replacer.ReplaceText,{"Column A"}) |
So, to make it case insensitive you need to change the M code to this:
|
1 2 3 4 5 6 7 8 9 10 11 12 13 14 |
#"Replaced Value" = Table.ReplaceValue( #"Added Custom", each [Column A], each Text.Combine( List.ReplaceMatchingItems( Text.Split([Column A], " "), {{"hello", "Good Morning"}}, Comparer.OrdinalIgnoreCase ), " " ), Replacer.ReplaceText, {"Column A"} ) |
This increases the complexity of the M code, but will properly replace words “hello”, “Hello”, or “HeLLo” and replace it with the word “Good Morning”.
Keep case sensitivity in mind whenever using text replaces or if you’re using other functions like Text.Contains or Text.StartsWith.
Credit to Rick De Groot for teaching me this one.
2. Sort and Remove Duplicates
With timestamped data, I’ve often seen users sort by timestamp and then remove duplicates based on an ID column. However, due to how Power Query streams data during refresh, it won’t retain that sort order unless you explicitly preserve it.
Use Table.Buffer to wrap your Table.Sort step and ensure the sorted table is held in memory before applying Table.Distinct.
Before:
|
1 2 3 |
#"Sorted Rows" = Table.Sort(#"Changed Type",{{"Timestamp", Order.Ascending}}), #"Removed Duplicates" = Table.Distinct(#"Sorted Rows", {"ID"}) |
After:
|
1 2 3 |
#"Sorted Rows" = Table.Sort(#"Changed Type",{{"Timestamp", Order.Ascending}}), TableBuffer = Table.Buffer(#"Sorted Rows",BufferMode.Delayed), #"Removed Duplicates" = Table.Distinct(#"Sorted Rows", {"ID"}) |
3. No Regular Expressions Support
Unlike many languages, Power Query (M) doesn’t support regular expressions. If you’re used to extracting or cleaning multiline text using regex, you’ll need to use alternative options (outside of Power Query). Fabric Notebooks have this capability with pyspark.sql.functions.regexp, so that is alternative is you have access to Microsoft Fabric.
4. Merges are Expensive
Merge steps can significantly slow down development, especially with large datasets, because they require scanning entire tables. Ideally, place merges later in your query. The less processing you do after them, the faster your development will be.
In addition, you can apply these best practices to lower the cost of merge operations:
- Reduce columns before merging to increase performance.
- Use
Table.AddKeyto create an index to improve merge performance. - If needed, use a parameter like
Is_Development = trueto limit rows during development. Set it to false before publishing.
Credit to Chris Webb for his great content on this topic.
5. Rounding Numbers Isn’t What You Expect
Number.Round doesn’t follow traditional rounding rules. By default, it uses Bankers Rounding. This means that when two numbers are the same difference from two integers, it will favor the nearest even integer.
So in Figure 2, you’d expect 24.5 to round to 25 if you’re rounding to the nearest whole number by using Number.Round([Value],0).

Figure 2 – Number.Round with Bankers Round
If you wish numbers to round in the “normal way”, meaning they always round up when they end in .5, you would need to update the Number.Round function to be:
|
1 |
Number.Round([Value], 0, RoundingMode.AwayFromZero) |
As result, the rounding to the nearest whole number works as expected.

Figure 3 – Rounding fixed
Credit to Celia Alves for teaching me this aspect of Power Query.
6. Parameters Should Not Be ‘Any’ Type
Parameters are a powerful way to make your models more flexible, especially when moving from development to production environments. But here’s the issue: if your parameter is of type Any, it cannot be updated in the Power BI Service. There is nothing more frustrating that finishing your work, publishing to the Power BI Service, going to update a parameter and have the parameter disabled. It’s never convenient and you have to update the model and publish the changes again.
Always set parameters like URLs or server names to type Text (see Figure 4) if you plan to change them after publishing.
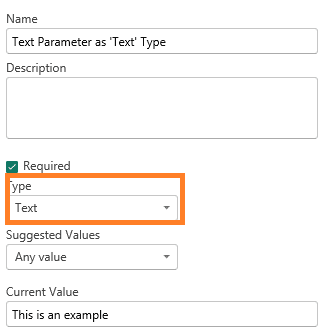
Figure 4 – Example of setting a parameter as Text
As a result, you can set value in the Power BI service versus getting a disabled input field (see Figure 5)
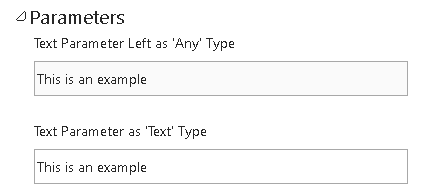
Figure 5 – Remember to set your parameters as Text instead of the default value of Any.
7. Enable Load vs. Include in Refresh
Right-click on a table in Power Query and the options shown in Figure 6 can be quite confusing:

Figure 6 – Confusing Options?
Both options can be checked or unchecked independently. Here’s what each one does:
Option | Description |
|---|---|
Enable Load (Unchecked) | The query runs but does not appear in the model. Useful for intermediate steps. |
Enable Load (Checked) | The query runs and appears in the data model for reporting. |
Include in Refresh (Unchecked) | The query is excluded from refresh operations. Useful for static reference data. |
Include in Refresh (Checked) | The query is included for refresh operations and will pull data from sources when a refresh operation is conducted. |
8. Web.Contents Should Use Relative Paths
If you’re using Web.Contents to access an API, avoid hardcoding the entire URL for every call. Each hardcoded call creates a separate connection, which becomes difficult to manage.
For example, two different tables would each have these functions:
Web.Contents("https://x.sharepoint.com/_api/web")Web.Contents("https://x.sharepoint.com/_api/list")
This creates multiple data sources to manage as shown in Figure 7.
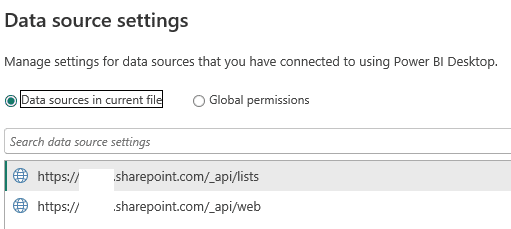
Figure 7 – Duplicate data source connections to the same source
You can access the tables on the same connection using a parameter named Domain and the RelativePath Parameter.
- Web.Contents(Domain,[RelativePath=”/_api/web”])
- Web.Contents(Domain,[RelativePath=”/_api/list”])
And now you have one connection to manage as shown in Figure 8.
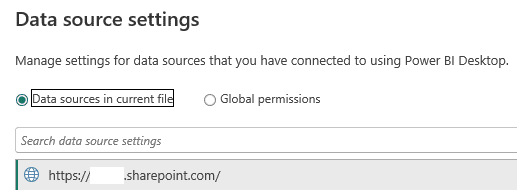
Figure 8 – One connection with the help of RelativePath argument in Web.Contents
This will reduce the need for repeated mouse clicks and credential entries in the service, while also improving the model’s maintainability by minimizing the number of connections to manage.
9. The Formula.Firewall Error
Joining data from different domains or APIs often triggers privacy level errors during service refreshes with this hated message in Figure 9. It’s agonizing and you usually see this error once you publish to the service and try to refresh the semantic model.

You can read more about it here, but my advice is to use Gen1 or Gen2 Dataflows to bring in data from each source, then join the data in your semantic model. This adds a layer of transformation but prescriptively identifies the sources you wish to join and avoids this error message.
10. Too Many API Calls Slow You Down
When chaining API calls, clicking each step in the interface can trigger a fresh API request, which significantly slows development.
Solutions:
Use a parameter to limit API responses while developing.
Create a parameter that acts as a feature toggle to indicate whether the environment is in development. When enabled, it should limit the number of records ingested to streamline testing and development. For example, create a parameter IsDevelopment (shown in Figure 9)

Figure 9 – IsDevelopment parameter
Then add this step prior to making API calls to limit rows.
|
1 |
if IsDevelopment then Table.FirstN(#"Prior Step",10) else #"Prior Step" |
When IsDevelopment is set to TRUE, only 10 rows are returned, otherwise all rows are returned.
This will save you hours of waiting for Power Query processing if you reduce the number of rows while developing.
Storing raw API data in Power BI dataflows
You could also follow a Medallion architecture by storing raw API data in a Power BI dataflow, then joining and transforming it in your semantic model.
This keeps the semantic model from making the API calls because it’s been handled by the dataflow.
12. Name and Comment Your Steps Clearly
A professor once told me, “Commenting your code is like cleaning your guest bathroom. It’s a hassle, but others will appreciate it.”
When creating steps, use clear names like “Added Fiscal Year Column” instead of “Added Custom Column 10.” Even if you work alone, this makes revisiting your own work weeks later much easier.
For example, would you prefer working with the Applied Steps on the left-side in Figure 10 or the right-side in Figure 10.
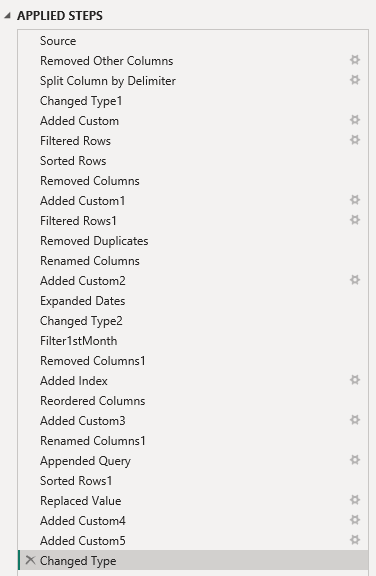
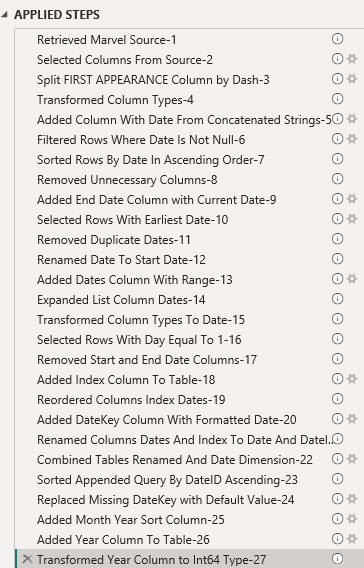
Figure 10 Example step names
GitHub Copilot can even help generate helpful comments and rename steps automatically. Here is a prompt I use.
|
1 2 3 4 5 6 7 8 9 10 11 |
You are an assistant to help Power Query developers comment their code. Please update each line of code by performing the following: Insert a comment above the code explaining what that piece of code is doing. Do not start the comment with the word Step or a number Do not copy code into the comment. Keep the comments to a maximum of 225 characters. Please also update each line of code by performing the following: 1) Update the variable name explaining what that piece of code is doing. 2) The variable name should always start with a verb in the past tense. 3) The variable name should have spaces between words. 4) Please keep the variable to a maximum of 50 characters. 5) The variable name should be wrapped in double quotes and preceded by the '#' |
It is a very long prompt, but it gives Copilot the details it needs to do some renaming for you (especially when you get code that has not been named and commented by the original programmer.. whether that is another programmer… or you.)
12. Scrolling to Find Columns Wastes Time
Sometimes it is the little tips that save you more time than you might expect. When you are searching for a column in a table, you don’t need to scroll and hunt for the name in a list. Power Query includes a “Go to Column” feature (see Figure 11).
When I realized this myself, it has saved me a lot more time than I expected. Now, in meetings and screenshares, I can’t tell you how it pains me to see folks struggle to find a column with a 20-column table. Use the “Go to Column” feature instead of scrolling through dozens of columns. It’s a simple feature that saves a lot of time.
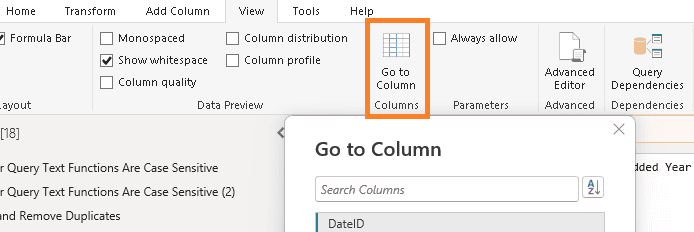
Figure 11 – Use the “Go to Column”
13. Don’t Struggle Alone…Learn from the Pros
You don’t need to reinvent the wheel. Many Power Query experts have shared solutions to common problems. The Power BI community is strong, don’t feel like you have to come up with something first. Bookmark and leverage their content:
(Note: I don’t claim to be an expert-I just have experience knowing who might have the answer.)
And if you can’t find it from them, you can always reach out to the active Reddit group for ideas.
Summary
Those are the 13 things I wish I knew about Power Query early in my career with Power Pivot/Power BI. What things do you wish you knew? Share in the comments, so others can benefit from your knowledge.
This document contains proprietary information and is protected by copyright law.
Copyright © 2026 Red Gate Software Limited. All rights reserved


Load comments