
Virtualisation is a wonderful technology. With it, I’m able to deploy and manage servers with a minimal amount of effort, which is absolutely great for today’s busy SysAdmin. Not to mention the other benefits you get, such as servers which can be scaled effortlessly, high availability and even power savings via server consolidation, to name just a few.
Figure 1: VMware ESX – one of the more popular enterprise-level virtualisation products
One important (and hopefully obvious) consideration when setting up new virtual machines, or modifying existing ones, is storage. Specifically, how is this handled and what are the best practises to follow? In this article, I’ll be looking at how this is done in a VMware environment and will try to offer a few solid guidelines to follow when setting up your virtualised disks and storage.
If you are unsure of anything that I’m covering (for example, some of the settings I recommend), it may be a good idea to backup any virtual machines or data you will be working with before starting. These processes become second nature once you have familiarised yourself with them, and soon you’ll be able to happily provision and manage virtual disks without worry.
Storage provisioning
To start with, we’ll assume that your backend storage is ready to go. You probably have a nice iSCSI or Fibre Channel SAN running alongside your host machines (the servers that will be running the virtual machines).
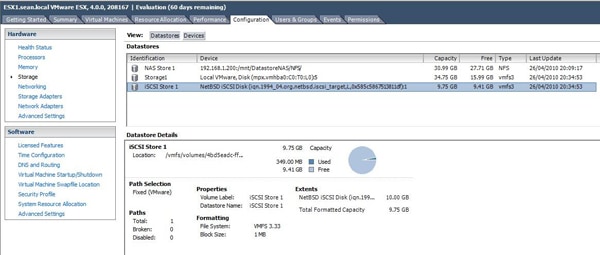
Figure 2: A few different types of VM storage available: Local storage on the Host, NAS or NFS Storage and iSCSI.
When you create a new virtual machine, you set its basic configuration options, one of which is the size of its virtual disk or disks. As a best practise, I tend to start by assigning the minimal amount of disk space needed for each virtual disk. After all, you don’t want to unnecessarily provision a truck load of free space that may not end up being used and, this way, you can make good use of all the disk space your current SAN provides you with. The same theory also applies if you are provisioning your virtual machines on a physical host’s local storage or a NAS device: Keep the sizes to a minimum and then expand as needed. This recommendation obviously changes if you are using thin provisioned disks, but I prefer to use “thick provisioned” disks whenever possible, as they seem to offer the best performance. (In case you were wondering, thick provisioned is when you assign all of the specified disk space to your virtual disk at the time it is created.)
As an example, let’s say we’re setting up a Windows 2003 Standard Virtual Machine as a Primary Domain Controller. This shouldn’t need too much disk space to be allocated at the start, so I would give it one virtual disk of about 6 or 7 GB to begin with. If you found that Windows was eating up disk space over time (don’t you just hate the rubbish that Windows update leaves behind?), your free disk space had dropped to below 10%, and you had cleared up as much temporary flotsam as you could, then it would probably be a good time to extend the size of the Virtual Machines’ disk.
So, let’s take a look at a scenario where you need to extend the size of a virtual machine’s disk. First of all you need to determine what is stored on this disk in question – is it a System disk? And by that I mean “is it the disk running Windows or the disk that contains the Paging file?” If so, this VM will need to be shut down in the case of older Operating Systems (see below for Windows Server 2008), and will require a little more work. If it’s just a data disk used for storage, then you’ll probably be OK to extend it on the fly – even while the machine is still running.
I always make sure to keep a special VM used just for extending virtual disks in our VMware clusters. This VM has a basic install of Windows 2003 Standard, and has the “diskpart” DOS utility installed by default. In terms of Operating Systems, most recent versions of Windows will do, (The key being NTFS partition support of course). Windows 2003 or 2008 would be recommended though, as diskpart has some small restrictions when it comes to extending partitions under Windows 2000 and XP. This machine is used to host an attached virtual disk from another VM that needs extending, though you should only need to use this VM to extend System and Paging disks on operating systems older than Windows 2008. This is because you shouldn’t power up a VM that has had its system or paging disk extended until you have completed the resizing operation, as it involves more than just extending the size in the VMware disk configuration. Instead, we need to attach the VM’s system or paging disk to this Windows 2003 VM as a secondary disk, and then boot into Windows and use diskpart to extend the size of the temporarily added disk. I’ll go into more detail below on how to complete the resizing operation for a System or Paging disk, and then later we’ll look at a Data disk. Note that Windows Server 2008 and above allow you to resize System or Paging disks whilst they are still powered on. For this OS, follow the VMware disk extending method below, and then refer to the Windows Server 2008 section for instructions to extend the disk “on-the-fly” in the OS itself.
It’s worth bearing in mind that there are software tools such as Partition Magic and Partition Manager which can streamline this process, but these are paid-for tools, and the approach I’m describing here is possible using just the tools which you already have.
System / Paging disks method
First and foremost, ensure that there are no snapshots on this VM. If there are, then you do not want to extend any disks, as this will result in data corruption. Commit or remove the snapshots before proceeding (See Figure 3), and once the snapshots are out of the way we can start by opening diskmgmt.msc (Windows Disk Management). Right click on the disk that requires extending (the grey area that reads: Disk X, XXGB, Online in Figure 4, for example), click Properties and note down the Location details. This will help you ensure that you have the correct disk when extending it in VMware, which you’ll do in a moment. An example location would be: Location: Bus Number 0, Target ID 2, LUN 0. See Figure 4 for more detail.
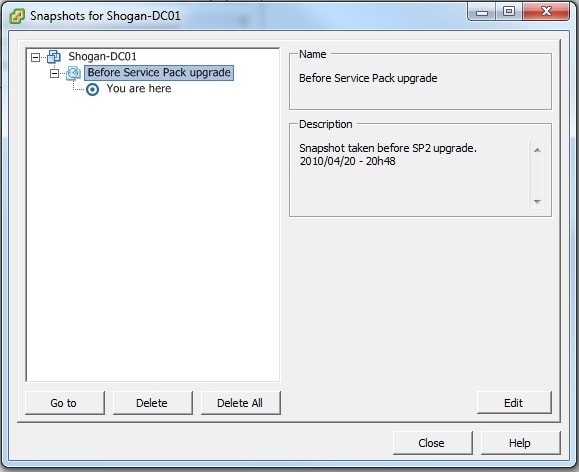
Figure 3: Be sure to remove Snapshots before extending VM disks.
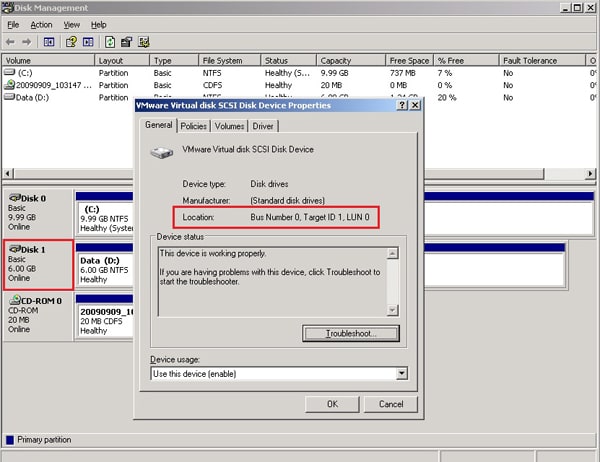
Figure 4: Right click the disk and select properties, then note down the Location information.
Now we need to shutdown the VM; wait for the machine to power off, and then go to the VM configuration (Right-click the VM, and select Edit Settings). Select the disk you want to extend, and confirm it is the correct disk by matching up the location information we noted down from diskmgmt.msc. For example, a disk with Bus Number 0, Target ID 2, LUN 0 as the information in Diskmgmt.msc would match up with the disk listed as SCSI (0:2) Hard disk 2 in the VM’s “Virtual Device Node” information – Note that you are matching the Target ID of 2 with the SCSI (x:2) virtual device node information on the VM. You’ll obviously want to take care to make sure that these targets match up and that the current size of the disk looks correct!
Now just bump the disk size up to what you need, click OK (see Figure 5), and wait for VMware to complete the resize operation. Now, this is very important: do not power up yet! Leave this VM powered down and ensure it is not powered up until we are completely finished. If you don’t have a good memory for long strings of seemingly random information, it may be a good idea to note down this virtual disk’s location, as you’re going to need that information in a moment.
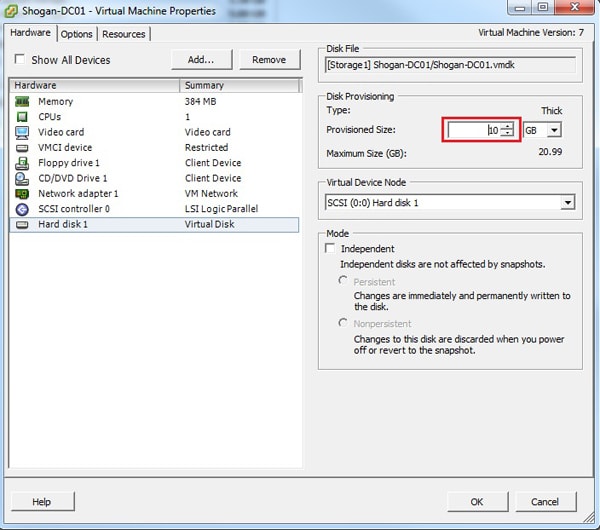
Figure 5: Increasing the size of the VM disk.
Go to the Disk managing VM that we mentioned earlier – the one with a basic Windows 2003 installation and diskpart – this VM should now be shutdown. Edit the settings of the VM, and under the “Hardware” tab, click the Add button. Select “Hard disk” as the type, click Next, and now we want to select “Use an existing virtual disk” (See Figure 6.) and browse to the exact VMDK file location of the Virtual disk we just extended. Be 100% sure that you have the right VMDK file, and then complete the wizard to finish attaching the disk to this VM. Wait for the add hardware task to complete, and then power up the ‘special’ VM.
Remember that if you are extending a System or Paging disk on Windows Server 2008 and above, you can skip the part above about ensuring the VM is shutdown first and the additional part about attaching the disk to your “disk manager” VM. You should still ensure you match up the disks though – you wouldn’t want to extend the wrong disk!
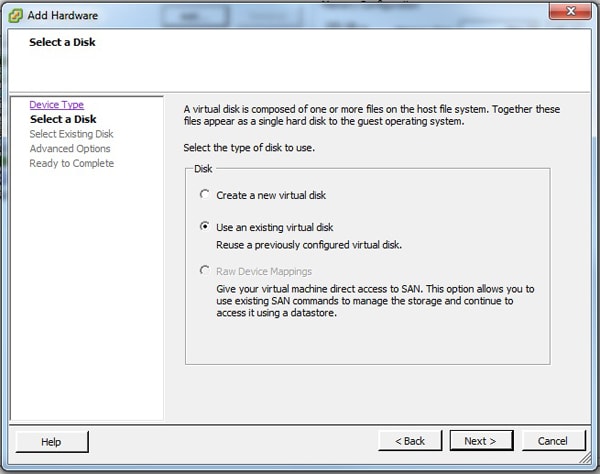
Figure 6: Attaching the existing Windows Server 2003 System or Paging Virtual Disk to your disk management VM.
At this point there are two methods we can use to finish extending Windows Server 2003 or 2008 VM System or Paging disks. For Windows Server 2003 disks, follow the diskpart instructions below. The Windows Server 2008 method will follow on below this.
Windows Server 2003:
Now that Windows has loaded, you may want to ensure that the disk we just added has been detected in diskmgmt.msc. Once you are happy that it can be seen here, fire up the command prompt, type in “diskpart“, and press enter. If you’re feeling efficient, you could even set this up as a startup item so that it loads as soon as Windows logs in. Next, follow this sequence (which you can see demonstrated in Figures 7 & 8):
- At the diskpart command line, type “list vol” and press enter; this lists the various disk volumes available to this VM.
- Next, type “select vol x” (where “x” is the volume number you want to extend) and press enter.
- Now type “extend” and press enter. You should get a successful message.
- Type “list vol” again, just to ensure that the volume shows up as being the new extended size, and then type “exit” & hit enter to quit diskpart.
Shutdown your VM and be sure to remove your newly extended virtual disk. Make sure when you remove the disk that you only remove the reference to the disk from the VM; don’t remove the reference and delete your disk! You may now power up the original VM again and check that the System or Paging disk has been extended as expected.
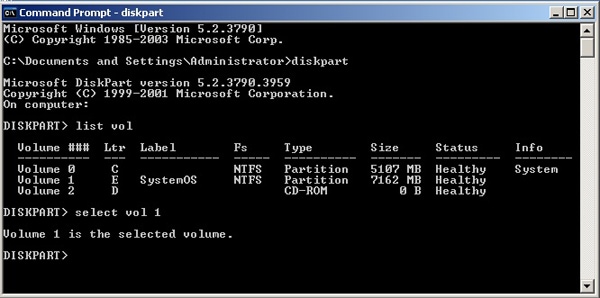
Figure 7: Diskpart with the volume selected before extending.
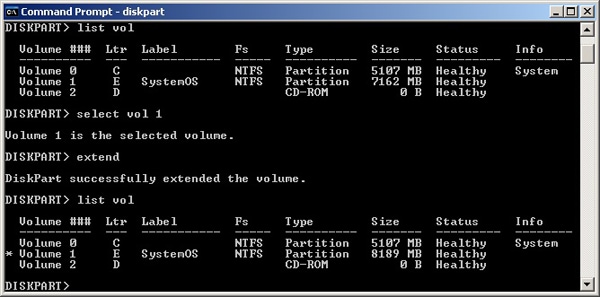
Figure 8: Attached disk successfully extended from 7GB to 8GB.
Windows Server 2008:
- As mentioned previously, we don’t need to shutdown these VMs before extending their System or Paging disks. Therefore there is no need for a “disk manager” VM to attach the disks to. Simply follow the process above to extend the System or Paging disk, omitting the part about shutting the VM down whilst extending the disk and attaching the extended disk to the “disk manager” VM.
- Once the VMware disk extension operation is complete, open diskmgmt.msc; You should see the disk you have added space to, with the additional space being displayed as “unallocated“. (See Figure 9). If you don’t see the unallocated space, refresh diskmgmt and it should then show up.
- Right-click the currently-allocated partition area of this disk and you should see the “Extend Volume” option. Choose this.
- Follow the “Extend” wizard to complete the resizing operation on this disk. It will ask you how much of the additional space you would like to use to extend the disk – usually you would choose to use all of it, but the choice is ultimately up to you.
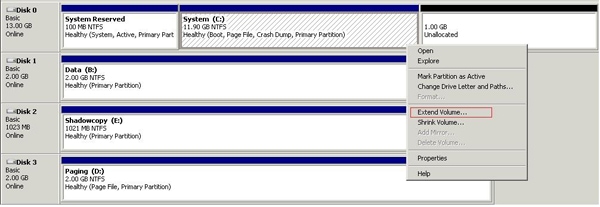
Figure 9: Extend a System or Paging disk on a Windows Server 2008 VM.
Data disk method
Data disks are far easier to extend. As before, the first thing to do is to make sure that there are no snapshots on the VM in question. Remember: if you extend a disk with a snapshot still on the VM you will corrupt your data.
As a best practise, I usually ensure that there are no backups happening on the VM – i.e. no file level or server level backups are running, as I generally prefer to try and avoid doing disk operations on storage that currently has high IO. There is no concrete evidence that I am aware of to suggest that this theory is correct, but I like to stay on the safe side. Perhaps it has something to do with my thinking that a disk operation could potentially cause a short interruption to the current disk activity. If you wish to check the current activity, you can use the VM’s Performance monitoring tab to view current disk I/O or run “perfmon” in the Windows Operating system of the VM to measure disk activity.
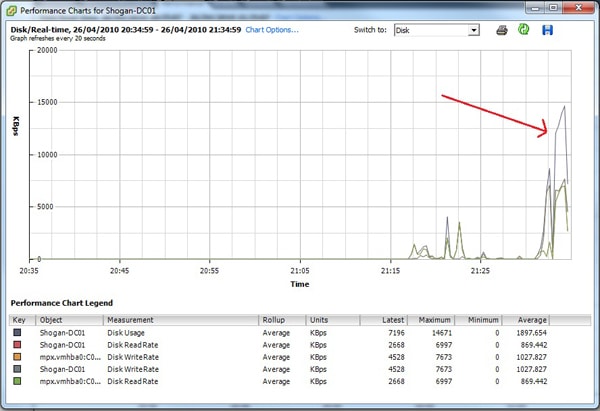
Figure 10: If you are paranoid like me, you may wish to check that there is not any high disk IO before performing any disk operations.
Now that you are happy to proceed, check the disk’s Bus Number and Target id (e.g. Bus Number 0, Target ID 1, LUN 0) in diskmgmt.msc. For data disks you can leave the VM running as you extend them, so you can right-click the VM and choose “Edit Settings” right away. Select the correct hard disk by matching the Bus number & Target id information from diskmgmt.msc with the Virtual Device Node information you see on the VM; “SCSI (0:1) Hard disk 2” would be a match for the example information given above. Increase the size of this virtual disk, click OK, and wait for the operation to complete.
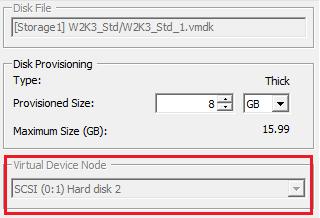
Figure 11: Match the Bus number and Target ID from diskmgmt with the Virtual Device Node information seen in the VM disk configuration.
Next, you’ll need to go through a similar extension process as with the System disks:
- Run diskpart.exe from the command prompt and type “list vol” to display the disk volumes.
- Type “select vol x” where “x” is the volume number that you are extending.
- Finally type “extend” to extend the volume. You can double check the size has increased by doing another list vol at this point.
- Exit diskpart and you should be good to go with your newly extended data disk, no restart required!
A note on diskpart’s compatibility with certain disks, as quoted from Microsoft KB 325590:
“In Windows XP and in Windows 2000, you cannot use Diskpart.exe to extend a simple volume on a Dynamic disk that was originally created on a Basic disk. You can extend only simple volumes that were created after the disk was upgraded to Dynamic disk. If you try to extend a simple volume on a Dynamic disk that was originally created on a Basic disk, you receive the following error message. This restriction was removed in Windows Server 2003.”
Error message: “Diskpart failed to extend the volume. Please make sure the volume is valid for extending”.
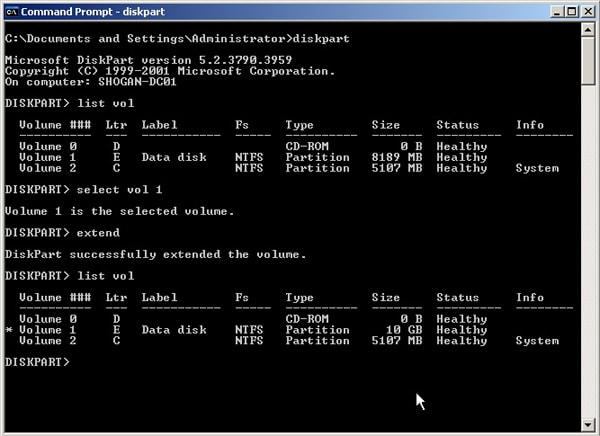
Figure 12: Extending a data disk from 8GB to 10GB “on the fly”
New Virtual disks and alignment
Now that we’ve covered how to extend Virtual disks, this section will discuss creating new Data disks for Windows Guest Operating System Virtual Machines. It’s worth noting that aligning the boot disk in the VM is, to quote VMware, “neither recommended nor required“. You only need to align data disks in your Virtual Machines.
Note that aligning the storage track boundaries is not required on Windows Server 2008 and above, as partitions created on these operating systems are aligned on 1MB boundaries. See the further reading links at the end of this article for more information. If you would like to learn more about storage track boundary alignment, these links also provide some very useful insight as to what it is and how it works (the short answer is that it’s a way of improving disk performance).
Add the new virtual disk to your VM, which can be powered on or off for this operation. Next, to ensure we get the best performance out of the virtual disk, we are going to align the storage track boundaries using diskpart on the new virtual disk.
- Once Windows has loaded, start diskpart from the command line and type “list disk” to get a list of your virtual disks.
- Select the correct disk with “select disk x” where “x” is the number of the new (and empty) virtual disk. Now we will create the partition.
- Type “create partition primary align=64” then press enter. Note you could also use 32 instead of 64 – it is best to adjust this depending on the recommendation from your storage vendor. If you are unsure, use 64.
- Now type “Assign Letter=<DriveLetter>” <DriveLetter> refers to the letter you would like to assign to this disk. For example “Assign Letter=Z” would assign your new disk as the Z: drive. Naturally, you need to make sure this is free before assigning.
- Now that we are done here, exit diskpart.
Now that you’ve created this partition, you can use the Disk Management snap-in or the Windows Format command to format it as an NTFS partition. For Windows Guest Operating systems, VMware recommends formatting the data disk with an allocation unit size of 32K.
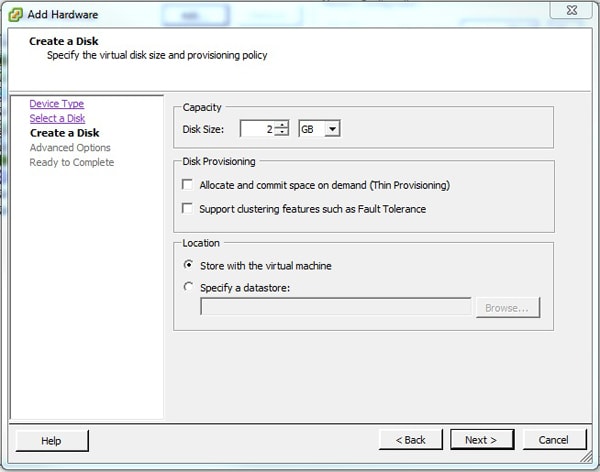
Figure 13: Thick provisioning a new virtual disk. Once this disk has been provisioned, we will align the storage track boundaries.
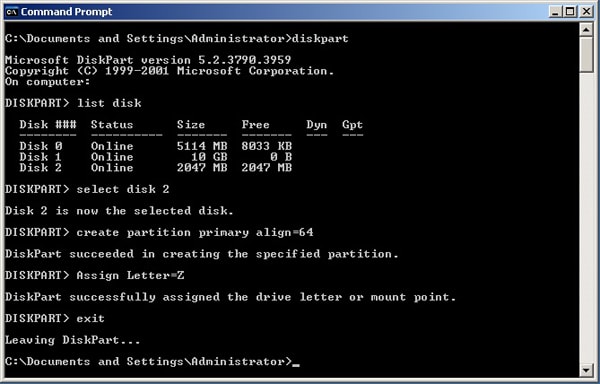
Figure 14: Creating the disk partition and aligning storage track on the new disk.
Conclusion
It may be easy to quickly provision storage to virtual machines and take the easy paths whilst doing so, but in the long run you are likely to run into performance issues, or hit brick walls when it comes to your infrastructure’s scalability. I might not have made any revelations in the basic content of this article, but the real message to take away is that you need to take some time to figure out a few best practises which work for your particular organization, and start using them. As you can see, it’s really very simple to create some procedures and rules, which will make your life so much easier down the line.
Once you have run through a few deployments and changes using your new found guidelines, you’ll quickly find that they become reflex actions and take less and less time. With these skills, you will have storage that scales better, Virtual Machines that perform better, and that warm fuzzy feeling that comes along when you know you have configured something to the best of your ability.
Further Reading
- How to extend a data volume in Windows Server 2003, in Windows XP, in Windows 2000, and in Windows Server 2008
- Partition Design
- How to Align Exchange I/O with Storage Track Boundaries
- VMware Recommendations for disk aligning
This article was commissioned by Red Gate Software, engineers of ingeniously simple tools for optimizing your Exchange email environment.
Learn more about Exchange Server Archiver and PST Importer.
Load comments